Knitting is one of the most common types of needlework. Most often, special devices are used for it - hooks and knitting needles. But you can do without them - there is a simple finger knitting techniqueTo master it, you can use the instructions for beginners.
Finger knitting techniques, rules, features, instructions
You can use different numbers of fingers for knitting (5, 4, 3.2), and the width of the fabric will differ in size. Despite the fact that this technique is similar in execution to French and Japanese, the fabric turns out completely different.
The size and tension of the loops depends on the type of threads and the thickness of the fingers. Regardless of how many fingers are used to perform the work, in order for the fabric to be even and beautiful, you need to follow several rules.
These include:
- The threads should be at least 3 mm in diameter, as threads that are too thin can injure your fingers.
- While working, you should constantly monitor the tension of the thread, otherwise the loops may turn out to be too tight.
- Right-handed people need to use their left hand to make the canvas, and left-handed people need to use their right hand.
A big advantage of finger knitting is that it does not require any additional tools - knitting needles, hooks, looms, etc. Any kind of threads (except very thin ones), nylon tights, and strips of fabric can be used for the products.
Finger knitting for beginners will help people of any age quickly master the technique, and will also help develop fine motor skills and cope with stress.
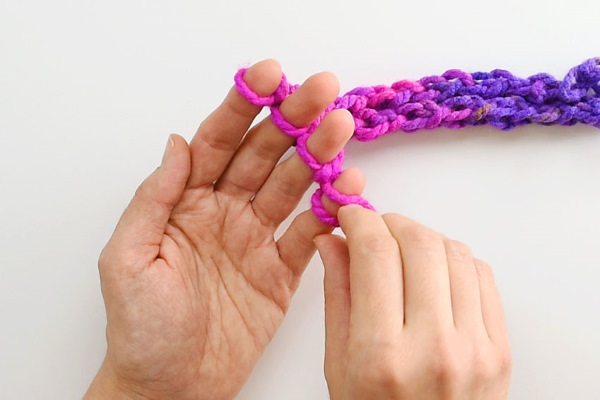
Knitting on 2 or 3 fingers
This type of knitting is used to make decorative elements - ropes or braids. They can be used both to decorate the interior and to assemble various products from them.
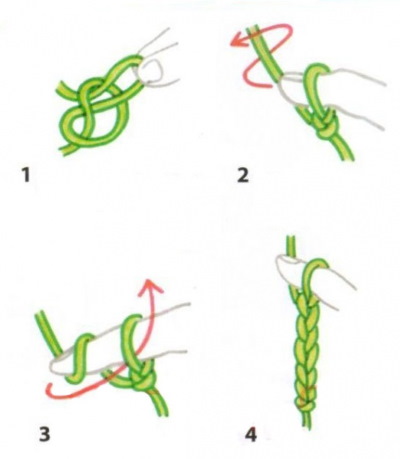
Instructions for 3 fingers:
- you need to turn your hand with the palm facing you;
- make a loop on your thumb and secure it with a knot;
- pass the thread in a “snake” pattern (behind the index finger, in front of the middle finger, behind the ring finger);
- it is necessary to return the thread in reverse order;
- next, wrap the thread around 3 fingers and throw it forward;
- continue making the "snake", starting with the index finger.
For knitting on 2 fingers, the sequence of actions is exactly the same, excluding the ring finger.
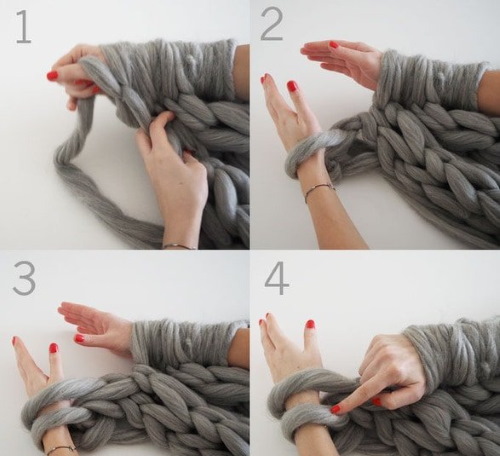
Knitting on 4 fingers
When knitting on 4 fingers, the fabric is quite wide. The desired product is assembled from several strips.
Instructions:
- it is necessary to secure the loop on the thumb;
- wrap the thread around 4 fingers in a figure eight pattern;
- pass the yarn around the little finger 1 time;
- do a figure eight in the opposite direction;
- pull the thread over your fingers;
- remove the loops of the first row from your fingers;
- repeat all steps starting from point 2;
- close the loops after obtaining the fabric of the required length.
The knitting principle is approximately the same for any number of fingers. Only the width of the strip will be different.
Knitting on fingers, like a crochet hook
Using this technique, you can knit the same items and patterns that are made with a crochet hook.
You can easily knit different types of loops with your finger:
- aerial;
- dense;
- double crochet and single crochet;
- half-column;
- a column with a different number of yarns (1,2,3) and others.
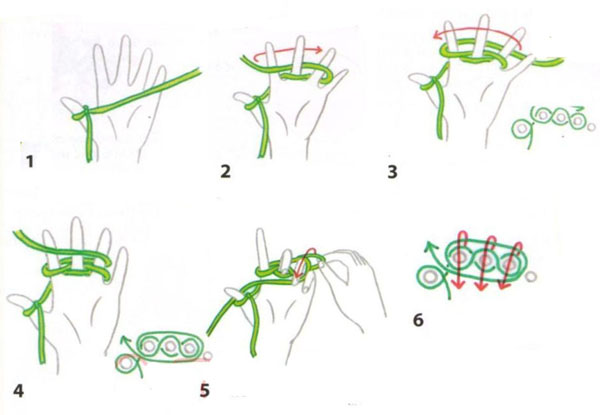
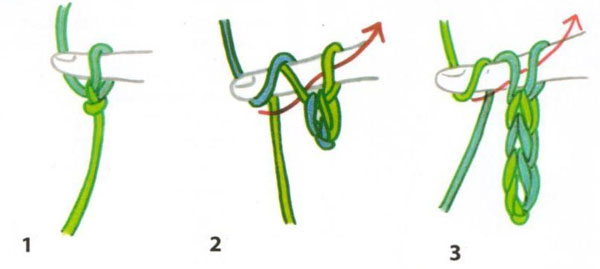
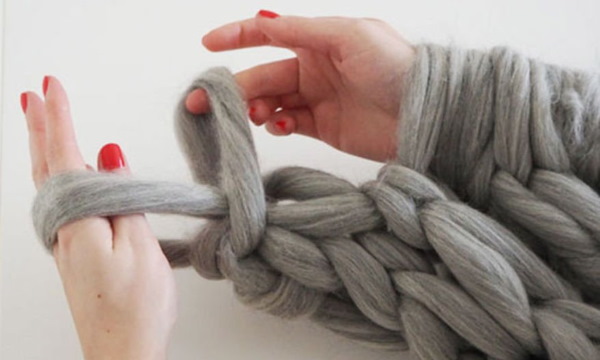
Instructions for knitting a chain of air loops:
- you should tighten the loop at the end of the thread;
- put it on the index finger of your leading hand;
- wrap the thread once around the tip of your index finger;
- pull it through the first loop;
- all subsequent loops are performed in the same way;
- After receiving the chain of the desired length, close the loop.
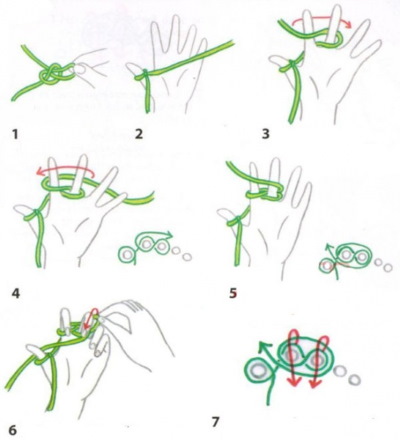
Instructions for knitting a chain of air loops with a yarn over:
- it is necessary to make a loop from two threads;
- put it on the index finger of your leading hand, with one thread at the bottom and the other at the top of your palm;
- place the bottom thread over the index finger in front of the loop;
- wrap the thread around the tip of your finger once before the yarn over;
- pull it through the yarn over and the first loop;
- repeat starting from point 3;
- close the last loop.
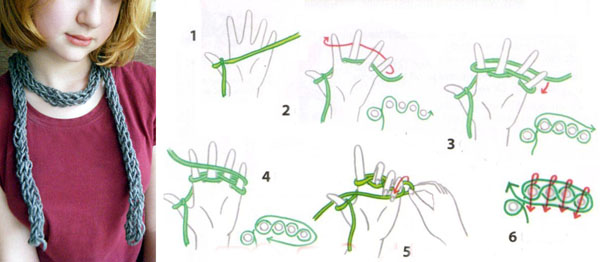
Finger knitting for beginners in Afghan technique:
- you will need to knit a chain of the required length in the manner described in the first instruction;
- pull the thread through the penultimate loop without removing your finger;
- do the same with each previous loop, while all loops should remain on the finger;
- at the end of the row, pull the thread through all the loops on the finger, without allowing it to tighten;
- perform the second and subsequent rows in the same way;
- After receiving the fabric of the required length, close the loops.
Using this method, you can get a fabric of different lengths and widths. Each subsequent row in any type of finger knitting is done in mirror image, that is, in reverse order.
What yarn is good for finger knitting
When choosing yarn for finger knitting, you need to consider the type, purpose and model of the product.
For voluminous items you will need a thicker and/or fluffier yarn, for light, openwork items - thin, but not less than 3-4 mm. There is also a special yarn designed for knitting without the help of special devices (crochet hooks or knitting needles).
This is a plush yarn with loops. When making items from it, you will not need to cast on loops, you should lay out the fabric evenly and stretch the loops in accordance with the desired pattern. To determine how much yarn is needed for the product, it will be enough to know the length and width of the finished item.
Finger knitting master classes, step-by-step instructions
Finger knitting for beginners will help you create unique things from yarn for your interior and for yourself. Using this technique, you can knit scarves, blankets, rugs and much more.
Sofa cushions
For medium-sized sofa cushions, you will need several skeins of yarn in different colors, from which you knit 20 strips 2-5 cm wide using your fingers. Once the strips are ready, you will need to connect them together using a simple (smooth) weave.

Any material can be used for filling – foam rubber, synthetic padding, holofiber and others. It needs to be evenly distributed on the canvas, after which the strips are sewn together. To decorate the sofa cushions, you can use pompons, tassels, chains of air loops and much more.
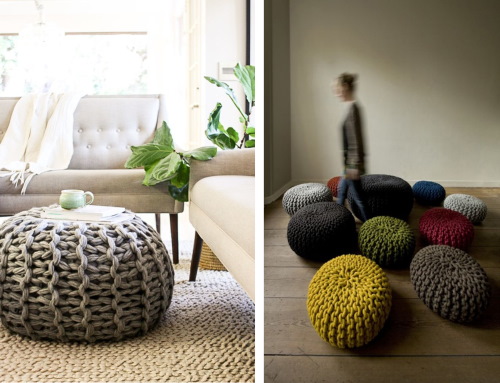
Knitted pouf
A pouf is a soft cushion in the form of a small backless chair that will decorate any interior. It can be used in any room - a living room, a nursery, a kitchen, a bedroom.
The amount of yarn depends on the size of the pouf. Usually, this product takes from 500 g to 1600 g. In terms of composition, yarn made of pure wool or with the addition of acrylic is more suitable.
You will also need additional materials for the lining and filling for the pouf. For the base of the product, you need to cut out 2 pieces of the same size from thick fabric, sew them together, not forgetting to leave an opening for the filling.
Various materials can be used as filler:
- polystyrene balls;
- holofiber;
- foam rubber;
- synthetic padding;
- cotton wool.
The pouf cover is knitted and assembled in the same way as for sofa cushions. The only difference will be the shape of the product.
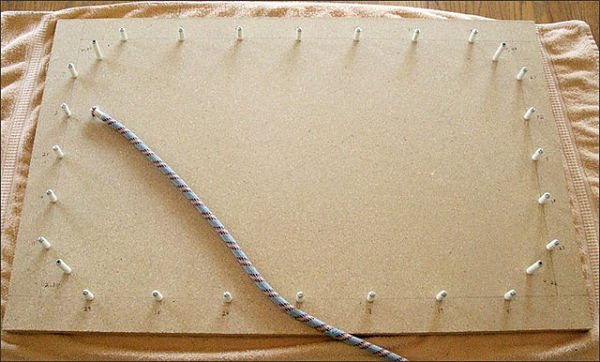
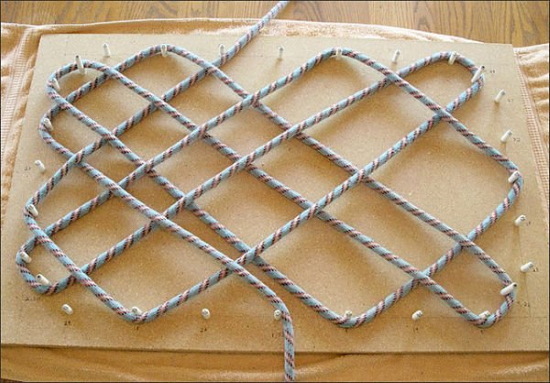
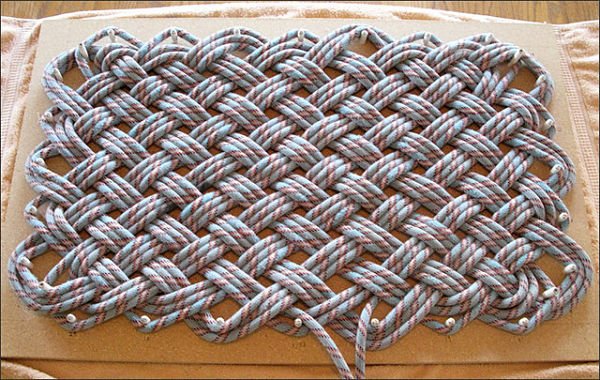
Round wall panel
Finger knitting of a round wall panel is done in the same way as weaving on a loom.
| Materials and tools | Step-by-step instructions for weaving a panel |
|
|
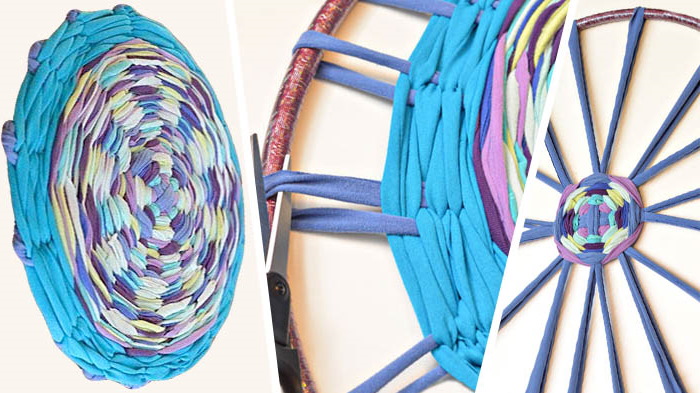
The remaining ends of the cords can be tucked into the edges of the product or left as decoration. The product can be used as a wall panel, a cover for a chair or armchair, or a tablecloth for a coffee table.
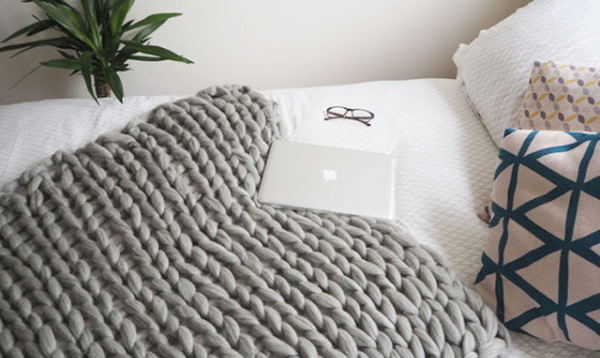
Blanket made by hand from yarn with loops
A blanket made of looped yarn is very warm, soft, light and pleasant to the touch. The product is very easy to make, so even someone who does not have special skills can knit it.
For the blanket you will need several types of yarn with loops:
- plush;
- alize puffy;
- Alize.
To have enough yarn for the product, you need to calculate its consumption correctly. For a blanket measuring 2.05*1.85 m, you will need 20 skeins weighing 100 g, with a thread length of 9 m.
It is quite easy to calculate how much yarn you will need for other sizes of blanket, to do this you should:
- knit a small piece of fabric, wash it and calculate its area;
- multiply the resulting sum by the length of the thread in the ball;
- then divide the result by the area of the sample.
In total, you will get the length of thread needed for the work. To knit a blanket, use the technique of a pattern with an offset (braid). This type of weaving makes the fabric denser. But you can also use other types of weaves. For example, "braids" or "diamonds". The blanket should be knitted on a flat surface, there is no need to turn the product over during the work.
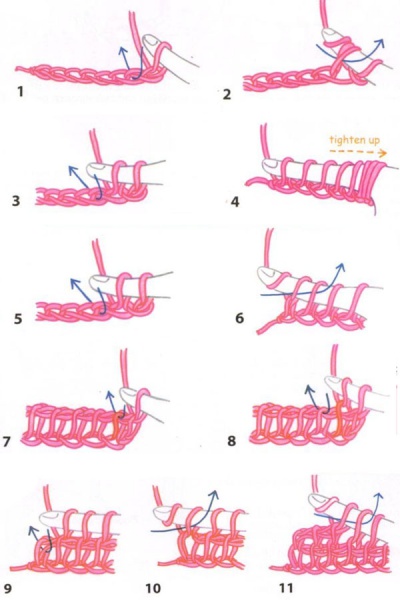
Step-by-step instructions for a standard size blanket:
- unwind 50 loops from the ball;
- stretch the thread evenly over the surface;
- place the working thread on top of the product;
- knit the first row, crossing the loops from right to left;
- the second row is done in the opposite direction (mirror image);
- subsequent rows are knitted according to the principle: even (4, 6, 8 and so on) like the second, odd - like the first;
- After finishing knitting, the thread must be cut and secured to the fabric.
To decorate the blanket, you can use edging made with a hook and alize yarn. It will also protect the product from stretching after washing.
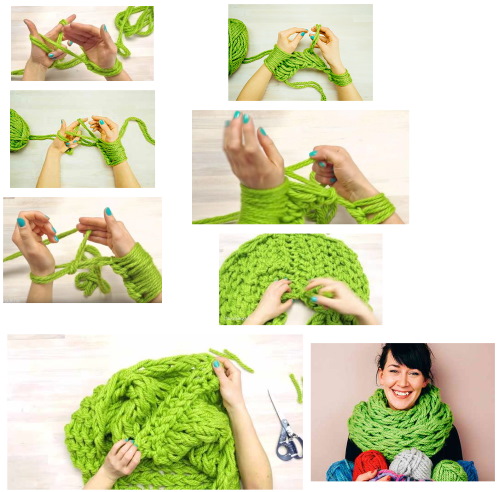
Scarf-hood snood
A snood is a warm, voluminous scarf that can also be used as a headdress. This product can be made using knitting needles and a crochet hook, or using the finger knitting technique.
For a snood scarf you will need 3 balls of yarn with a medium-sized thread weighing 100 g, a thread length of 100 m. Too thin threads will not work, as the scarf will be too light. The product will be too heavy if made from thick yarn.
Step by step instructions:
- measure out 1.5 m of thread;
- make a chain stitch on its edge;
- place it on the wrist of your leading hand so that the working thread is closer;
- secure the loop, being careful not to tighten it too much;
- make a few more loops similar to the first one (from 10 to 15 depending on the size of the product);
- throw the working thread over the thumb of your right hand;
- squeeze it tightly in your fist;
- remove the first loop (the one furthest from the wrist) through the fist onto the left hand;
- unclench your fist (you get a new loop);
- knit the next loops using the same principle;
- knit the loops from the left hand to the right in the same way;
- You can finish knitting the fabric when it reaches a length of 1.5 m;
- close the loops.
- sew the edges of the product together to form a ring;
- cut off excess threads or carefully tuck them over the edge of the product;
- The snood hood scarf is ready.
To make the fabric uniform, you need to monitor the tension of the thread and loops during knitting. The work time is approximately 2-2.5 hours.
Rug
Finger knitting for beginners will help you learn how to create various interior items, including rugs.
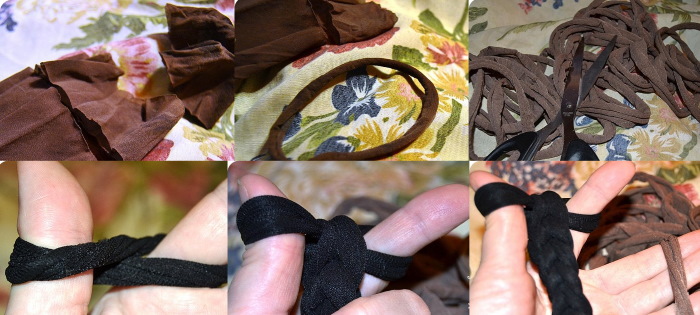
To make them, you can use any thick yarn, as well as old nylon tights, knitted T-shirts and much more. There are several techniques for knitting a rug from tights - from rings, braids and on a hoop.
Instructions for weaving a rug from rings:
- cut off the top part and socks from the tights;
- fold into 2 or 4 parts;
- cut them into 3-5 cm wide pieces;
- stretch the fragments to form rings;
- make a figure eight out of one ring on four fingers of the secondary hand;
- do the same with the second ring;
- remove the loops from the first ring and place them on the back of the hand;
- make a figure eight from the next ring;
- remove the loops from the second one in the same way as the first one;
- continue the same steps with each subsequent ring;
- At the end of weaving, close the loops.
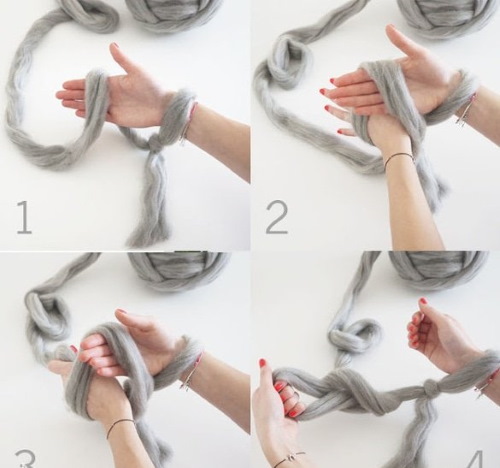
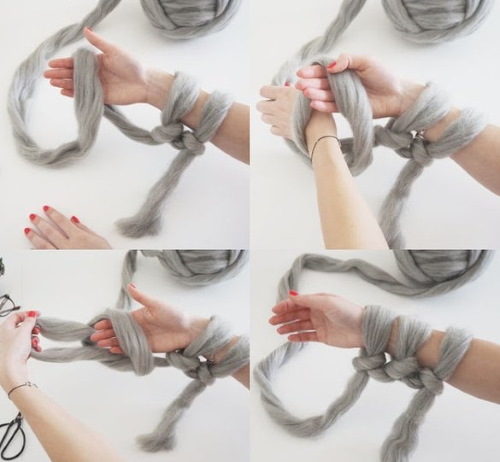
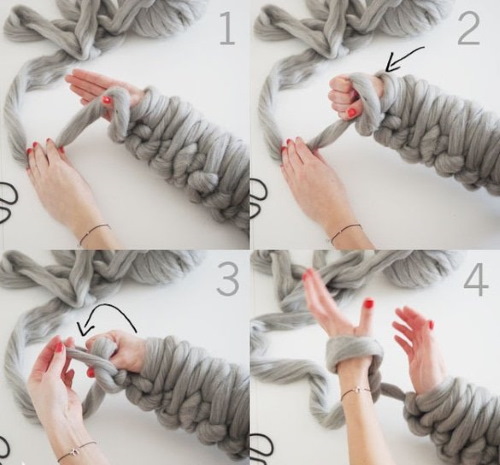
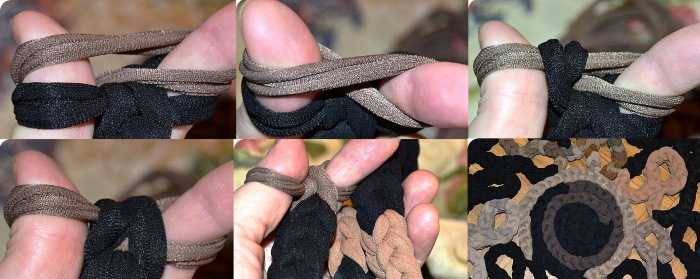
Instructions for braiding from a tourniquet:
- fold the ring in half;
- put it on in a figure-eight pattern on 2 fingers of the secondary hand;
- do the same with the second ring;
- pull the loops from the first row to the back of the hand;
- close the loops after you have obtained a tourniquet of the desired size;
- lay it out on a flat surface in the form of a spiral, pressing the edges tightly together (you can secure it with pins);
- sew the product with strong thread, preferably nylon.
You can also knit a rug from braids made from nylon tights. To do this, you need to braid a braid of the desired length and perform the same steps as when knitting from a tourniquet. A rug made of yarn is knitted similarly to a wall panel.
A scarf woven from several strips
For such a scarf, it will be enough to weave several strips of different colors of yarn, then sew them together. You can weave a braid from the strips, which will make a unique accessory.
Interior decorations
Finger knitting will allow you to learn how to create not only original things, but also interior decorations.
Beginners who love handicrafts can try to start with them, since the simplest chains of air loops are most often used to create interior decorations.
The following products can be made from this type of chain:
- curtains;
- letters;
- decorations for sofa cushions;
- awnings;
- cup holders and much more.
You can also make soft toys, bracelets and hair ornaments from strips of different lengths, knitted with your fingers.
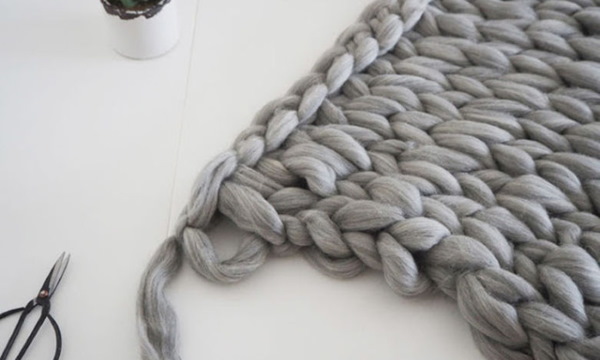
Peculiarities of closing loops when knitting on fingers
The principle of closing loops when knitting on fingers is the same for all techniques.
To do this, you need to perform the following steps:
- you will need to move the thread from the little finger to the ring finger (when typing on 4 fingers);
- remove the bottom loop from it, placing it behind the back of the hand;
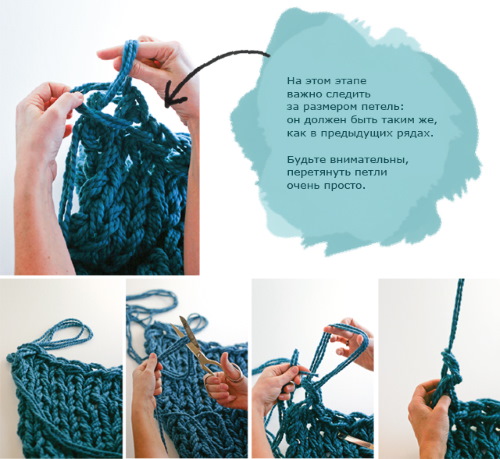
- repeat the steps from the ring finger to the middle finger, and so on until there is 1 loop left;
- cut the thread, leaving a short end;
- pass it through the last loop and tighten.
To prevent the fabric from warping, you need to monitor the tension of the loops when closing them. Be sure to tighten the thread at the beginning of the fabric and tuck it behind the edge.
Finger knitting is one of the simplest handicraft techniques that even a child can master. The pattern for making any product is clear even to beginners. In addition, knitting perfectly calms the nervous system, improves mood and develops fine motor skills in children.
Finger knitting video
Finger knitting for beginners: