Each person has their own idea of angels, but mostly they are cute and beautiful creatures with wings. Everyone is at least somewhat familiar with this image. Children may be interested in such drawings, especially if they have started to be interested in this topic and are already asking their parents who angels are. Images can be created using step-by-step instructions or using drawings for copying.
What you need for drawing
You can create drawings using any technique, for example, using hatching, shadows and highlights, color or black and white. For drawing you will need only a few tools that can be found in every home.
| Drawing tool | Peculiarities |
| Simple pencils | It is best to use a pencil marked HB for creating a sketch and a thicker one for outlining the finished image. |
| Sheets of paper | Usually children draw in special albums. The paper in them is quite thick, so you can easily erase extra lines many times and not be afraid that the paper will wear through to holes. Regular A4 sheets will also do, but it is better that they are also thick enough. |
| Eraser | Useful for removing extra lines or if a mistake was made while drawing. |
| Black marker | It is not necessary to use it, but if you outline the finished image with a thin black line, the picture will be clearer and brighter. |
The finished image can be colored in any way that the child likes. Felt-tip pens, colored pencils or paints are suitable for this. But pictures without filling also look impressive.
Miniature angel
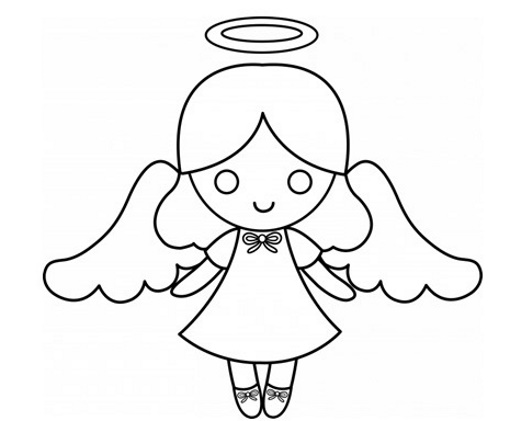
Drawings of angels with wings are beautiful and bright and can be of various styles. If the child does not have experience in fine art, then he will like the idea of a very simple and cute angel. This option is suitable for younger students.
To create such an angel you will need:
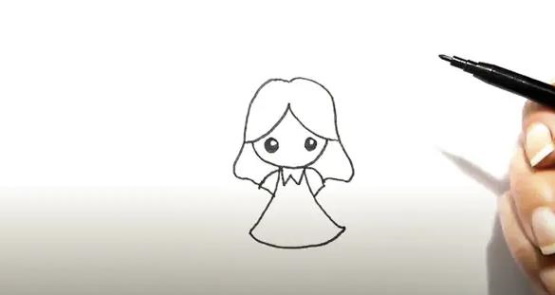
- First draw a round head and add hair as shown in the image above.
- Now add a dress that flares out at the bottom.
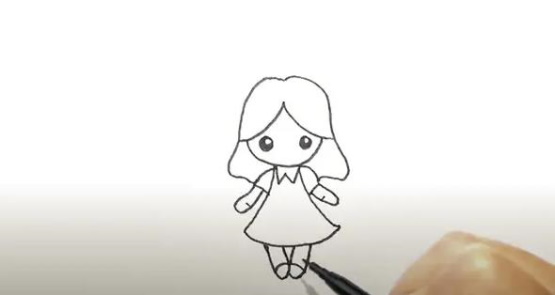
- The next step is to draw the arms and legs. Using semicircular lines, you can indicate the angel's shoes.
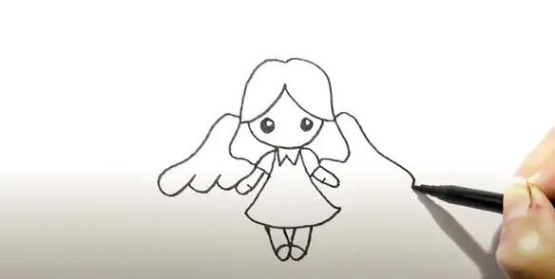
- Next, draw the wings. The lines should be smooth enough, not angular. The drawing can be stylized, that is, it should not have sharp angles.
- Now you can detail the face. For eyes, just draw two circles. If desired, you can add pupils and then use highlights to make them look more realistic.
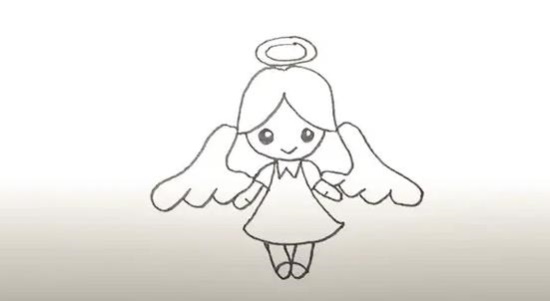
But for small children this technique may seem complicated. Then you need to leave only circles. As a mouth, it is enough to draw a semicircle to get a smile.
It remains to detail the image, adding laces to the shoes and a bow to the dress. Of course, we must not forget about the halo. To do this, you need to draw a flat oval and another one inside it, only a little smaller.
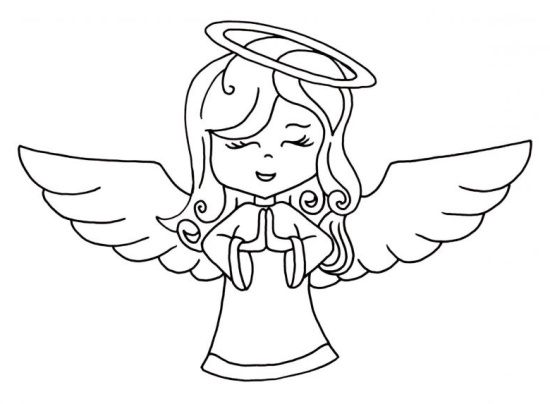
Simple drawing of a girl angel
This image is very similar to the previous one, but in this case more attention is paid to the eyes. The child may like this idea more.
For drawing:
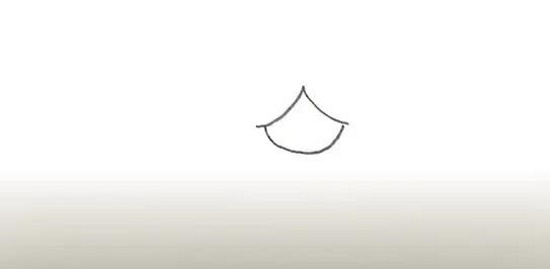
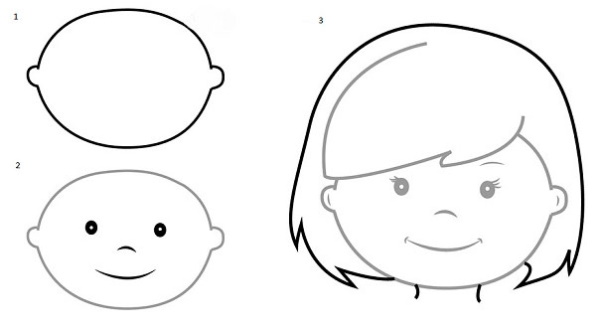
- First, draw 2 downward and slightly concave lines to create a simple fringe that does not cover the angel's face. Slightly stepping back from the edges of these lines, draw another semicircle. This will be the oval of the face.
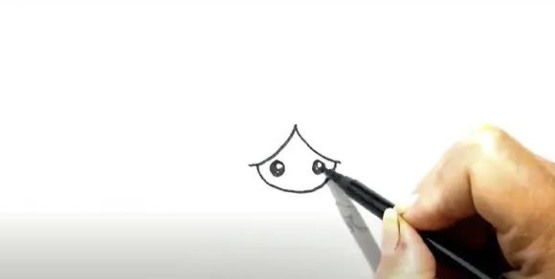
- In the next step, draw 2 circles under the bangs and paint them, but not completely. You need to leave 2 small circles to create a highlight. If you can, you also need to leave a few white dots a little lower. Then the eyes will look more touching.
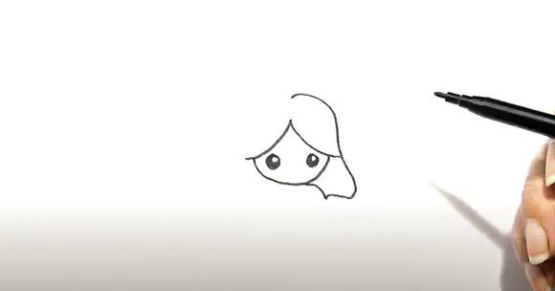
- Draw a curved line above the bangs and move it down and to the right. Then bring it to the face.
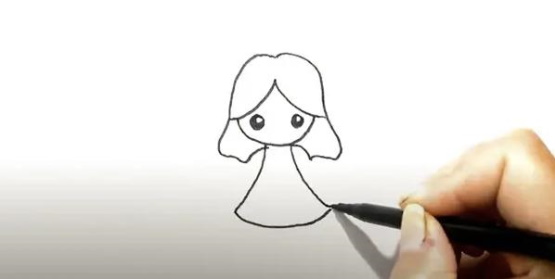
- On the other side, do the same to get the hair. When drawing the hairstyle, make curves under the shoulders, which will be added later. After that, draw the dress. It should be started from the central lower part of the face, gradually expanding it.
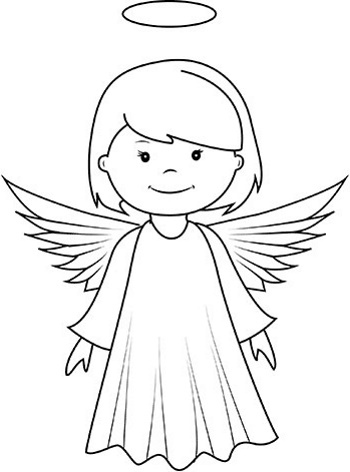
- In the next step, draw the sleeves of the dress and the W-shaped collar.
- Draw the arms from the sleeves, adding a few very small strokes to indicate the palm area. Draw the legs from the bottom line of the dress. They are at a distance from each other at the top, and touch at the bottom. Using 2 additional strokes, add shoes.
- Now the most important thing is the wings. Where the bangs meet the hair, start drawing the first wing. It should smoothly go down and slightly to the right. The feathers are easiest to depict as wavy. The second wing is drawn in the same way.
All that remains is to add a soft smile and a halo above the angel girl's head.
Drawing an angel with colored pencils
Drawings of angels with beautiful wings can be done in color right away. It will be most convenient for a child to work with colored pencils. If they are not very hard, then extra lines can also be erased if necessary.
The image is very simple, but bright. This is a fairly simple option that will suit small children who are just starting to draw. It is okay if the lines are not as even as in the image. On the contrary, this will give the drawing more individuality.
To create a colored drawing of an angel:
- First, draw an oval face and small ears. Using semicircular lines, you can depict the nose and mouth. For the eyes, draw 2 circles, color them, but not completely, leaving 2 small white dots. After that, add eyelashes and a few small strokes to emphasize the smile.
- To complete the face, it remains to draw the hair. In this example, the angel has a short haircut.
- Now you can move on to the body. To do this, draw a short neck and then draw a dress that is slightly wider at the bottom. Its lower part can be depicted with a wavy line. Also at this stage, add long sleeves to the dress. They should also be slightly wider at the bottom.

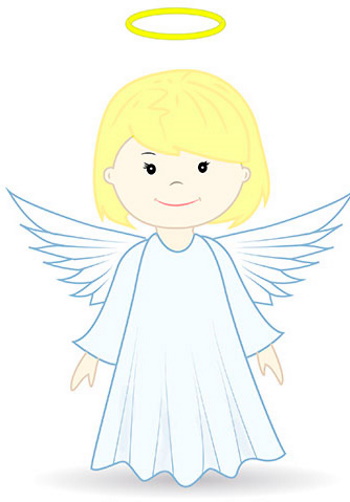
- When the base is ready, it remains to add wings behind the back. It is not necessary to draw them large. Also, palms should be visible from the sleeves of the dress. There is no need to draw fingers, as this will be difficult for a child.
- You should also detail the folds on the clothes and finish drawing the halo. To do this, you only need to draw a neat flattened oval.
After that, you can outline the lines with colored pencils or markers. You can immediately start drawing in color. The dress can be depicted in blue, and the hair in yellow. If the child wants, he can color the picture.
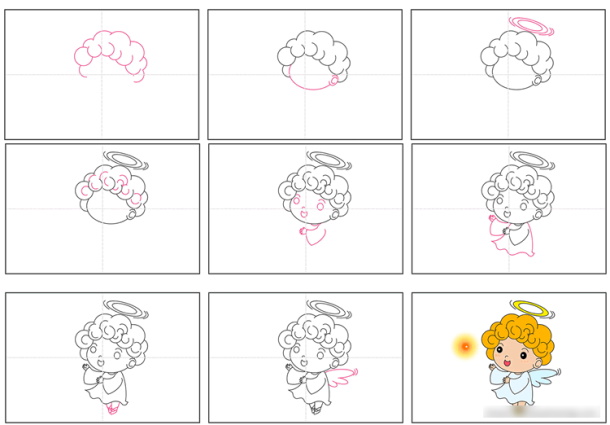
Angel at prayer
The child's drawings can be used later as home decorations for various holidays, such as Christmas. The finished image can be simply cut out with scissors and attached to a wall or window.
You can use the picture as a basis to later make toy decorations for the Christmas tree.
This is a more complex drawing, but if you practice, you will succeed:
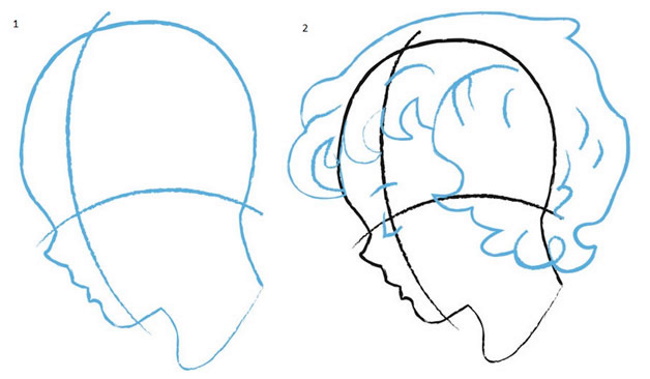
- You should start with the head. The angel will be drawn from the side, sitting on his knees. First, draw the main guide lines that intersect to determine where the nose, eyes, and other parts of the face will be. After that, add details.
- To finish drawing the head, you need to add hair. Angels usually have short hair. So you need to draw a few curls.
- Now you can move on to the body. First, outline the main outline, as shown in the picture below. After that, add the hands folded in prayer. This stage may seem more difficult for the child, so you can ask him to practice drawing the fingers on a separate sheet of paper first.
- It is also necessary to add wings. One of them can be depicted slightly more bent. To finish the clothes, it is necessary to detail the cassock by adding folds. At the bottom, legs should be added.
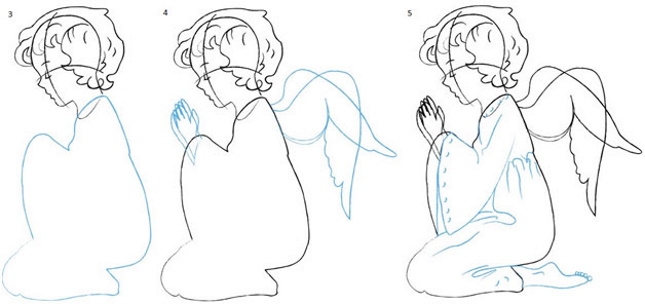
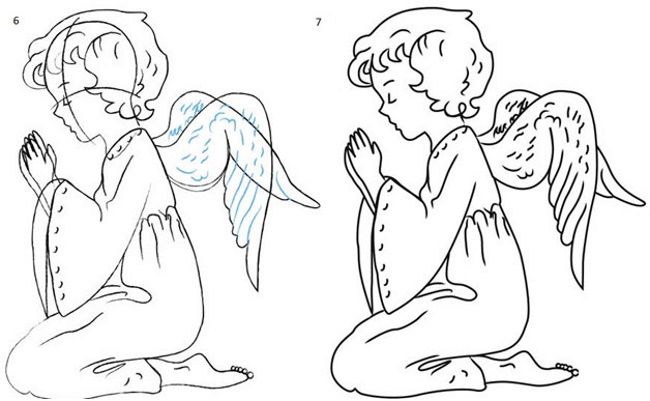
- The next step is to detail the created image. You need to remove all unnecessary guide lines. Also add more elements to the wings.
The finished image needs to be colored. If you additionally outline it with a thin black marker, it will be easier for the child not to go beyond the boundaries of the picture. The finished image can be cut out and glued to cardboard or you can think of another way to use the decoration.
Cartoon angel
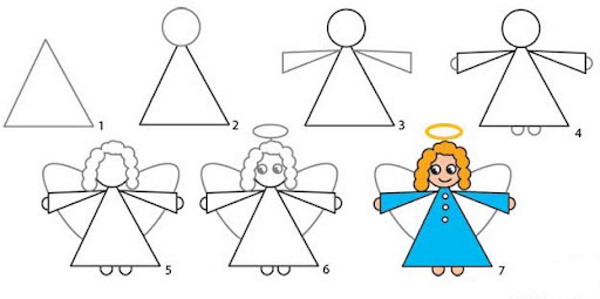
Drawings of angels with wings turn out very beautiful if you take a cartoon character as a basis. Every child loves to watch cartoons and has favorite characters.
Characters with a large head and a miniature body look very interesting. It is easy to draw such an angel, but older children will be able to cope with such an image.
To create an unusual character:
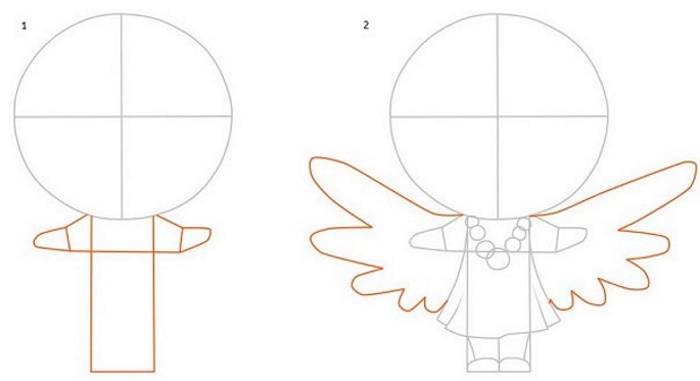
- First, make a sketch and guide lines. So draw a circle and intersecting lines inside it. They will help you navigate the location of the eyes, mouth and nose. The body will consist of rectangles.
- Also depict hands using simple geometric shapes. After that add wings, draw a dress, beads and give the legs a more interesting shape.
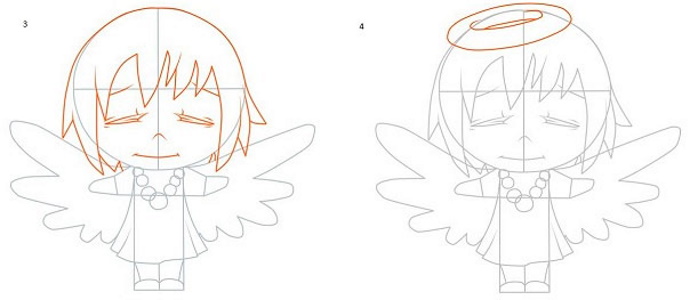
- The next step is to draw the face. For convenience, it is worth adding hair first. The haircut, as in other cases, should be short. If you make the bangs ragged, the character will look even more interesting. The angel's eyes are quite large, but closed. This simplifies the task.
- But the smile is also simple, slightly curved lines. The image needs to be complemented with a halo. It does not necessarily have to be at a distance from the head. You can make it look like it is lying on the hair.
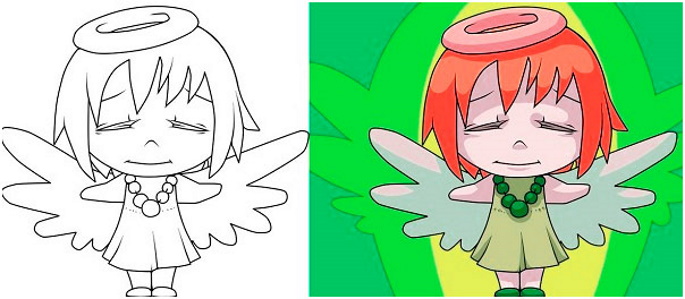
Now you can remove all the guidelines using the eraser. Since the character is cartoonish, it is worth painting the image with bright and interesting colors. The child can decide for himself which shades he likes best.
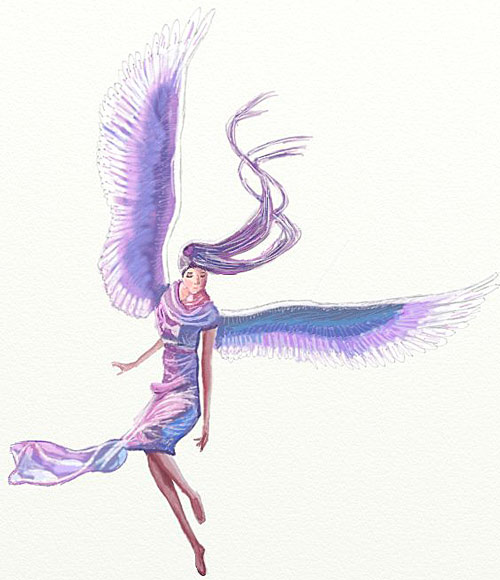
Drawing of an angel for older children
If the child can easily and quickly cope with simpler drawings, then the task can be made more difficult by asking him to draw an angel that looks more like a real person, with more detailed details.
It is worth working on drawing people's poses beforehand, since in this case the image conveys movement. Below is an interesting illustration of an angel, who is depicted as a girl with long hair.
You can color the image in purple tones, also explaining to the child the basic rules of light and shadow. You can use pencils or paints for coloring. The second option is a little simpler, since then it will be easier to create different shades and transitions.
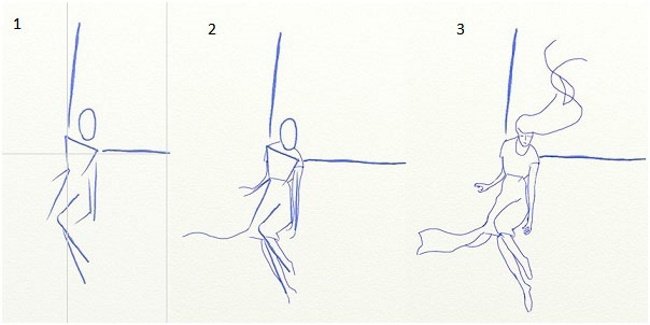
To get such an unusual image:
- First, create the basic contours, deciding what pose the character will be in. At this stage, you should use only simple lines. Also outline the future wings using 2 simple lines.
- In the next step, start adding the dress, arms and legs, rounding the lines in the shoulder area.
- Now add hair, palms and feet, apply a few strokes to indicate eyes, mouth and nose. Try to make the hem of the dress as realistic as possible, as if it is fluttering in the wind. The same with the hair.
- Next, make the image more streamlined, remove all unnecessary outline lines. Folds are added to the dress, and the wings acquire a more realistic shape.
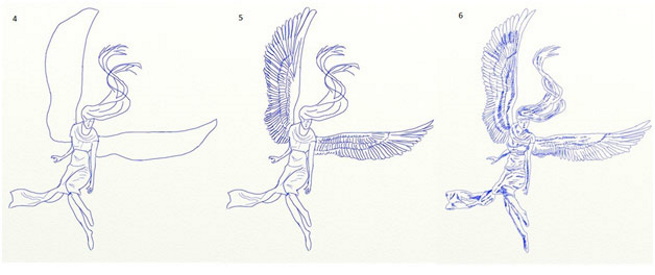
- The next step is to add volume to the hair and draw feathers on the wings. To understand where they should be larger and in what part, on the contrary, smaller, you can use images of birds. This can be a difficult step, so you can practice drawing wings on a separate sheet of paper beforehand.
- It remains to add details. It is also necessary to apply shadows, so that it will be easier to color the picture later.
All that's left is to color the finished image. If your child prefers to work with colored pencils, then it's worth telling him a very useful trick.
If you need to connect 2 colors to make a soft transition between them, you can rub the image a little with your finger after coloring. This will create a blurry effect.
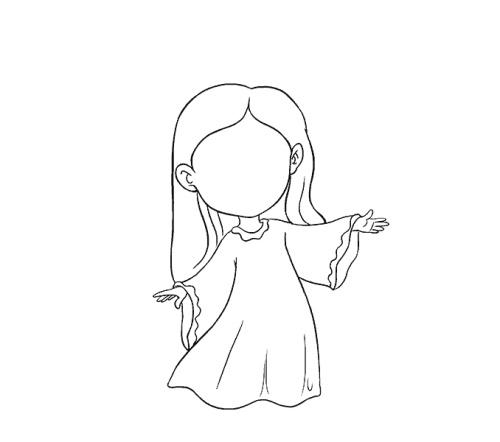
Angel with long hair and big eyes
Drawings of angels with wings can be beautiful and unusual, created by mixing styles. For example, in anime, the characters' eyes are usually very large and expressive. You can also move away from the standard image of an angel with short hair and draw it more like a girl.
To create such an illustration:
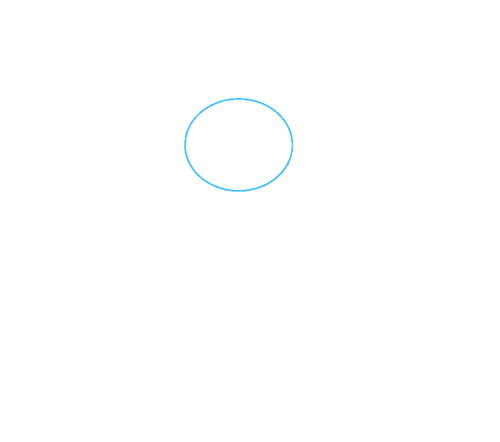
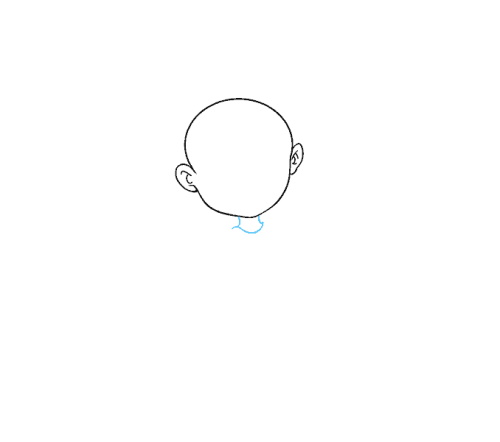
- First draw a circle that will be the head.
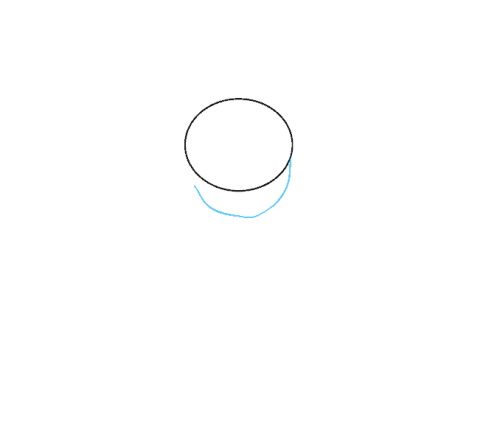
- Draw a slightly curved, unfinished line under the circle to depict the chin.
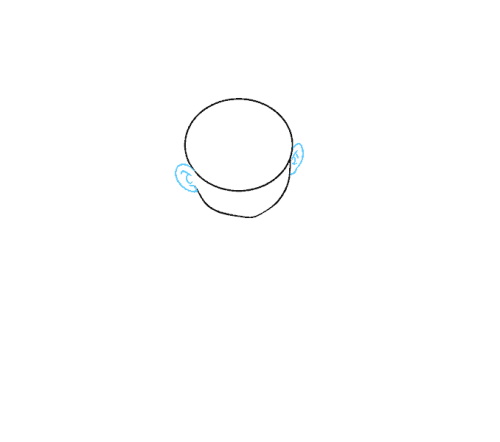
- Add ears on the sides of the head. To do this, draw flattened circles and add several short connected lines inside. This will allow you to detail the image and draw the auricles.
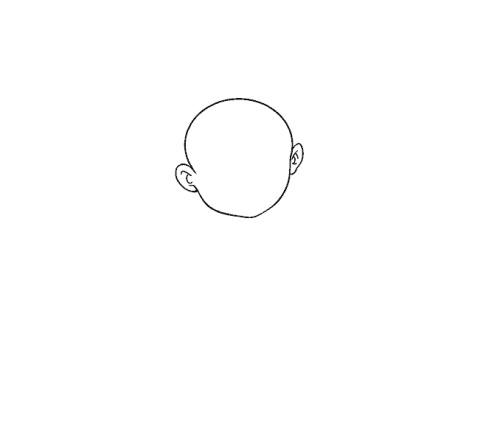
- The face oval is ready, all that remains is to erase the extra guide lines.
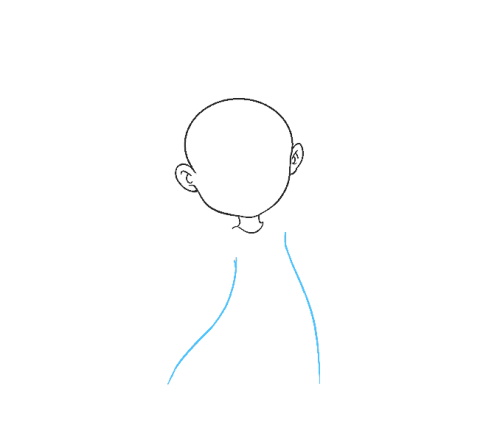
- Now we can move on to the body. First, draw a thin neck from the center of the chin and add a curved line. This will be the collar of the dress.
- Below add 2 vertical lines, curved as shown in the picture below.
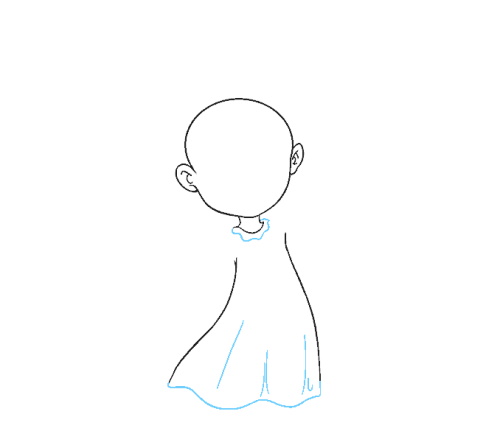
- Add a wavy line around the collar. Connect 2 vertical lines with a wave to get a dress hem that flutters in the wind. From the resulting bends, draw several vertical lines. Then the folds on the dress will look more voluminous.
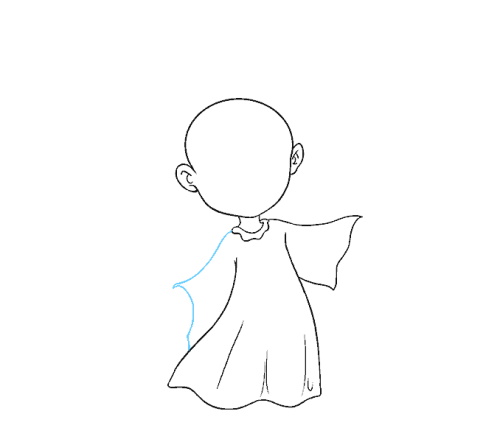
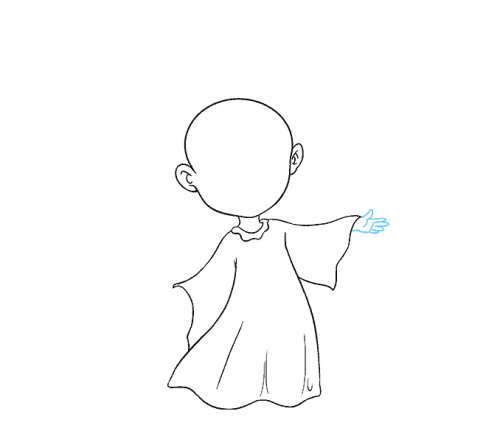
- The next step is to draw the sleeve. To do this, draw a line to the right from the top of the collar. From there, draw a wavy line down. Closer to the bottom, it should be closer to the body. It remains to add one more stroke to complete the sleeve.
- Based on the angel's pose, one arm is pulled to the right and slightly raised, and the other is stretched along the body. Accordingly, the second sleeve should be of a different shape. To do this, draw a curved line down from the collar and also add a wave to indicate folds.
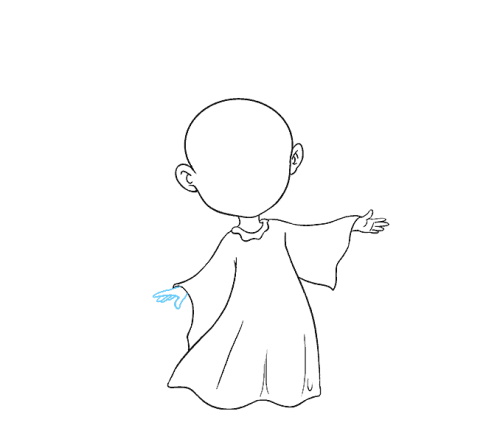
- Now comes the hardest part – the open palm. The fingers are drawn with narrow U-shaped lines. Then you can add the thumb and draw the sides of the palm. It is rare to be able to draw a hand the first time. In order not to use the eraser again, it is better to practice on another sheet of paper.

- The left hand is folded differently, as shown in the picture below.
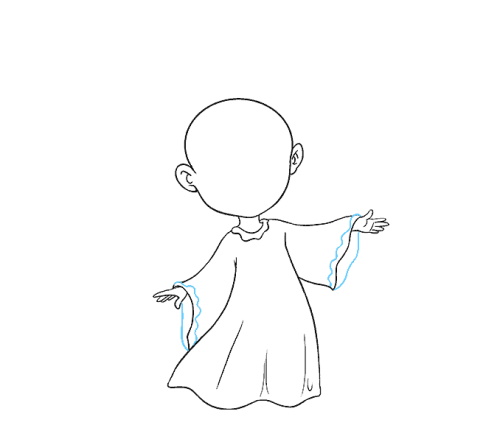
- Along the sleeve lines, you need to draw additional wavy lines. This will allow you to depict cuffs. To indicate the depth of the sleeves, you need to add additional lines on the other side of each sleeve.
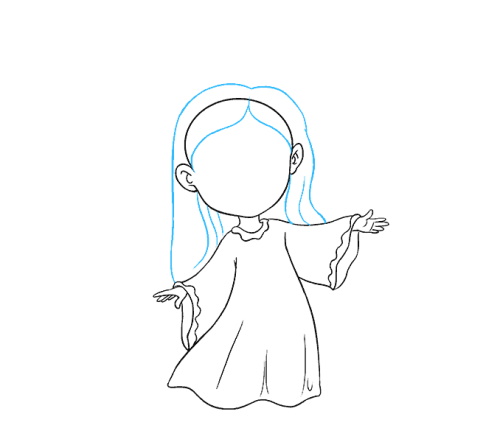
- It's time to detail the head. Start with the hair. The bangs can be drawn in the same way as in the examples above. And the hair should be made long. It goes behind the ears and goes down the back. The lines should be slightly wavy.
- After this, you can remove the guide lines of the head to get a more harmonious image.
- It's time to move on to the eyes. They should be at ear level and fairly large. Start with the main lines. The upper curved line should be thicker. Eyebrows are needed above the eyes. They are located high enough to make the look very open.

- The nose and mouth can be drawn using simple curved lines. The chin can also be highlighted by adding a few small strokes. The pupils can be drawn as ovals.
Inside, they need to be painted in such a way as to leave a few light parts. This will add gloss and make the eyes more touching.
- You can move on to the wings. To do this, draw long curved lines from the hair on each side of the angel. After that, the lines are rounded. This will allow you to form the very top parts of the wings. Under them, draw the same lines, only this time a little shorter. The procedure is repeated several more times.
- Inside the wings add another set of feathers. They should be smaller and go in the same direction as the main wings.
- The final element remains - a halo above the head. To do this, draw a flat oval, and inside it the same, only smaller.
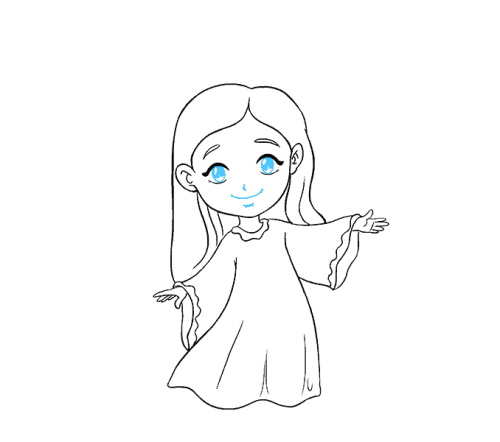

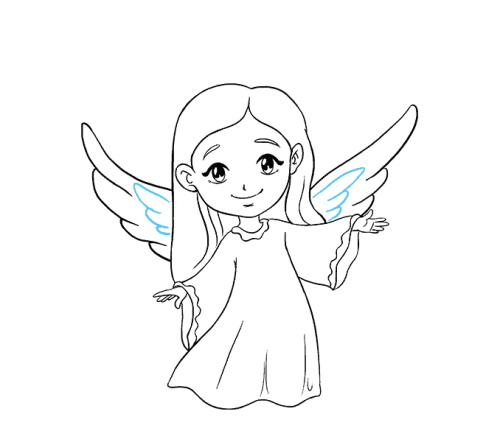

The image is ready, you can move on to coloring. The dress can be depicted in light pink. If you paint the inside of the sleeves dark pink, you will be able to give it more volume.
To indicate the color of the eyes, the lower unpainted parts must be painted with a color, for example, blue. The upper highlights must be left unchanged. If desired, you can add shadows or leave the picture as is.
More Angel Drawing Ideas
Drawings of angels with wings are beautiful and cute; they can be created both in the simplest form, consisting of just a few lines, and in complex forms.
We can take several interesting examples as a basis:
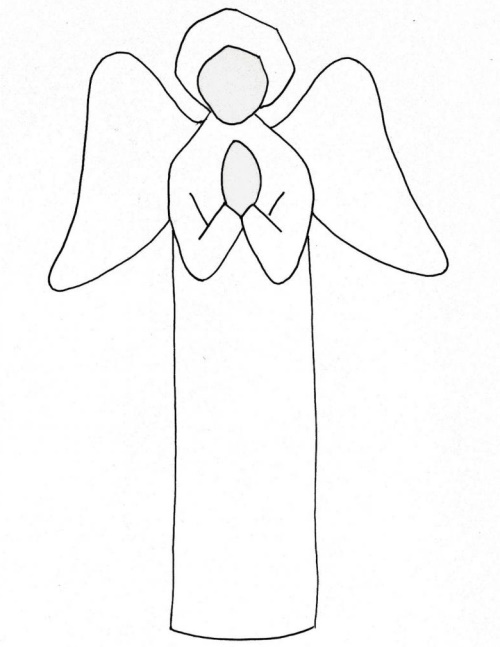
- Below is an extremely simple image of a praying angel. The picture looks more like a statue. To draw it, it is enough to use simple geometric shapes. For example, the body is an elongated rectangle, the head and hair are circles.
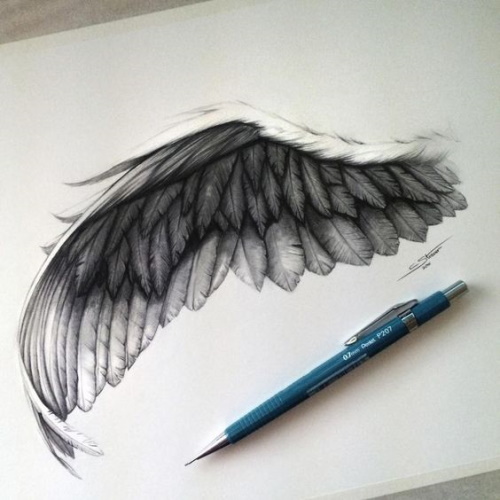
- If, on the contrary, the child has already mastered many drawing techniques and has done a great job, then you can show him how to detail the wings. Below is a very beautiful drawing with a simple pencil, where you can see exactly how to depict feathers. It is also worth paying attention to the light and shadow.
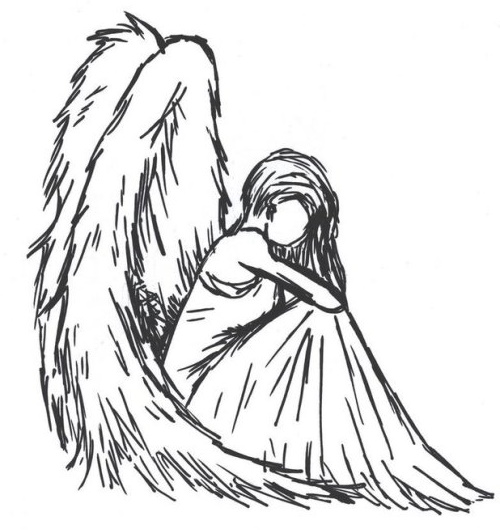
- Another simple drawing technique can be used. For this, the image is drawn with short strokes. That is, there are almost no straight and evenly connected lines.
This will be especially convenient for a child who still finds it difficult to draw without lifting the pencil from the sheet of paper. Below is a simple version of drawing a seated angel with his head bowed over his knees.
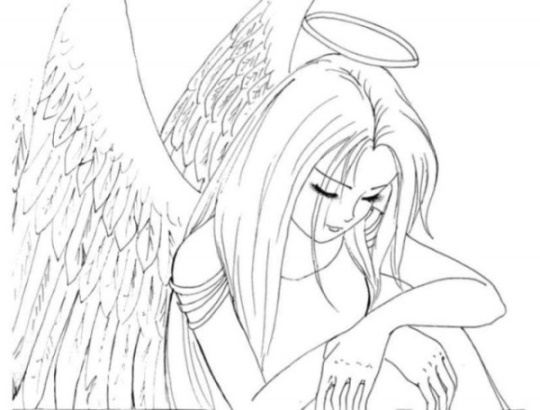
- An angel does not necessarily have to be a child. You can depict an adult girl. If you do not want or find it difficult to draw eyes, then they can be depicted closed, adding only voluminous eyelashes. Below is shown how the arms and wings are drawn.
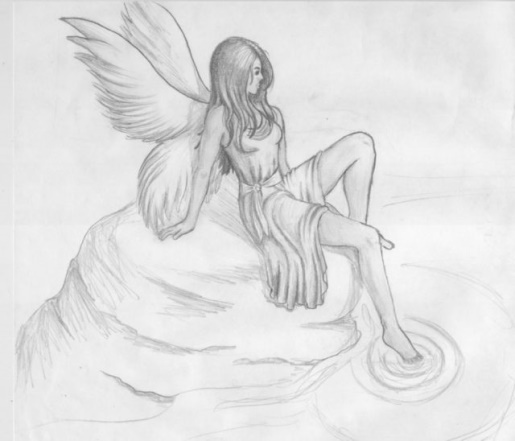
- Sometimes the wings are given a not very usual form. For example, you can take the wings of a butterfly or a fairy as a basis. In this case, they will be forked. An angel-girl can be depicted sitting on a stone and lowering one leg into the water. In this example, the dress is depicted in more detail.
- Angels are often depicted as more serious. But you can go the other way. Below is a cool angel with a funny face. The character's mouth is slightly open in a smile, and his eyes are closed. You need to draw fairly long eyelashes.
You can complement the image with cute curls of hair, and draw a halo directly on your head.

- Here is another example of a funny angel with beady eyes, located very close to each other. The picture is very easy to make and can be done by both younger and older children.
You can draw a magic wand in the angel's hands. The wings should be very light and rounded. This example also shows how else you can draw hair.
The resulting drawings of angels can be hung on the refrigerator, wall, or you can think of other ways to use them for decoration. Beautiful characters with wings are symbols of many holidays. In the process of drawing, you can tell who they are, give several parables as an example. Children like such pictures.
Video about drawing
Drawings of angels with wings are beautiful: