Making accessories from beads is an enjoyable activity. You can make any decoration from it, which will become a gift for a loved one. For example, a bracelet, beads, earrings, flowers. The process of creating compositions is not complicated. The main thing is to prepare materials and tools for work in advance, and also rely on the experience of the best craftswomen of this creativity.
Necessary tools and materials
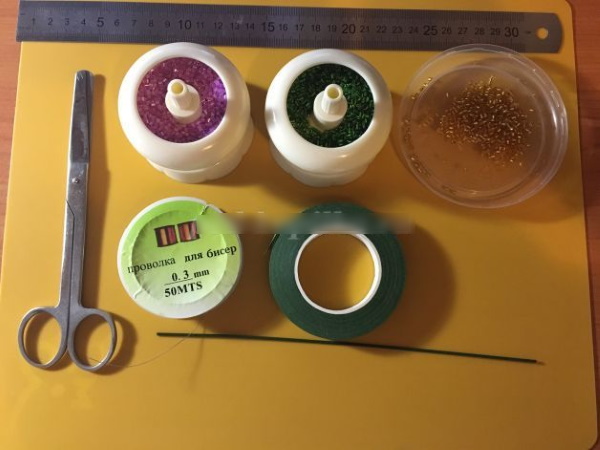
The main material will be beads, the colors of which depend on the planned product for production. For example, for plant leaves, green beads will be needed, for bell flowers - blue. The beads will be strung on a wire, the thickness of which can also be different. If desired, it can be replaced with a fishing line. Threads or glue are used to connect the elements.
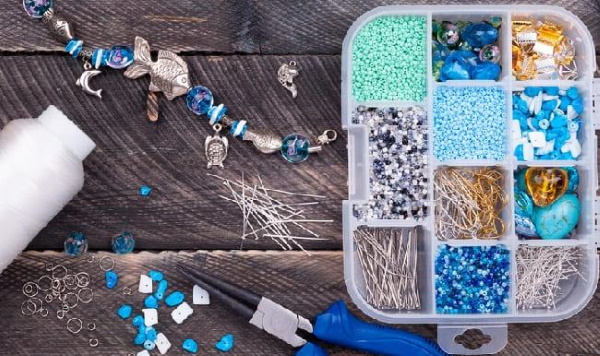
The following tools will be needed:
- scissors;
- ruler;
- tweezers;
- pliers;
- round nose pliers.
Schemes with description of works for beginners
Bead compositions of the best craftswomen, as in any creative process, will require first setting simple tasks, and then gradually moving on to more complex ones. The master classes presented below are designed for beginners. It is better to start composing bead compositions with the simplest options.
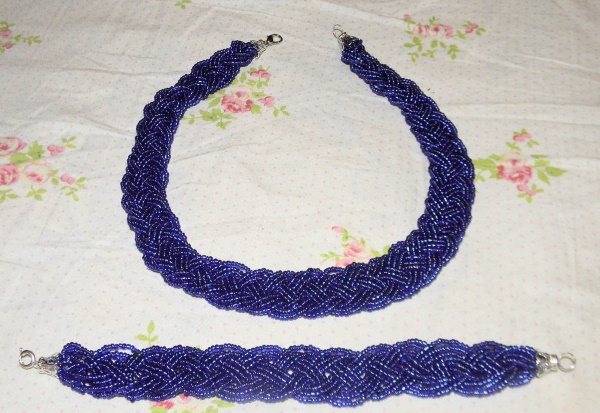
Pigtail
To make a braid from beads, you need to prepare the following tools and materials:
- beads;
- thin fishing line with a diameter of 0.2 mm;
- needle;
- lock;
- scotch;
- adhesive substance;
- round nose pliers;
- 2 connecting rings;
- pin for jewelry.
The work of making braids takes place in the following stages:
- Place the ring into the pin and tape it to the work table.
- Thread a thread through the ring, and thread both ends into a needle.
- String one of the threads of beads of the required length and secure its ends.
- Similarly, create 11 more threads. In total, there should be 12.
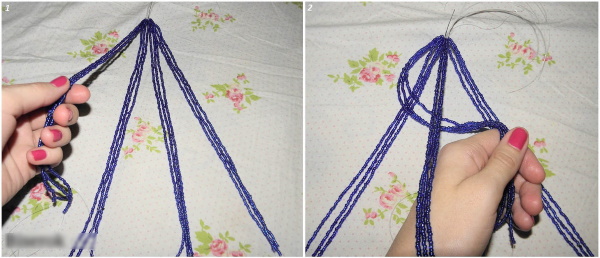
- Distribute all 12 threads into 3 strands, each with 4 pieces. Make a braid from these strands.
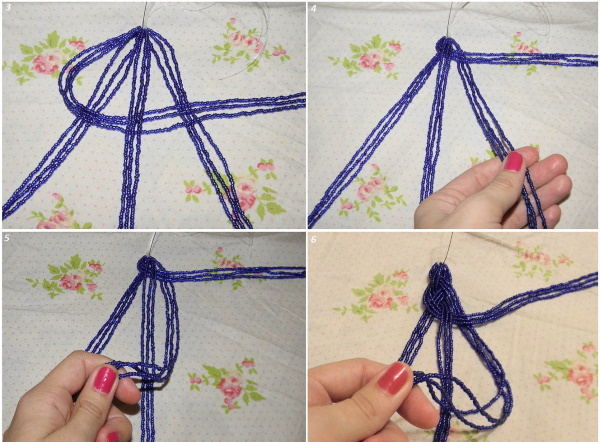
- Connect all the threads in pairs, tying them together one by one.
- Tie the ends together.
- Tie the ring to the bracelet with several knots and secure with glue. Remove unnecessary ends of the thread.
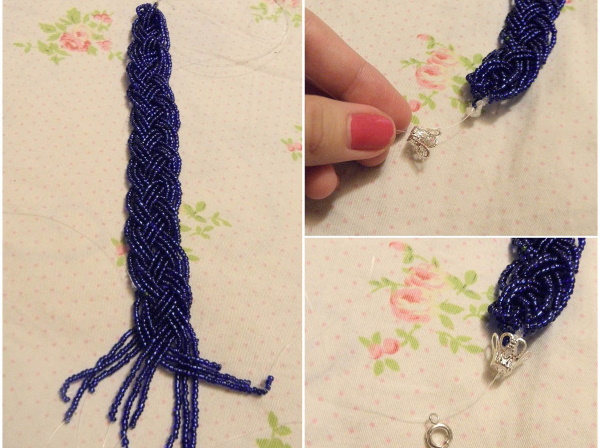
- Attach the clasp to the rings.
Ready.
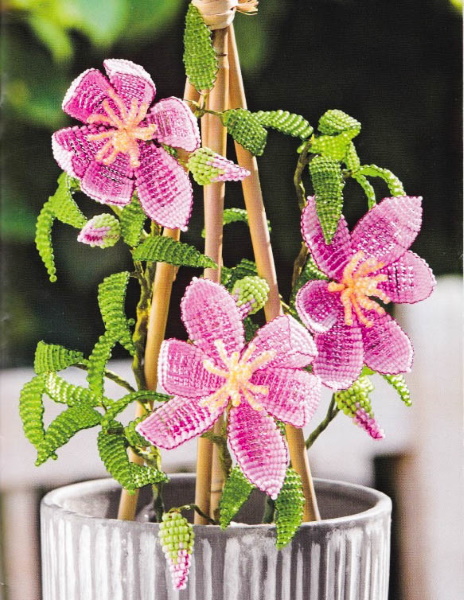
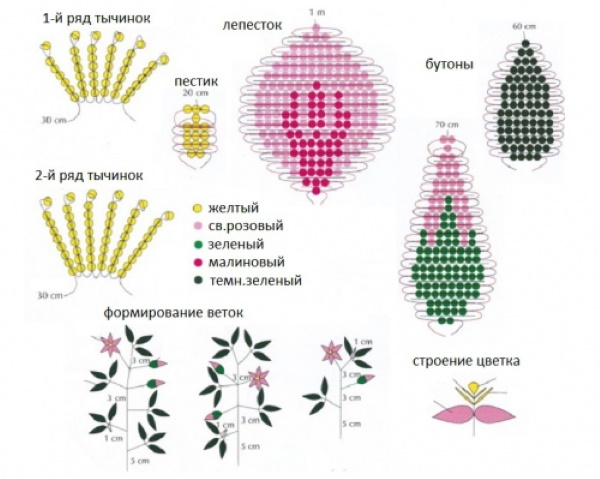
Clematis
This master class is designed for primary school students, teachers, and parents.
The following materials will be required for the work:
- purple chopped - 100 g;
- green beads – 100 g;
- wire 0.3 mm for weaving;
- 4mm wire for stems;
- green cotton yarn;
- 2.5 cm strainers.
The stages of work will be as follows:
- Start weaving from the center of the flower. There are 5 rows on the strainer, including the middle. The outer 2 rows do not need to be touched. In all other holes, you need to make 2 loops (10 beads, 1 chop, 10 beads). Make 3 blanks for the middles.
- Make 18 jagged petals for each flower. Make a loop from the wire, then make a petal. Put 10 beads on the central axis, and 11 beads on the long wire. This is how an arch is formed. Make 3 more arches using the same principle. This is how the central axis and 4 arches will be made. When weaving the 4th arch, you need to hide the 2nd end of the wire. Then connect the wires, and put beads on the 2 ends. Remove the excess wire, leaving 0.5 cm.
- Make a tooth. From the top of the petal, count 4 cuts. Here, between the 4th and 5th cuts, insert the wire. Then dial such a number of cuts that it is exactly up to this 4th. On each side of the petal there should be a pair of teeth.
- Place the prepared petals into the unfilled rows of the sieve, through one hole.
- To make the flower look like a real one, add a sepal to it. To make this element, the French weaving technique will be used. 7 beads are strung on each end of the wire, and the middle is made by hand. The work continues according to the same principle. At the end, remove the ends of the wire and bend the short "tails" that remain.
- Attach the sepal to the flower using glue and wait until it dries.
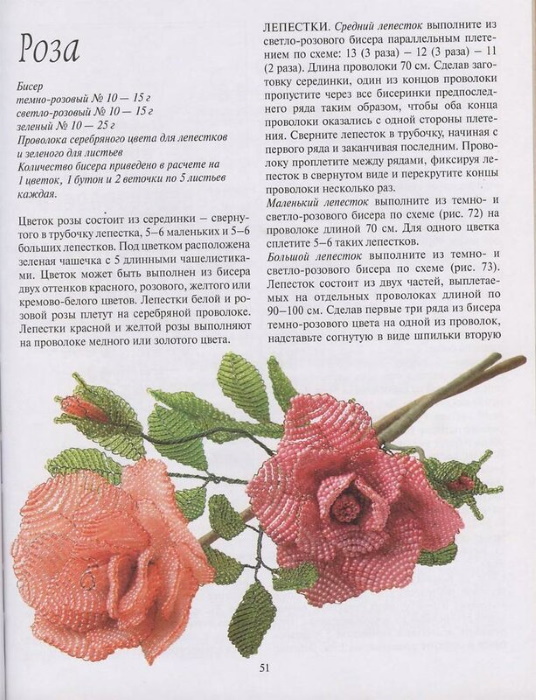
Roses
Bead compositions of the best craftswomen, represented by roses, roses always look beautiful and similar to natural flowers.
To make a rose bush you will need:
- beads - red, dark green and light green beads. It is better to take No. 10 (Czech) or No. 12 (Chinese);
- wire 0.3 mm thick – for weaving, 2 mm – for flower stems and 5 mm – for branches;
- green threads;
- clear varnish;
- floral rod 0.7 mm.
The work of making roses goes through the following stages:
| No. | Stage | Description |
| 1 | Make a small frame rose | It is manufactured according to the following scheme: · middle – 4 bis, 4 arcs (3 petals); · 1st tier – 4 bis, 5 arcs (4 petals); · 2nd tier – 5 bis, 7 arcs (4 petals); · 3rd tier: 1st axis – 1 bis; 2nd axis – 2 bis, 4 arcs on the wrong side and 8 arcs on the right side (5 petals) |
| 2 | Make 2 large roses | You need to act according to the following scheme:
· middle – 5 bis, 5 arcs (6 petals); · 1st tier – 5 bis, 7 arcs (8 petals); · 2nd tier (5 bis, 8 arcs) (8 petals); · 3rd tier: 1st axis – 1 bis; 2nd axis – 2 bis, 4 arcs on the wrong side and 10 arcs on the right side (10 petals). The petals of the 3rd tier should be given the necessary shape. If you want to make more roses, then for proportionality the remaining branches should be larger |
| 3 | Make sepals | There should be 15 of them in total.
They are woven as follows: 1. Put 5 cm of beads on the axis and make 1 arc. The front side should be on top, and the back side should be on the bottom. 2. String 1 cm of beads onto the working wire, make a hook. After stringing the beads, move to the other side. Repeat everything again. 3. Once again, string the beads in such quantity that the hook is 1 bead higher than the previous one. This is how the sepal is stitched with the transition to the other side. 4. Make a return arc, sepal is done |
| 4 | Make leaves for the flower | They should be of 2 sizes. Their total number is 18 pieces. Small leaves - 12, and large ones - 2 times less.
The manufacturing scheme is as follows: · small leaves – 5 bis, 7 arcs; · large leaves – 5 bis, 8 arcs. In both cases, regardless of the size of the sheet, it is important to remember that the top should be sharp and the bottom should be rounded. |
| 5 | Assemble the manufactured leaves | The assembly steps are as follows:
1. Attach an additional wire (a little more than 10 cm long) to the large sheet. 2. At a distance of 2-3 cm from the large sheet, tie 2 more small sheets. After that, wrap another 5 cm. 3. Attach an additional 20-centimeter wire to the 6th large sheet. 4. After attaching another pair of small leaves, wrap the threads almost to the end of the wire. |
| 6 | Complete the rose collection | The assembly steps are as follows:
1. Roll up the 3 middle parts, squeezing the little finger, and then – holding the axis, place them inside each other. To prevent them from falling apart, twist them 2 turns. 2. Take a thick rod, place it in the middle and firmly attach the middle with threads, and then the petals of the 1st tier, then the 2nd and 3rd. 3. Attach the sepals to the petals with the wrong side. To keep the flower in shape, you can stitch it with wire. This is done as follows: 1. Take a wire and sew it through the flower. This touches the sepals. Twist the ends and hide them inside the petals. 2. After wrapping the rod another 5 cm, attach the 1st branch of leaves. After 3 cm, attach the next branch. Continue wrapping the rod until its end. 3. Assemble the 2nd rose in the same way. The leaves are attached at the same level. 4. Collect the 3rd rose. The 1st branch of leaves is attached at the same distance. The 2nd branch (on a long stem) does not need to be attached. |
| 7 | Complete the composition | The rose can be supplemented with grass to create a whole composition. The amount of grass can be any, but the minimum is 5 pieces. You can use artificial grass.
The stages will be as follows: 1. Bend the end of the rod to securely fix the beads. 2. String a little more than 30 cm of light green beads. 3. Wrap the tip of the rod with thread or tape. |
Bells
Compositions of beads from the best craftswomen in the form of bells will be distinguished by their special tenderness and beauty.
To weave a small bouquet, you need to take the following materials:
- blue beads;
- white beads;
- yellow beads;
- green beads;
- wire for weaving 0.3 mm and 0.4 mm;
- wire for the stem 1.6 mm;
- floral tape;
- flower vase.
Having prepared everything necessary, you can begin the work, which will consist of the following stages:
| No. | Stage | Description |
| 1 | Make petals | For this, the French weaving technique will be used. Each bell will require 5 petals. A 13-centimeter piece of wire with a thickness of 0.4 mm will act as an axis. The manufacturing stages are as follows: 1. Measure 5.5 cm from one end of the wire and attach a piece of wire 27 cm long and 0.3 mm thick to it. 2. String 20 blue beads onto the axis. 3. Make 2 turns (4 arcs) with the working wire. |
| 2 | Connect 5 petals | They need to be sewn so that they are located close to each other and do not fall apart. They should be sewn at the level of the 8th bead from the bottom on the axis. First, the 1st petal is sewn, then the 2nd is attached to it, then the 3rd, 4th, 5th |
| 3 | Connect the ends of the wires | This refers to the 2 ends of the wires used for stitching. The result will be a circle. The remainder of the wire should not be removed completely, but leaving 1 cm. This short end should be bent inward. The flower can be shaped |
| 4 | Make the bell centers | This element will consist of a stamen and a skirt. The needle technique is used to weave the stamen, and the loop technique is used to weave the skirt.
The stages are as follows: 1. Start with the stamen. To do this, take a 15-centimeter piece of wire with a thickness of 0.3 mm and put 4 yellow beads on it. 2. Holding 1 bead, thread the end of the wire through the other 3 in the opposite direction and tighten it well. It is important to remember that the ends of the wire should be the same length. 3. Connect 2 ends tightly, and put 17 white beads on them. In total, you should get 3 such blanks. When they are all ready, connect them, twist the wires together. Bend the yellow ends so that a triangle is formed. 4. Having made the stamen, move on to making the skirt. To do this, take a 30-centimeter piece of wire, put 17 white beads on it. They should be placed so that the distance from them to the edge of the wire is 3.4 cm. Then you can make a loop. 5. After stringing another 17 beads, make the next loop. There should be 5 of them in total. |
| 5 | Make a sepal | The same technique will be used here as when weaving the skirt in the previous stage. Only the piece of wire should be 40 cm long. 21 beads should be put on it. After that, a loop is made. Then the 2nd loop is also made, the 3rd. In total, the sepal should have 7 loops |
| 6 | Complete the leaflets | To do this you will need:
1. Prepare 2 pieces: 10 and 17 cm. 2. Make an axis and put 23 green beads on it. 3. Make 1 turn with the working wire (2 arcs) |
| 7 | Perform assembly | The stages are as follows:
1. Attach the stamen to the skirt. 2. Give the flower shape and insert a skirt with a stamen into its center. 3. Attach the sepal at the bottom |
| 8 | Make a bouquet | Its creation consists of the following stages:
1. Take a 29-centimeter thick piece of wire (1.6 mm thick) and attach 1 of the flowers to it. 2. Wrap the stem with floral tape and attach a leaf to the stem at a distance of about 3 cm from the flower. The 2nd leaf should be 1 cm lower on the opposite side. The 3rd leaf is located even lower by 1.5 cm. The 4th leaf is located even lower. It is best to attach them so that it looks as if they are growing in different directions. 3. Place the 5th leaf 5 cm below the previous ones, and attach the 2nd flower with the 6th leaf next to it. Place the 7th leaf 1.5 cm below. 4. Wrap the tape around the barrel all the way to the end. 5. To give the branch shape and realism, bend the flowers downwards in an arc and slightly straighten the leaves. 6. Similarly, collect 3 more exactly the same branches, each with 2 flowers and 7 leaves. The 5th branch will be the largest. Make 3 flowers and 10 leaves on it. 7. The finished bouquet of bells can be placed in a vase and filled with a solution, for example, alabaster. |
Ready.
Orange Keychain
Bead compositions by the best craftswomen can be presented in the form of an orange slice.
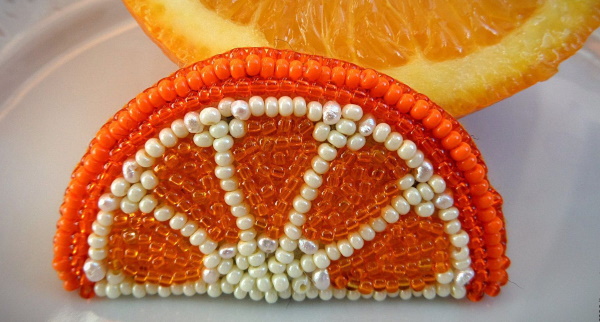
To make a beaded keychain according to the diagram below, you will need:
- 1 m long fishing line;
- orange and white beads;
- a pre-drawn diagram on a piece of paper, where white and orange circles will be highlighted.
The stages of work will be as follows:
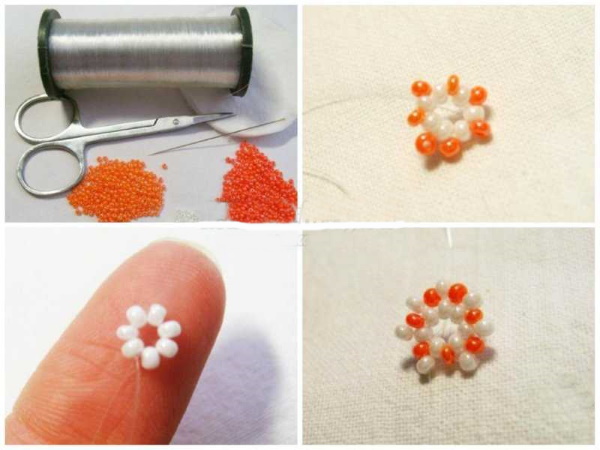
- There is no need to divide the prepared meter-long fishing line into parts. Weaving will be done with it alone. Tie a knot with a bead at one end. At the final stage, it will be tucked into the keychain.
- Take 7 white beads and arrange them in a circle. Weaving will be done using the mosaic technique. This means that in the following rows, the orange beads should be located between the white ones. In the first 3 rows, there should be 7 beads, and in the 4th circle, their number begins to increase. Here, between the white beads, there should be 2 orange ones. In total, there will be 14 beads in this circle.
- Proceed in the same way, increasing the number of orange beads located between the white "veins". Continue weaving in such a way that 7 orange sectors are formed, between which there will be white "veins". In total, you need to make 12 rows, and then move on to making the edging. The edging of the orange circle is made with white beads (2 more rows).
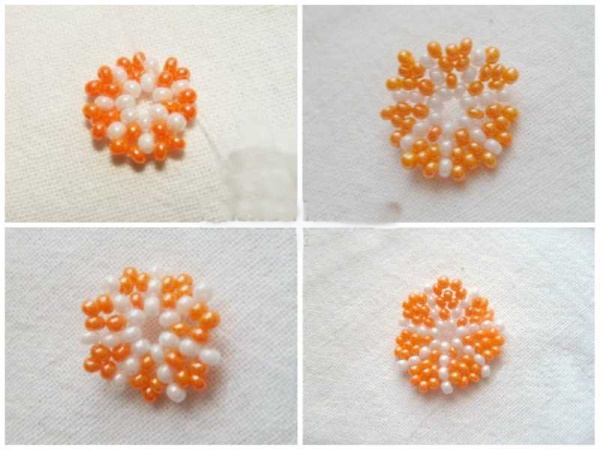
- After the white edging, make 3 rows of orange beads. It is better to use a darker color for this.
- Give the blank such a shape that it resembles an orange slice. To do this, fold it in half and place a soft white material in the middle: a cotton pad or foam rubber.
- Sew the edges of the slice using fishing line. Grab the beads alternately from both sides.
- Fasten the strap with a carabiner. This completes the work on making an orange keychain. Now you can use the finished product.
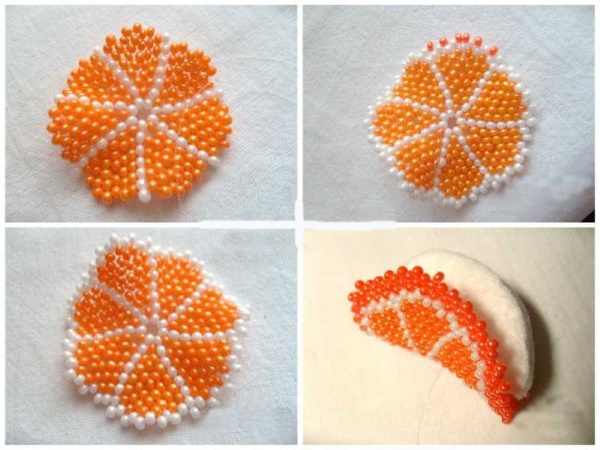
Using the scheme just described, you can make not only orange slices, but also pieces of other fruits: lemon, kiwi, apple, pear.
Secrets for Beginners
For many craftswomen, weaving beaded compositions begins as an interesting pastime, but then becomes a favorite job or a lifelong pursuit. The most popular objects made from beads are flowers.
They are designed in various styles, for example:
- vegetative, the main feature of which is asymmetry. In this case, it is necessary to carefully select the materials and plants used. Such a composition can have 2 so-called "growth points" at once. The spring theme looks especially beautiful;
- decorative. In it, several elements are collected into a single whole. When making such compositions, you can combine plants from different seasons, for example, spring with autumn;
- minimalism. It places more emphasis on the linearity of elements than on the number of plants.
Different techniques are used in the production of various objects from beads, for example:
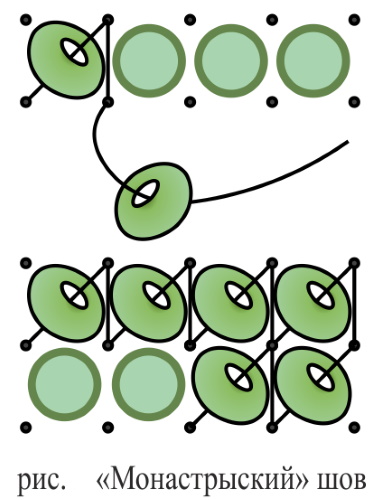
| Technique | Description |
| Monastery stitch | Its main advantage is simplicity. It is very similar to cross stitching. |
| Line stitch | Here the number of beads is equal to the number of stitches. |
| Arched seam | The product made using this technique is softer, because the beads are put on the wire several at a time. |
| Stem suture | Required for the production of dense products. |
It's nice to make something yourself rather than buy it ready-made in a store. If you learn how to weave with beads, you can make unique jewelry with your own hands: various bracelets, earrings, flower arrangements and many other accessories.
To achieve success in handicrafts and making bead compositions, you should start with the simplest technique from the best craftswomen. Having mastered the basics, you can gradually move on to more complex works. This way, the products will be more complex and more beautiful.
Video about creating bead compositions
Beaded composition - lavender, lily and gerberas: