A snowdrop is easy to create on paper with a few lines. The simplicity and tenderness of the image of the first spring flowering plant attractive for young authors - even preschoolers can handle the drawing.
General rules for drawing a snowdrop
Snowdrop (a drawing for children reproduces a small flower) is a plant with a stem about 10 cm high, 2-3 leaves, white petals of the peduncle. There are varieties with blue, bluish, purple inflorescences.
Before drawing with your child, you can remember interesting facts about the snowdrop:
- the time of plant awakening is the first spring months;
- flowering is often observed when there is still snow around the thawed patches;
- the bell-shaped bud always bends towards the ground, the 3 outer petals never open fully;
- The flowering period lasts up to 2 weeks; then, with the melting of the last snow, the petals fall off.
- With the onset of the last weeks of spring, seeds ripen in a rounded “box” at the top of the stem.

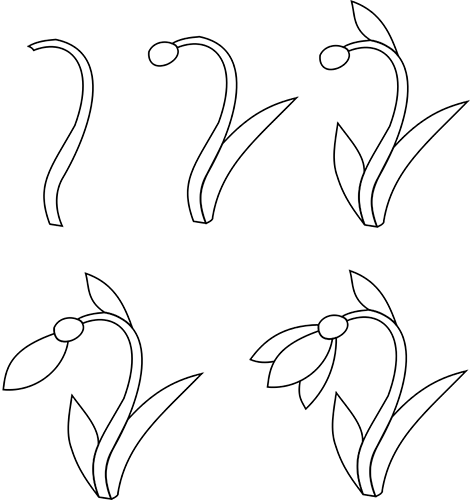
To capture a snowdrop on paper, first outline a thin stem, slightly curved downwards in the upper third. Draw 2 elongated narrow leaves on the sides of the stem. Draw an oval green "box" on the inclined top of the stem - 3 large petals originate from it. They are painted bluish, violet, blue, or left white, at the author's choice.
In the latter case, to give shape to the petals, make a small shadow with a gray or blue pencil. The stem and leaves are painted grassy green, shading at the edges with emerald or dark green colors.
Next to the snowdrop, the young artist is asked to draw additional elements of the composition:
- a few more flowers;
- grass sprouting on the thawed ground;
- snow on the edges of thawed patches with flowering plants.
An unusual theme of the work is to capture snowdrops in a vase or basket. For such an activity, you can use a technique using a stencil, applique. To make parts of the composition bright, thick colored cardboard and craft paper are used for the background.
Simple pencil drawing
A snowdrop (a drawing for children has a simple and straightforward image) can be tried to be created on paper with a simple pencil. Then the author is offered to color the work with colored pencils or crayons, if desired.
What tools will you need?
The child, with the help of an adult, prepares a set of necessary tools:
- pencil with a simple soft lead;
- thick paper;
- eraser;
- pencils of blue, green, dark green colors.
How to draw
The stages of the lesson are listed in the table.
| Stage | Description |
| 1 | Taking into account the margins, mark a place in the center of the sheet for the image of the flower. |
| 2 | Draw a vertical line that resembles an S-shaped silhouette. Next to it, draw another one that repeats the original one. This is the stem of the snowdrop. |
| 3 | At the top of the stem, outline a rounded "box", from which the beginning of the petals will be drawn later. On the right side of the stem, depict a narrow leaf elongated to the right, about two-thirds the height of the plant itself. |
| 4 | On the left, add another leaf growing from below. Its top is located directly under the "box". On top of the stem, draw a 3rd small leaf, inclined towards the future petals. |
| 5 | The inflorescence of the snowdrop is quite large. First, begin to outline the petal in the middle, from 2 convex lines connected in a sharp corner. |
| 6 | On the sides, depict parts of the 2 remaining petals. It turns out to be a kind of "trident". The drawing with a simple pencil is complete. |
How to complete a drawing
The logical continuation of the work is coloring the resulting flower. Light blue shading shades the petals, giving them volume.
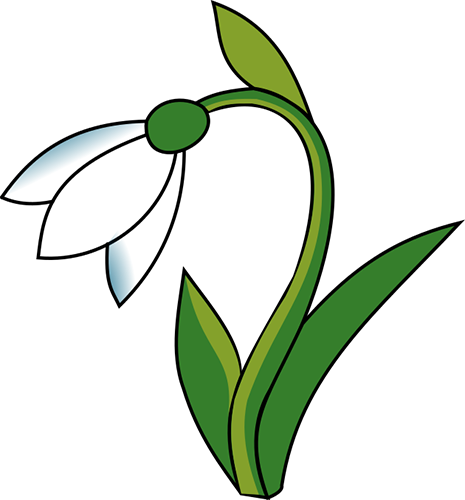
Grassy green fills half of the stem and leaf fragments. A darker shade of green will give the final shape to the plant parts.
With paints
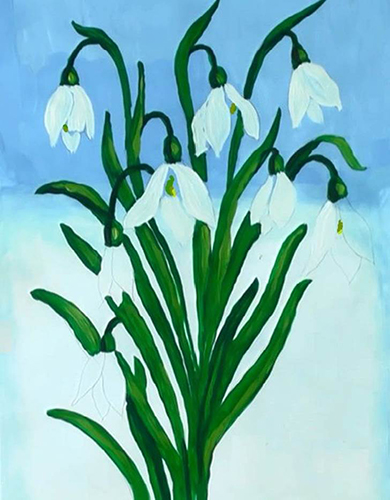
Snowdrop (a drawing for children can be done in gouache technique) is a good theme for a composition with a bouquet of flowers. The density and brightness of gouache paints are attractive to a child.
The petals of the plant's inflorescences are painted with white paint over a dried colored background.
What tools will you need?
The following materials are selected:
- thick paper (sheets from albums or for drawing);
- a simple soft pencil (lines from a soft lead are more visible under a layer of gouache);
- eraser;
- wide brush;
- medium sized round brush;
- gouache paints;
- container with water;
- rag;
- palette.
How to draw
Below is a detailed sequence of actions:
| Stage | Description |
| 1 | Compositionally, the bouquet is placed vertically, outlining the fields of the image. First, several longitudinal lines are drawn in the center, curved at the top - the stems of the plants. Oval "boxes" are depicted at the tops. |
| 2 | In the upper parts of the stems, before the bend begins, small leaves begin - they are drawn rather narrow, slightly inclined towards the buds. Large, elongated lower leaves should be drawn coming out of one area at the bottom of the stems, since the snowdrops are collected in a bouquet. The mass of the lower leaves approximately balances the upper fragment of the composition, where the flower petals will be located. |
| 3 | Three petals are drawn to each rounded "box", starting with the central one, closest to the viewer. The young author's attention is drawn to the pointed end of each petal. Some inflorescences are depicted open - at the end of the work, these inner petals of the snowdrop are emphasized with yellow-green paint. |
| 4 | Let's start coloring. For pure, bright tones, change the water in the container more often, use a cloth to remove excess liquid and paint. Start by coloring the background: it can be made light, monochromatic, or create a gradient color stretch. In the latter case, darken the background at the top of the composition, where the white petals are drawn. The contrast technique will emphasize the foreground. The illustration shows a gradient option from white to blue. Use a wide brush to make horizontal strokes over the entire area of the sheet, creating a smooth connection of 2 tones. Apply the paint in a thin layer so that the pencil sketch remains visible. Leave the work until completely dry. |
| 5 | Then apply green paint to the palette, add a little yellow. The resulting herbaceous shade is used to paint the leaves and flower "boxes". It is convenient to use a medium round brush. Let the layer dry. |
| 6 | The dark green tone, obtained from green and a drop of emerald, is used to paint the stems, to give shape to the "boxes", the upper and lower leaves. After this stage, the applied paint is also completely dried. |
| 7 | Apply white paint to the palette. Use a round brush to paint the petals of the snowdrops, creating each petal from 3 strokes: first, connect the first 2 at the bottom into a sharp end, then fill the unpainted area in the middle with tone. Follow the pencil lines precisely. Leave the work to dry. |
How to complete a drawing
The final stage of working with paints is called glazing. The child's attention is drawn to the importance of this moment: the composition is completed by small details, which are emphasized at the very end.
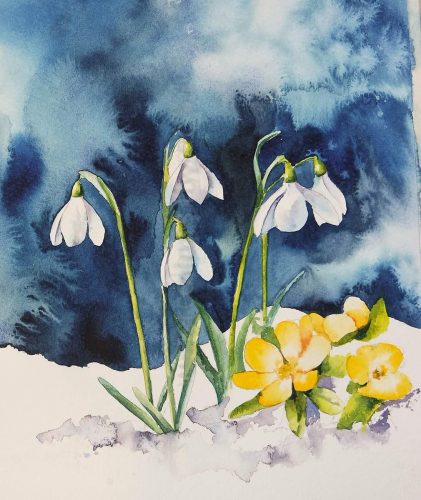
The fragments of the inner petals in the inflorescences are painted with a light yellow-green shade. Also, with 3-4 thin longitudinal strokes, part of the leaves and "boxes" are lightened. Having mixed white with a drop of blue, shadows are painted on the petals of the lower snowdrops, running a brush along the edges of the inflorescences.
In the clearing
Drawing a snowdrop is a simple lesson topic even for preschool children. The large flower is placed in the center of the sheet, surrounding the plant with an image of a spring grassy meadow.
Young artists are offered to use pencils, felt-tip pens, and crayons.
What tools will you need?
The author of the future drawing prepares the following items:
- simple hard-soft pencil;
- eraser;
- paper with a thick texture;
- multi-colored crayons, pencils, markers.
How to draw
The successive stages of work are shown in the table.
| Stage | Description |
| 1 | The center of the composition is a large snowdrop, it is placed on paper, having first outlined a curved S-shaped stem. The space for a large inflorescence is taken into account. |
| 2 | At the top of the stem, a small rounded "box" is outlined. From it, first 2 side petals are drawn, then the central petal, located at the back. Pay attention to the structure of the elements - they are drawn from 2 convex lines connecting downwards, forming a sharp end. |
| 3 | They move on to the depiction of leaves. The two lower ones start from the bottom of the stem, the upper one is drawn on the S-shaped bend of the plant's stem. Snowdrop leaves are elongated, not wide. |
| 4 | The composition is complemented with grass bushes, perhaps another 1-2 small snowdrops, and the remains of snow around the thawed patch. |
| 5 | The child colors the drawing with the chosen tools. A blue pencil is used for the bluish tint of the petals. The core of the flower is painted yellow. The grass in the meadow, the stem, and the leaves are painted in dark and light shades of green. The thawed soil is brown, and the sky is light blue. The young author can use mixed techniques in his work: transparent light tones are achieved with pencil shading, and bright fragments of the composition are depicted with felt-tip pens and wax crayons. |
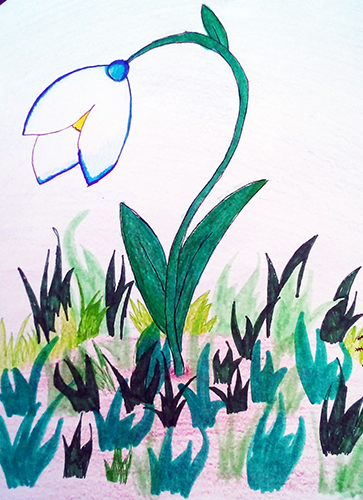
How to complete a drawing
The outline is the final addition to the color drawing. Bright blue, purple outline can be used to shade the color of the petals, a black gel pen can be used to accentuate the center of the composition - a large snowdrop.
In the basket
Snowdrop (a drawing for children is interesting for its plot) is a flower known from the fairy tale by Samuil Marshak "12 months". During the lesson, together with the children, they remember who collected the flowers and what role they played in the fate of the main characters. Then, young authors are invited to capture a basket with blue snowdrops, illustrating their story.
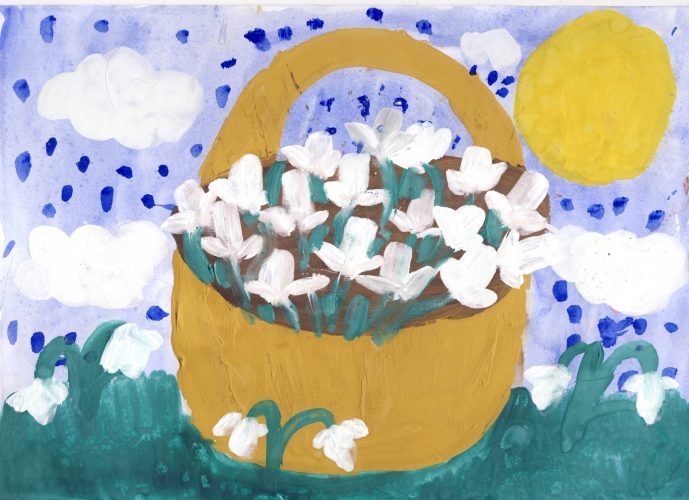
The work is done with watercolor paints - they are easy to use, the paint layers dry quickly on paper. Before coloring, a pencil sketch of the elements of the composition is made. Hard or hard-soft lead is suitable for this. They try not to use an eraser so that the paint lies more evenly.
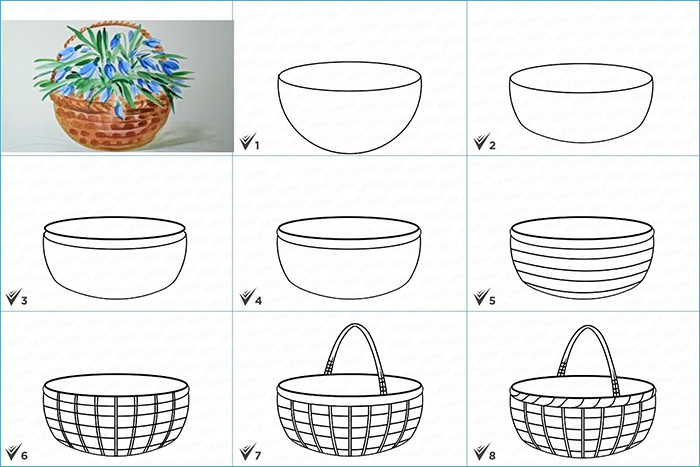
It is advisable to first practice drawing a basket on a separate sheet, taking into account the structure of the details, the interweaving of the vines. After the method of drawing and coloring the basket is clear, the child will easily repeat the image for the composition with snowdrops. For clarity, any basket or wicker texture can be examined in advance during the lesson.
The young artist's attention is drawn to the following:
- how the light falls on the material;
- a combination of light and dark areas of weave;
- the position of the object in aerial perspective (if you look at the basket from above, the inner surface becomes visible).
What tools will you need?
The following materials are placed on the work table within easy reach:
- a sheet of thick watercolor paper with a rough top layer;
- a simple pencil of moderate softness;
- round pointed brushes - medium and thin;
- foam rubber clean thin layer sponge;
- watercolor paints;
- container with water;
- rag;
- palette.
How to draw
The stages of work are described in detail in the table.
| Stage | Description |
| 1 | The composition is arranged as follows: in the lower half of the sheet, outline a semicircle with the top down; in the upper half, plan to outline a large bouquet of snowdrops with a pencil. The ends of the semicircle are connected with a horizontal narrow oval. This is the future basket, in which the inner surface is slightly visible. |
| 2 | The top of the semicircle facing downwards is smoothed with a flat line, erasing the previous one. This is the bottom of the basket. |
| 3 | The upper oval is complemented by a lower parallel line, leaving a small distance. This is the border along the edge of the basket. |
| 4 | The sides of the border are made convex - the braided edge of the basket has its own thickness. |
| 5 | Parallel convex lines are drawn across the entire front surface - these are the rows of vines. |
| 6 | Draw perpendicular lines - the texture of intertwined vines is obtained. In the middle, the vertical line is strictly rectangular to the bottom edge of the paper, the following lines along the edges are bent in 2 directions, following the rounded structure of the walls of the basket. This technique conveys the shape and volume of the object |
| 7 | At the top, draw an arched handle with twigs wrapped around it at the points where it is attached to the basket border. |
| 8 | Add oblique strokes along the edge of the basket - this is the braided border. |
| 9 | They move on to the stage of pencil sketching of flowers. They begin by drawing 15-17 inflorescences, placing them between the handle and the edge of the basket. Then they outline the mass of narrow elongated leaves. |
| 10 | Before working with watercolors, the sheet is slightly soaked in clean water - this way the shades will lay down more evenly. To do this, dip a foam sponge in clean water, squeeze it well and move the slightly damp edge horizontally over the entire surface of the sheet. You can also use a wide soft brush at this stage. Allow the paper to dry completely. |
| 11 | A thin brush is dipped in clean water, and blue cobalt or dark blue paint is applied to the palette. Each snowdrop flower is painted with 3 precise strokes, sharpening the ends of the petals. To do this, hold the brush almost vertically, pressing when drawing the middle of the petal. Then, with a quick movement, the tool is lifted, leaving a finely pointed stroke on the paper. Some inflorescences are depicted half-open. |
| 12 | On the palette, mix yellow-green and a drop of emerald paint with a clean brush. Draw the leaves and stems of the plants. The stroke begins with a light touch of the brush bristles to the leaf to begin drawing the leaf from the thin top. For the stems, the pressure on the tool should be uniform along the entire length of the element - then you will get an even, slightly thickened line. It is important not to touch the wet layer of blue paint on the petals, so as not to mix the shades. It is better to dry the work after applying each layer of paint. |
| 13 | The outline of the basket is outlined by mixing olive and sienna. If the watercolor set is limited, use brown with a drop of green. The paint on the palette is diluted until it is light brown. |
| 14 | Adding a little orange to the brown, paint the surface of the basket with longitudinal rounded strokes. Avoid repeatedly brushing over the wet layer of paint to prevent the paper from collecting into pellets. Dry the sheet of paper. |
| 15 | A denser brown-orange color is applied in square strokes, depicting the interlacing of the vines and the convexity of the border. The density and thickness of the watercolor tone appears when a minimum of water is added to the paint. The structure of the outer wall of the basket is emphasized with thin horizontal lines parallel to the border. |
| 16 | Short oblique strokes of the same tone are applied to the basket handle and edge. After washing the brush, the petals are shaded with dark blue. Emerald green adds volume to the "boxes" at the top of the inflorescences, leaves, and stems. |
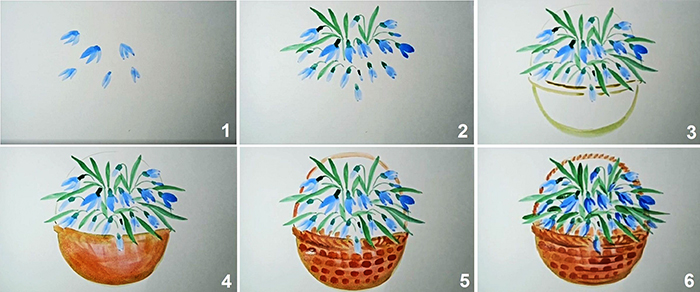
How to complete a drawing
To give the work even more volume, the white space between the flowers inside the basket is carefully painted dark brown. The unpainted fragments between the leaves and inflorescences are filled with dark green short strokes, depicting the leaves inside the bouquet.
Additionally, you can shade the petals using a thick cobalt tone. The work is completely dried to prevent the paint from flowing and mixing the colors of the elements.
Drawing flowering plants is a fascinating activity; on walks with your child in spring and summer, you can watch the growth of flowers and grass. In the future, such observations will help the young artist successfully depict floral compositions. Mastery appears over time - therefore, adults should more often pay attention to successful moments in children's works, praise the author.
A snowdrop drawing is a simple image of a spring plant, attractive in its delicate coloring. It is interesting for children to master the skill of drawing a snowdrop first with a pencil, then create a large composition with a bouquet of flowers, painted with paints.
Video about drawing
Master class on painting snowdrops with gouache: