Polymer clay flowers have been used for decoration since 1974. They look like real ones and will not fade for 8-10 years. Beginners often mistakenly believe that creating flowers from cold porcelain – is a very difficult task. To dispel doubts, you need to look at several detailed master classes and learn how to prepare the mass for modeling yourself.
Making polymer clay for crafts
Polymer clay has a consistency similar to soft plasticine. It contains a viscous substance that gives off moisture well at high temperatures and allows the mixture to harden. This component is called polyvinyl chloride, or PVC for short.
Material with this ingredient is produced and sold on an industrial scale. High-quality polymer clay is expensive, so experienced and thrifty craftsmen have learned to prepare plastic material with their own hands from simple and affordable ingredients.
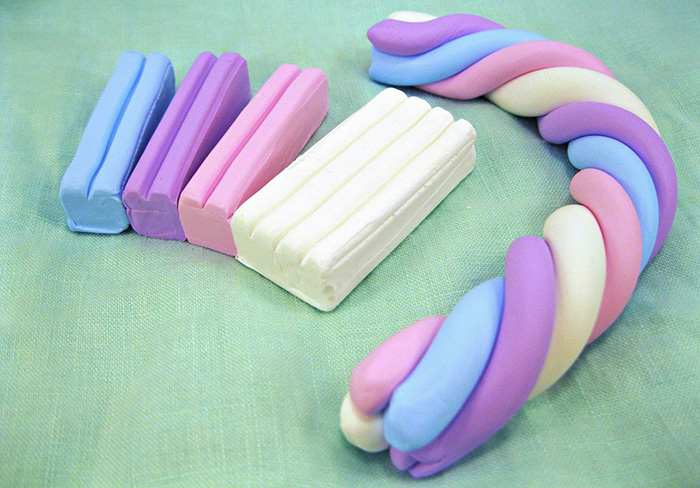
Homemade polymer clay has a number of advantages, for example, crafts do not need to be baked in the oven. The mass hardens at room temperature. The duration of hardening depends on the size of the product. During the molding process, you can add coloring pigment and get the mass of the desired shade.
The homemade material turns out soft and pliable. It is suitable for classes with children and for beginners who have just begun to master the art of modeling. When hardening, the mass becomes slightly transparent, so very beautiful flowers are made from it.
When stored properly, the mass remains suitable for modeling for about 60 days. The shelf life of finished products is 5 years. If you cover them with a layer of varnish or store them under glass, then the crafts will begin to deteriorate only after 10-15 years.
Ingredients
Homemade polymer clay consists of 4 components:
- oil;
- starch;
- glue;
- fatty cosmetic cream.
To ensure that the mass is of high quality, all ingredients must be selected correctly.
Oil is necessary for the plasticity of clay. Vegetable or olive oil intended for cooking is not suitable, as it has a yellow tint, which will negatively affect the color of the finished product. Experienced craftsmen recommend using cosmetic baby or massage oils without color.
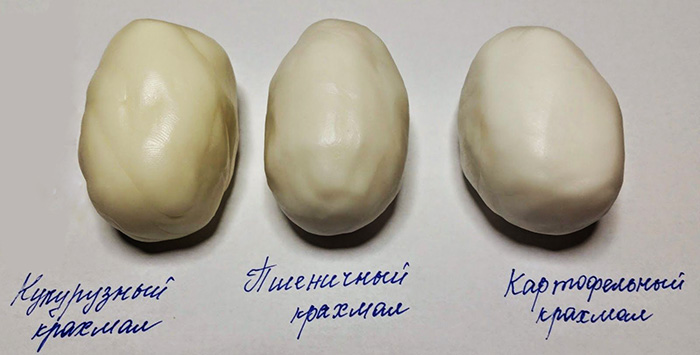
Starch serves as a filler. Potato and corn flour have different grain sizes, which affects the quality of the finished product.
For making small figurines or jewelry, it is recommended to use corn starch. It is finer and tolerates varnish or other paints well. Potato starch is more suitable for large crafts. The mass prepared on its basis hardens quickly, and the products are strong and resistant to chipping and cracking.
Glue is needed as a binding agent. It should be transparent or white. Chancellor's liquid glue is suitable for creating small figures, and for large items you need construction PVA. It can be purchased in powder and diluted in a separate container before cooking.
Liquid PVA is considered a good option for gluing wood. The most durable products are obtained from the mass prepared with such glue.
A fatty cosmetic cream prevents the finished mass from sticking to your hands and the sides of the dish., in which it was prepared and planned to be stored. It is desirable. The cream should be transparent. It should not contain silicone.
Step-by-step instructions for preparation
Therefore, according to the recipe, you can prepare a modeling mass based on potato or corn starch.
In what proportions to add ingredients:
- oil – 20 ml;
- starch – 110 g;
- cream – 10 g;
- glue – 110 ml.
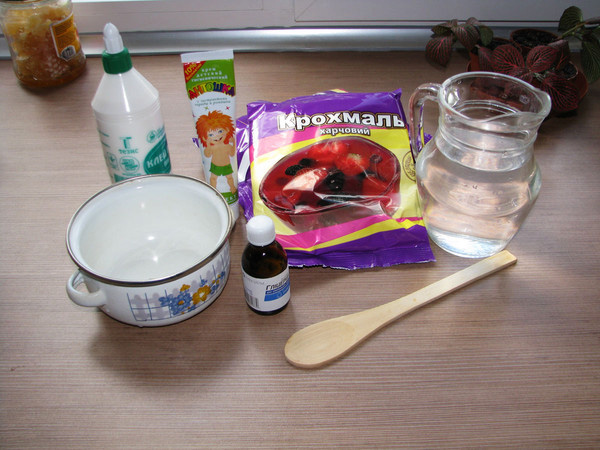
Additional tools and containers:
- glass bowl resistant to high temperatures;
- aluminum or enamel basin;
- a piece of cotton fabric;
- latex gloves;
- small towel;
- plastic cutting board;
- sturdy plastic spoon;
- plastic bag;
- silicone rubber.
Step by step instructions:
- Wash the bowl and dry it completely so that no moisture remains at the bottom.
- Pour water into a basin and place a piece of fabric on the bottom so that the glassware does not rattle when the water boils. Place a bowl in the middle.
- Put on gloves.
- Grease the cutting board with oil.
- When the water is hot, pour the glue into the bowl.
- Immediately add the cream to the glue and mix until smooth.
- Add a little to the mixture and mix thoroughly.
- Now, while actively stirring the mixture, you need to carefully pour in the starch.
- Stir the mixture until it begins to form lumps that stick together and form a viscous consistency.
- Place a towel over the bowl to prevent the latex from melting on the hot glass, and remove the container from the basin.
- Transfer the mixture from the bowl to a cutting board. Let it cool for 2 minutes. Start kneading it with your hands like dough. Be careful, the clay should not burn your hands too much.
- After 5 minutes of kneading, you need to check the readiness of the mass for modeling by rolling it into 1 large ball. If no folds or bubbles form on it, then the polymer clay is ready.
- Grease the ball with cream and leave to cool for 40 minutes.
It is convenient to store polymer clay in a cellophane bag. Place the ball inside, squeeze out the air from the bag and tighten the ends with a rubber band. Avoid direct sunlight and high temperatures (above +23 degrees).
Tips for working with polymer clay, necessary tools
To work with polymer clay, you need various tools, their names and areas of application can be seen in the table:
| Tool | What is it for? |
| Stationery knife | To cut the modeling clay into even pieces and to create relief |
| Toothpicks and needles | For making small holes and pressing out patterns |
| Rolling pin | To roll polymer clay into thin sheets |
| Curly shapes | For cutting out even shapes or embossing patterns |
When you don't have the right tool, you can replace it with something you have at hand. Instead of a stationery knife, you can use blades. They are flexible and cut more accurately. To avoid cutting yourself on the top, you can seal the blade with a piece of polymer clay and dry it, or glue thick cardboard wrapped with tape to this place.
The rolling pin can be replaced with a bottle with smooth sides. If you need to roll out a small piece of clay, you can put it between 2 sheets of glossy paper and press it down with something heavy and flat.
You can make the figured forms yourself by cutting them out of tin cans. The can is cut lengthwise, the bottom and neck are cut off. Across, they are marked into strips 1 cm wide, then cut along the marked lines. Now this strip can be given any shape.
To color polymer clay, during modeling, the desired piece is rolled into a layer and dye is dripped into the center. Then the clay needs to be kneaded well so that it is colored evenly. You can use food coloring, acrylic paints, makeup or gouache.
If the product is planned to be painted after hardening, then you will need artistic brushes of different thicknesses. It is important that the bristles do not come out of them, they can spoil the appearance of the craft.
Master classes for beginners on making flowers from polymer clay
Flowers made of polymer clay (for beginners it is important to practice creating simple shapes, petals, stems and other elements) are beautiful and resemble real ones. Petals and buds look especially good, since after hardening the homemade modeling mass becomes translucent.
Polymer clay flowers can be used to decorate a room or to give to friends as a souvenir. They can be used to decorate hairpins, make a brooch or other decoration. You can read further in the article how to properly sculpt beautiful flowers.
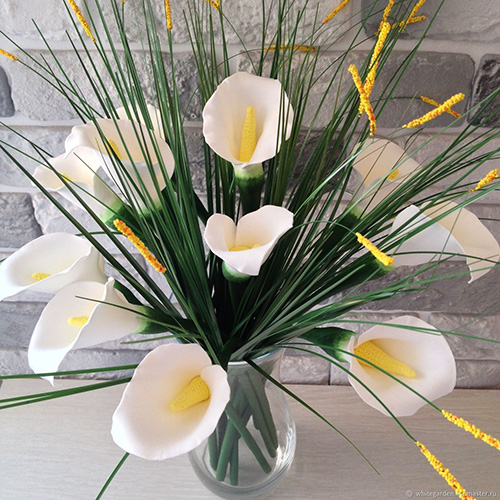
Callas
To make a calla flower, you will need:
- white polymer clay;
- acrylic paint in yellow, dark green and white;
- thick wire 25 cm long;
- green floral tape;
- scissors;
- small brush;
- transparent PVA glue;
- 3-4 sheets of A4 paper;
- scotch;
- carpet sweeper;
- sieve;
- flour.
Step by step instructions:
- Wrap the wire with paper and secure it with tape. The stem thickness should be 1 cm.
- Cut a small piece of clay from the total mass, roll it out and add yellow dye. Knead well.
- Apply yellow clay to the end of the wire on the side where the tsichonki will be. The layer should not be too thin. Give the mass a conical shape, round off all the edges.
- Use a brush to create relief on the stamen.
- Coat the yellow clay with glue and sift flour onto it through a sieve, turning the stamen in different directions. Leave until the glue dries completely.
- To form a petal, roll out a piece of white polymer clay into a round layer. Pull the tip from below. Now the shape of the layer should resemble a drop.
- Stretch the edges to form folds.
- Attach the stamen to the wide side of the "drop" so that it is in the middle. Its lower edge should not protrude beyond the petal.
- Coat the base of the stamen with glue and cover it first with the left edge of the petal, then with the right, overlapping.
- Bend the edges of the petal outward and pull the narrow tail upward.
- Wrap the stem with green ribbon.
- Cut a piece of polymer clay and paint it green.
- Spread the clay over the stem.
- Leave the product to dry for at least 48 hours.
When the flower has completely hardened, you need to tone the middle and edges of the petal with paints.
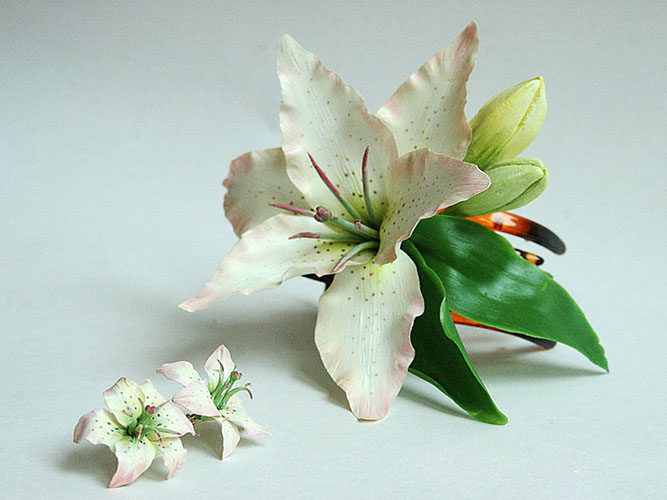
Lilies
Polymer clay flowers for beginners consist of large parts, they are easier to work with. The lily has large but elongated petals. The clay may harden incorrectly, and their shape will be deformed, so for work you will need thin wire that will hold the shape well.
What other tools and materials are needed:
- polymer clay white and green;
- yellow and green acrylic paint;
- thick paper;
- stationery knife;
- thick wire;
- rolling pin;
- PVA glue;
- clean sponge for washing dishes.
Step by step instructions:
- On thick paper you need to draw the contours of 6 petals. 3 of them should be wide, and 3 – thin and narrow. Cut out the blanks.
- Roll out the white polymer clay into 1 large layer.
- Place the paper templates on the layer and carefully cut them out with a knife, repeating all the bends. Crumple the edges to form waves.
- Cut thin wire into 6 pieces according to the size of the workpiece. Leave 3 cm in reserve and roll each of them in the remaining clay.
- Now, using a dish sponge, you need to squeeze out the texture on both sides of the petals.
- Use toothpicks to make grooves in the middle.
- On the back side, coat the petal with glue and attach pieces of wire.
- Give the petals a curved shape and leave to dry. To prevent the shape from deforming, you can place the blanks on a cardboard tube from a roll of wallpaper.
- Cut 6 more pieces of wire and roll them in clay. These will be the stamens.
- Roll the end of the thick wire for modeling the stem in clay. It should be thicker at the top than at the bottom. Give the wide end the shape of a pestle.
- Leave the stamens and pistil to dry for 4 hours.
- Now roll the part of the wire where the stamens will be placed with green clay. Make a recess for each of them, then glue the thin wire with PVA glue.
- Use acrylic paints to tone the dried petals and the core of the flower.
- Attach the petals to the stem, twist the wire, and cut off the excess with wire cutters.
- Mask the joints with green polymer clay.
- Coat the stem with green clay and leave the flower until completely dry.
The stem can be decorated with 3-4 sharp green leaves.
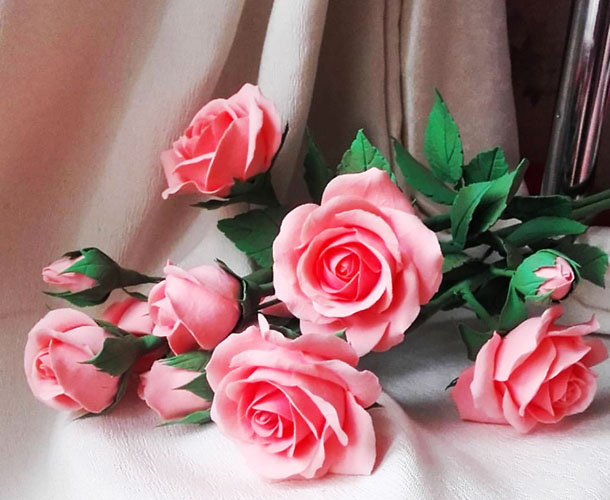
Roses
Polymer clay flowers may seem difficult to make for beginners. The rose in particular seems like a complex, multi-layered flower. In fact, it is very easy to make.
What materials and tools will be needed:
- polymer clay pink and green;
- PVA glue;
- green floral tape;
- thin wire;
- thick wire;
- toothpicks;
- thick paper;
- scissors;
- stationery knife;
- rolling pin;
- large bead.
Step by step instructions:
- Roll 19 balls slightly larger than a pea from a piece of pink clay.
- Set 1 ball aside and roll the rest into thin layers.
- Use a stationery knife to cut out the petals. You can do without a knife and shape the petals with your fingers. Make the edges wavy.
- Use toothpicks to press out veins and grooves on each petal.
- Place the remaining ball on the end of a thick wire and shape it into a drop. The narrow side should be facing up.
- Cover the core with 1 petal so that its edges rise above it by 1-2 mm.
- The next 2 petals should be arranged in a similar manner.
- The 3rd row consists of 3 petals, which need to be slightly bent outward.
- There will be 5 petals in the 4th row. Each of them needs to be bent, and the edges carefully twisted on toothpicks so that they take a natural shape.
- The last row consists of 7 petals. They need to be designed in the same way as the previous ones.
- Draw a flower cup with 5 narrow leaves on thick paper. Cut out the blank.
- Roll out the green clay into a layer, apply the template and cut out a bowl from the clay using a stationery knife.
- Use a bead to press a depression in the center. Cut out teeth along the edges of each green leaf.
- Grease the concave side of the bowl with glue, pierce the middle with a stem and pull the piece through the wire to the bud.
- Wrap the stem tightly with green floral tape.
All that remains is to dry the flower and put it in a vase.
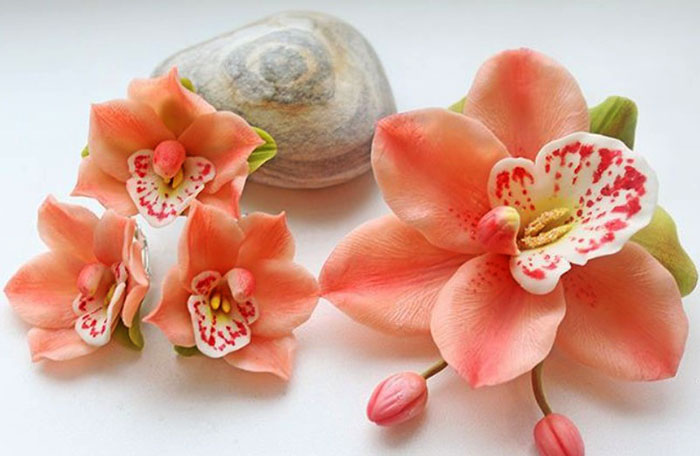
Orchids
This master class describes the process of making 1 flower. If you need to assemble a branch of an orchid, you will need to make several buds and flowers, then attach them to a wire wrapped with floral tape.
Materials and tools for work:
- white polymer clay;
- rolling pin;
- stationery knife;
- sandpaper with coarse and fine grain;
- dry artistic pastel pink;
- acrylic paints in yellow, pink and green;
- 2 art brushes, thin and thick;
- hard brush;
- 2 sheets of thick white paper;
- Scissors;
- scotch.
Step by step instructions:
- Draw orchid petals on a sheet of paper. Cut out the blanks.
- Roll out the polymer clay into 1 layer 5-7 mm thick.
- Place the blanks on the clay and use a craft knife to cut out the petals.
- The edges of all the petals need to be carefully cut with a knife at an angle of 45 degrees. Smooth all the cuts with your fingers.
- Draw the outline of the core on paper, place it on a layer of clay and cut out.
- Process the edges as in point 4.
- Crush the pink pastel, wet a thick brush in water and apply the pigment to the center of the flower.
- Use a hard brush to create relief on the petals and core.
- Assemble the flower by first laying out 3 thin petals, then attaching the wide ones. Fix the core. For reliability, coat all the joints with glue.
- Roll a small ball out of clay, make a depression in it and fix it in the center of the flower. This will be the stamen.
- Roll paper tubes with a diameter of 1-2 cm and secure with tape. Place them under each petal. Leave the flower in this position until completely dry.
- Using coarse sandpaper, carefully remove any uneven areas along the edges of the petals.
- Paint the petals with pink acrylic paint, wash off the pigment with a brush after 10 minutes. It should be partially absorbed and the petals will be spotty.
- Use fine sandpaper to remove any unevenness from the outer part of the petals.
Cover the orchid with clear varnish and wait until it dries.
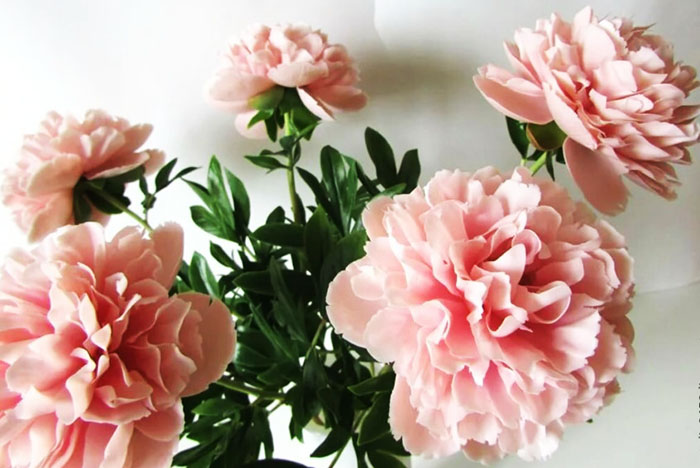
Peony
Polymer clay flowers (for beginners, it is recommended to practice creating thin details) with a large number of petals can be made without a core. The middle of the flower in this design will look like a bud that has not fully opened.
To make a peony you will need:
- thick wire for the stem;
- foil;
- PVA glue;
- polymer clay of white, light pink and green colors;
- green floral ribbon;
- knitting needle.
Step by step instructions:
- Crumple the foil into a drop shape. Pierce the wide side with a wire, drop some glue into the hole and place it on the stem.
- Coat the foil with white clay, making all edges rounded.
- Roll the pink clay into a sausage and cut into pieces of different sizes, from 1 cm to 3 cm. You will need about 30 pieces.
- Roll each ball and shape it into petals. Then twist the petals from the upper edges using a knitting needle and make waves.
- Grease the white clay blank with glue and attach 3 petals so that they imitate an unopened bud.
- Then, connect the other petals from larger to smaller, similar to a rose.
- Coat all joints with glue.
- When the flower head is ready, you need to hang it by the stem downwards and wait until the material has completely hardened.
- Wrap the stem with green ribbon and coat with clay of the same color.
Leave the peony to dry. You can use acrylic paints to tone the petals, imitating highlights and shadows.
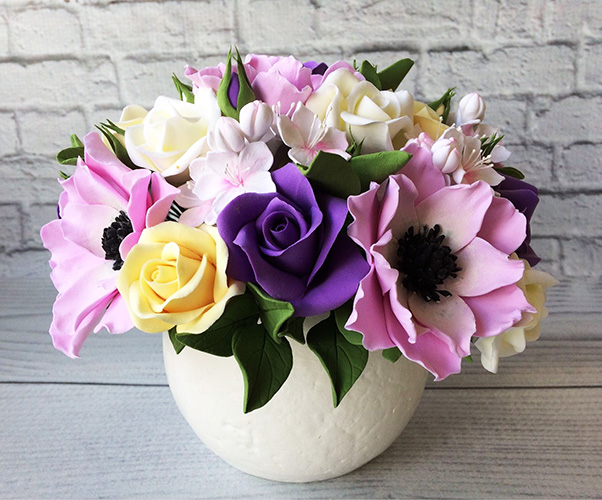
Bouquet of flowers
A beautiful bouquet can be made from 5-7 flowers, which are described earlier in the article. These can be only roses or peonies, or a mixture of different types of artificial plants.
To make the bouquet look festive, like from a flower shop, you need to add a couple of branches with small white flowers. They are called gypsophila. Florists use them as a small accent in the bouquet, which gives the effect of tenderness and lightness to the entire composition.
To make gypsophila you will need:
- thin wire in green plastic (sold in florist shops);
- PVA glue;
- green floral ribbon;
- hard brush;
- white polymer clay.

Step by step instructions:
- Cut the thin wire into 4-5 different pieces, 10 to 18 cm long. Gather it into a “bouquet” and tie the connection with a green ribbon.
- Roll balls of clay smaller than a pea. You need as many as there are ends on the wire.
- Give each ball a relief using a hard brush.
- Coat the wire with glue and place 1 ball on each end.
When the balloons are dry, you can assemble the bouquet.
Polymer clay allows you to mold flowers of any shape and size. Beginners should buy special molds with veins for leaves and petals to make the work easier. The finished petal is applied to the board with relief and carefully removed. The result is realistic grooves and veins.
Video about polymer clay flowers
Master class on making a bouquet of flowers from polymer clay: