Creativity allows you to develop imagination, fine motor skills and realize the child's self-awarenessBy drawing pictures related to space - planets, the solar system, astronauts, spaceships, children begin to understand the involvement of man in great events, what the universe is, and how endless it can be.
Drawing tools
To start drawing, you need to buy everything for this process. This will allow you not to be distracted by unnecessary actions and devote yourself to creativity.
In addition to the album sheet, the main materials and tools are:
| Tools and materials | Description |
| Brushes | Brushes are needed if the drawing is going to be watercolor. They make the drawing dynamic, allowing you to correctly place color accents. The shapes of painting brushes can be different: · for wide strokes, round brushes with a sharp end made of long, hard bristles are more suitable; · round brushes with short bristles are great for drawing small details; · Flat tools are designed to cover a large area of the canvas with a layer of paint. The most expensive and high-quality brushes are made from kolinsky hair. However, at first it is better to use products made from synthetics or squirrel hair. |
| Paints | The paints most often used are regular, water-based. They combine well with other materials, such as wax crayons. They do not mix in texture, and this creates an interesting effect. |
| Simple pencil | You can choose soft pencils, after making sure that the lead does not break with every touch.
To make the lines even, not very thick, but clear, pencils should be sharpened well. |
| Colored pencils | Colored pencils from different brands may have different shades of the same color, so it is worth checking them on a rough sheet of paper first.
If you need wax pencils or crayons for your work, you can only use them to create the internal structure of the drawing. |
| Eraser | It is better to buy a high-quality and soft one. It removes incorrectly drawn lines well. |
| Mixing and sharpening tools | You can use your fingers for this purpose, but it is better to buy a sponge or cotton pads. They are used for mixing colors and getting the desired tone. |
Master classes
One of the famous spring holidays is considered to be the Cosmonautics Day. Modern children understand what space is, who the cosmonauts are and they draw them with pleasure. There are several options for creating such pictures and all of them are interesting.
Cosmonautics Day has always been a reason for residents of our country to be proud of their people and their culture. After all, the first person to fly into space was Russian. And our cosmonaut was also the first to go into outer space, and at first one scientist created a rocket. He was called a science fiction writer, but Tsiolkovsky firmly believed that people would fly far beyond the Earth.
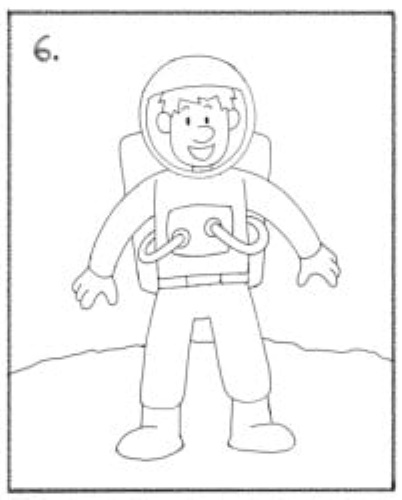
Astronaut on the Moon: Pencil Drawing
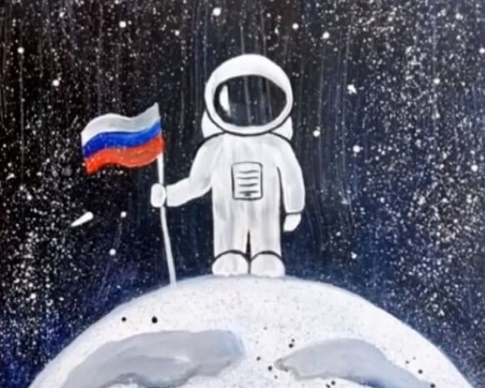
An astronaut (a drawing for children can be done with just one pencil) on the moon can be depicted if you follow these steps:
- Visually divide the sheet of paper into 3 parts and mark a circle in its uppermost part. It will be the helmet that the astronaut wears. Make a hole inside that will represent a glass window for the face.
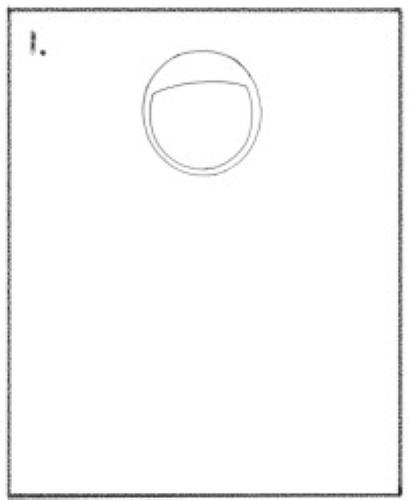
- Draw the face of a courageous person inside the glass hole. It can be sad, surprised or happy. The artist must create the mood himself. The facial features can also be different, large or small, because people are different.
- Draw the eyes as 2 circles, the mouth as an inverted comma and the nose as 2 dots with a crossbar.
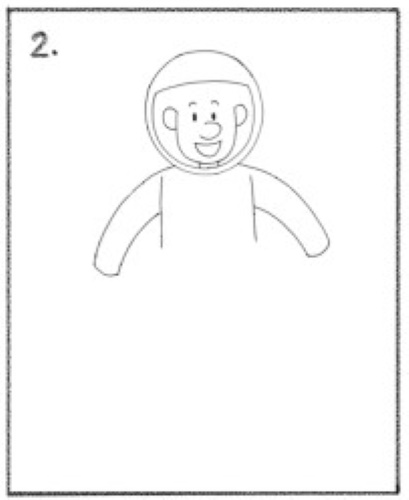
- Go to the image of the arms and body. The arm is made at first as 3 elongated tubes: one thicker, and the other 2 shorter and thinner.
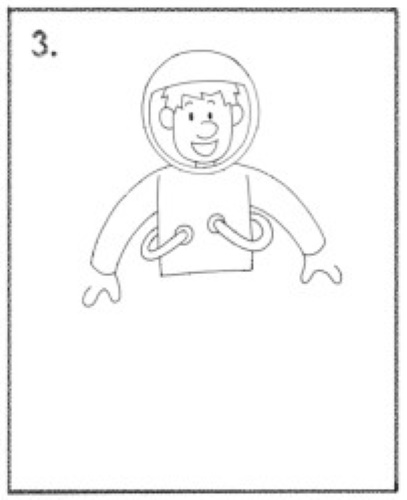
- Draw the tubes that connect the astronaut's head to the oxygen. Special attention should be paid to drawing the arms and hands. The thumb and index finger are especially highlighted.
- Finish the head by drawing the hair inside.
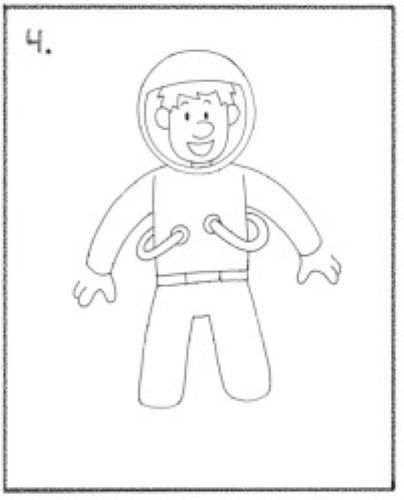
- Having paid attention to the arms and made their outline complete, move on to the legs and belt.
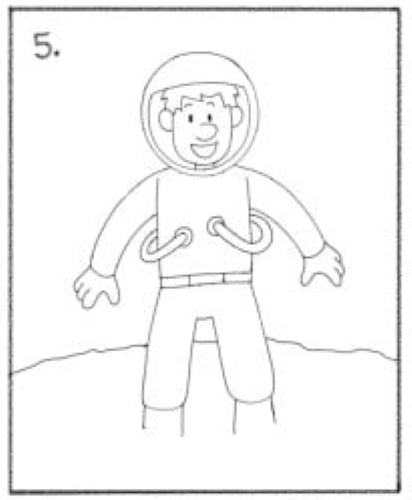
- To indicate the space around the astronaut, draw a line that indicates the lunar surface. The astronaut stands on it in voluminous boots. They should also be carefully drawn.
- Having finished working with the boots, finish the details. In particular, depict the oxygen tank behind the astronaut's shoulders. Attach 2 tubes to it, attached to the chest.
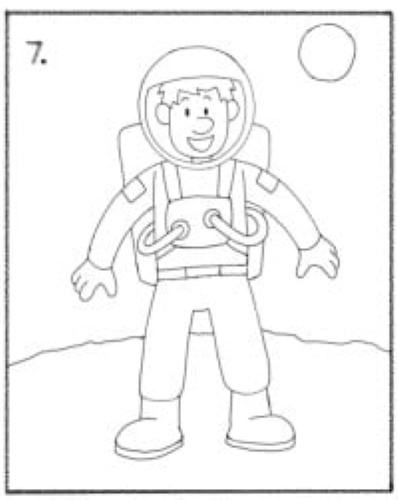
- Work on the details, adding the thick soles on the boots, the emblem patches, the straps to hold the oxygen tank, and leave some space in the top corner to outline the Earth.
- Draw individual elements: stars in the sky, make the Earth clearer, cracks in the lunar soil and folds in the astronaut's suit.
- All this will give the picture a natural look.
- Color the resulting drawing or leave it black and white.
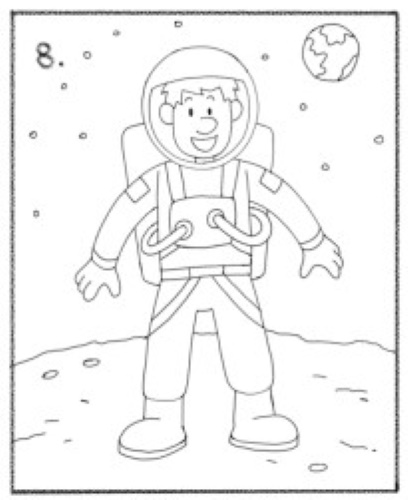
Ready.
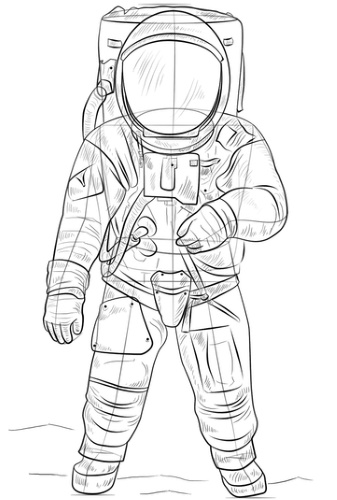
Colored drawing
An astronaut (a drawing for children can be done with or without adults) in color can be depicted if you follow these steps:
- Create the outline of the top of the spacesuit and helmet.

- This is done with a simple pencil using dashed lines. Draw the pants and the oxygen container behind the back in the same way.
- Using smooth lines, create the outline of the head, arms and hands, drawing the fingers.

- Depict the astronaut's face, ears and hair in detail. It is not necessary to create a clear heroic image, you can make it cinematic or cartoonish.
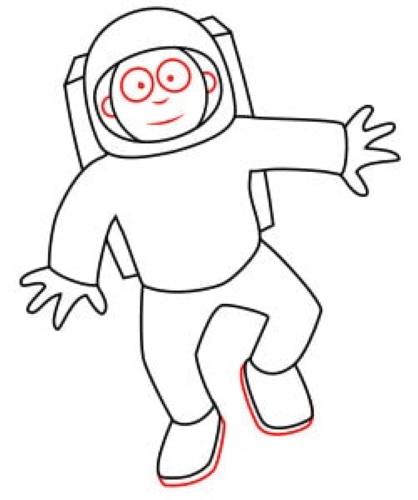
- Draw the boots and their thick soles.
- Draw the belts for the oxygen apparatus, the antenna and other small details.
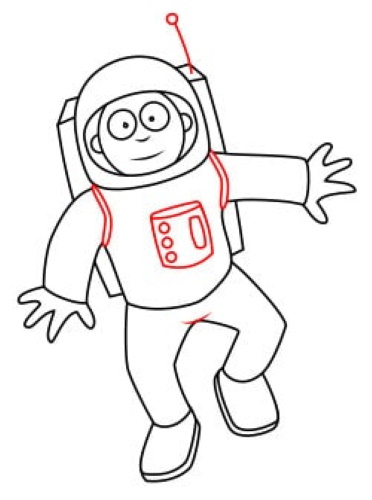
- To make the image dynamic, make the drawing colorful by adding a few colored strokes.
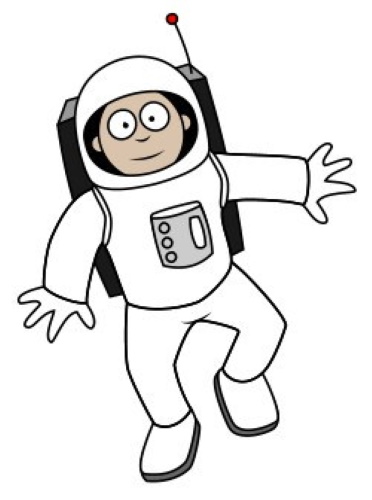
- Bring the spacesuit to life with chiaroscuro. This will give the necessary volume and make the painting dynamic. It is better to make shadows in the lower part of the painting.
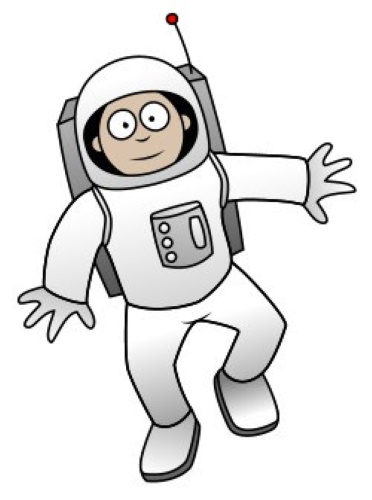
- To mark the folds on the suit, as if the astronaut were moving in airless space.
Ready.
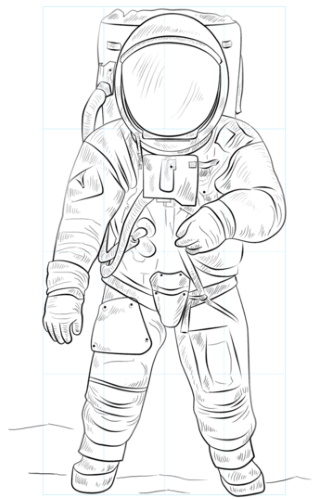
Going into space
A more complex version of the drawing is suitable for older children. In some cases, adults can help them. First, you need to draw a grid using a simple pencil or print out a translucent hatching from a computer.
Further, the actions proceed according to the following stages:
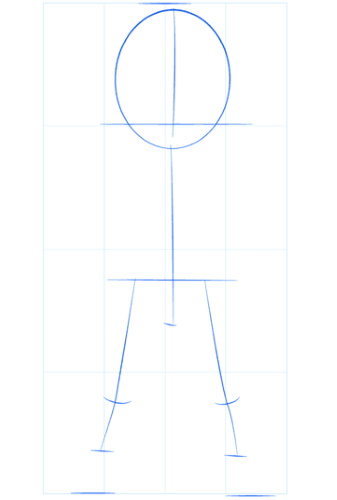
- Create a rectangle inside the grid. It will become the frame of the painting, setting certain proportions and a border.
- From the very center, draw several lines, one of which is vertical, the other is horizontal. They will divide the interior space in half. In the same way, create 2 vertical and horizontal lines inside each of these rectangles.
This was preparatory work for creating the drawing.
Next, you can proceed to the main process, which is as follows:
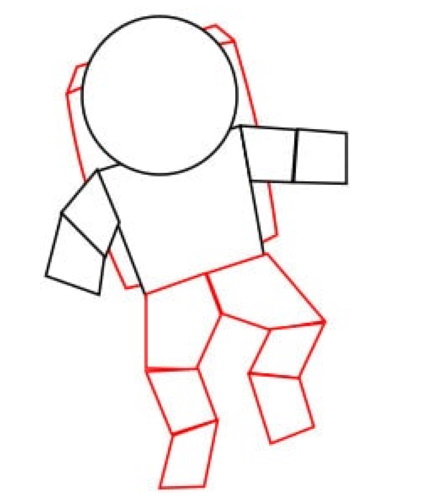
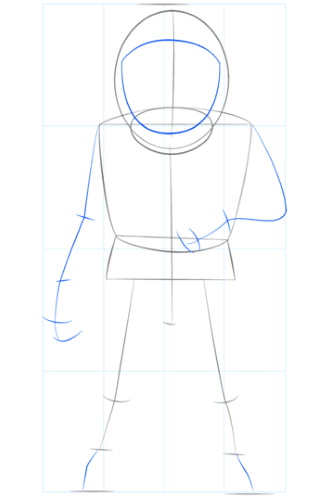
- Outline the future proportions of the astronaut by creating the outlines of the body, an oval for the helmet and head, 2 stripes for the arms and legs. The oval should match the proportions of the body. It is slightly enlarged to create the helmet. To find the center, another line is drawn.
- Draw more clearly the outline of the body and neck leading to the helmet.
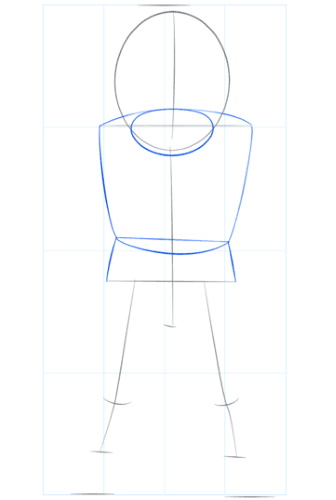
- Create additional volume for the person's arms and legs and draw glass on the helmet to protect him from the outside world.
- Give the limbs the desired shape and direction of movement.
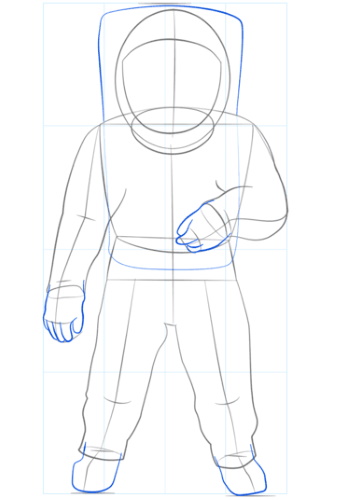
- Create gloves on your hands and cover your feet with boots. They are quite voluminous and powerful in appearance.
- Draw an oxygen tank and the tubes coming from it.
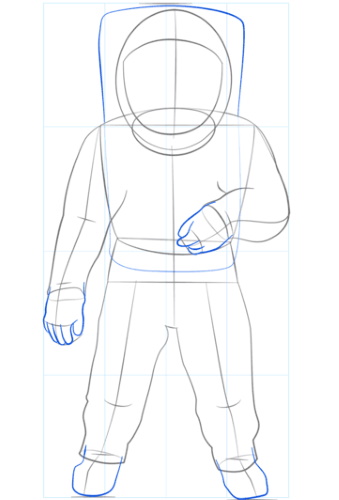
- Draw the spacesuit more clearly, adding fold lines and light and shadow.
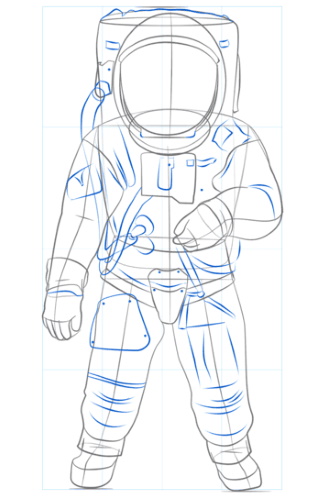
- Draw small details that make the astronaut's figure lively and real.
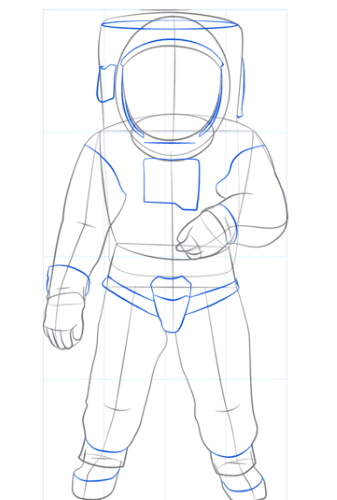
- Outline the contour in the right places, where necessary making the lines thicker or thinner. Erase all unnecessary lines, and make a surface under the astronaut's feet on which he steps.
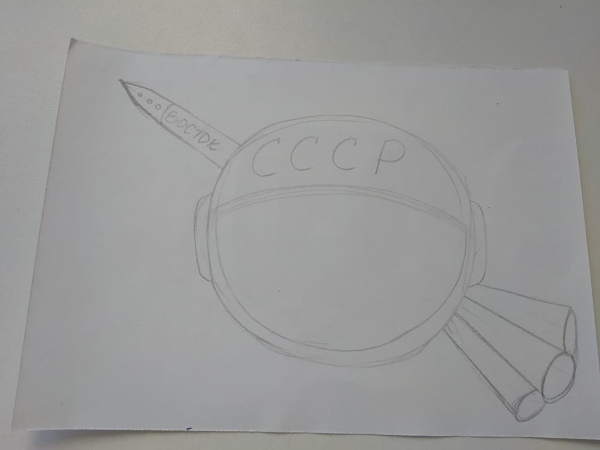
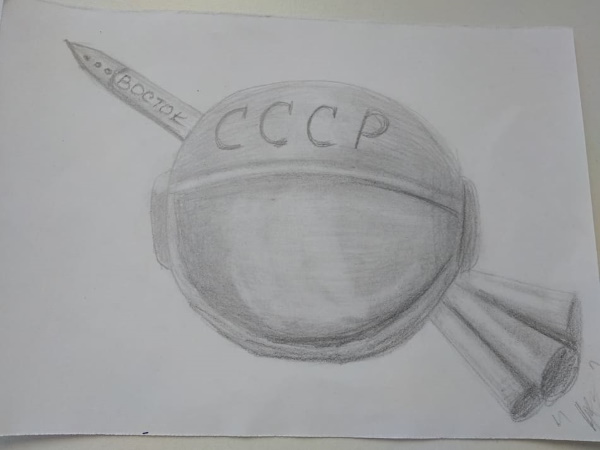
The astronaut and his helmet
The drawing for children can be supplemented with various elements, for example, an astronaut's helmet, which is of historical value. If desired, you can draw separately the legendary helmet of the first astronaut.
To work you need to prepare:
- album sheet;
- pencil;
- ruler;
- eraser.
The step-by-step method for creating the image will be as follows:
- Prepare half of the album sheet. It will help you better understand how to distribute the proportions of the drawing.
- Draw a circle in the center of the sheet.

- It may not be very correct, but the main thing is that the child tries. Not everyone has perfect circles, even adults.
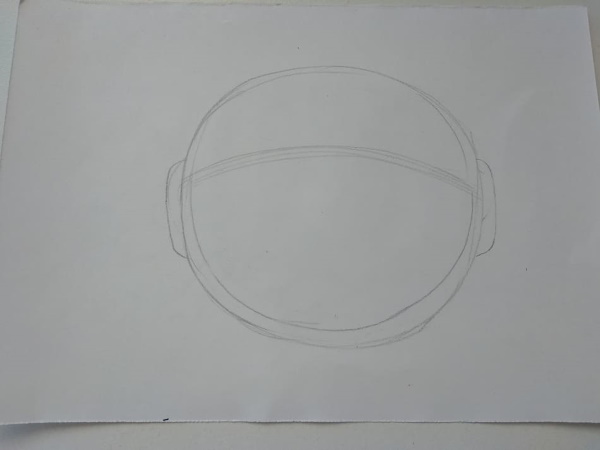
- Draw a double line in the chin and forehead area. On the sides, make a slightly rounded segment for the ears. If desired, make the inscription USSR on the helmet.
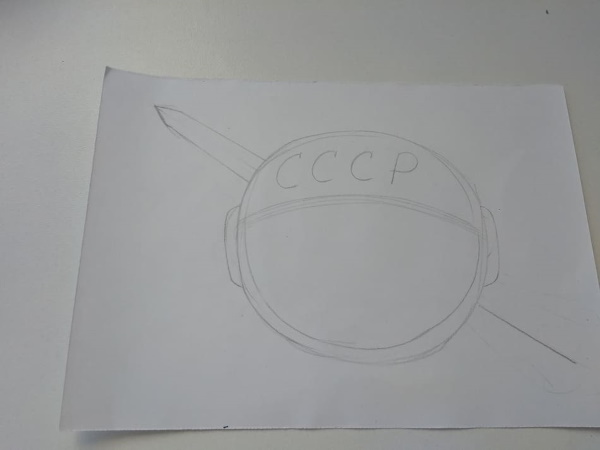
- Draw a line for the rocket. It should be straight and have the appropriate proportions. A ruler can help with this. The nose will be slightly pointed, and the length will not be too long.
- Draw turbine nozzles at the bottom of the rocket. It is better to make 3 of them, because the 4th will not be visible. The name on the rocket is better "Vostok", as it was historically.
- Cover the surface of the helmet with hatching, first using thin lines, then thicker ones.
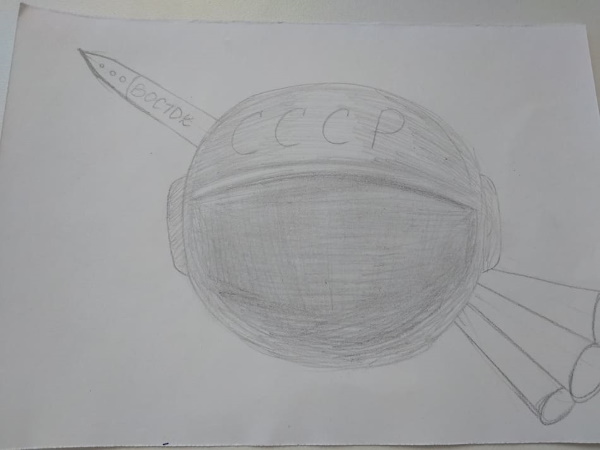
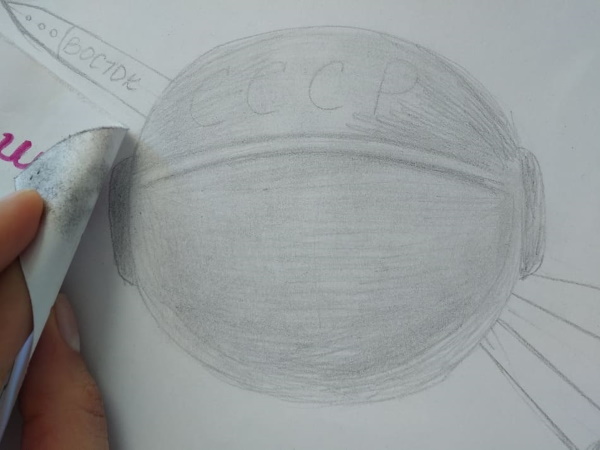
- You can make the surface uniform and matte using a piece of paper. You need to rub the pencil with it, it will turn out very beautiful. You need to work carefully so as not to go beyond the edge of the drawing.
- Erase all unnecessary things, but you should teach the child to do everything correctly so that there are fewer corrections.
- To mark the shadows. To do this, the sides of the helmet are unevenly shaded from bottom to top. The forehead line is highlighted with chiaroscuro.
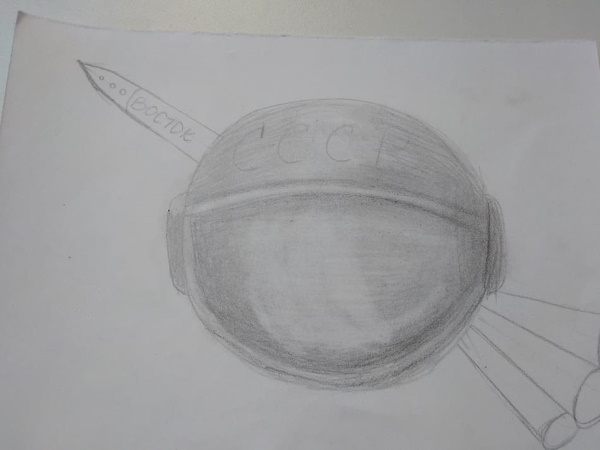
- Using an eraser, carefully go over the drawing in a semicircle.
- Paint the rocket in the same way. The bottom of the turbine is made a little darker, as are the sides. The middle should be lightened with an eraser. This will give it the desired shape and volume.
- Correct the details and inscriptions, erase all unnecessary lines and insert into the frame.
Drawing on the theme of astronautics for kindergarten
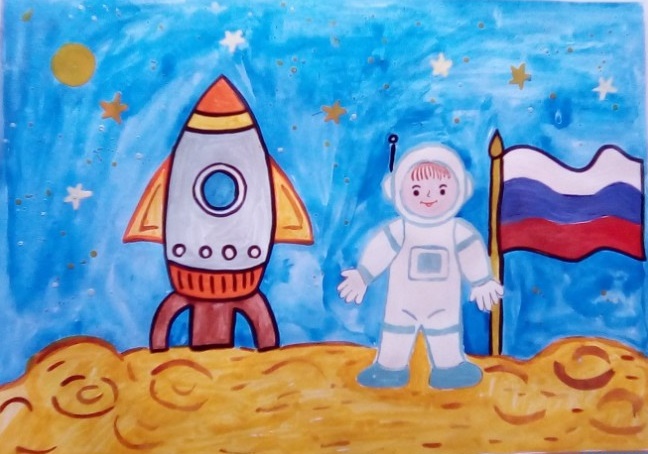
An astronaut (a drawing for children can be done with watercolors or gouache) or a spaceship can be offered to be depicted by children of the senior group of kindergarten. They already understand what space is, but do not yet know how to create the necessary forms.
Such work in kindergarten, in addition to the cultural and educational task, also has a physiological one. The children develop fine motor skills and therefore it is useful for them to draw not only with a pencil, but also with palms, fingers or loose substances.
To work you will need:
- a sheet of thick paper;
- paints;
- brush;
- water.
The steps to create an image are as follows:
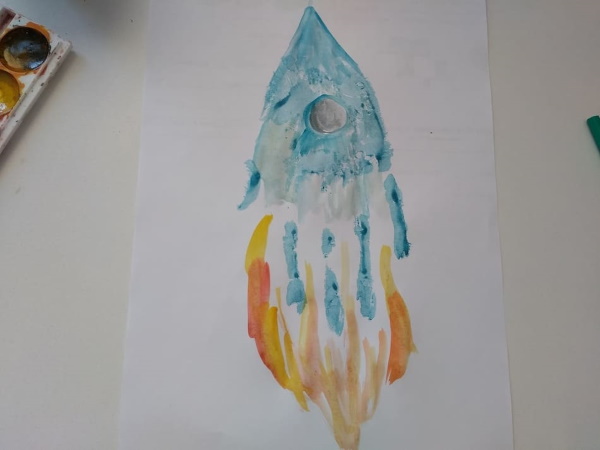
- Place the sheet vertically. Having stained the palm with blue paint, make a print on the sheet. It should remain wet, and the palm is immediately washed in a nearby container of water or under the tap.
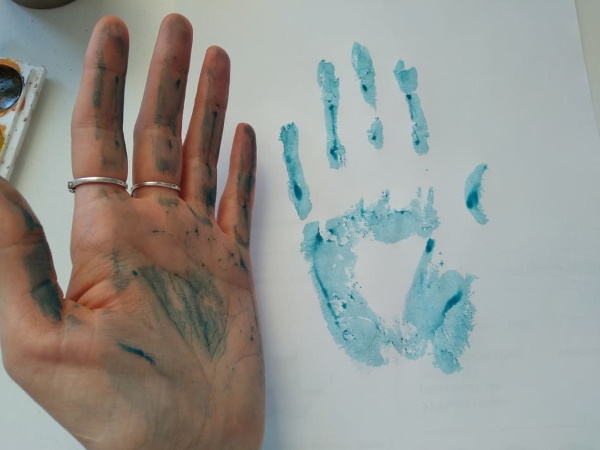
- Adjust the imprint to the shape of the rocket. It is better to do this with blue paint. It is used to make a corner at the base of the imprint. The image itself will be turned upside down so that the fingers remain at the bottom.
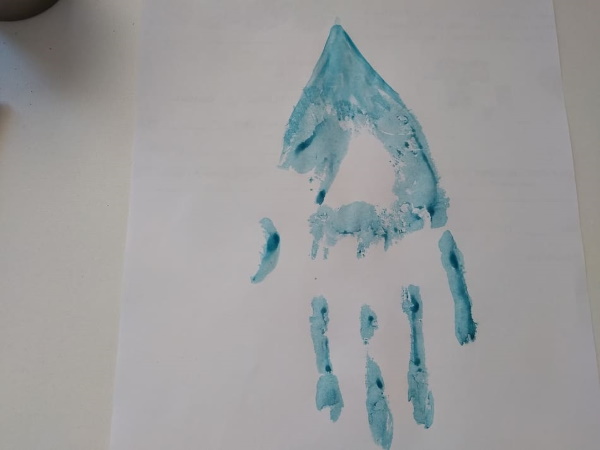
- Draw flames flying out between the fingers, as if it were a flying rocket. They can be red or yellowish.
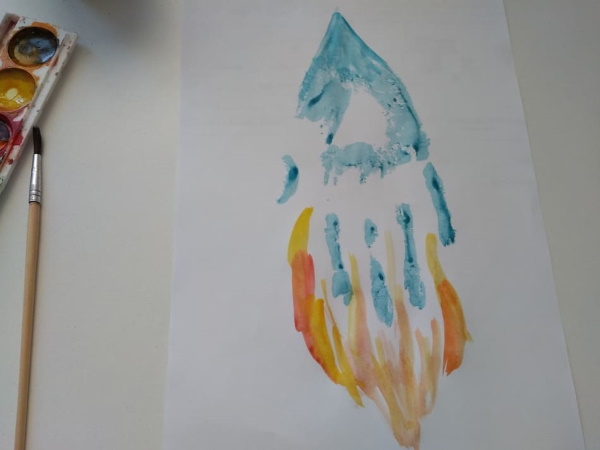
- Use a brush to make the center blue. The porthole inside can be made gray.
- The sky will be darker than the rocket, preferably purple, and stars are drawn on it using yellow paint.
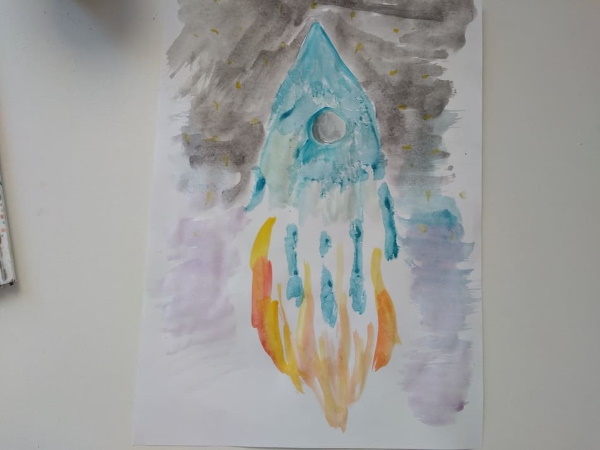
Thus, a picture of a rocket was obtained. Using the same technology, you can draw the astronaut himself.
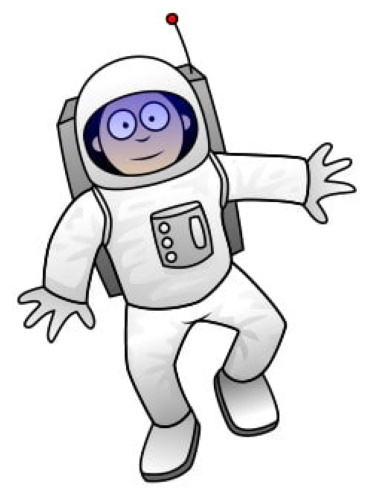
Astronaut using wax crayons
To work you will need:
- marker;
- album sheet;
- wax crayons.
The work takes place in the following stages:
- Draw the head. It will be round and big, because it has a helmet on it. The person is placed inside the suit.
- Start creating the body. It will be in a spacesuit. To do this, draw a rectangle under the head, with the elongated side on the side. Two arms are attached to it on the sides. They will have gloves on them. All this is large in size, because it is a spacesuit.
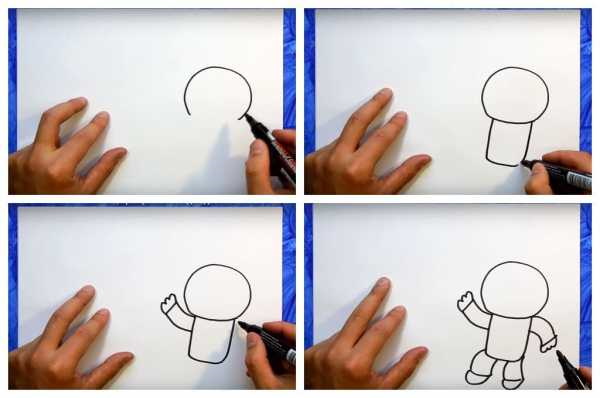
- Draw the legs using the technology described above. The limbs can be positioned in any way, since the person is flying and therefore does not control their movement. The legs will be wearing large boots with thick soles.
- Finish the head and helmet. Make a hole for the glass inside the circle. It will be square or rectangular. Inside will be the eyes, mouth, nose and hair. Slightly outline the circumference of the head so that it is clear that there is a person inside the spacesuit.

- They finished drawing pictures, for example, a spaceship, a starry sky or the surface of another planet. The ship will be in the form of an oblong tube with solar batteries on the sides and stable legs at the bottom.
- A wire should extend from the ship, to which the astronaut is tied. Below will be the Earth, on which continents, oceans, and mountains are schematically drawn.
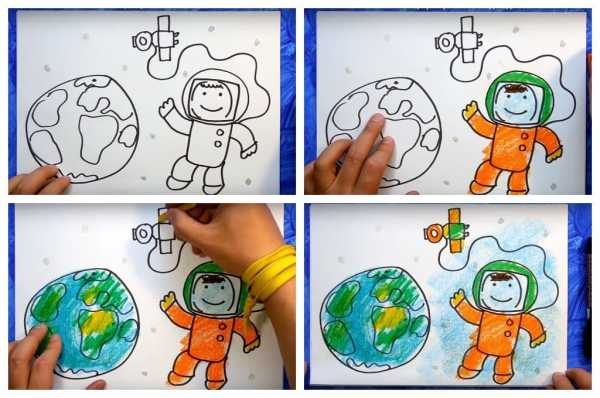
- Color the finished drawing.
The simplest drawing
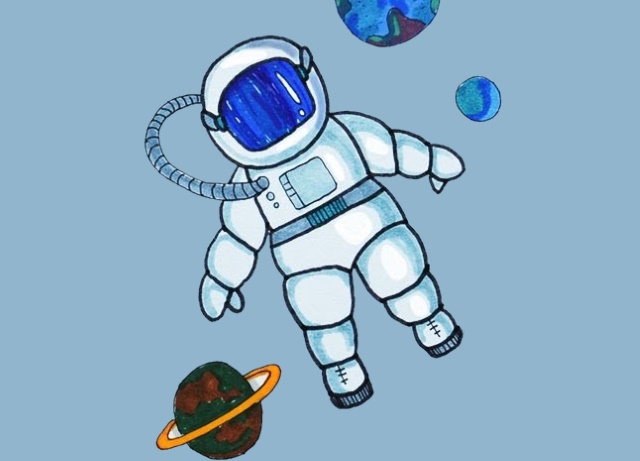
An astronaut (a drawing for children can be both simple to create and complex) with a simple set of plot lines can be a very interesting image. It is best to tell children before starting to draw about who an astronaut is, how interesting the Earth looks from a rocket, how limitless space is.
Under the impression of knowledge, the picture will be more interesting. The most popular will be a drawing of an astronaut in outer space. This drawing can be sent to an exhibition dedicated to Cosmonautics Day.
To work you will need:
- drawing album;
- marker;
- pencils;
- paints.
While younger children prefer to draw with colored pencils or felt-tip pens, older children already work with paints.
The stages of image creation will be as follows:
- Mark a circle for the head, then the torso and limbs. The head will be huge, because the person is inside the spacesuit. The rectangle of the torso transforms into the main part of the spacesuit.
- Draw the arms raised up or to the sides. It depends on the artist's imagination.
- At the end of the arms, draw huge gloves with fingers outlined.
- Make the legs voluminous, and their position can be very different, because the person is in an airless space. The boots, like the gloves, will be large, with a stable sole.
- Draw a hole for the glass in the helmet. It is rectangular. Draw facial features inside. Its expression can mean different states of the astronaut: joy, thoughtfulness, self-confidence.
- The spaceship that will stand next to you may not be too big. The kid should understand that he is not always flying in the sky, he may just be preparing for launch.
- If you want to draw the Earth, which is visible in the distance. The planet as a magnet or a desired home for astronauts. Continents and oceans are schematically drawn on it.
- Take pencils and paints and make the drawing colorful. The stars can be yellow, green or gray. Their size can also be different. The main thing is to add dynamics to the drawing. It is not necessary to use paints as in life. A bright picture will be more interesting. So the astronaut can be made yellow or orange, the helmet can be green, and the glass light blue. The surface on which the astronaut moves can also be colored.
Drawing an astronaut is not difficult. Such creativity is available to every child. The main thing is to show how to do it correctly, directing the creative energy of children to completing a complex task. Then they will be glad that they coped with the work and in the future will be able to create more complex drawings.
Video on how to draw an astronaut
Drawing of an astronaut for children: