The maple tree is found everywhere - from the American continent to China. The plant has a thick trunk and a great height. It has no fruits, but its leaves, which have an unusual shape and color, give it expressiveness. Often there is a desire to capture them, which is not difficult to do. For drawing maple leaves You will need paper and a few pencils.
Easy way to draw a maple leaf with pencil
Maple leaves come in a variety of shades. For example, in spring they turn light green, and in summer they turn bright green. In autumn, before falling, they turn yellow, and can turn orange or red.
To depict them on paper, you will need to prepare the following:
- simple and colored pencils;
- fountain pen;
- marker;
- eraser. It will help to remove auxiliary lines that are intentionally drawn to simplify the work.
A maple leaf (it is better to start drawing with a simple version) can be depicted in 7 stages.
To do this you need:
- Draw an isosceles triangle on paper. Its base should be located at the bottom, and its other 2 sides, located at the top, should be the same length. The base of the triangle should be slightly curved towards the top.
- Draw zigzag lines above the triangle to make it look like a crown.
- Draw the same crowns of zigzag lines on both sides of the triangle – left and right.
- Draw a branch under the curved base of the triangle. To do this, simply draw 2 parallel lines down and connect them with another short line.
- Remove all excess so that the drawing takes the shape of a leaf.
- Colour the image. You can make the leaf orange, yellow, brown or green.
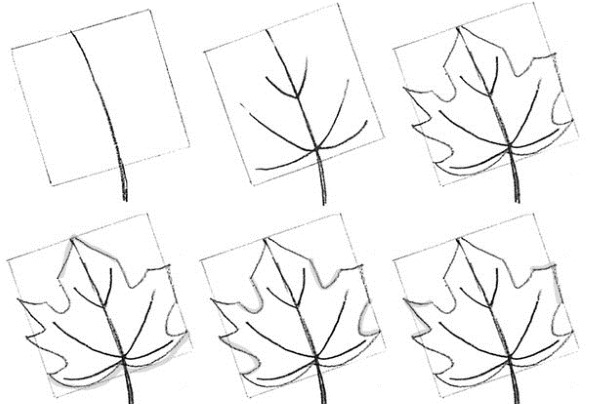
- Draw several veins inside the leaf. In this case, the leaf is divided into 3 segments. There should be the same number of main veins, each of which starts at the bottom of the leaf. At the same time, several additional veins extend from each of the main veins.
Black pen method
A simple version of a maple leaf with a black pen on white paper will be done in the following steps:
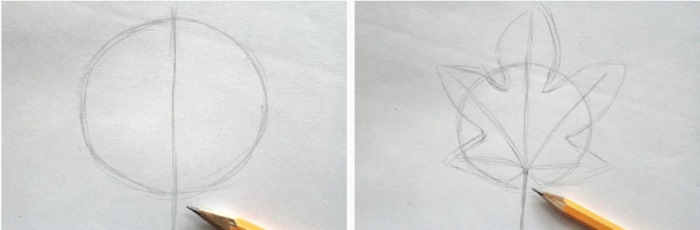
- Draw a large circle in the middle.
- Divide the circle in half with a vertical line.
- Divide the leaf into 5 symmetrical segments and draw veins in the center of each.
- Detail the maple leaf by adding lots of jagged edges to the outline.
- Draw the veins inside the leaf.
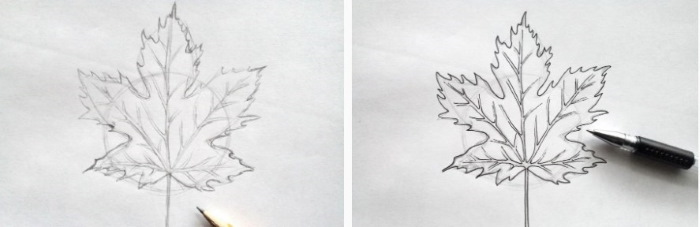
- Trace the outline and veins with a pen.
- Use an eraser to remove pencil lines.
- Place hatching near the veins to create shadows.
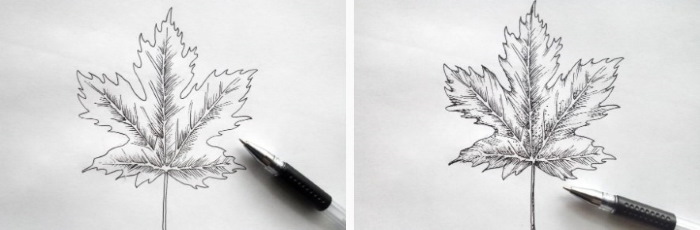
- From the edge, draw light strokes towards the center.
- Add shadow with dots.
For kids
For small children, you can offer a version of the simplest image of a maple leaf without the basics of drawing.
To do this you need:
- Prepare a maple leaf, white paper and pencils.
- Place a maple leaf on a sheet of paper.
- Cover the maple leaf with paper on top.
- Take a soft pencil and color the paper over the sheet. Hold the pencil at an angle to create wide strokes.
As a result of such strokes, a maple leaf with veins and small details appears on the paper.

For realism, you can apply shading with the same colors as in nature:
- bright orange;
- yellow;
- mustard;
- red;
- brown;
- green.
You can also use wax crayons or watercolor paints instead of regular pencils.
A difficult way to draw a maple leaf
Drawing a more complex version of a maple leaf with a pencil is done as follows:
| No. | Stage | Description |
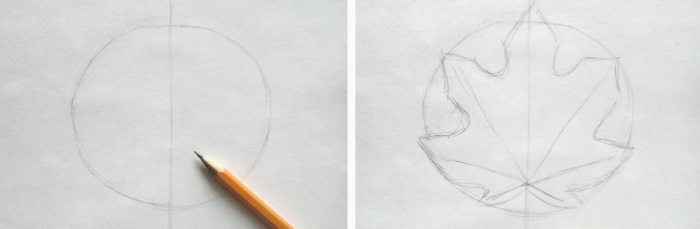
| 1 | Drawing the base | In the middle of the sheet, draw a circle. Through the center of this circle, draw a vertical line. In this case, the circle must be completely intersected by this line. As a result, the circle will be divided into 2 equal parts. |
| 2 | Creating a contour | At this stage, it is important to remember that the left half is symmetrical to the right relative to the vertical line passing through the circle. The edges of the leaflet should be pointed. In the middle, you need to draw a few additional lines. This will be the basis of the veins. |
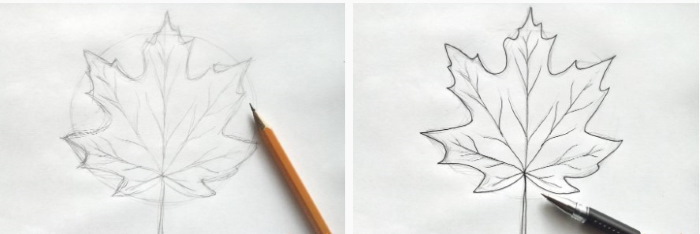
| 3 | Detailed drawing | Using a simple pencil, add several small veins across the entire surface of the sheet. Also at this stage you will need to work with the outline and make more pointed edges. From the bottom of the sheet draw a thin branch. It can be represented by a couple of lines.
At the top, where it connects to the leaf itself, the branch should be very thin, but as it moves away from the leaf, it widens. The bottom of the branch should be the widest. |
| 4 | Removing auxiliary elements | Using the eraser, you need to remove all the auxiliary lines that were drawn in stage 1. This applies to the circle itself and the vertical line passing through it.
The necessary details should be additionally outlined with a black pen, for example, a gel pen. This will help to highlight the drawing better. |
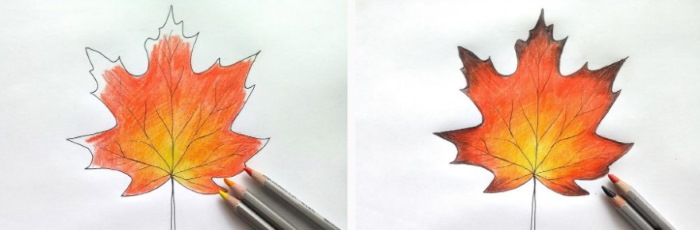
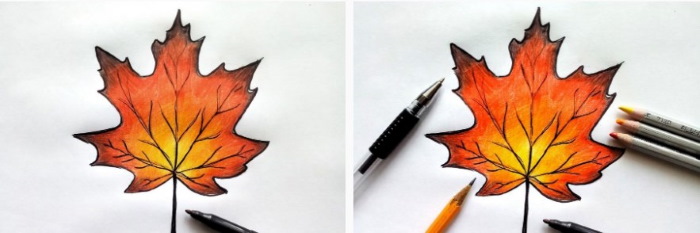
| 5 | Coloring the picture | For this, you will need pencils of orange, red, yellow and their shades. It is recommended to color from the middle of the sheet. It is better to start with yellow, then - one by one introduce the rest. The transition should be smooth. |
| 6 | Working with sheet parts | The edges of the leaf and its veins should be worked on. They should be made black. They will contrast well with the red color. |

Maple leaf folded like an accordion
The drawn maple leaf on colored paper can be cut out. The result will be a great decoration for autumn holidays. To give the leaf volume, it can be folded into an accordion.
For work you should take:
- several sheets of A4 paper;
- marker;
- scissors;
- glue;
- clothespin.
The steps for making a maple leaf are as follows:
- Glue 4 sheets of paper together one after the other until you get the desired length.
- Fold the paper like an accordion.
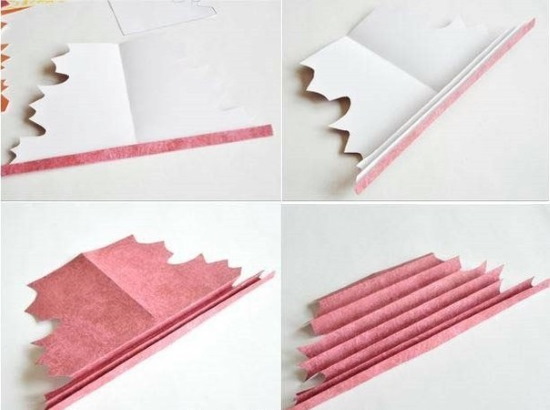
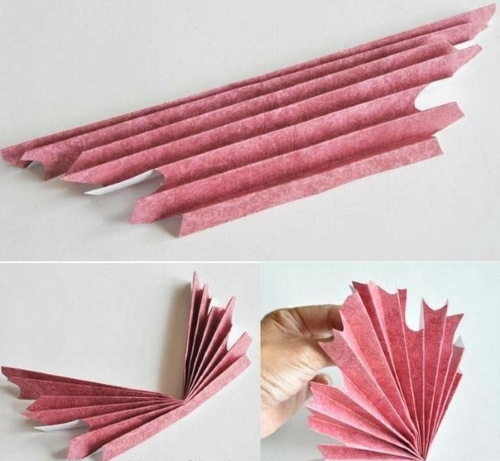
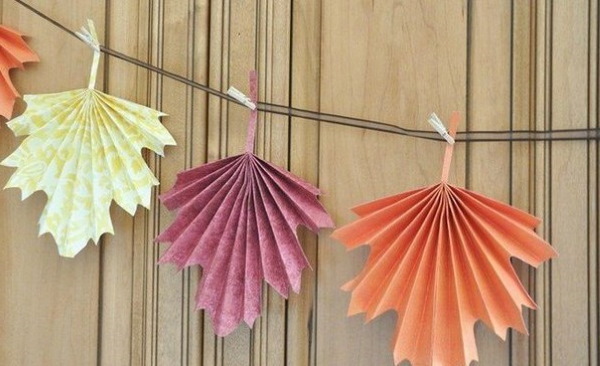
- The maple leaf has 5 blades. The outer ones are not directed upwards, but are bent downwards, so you need to make a fan out of a folded paper accordion, hook it with a clothespin and straighten it out.
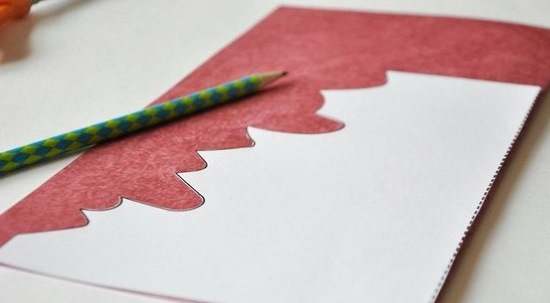
- Create a maple leaf template. To do this, draw it on flat paper and cut it out along the outline.
- Apply the created template to the paper fan and draw along its edges with a marker.
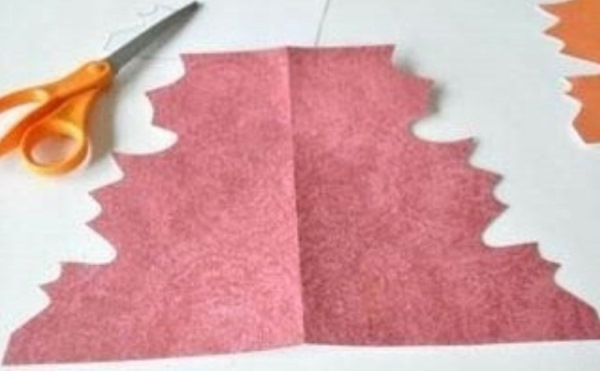
- After removing the attached template after tracing it, you can see the remaining silhouette of the leaf on the fan. Now it needs to be cut out. First, you should remove the clothespin and temporarily straighten the "accordion". This will significantly simplify the cutting, because you have to cut along the folds. It is important to be extremely careful here.
- After cutting, gather the accordion-folded paper again and fasten it with a clothespin or glue. After a few hours, the sheet will be securely fastened.
How to Draw a Maple Leaf with Colored Pencil
A maple leaf (drawing with a pencil is one of the simple and accessible methods) is depicted with pencils in the following stages:
- Start with a line that will later become the stem and core of the leaf. It is best to make it vertical: this will make it easier to work with the other elements. However, in the future, having gained experience, you can slightly tilt the main line or, by rounding it, change its shape.
- Mark the stem. Measure about a third of the future leaflet's length from the lower end of the drawn line. For example, if the line is 12 cm long, measure 4 cm from the bottom. If the line is 10 cm long, measure about 3.5 cm.
- Through the point that will be marked in this way, there should be 2 more lines. Each of them will become the bottom of the sheet, so it is necessary to make them wavy. This will give the drawing realism.
- Finish drawing the stem. To do this, you need to decide on its location. Everything that is below the intersection point of the 3 lines will be the stem of the leaf. The artist's task is to expand this stem and draw another line. The distance between the lines will be equal to the width of the stem.
- It is important to remember such a feature of this leaf element as narrowing when approaching the leaf itself. The 2 lines that will mark the stem should approach each other when approaching the leaf. In this case, when the leaf is located strictly vertically, the lines should narrow as the height increases. The lower part of the branch should be wider.
- When 3 lines intersecting at 1 point and another line passing at the bottom and indicating the width of the leaf stem are ready, mark the locations of the depressions. To do this, it is enough to put dots between all the segments, except for those located near the stem. There should be 4 dots in total.
- Draw the lower edge of the leaf. To do this, draw a wavy line on both sides of the stem towards the ends of the lower segments.
- From the point where the wavy line (the bottom edge of the sheet) connects to the bottom segment, draw another line towards the nearest point, making the angle acute. Repeat the same on the other side of the sheet.
- At the ends of the other 3 segments, also make sharp angles. The lines coming out of them should be directed to the nearest points. In this way, the drawing will take the form of a leaf. The more wavy and angular the lines are, the more realistic the drawing will be.
- Add veins. The same segments that are inside the leaf should be taken as a basis. There are 5 of them. Along their length, you need to add many short lines diverging from each other.
- Color the leaf with colored pencils. Start coloring from the middle of the leaf, using yellow first, then orange and red. Make the transitions smooth. Color the edges of the leaf black. The same color should be chosen for the stem located under the leaf. You can also outline all the veins in black. In this case, they will be more clearly visible.
The result will be a beautiful autumn leaf, as if it fell from a maple tree by a gust of wind. If desired, you can make the leaf green, as if it is summer and it was recently picked from the tree.
Bouquet of maple leaves
Maple leaf (a pencil drawing of a bouquet of leaves will look bright and impressive) in a bouquet To draw on paper you will need the following tools:
- pencils (colored and plain);
- black fountain pen;
- eraser;
- black marker.
If we consider the example of drawing an autumn herbarium, we will need yellow, orange, red, green, and also light green colors.
The work will take place in 9 stages:
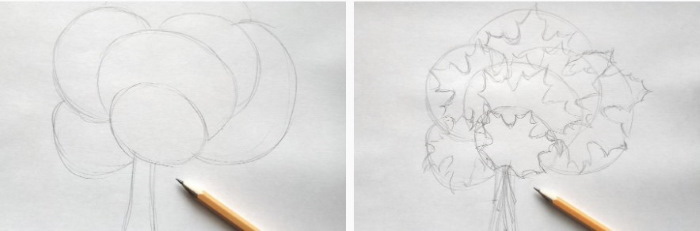
- Make markings: indicate where the bouquet will be located on the paper. To do this, draw several ovals. Each of them will indicate 1 leaf in the bouquet. There should be 7 ovals in total. When drawing them, it is necessary to make sure that the front ovals are smaller in size than the back ones.
- Work out the outline of each leaf. They will all be the same, slightly different in size and position in the bouquet. Each leaf is divided into 5 segments: 1 of them in the middle, the other 4 - on the sides. The stems of the leaves should be in one place - at the bottom. The length of the stems is also not the same: they can differ in width, but not significantly.
- Draw the veins on the leaves. Each leaf has many veins. Their exact number is impossible to determine, and it varies from leaf to leaf.
- However, among all these veins, 5 main ones should stand out. Each of the 5 main veins is located in its own segment of the leaf, and several additional veins extend from each of the main veins. All veins can be drawn with lines. The main 5 veins are long lines, and the rest of the veins are, respectively, short lines.
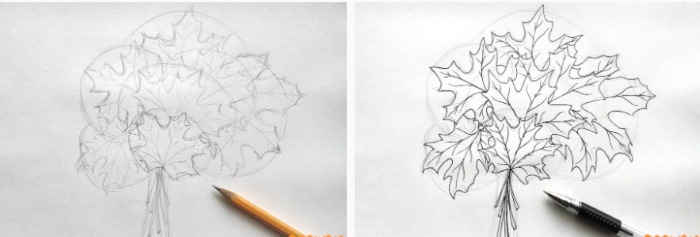
- Arm yourself with a black pen and carefully trace all the lines drawn earlier with a pencil, with the exception of the ovals that were drawn in stage 1. There is no need to trace the ovals - these are auxiliary elements that need to be erased with an eraser in the future. Thanks to the black pen, the drawing will become more expressive.
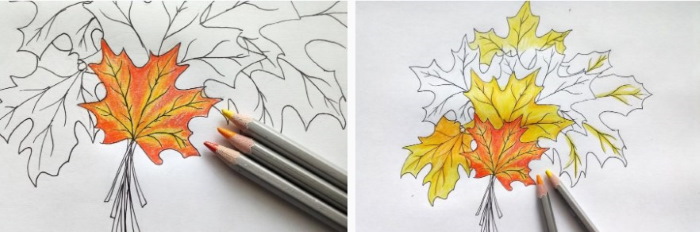
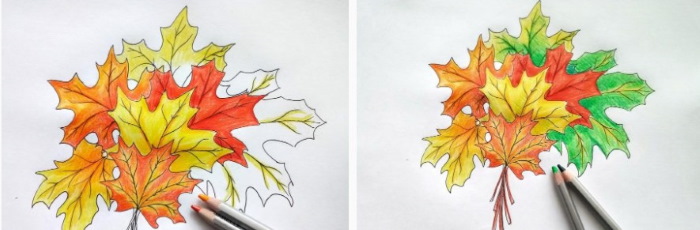
- Start coloring the bouquet. First, pay attention to the front leaf, located above the bunch of stems. This leaf should be colored yellow, orange and red. The areas where the veins are concentrated should be made yellow. And those that are closer to the edges of the leaf should be red. In the spaces between these 2 colors, add orange.
- Colour the part of the leaves behind the front leaf yellow and orange. The colours on each leaf should be distributed differently.
- Add orange color to the leaf that is on the left side of the bouquet at the edge.
- Add red color to the center and leftmost leaves.
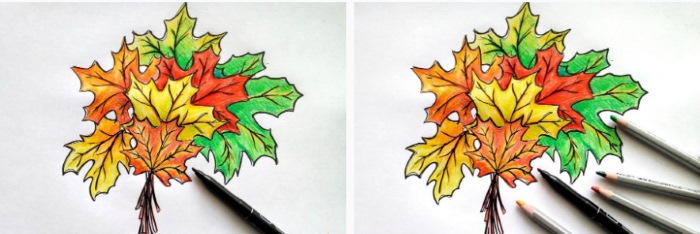
- Color the top and right leaves with green and light green pencils.
- Draw the outlines using a black marker.
Branch with maple leaves
A maple leaf (a pencil drawing can be based on a copy of, for example, a maple branch), depicted on a branch, will be distinguished by its volume and completeness.
To draw such a branch, you need to prepare:
- paper;
- simple pencil;
- a black fountain pen;
- eraser;
- black marker;
- several colored pencils.
This will be an autumn branch, so you will need yellow, orange, red and burgundy colors.
The drawing process is as follows:
- Draw a branch by drawing thin lines. This is done with a well-sharpened pencil. In this example, the widest branch will start on the right and become narrower as it approaches the left edge of the paper.
- Draw several thinner branches from the main branch. 3 branches should be placed at the top and bottom, and 1 branch will be on the left side. In fact, it will be the end of the main branch. In total, there will be 7 branches.
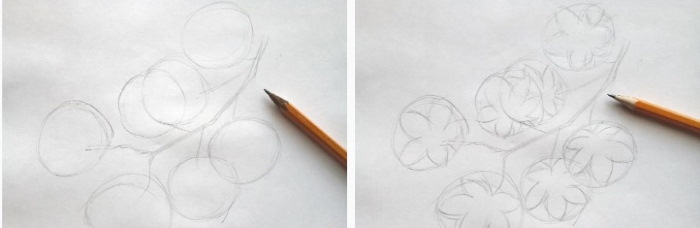
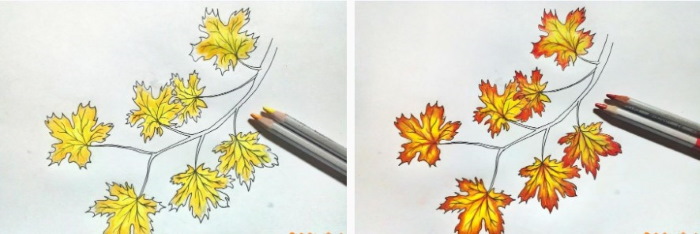
- Draw 1 circle at the end of each branch. The circles are auxiliary elements of the drawing, which will need to be taken as a basis when drawing the leaves themselves in the following stages.
- Each circle is divided into 5 segments. This will make it much easier to construct the correct shape of the leaves.
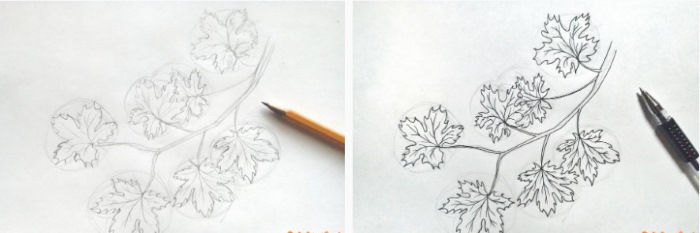
- Draw each leaf in detail. To do this, you need to make many sharp edges and add veins.
- Use a black pen to trace the outline of the drawing. At the same time, remove the remaining auxiliary elements previously drawn in pencil.
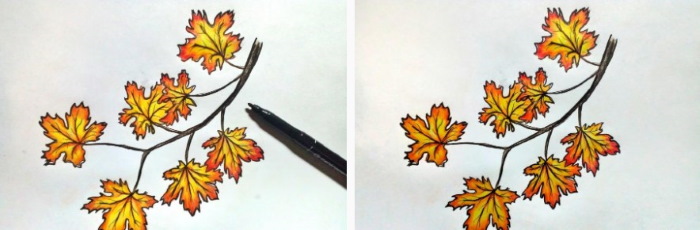
- Once the outlines are done and highlighted, move on to coloring. Decorate the center of each leaf with yellow and orange colors.
- Draw the edges of the leaves in red and add a burgundy shade. Thanks to this, the places near the outline will become darker, and therefore more realistic.
- Trace the contours with a black marker. Use the same marker to color the branch.
For those who have decided to start drawing with a pencil, maple leaves provide an opportunity to get good training. After all, these elements have many details. At the same time, the drawing scheme is almost the same for all leaves.
Maple Leaf Drawing Video
Maple leaf - pencil drawing: