Any festive event for children will be much more exciting if it is costumed. New Year, a themed matinee in a kindergarten or a birthday, costumes of fairy-tale and cartoon characters will bring a bit of magic and mystery, will please not only children, but also parents.
Masks for any holiday can be purchased, but it is much more interesting to make a mask with your own hands. The most accessible materials are paper and cardboard. What else is needed for work, how to make and decorate a mask for a holiday - further in the article.
Mask ideas for holidays and events
The most beloved children's holiday can rightfully be called New Year. Waiting for New Year's miracles, gifts from Santa Claus under the tree and, of course, the celebration itself. New Year's carnival implies the presence of a masquerade costume and mask.
The best ideas for children's masks for the New Year are considered to be:
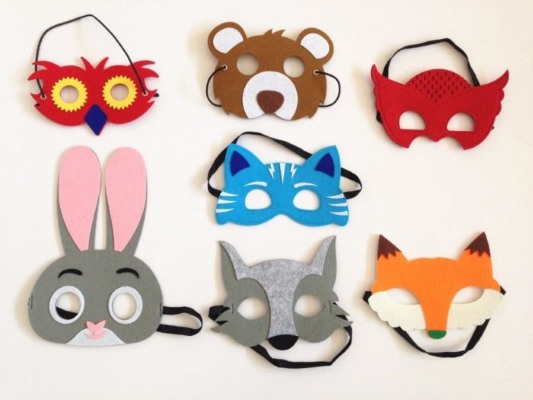
Animals:
- bear;
- bunny;
- wolf;
- squirrel.
Characters from Russian fairy tales:
- Baba Yaga;
- Serpent Gorynych;
- Ivan Tsarevich;
- Koschei the Deathless,
- The Frog Princess
Heroes from domestic animated films:
- Snowman;
- Snow Maiden,
- Snowflake;
- the wolf and the hare from "Well, Just You Wait!";
- Leopold the cat and the mice.
Heroes from foreign animated films:
- Snow White;
- Snow Queen;
- Mickey Mouse;
- Goofy the Dog;
- Santa Claus.
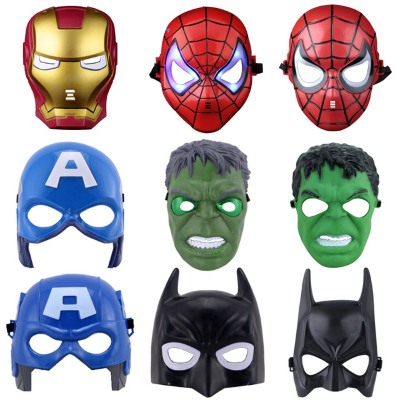
Marvel Studios Super Heroes:
- superman;
- iron man;
- captain america;
- Batman;
- spider-man.
The Halloween holiday, which came to Russia from Western culture at the end of the last century, was immediately loved by children and teenagers.
Ideas for this holiday could be:
- Mr/Miss Pumpkin;
- Dracula;
- scull;
- bat;
- little witch;
- Frankenstein;
- advent;
- sad harlequin;
- evil clown.
For a themed birthday, ideas can be drawn from fairy tales, popular cartoons, and children's films:
- spongebob;
- Winnie the Pooh;
- Shrek;
- Elsa;
- Smeshariki.
Tools and materials for making masks
A paper mask can be easily made by hand.
To make it you will need:
- colored and white paper and cardboard;
- paper glue;
- scissors or a stationery knife;
- colored foil for decorating mask details;
- rope/elastic band for ties.
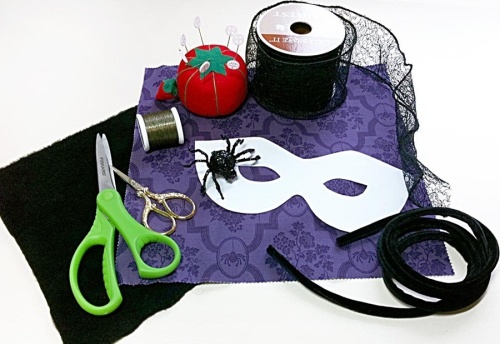
This is the minimum set for work. Depending on how complex the mask is, additional tools and materials for decoration may be needed.
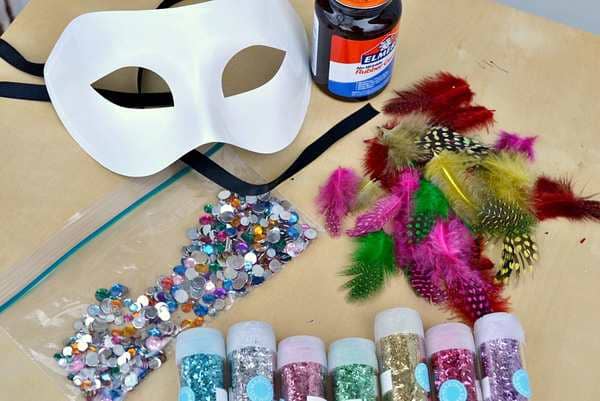
Methods of decorating masks
Paper and cardboard masks can be simple or complex. The better the idea and quality of production, the more interesting the main item of the child's outfit will seem. Even the simplest head mask can be turned into a work of art. What do you need for this?
Materials for decorating masks:
- paints;
- velvet, glossy, crumpled paper;
- ribbons;
- braid;
- lace;
- beads, rhinestones;
- scraps of fabric;
- feathers;
- faux fur.
You can use any paints for decoration. It can be gouache, watercolor, or acrylic. Acrylic paints have a bright and saturated palette of colors. For decoration, you can buy special acrylic products that can be used to add volume - contour paints, liquid glass.
You can use craquelure varnish for decoration and acrylic paints. Craquelure creates cracks when applied to paint, covering the surface with intricate designs. The decoupage technique allows you to decorate with various floral or abstract designs.
Gouache is a quick-drying paint with a bright palette, perfect for painting white paper or cardboard from which the mask is made.
Wolf Mask: Master Class of Making
To work you will need:
- paper of three colors - black, gray, white, brown for the nose;
- gray thick paper or cardboard for the base;
- PVA glue;
- scissors;
- simple pencil, eraser;
- ribbon (elastic band) for ties.
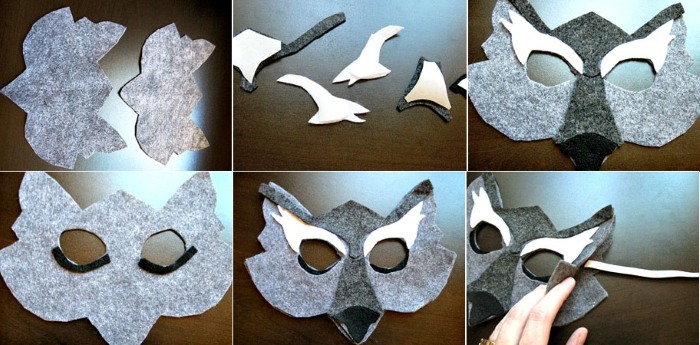
Step by step production:
- You should practice first so that draw a wolf's faceThe volume of the mask will be given by details made of colored paper and a special cut of the mask.
- Measure the circumference of the child's headThe width of the mask should be one third of the circumference.
- On grey cardboard draw the contours of the mask - nose and cheeks. Draw holes for the eyes. The height of the mask can be half the face or completely cover it.
- To add volume make cuts from the middle of the eye to the edge of the mask.
- Cut out the ears separately. They should have allowances at the bottom for gluing to the mask. Bend the allowances and make cuts on them to make it easy to glue to the base. Make cuts in the middle of the ears and glue their edges so that the ears become voluminous, wrapped inward.
- From black paper cut out the top and edge of the ears. Glue the details.
- Cut the ribbon in half. On the sides of the mask, strengthen the place where the tape is attached with pieces of kraton. Then make holes, thread the tape through them, leaving short ends on the front of the mask.
- Cut out of white paper the lower part of the wolf's muzzle - eyes and cheeks, glue the parts to the base. At the same time, this part of the mask will cover the ribbons for the ties.
- From gray paper cut out thin circles and glue them over the eye holes.
- From brown paper cut out the nose and glue it on. The wolf mask is ready.
Bunny Mask - 3D Cardboard Mask
To work you will need:
- thick cardboard, a shoe box of a suitable size;
- white paper for template and decoration;
- stationery knife;
- paper scissors;
- PVA glue;
- simple pencil,
- ruler;
- scotch;
- elastic band for attaching the mask.
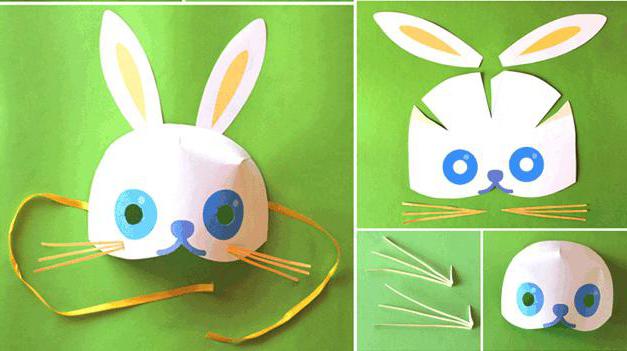
Creation process:
- Make a one-piece mask template with ears on paper. Two parallel fold lines will run from the tips of the nose to the upper edge of the cheeks. Make darts on the sides of the cheeks - from the nose to the edges with allowances for gluing. Cut out holes for the eyes and strings.
- Place the template on the cardboard, securing it with tape. outline, draw the fold lines with a dotted line.
- Remove the pattern and cut a mask out of cardboard. Draw the fold lines with pressure. Do this so as not to damage the cardboard and to facilitate bending the material in the right places. Cut out the eyes and holes for the tie.
- Cut out the mask. Fold the mask along the nose line and along the darts. Glue the darts. Leave the glue to dry. For the strength of the gluing place, does not come apart.
- After the glue has dried, the mask can be decorated.. Cut out inner ears, eye rims and cheeks from white paper, glue the parts. Draw dots on the cheeks to imitate whiskers.
- Thread the elastic band through the holes, tie a knot on the back side to hold the ribbon in place.
Dimensions for mask:
- Height - 20 cm
- The width of the top edge is 10 cm
- Mask width - 20 cm
- The height of the ears is 10 cm, the width of the base of the ear is 3-4 cm.
- The depth of the darts is 9 cm, the width of the darts is 5 cm.
Bear Mask: Master Class on Making
A quick way to make this paper mask yourself is to cut out a total of 6 circles.
To do this you will need:
- colored paper, brown, black, yellow or orange;
- thick paper or cardboard for the base of the mask;
- glue;
- scissors;
- pencil;
- ribbon for ties;
- stapler;
- a compass for drawing circles or a suitable sized container (plate, glass).
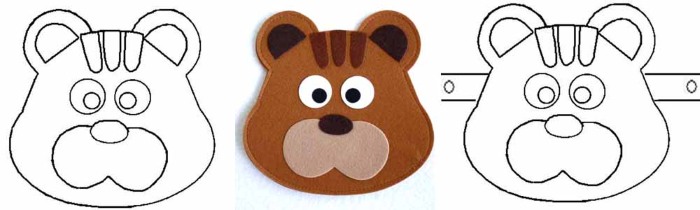
Step by step production:
- On cardboard, draw a circle with a diameter of 16-20 cm - the base of the mask.
- Draw and cut out circles from colored paper. From brown paper, a head, 16-20 cm in diameter, and 2 circles for the ears, 4-5 cm in diameter. From yellow/orange paper, a muzzle, 6-7 cm in diameter, and 2 circles for the inner ears, 3-4 cm in diameter. Glue the parts onto cardboard. Cut out a nose from black paper. Draw a mouth on the muzzle from light paper.
- Glue the ears together - place a circle of light paper in the middle of the brown circle. Attach them to the head so that they stick out halfway over the edge.
- Cut out holes for the eyes.
- Attach the elastic band. You can make holes and secure the band with knots, or you can attach it to the mask with a stapler.
Horse mask
For production, you can use regular cardboard, which you can then paint with gouache. Then you will only need to cut out the base and ears. For decoration, use foam rubber, adding eyebrows and a voluminous nose to the bear.
To make a horse head mask you will need:
- thick paper or cardboard for the mask frame;
- white, brown and some black paper;
- simple pencil;
- PVA glue;
- stapler;
- scissors.
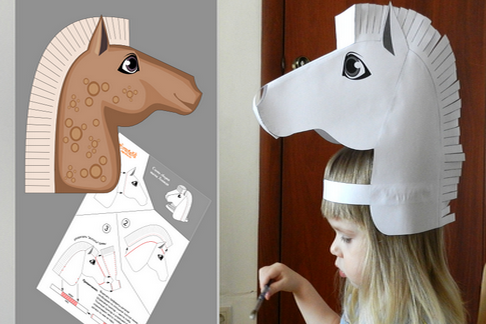
Manufacturing:
- Make a hat-shaped head mask frame from cardboard. To do this, cut a 3-4 cm wide strip from cardboard, the length of which is equal to the circumference of the child's head. You will also need 4 strips, the length of which is equal to half the volume of the head.
- Fasten the long strip with a stapler in the shape of a rim. Fasten two short strips crosswise and attach to the rim, creating a frame. From the other two strips make an oval frame for the horse's muzzle and attach it to the base.
- For the horse's neck, cut a rectangle out of cardboard 5-6 cm high and half the length of the head's circumference. Secure the paper to the headband at the back with a stapler.
- Cover the mask with colored paper, crumpling it a little for convenience. Make holes for the eyes. Secure the paper with glue or a stapler. Cut a strip of white paper along the length from the horse's nose to the withers, glue it.
- Cut out ears from brown paper, leaving allowances for gluing to the head - 4 pieces. Glue them together with the wrong side, secure them on the top of the head.
- Cut thin strips of brown paper, 5-6 cm long and 1 cm wide. This will be the mane. Using scissors, twist the ends of the strips, glue them from the crown to the bottom of the neck and make a fringe.
- Cut out semicircles for the eyes and the horse's nose from black paper and glue them on. The mask is ready.
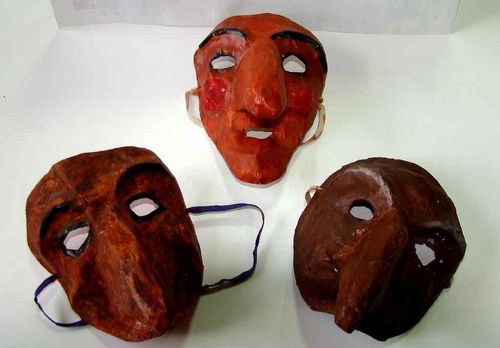
Baba Yaga mask (papier-mâché)
An evil character from Russian fairy tales with a hooked nose, how to make this mask more similar to the original?
To do this you will need:
- plasticine;
- any plastic mask in the shape of the face for the model;
- newspaper;
- PVA glue;
- glue brush;
- scissors;
- stationery knife;
- water;
- acrylic paints and brushes for painting the mask;
- ribbon.
Step by step process:
- First, you need to make Baba Yaga's face. To do this, take a plastic mask, newspaper for pasting, PVA glue, water.
- The first layer on the mask is made of paper soaked in water, without glue. This is to easily remove the resulting mask. Next, glue several layers (3-4 layers) of paper soaked in glue. Leave the mask to dry for several hours.
- Make Baba Yaga's nose and chin. To do this, make a nose with a crochet hook from plasticine, like the mask, cover with paper and glue, and also leave to dry. After drying, cut the nose in half and take out the plasticine. Glue the nose to the face with pieces of paper. Mold the chin from plasticine and also make a part from paper. Wait until it dries completely.
- Cut holes in the mask for the eyes or mouth, holes in the nose for breathing. Assemble the mask. The nose and chin are attached to the mask with pieces of paper soaked in glue.
- To make eyebrows, twist paper twigs, soak them in glue and attach them to the face. Make holes along the edges of the mask for ties. Thread the ribbon from the inside out, tie knots inside.
- Paint the finished mask.
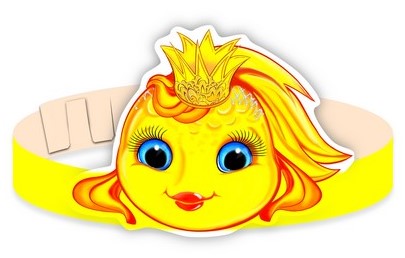
Fish mask
It is best to make such a paper mask with your own hands in the form of a crown-hoop for the head.
To do this you will need:
- thick paper;
- felt-tip pens;
- scissors,
- glue.
Work process:
- Draw a fish, color it and cut it out.
- Make a hoop out of paper around the circumference of your head.
- Glue the fish in the middle of the hoop.
You can decorate the fish with feathers and foil.
Another way to make a fish mask:
- Draw an oval in the shape of a face on white paper. Color it, for example, like Nemo the fish, alternating white and orange stripes with thin stripes of black.
- Make holes for the eyes and draw the fish's mouth.
- Glue fins to the top and sides, make them yellow.
- To attach the mask, make a hoop out of paper and glue it to the mask.
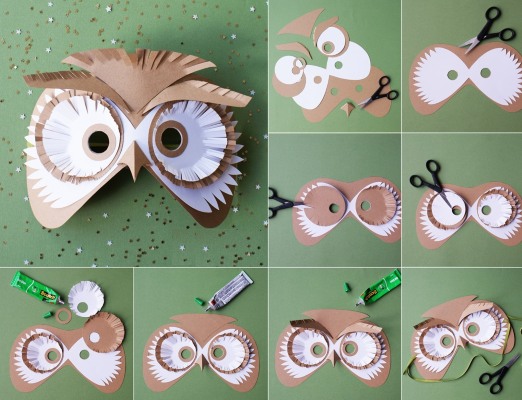
Bird mask
To work you will need:
- colored paper, 3-4 colors + yellow (for the bird's beak);
- simple pencil;
- thick white paper;
- ribbon for ties;
- stapler;
- glue;
- scissors.
Step by step production:
- Fold a sheet of thick paper in half and draw a mask in the form of large glasses. Draw the eyes and make a recess for the beak. This part of the mask will be attached to the base separately.
- Cut out the mask, slits for the eyes.
- Make a beak. To do this, measure the distance from the bridge of the nose to the bottom of the mask - this is the width of the beak. Fold the cardboard in half, measure the resulting length from the fold and draw a line from the top to the fold. You will get a detail - a triangle with equal sides. If desired, the beak can be long or short, slightly curved at the edges. At the base of the beak, leave an allowance of 1-1.5 cm for gluing it to the mask.
- Cut the beak allowance in several places and bend the cardboard. Cover the beak with yellow paper. Glue the piece to the mask using the allowances.
- Try on the elastic band, cut it to the desired length and secure it with a stapler.
- Mask decoration. To do this, you will need to cut feathers out of colored paper. The feathers can be in the shape of a leaf or a crescent. Fold the leaf-shaped parts in half to make them more voluminous. Glue the feathers onto the mask, overlapping them. The feathers can extend beyond the edges of the mask.
- For the eyes, cut out circles to neatly shape the cutout, stick them on. The mask is ready.
- To decorate such a mask, you can use natural feathers, ribbon for the eyes, rhinestones and beads.
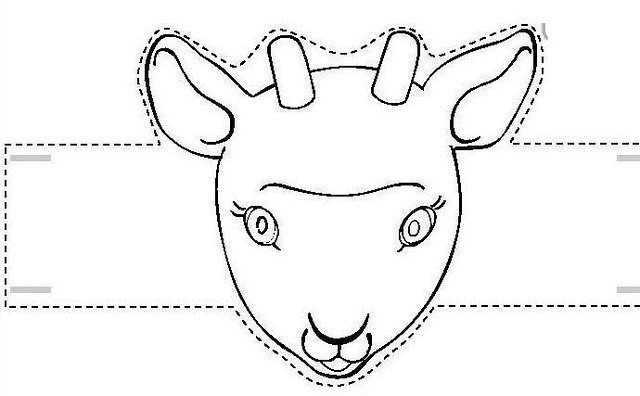
Goat mask
For such a mask you need very little:
- thick paper;
- simple pencil;
- black or brown marker;
- PVA glue;
- ribbons for ties.
Step-by-step execution of the mask:
- Draw a mask the size of the face, resembling an inverted pear in shape. On the top of the mask make two cuts 2 cm deep. Cut out holes for the eyes.
- Draw the goat's nose at the bottom of the mask by making cuts.
- Glue the cuts at the bottom and top to give volume to the mask.
- Cut out the horns and ears, glue them on, make holes for the ties.
- Thread the ribbons through the holes and secure them with a knot on the back side.
If desired, the mask can be painted or covered with colored paper.
Mask - frog
Materials and tools for the frog mask:
- thick cardboard;
- scissors or a stationery knife;
- colored paper;
- PVA glue, superglue
- hair hoop - mask fastening;
- colored markers.
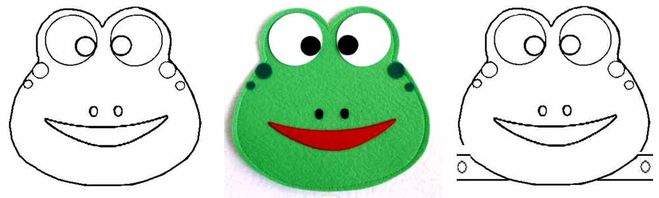
The process of making a mask:
- Cut out an oval from cardboard, resembling a melon in shape. The height of the mask is 15-17 cm, the width will be half the volume of the head.
- Make two darts. To do this, draw a line in the middle of the mask. The upper dart from the frog's nose to the edge, about 7 cm long, 1.5-2 cm wide, leave allowances for gluing. The lower dart is 1-1.5 cm high and 1 cm wide in the middle of the chin. Draw and cut out holes for the eyes, mouth - a smile, holes imitating a nose.
- Glue the darts.
- Cover the mask with paper and draw in the details - nose, eyes, eyebrows.
- Attach the mask to the hoop using superglue. For strength, you can cut out strips of paper to glue the hoop to the mask. The hoop will hold the mask well on the forehead and will not allow it to bend too much and lose its shape, as when using ties.
When making a mask for a girl or a mask of the frog princess, you can use the following for decoration:
- foil, yellow paper;
- rhinestones or beads.
Make a small crown out of yellow paper, decorate it with pieces of foil and beads at the bottom. You can draw red lips.
Spiderman mask
To work you will need:
- thick paper or cardboard of red color;
- white paper for spider eyes;
- PVA glue;
- scissors and a stationery knife;
- black marker;
- stapler and rubber band for fastening.
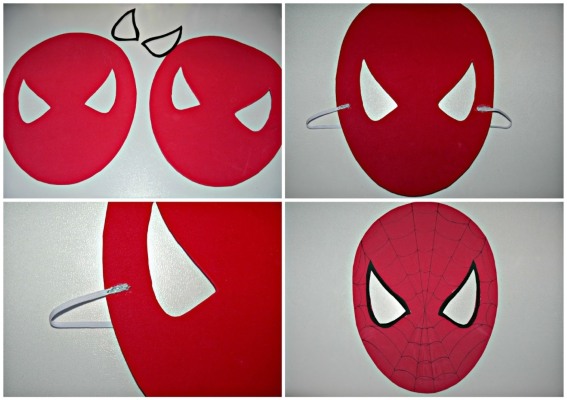
Making the mask:
- Cut out an oval from red cardboard in the shape of the face plus a 3-4 cm allowance along the edge of the oval. Make slits for the eyes and holes for the nose. Even though Spider-Man has no nose, he still needs to breathe somehow.
- Cut out a triangle from white paper – the spider’s eyes, glue them on and use a black felt-tip pen to outline the eyes, not forgetting to cut out circles for the eyes. Draw a spider pattern on the mask with a black felt-tip pen.
- To make the mask voluminous, make cuts on the mask. Two at the top, approximately from the eyebrow line to the edge of the mask and two on the chin. Glue the edges of the cuts.
- Attach the elastic band to the edges of the mask using a stapler. The superhero mask is ready.
Iron Man Mask
All the boys are crazy about this steel hero. This carnival costume and mask are a great solution for any costume party.
To create a paper mask with your own hands, you will need the following materials and tools:
- red cardboard and yellow paper;
- tie ribbon;
- black marker;
- office glue;
- scissors;
- pencil.
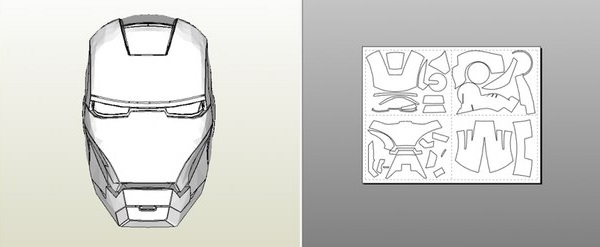
A paper mask is made from individual parts.
Execution:
- Draw the outline of the mask on red cardboard and cut out the shape.
- Make 2 pieces of ears from cardboard and glue them to the mask.
- Place the mask on yellow paper and trace it with a pencil. Draw the yellow parts of the mask inside the outline. Cut it out.
- Glue the yellow piece onto the red one.
- Draw the eyes and mouth of the iron man with a pencil. Make holes for the eyes.
- Use a marker to outline the head details, eyes and mouth.
- Glue the tape to the back of the mask.
Useful tips for making masks
Scroll:
- If the child is taking part in a production and needs to sing or recite poetry, it is best to make a mask on the upper part of the face or on 2/3 of the face, leaving the mouth uncovered.
- To quickly make a mask, you can use a template or a ready-made pattern. You only need to print the pattern, transfer it to cardboard or thick paper, glue it and decorate it.
- Acrylic paints are best for painting masks. They dry quickly, do not fade over time, and do not stain. Such a mask can be used more than once. Gouache is also suitable for these purposes, but this paint stains when exposed to moisture.
- You can not only glue decorations and decor onto cardboard or paper masks, but also sew them on or glue them with hot glue.
Making any paper mask with your own hands is quite simple. To do this, you need a little imagination, simple materials and desire. Children take part in such master classes with great pleasure, contributing their ideas to the creation of masks for the holiday and inspiring adults to create small art objects for the child.
Video: DIY Paper Mask
How to make a raccoon mask from cardboard, watch the video:
DIY New Year's masks in video:
For any event, you can make a unique and bright paper mask for your child with your own hands.
• For a birthday, you can make a mask of one of the Marvel heroes, a mask of a minion, a smurf or another cartoon character.
• For the New Year, the idea of a mask of the symbol of the year or any other animal would be great. Characters from Russian folk tales would also be a great option.
• It is better to attend the matinee in honor of March 8 wearing a mask of a bird, the sun or a flower.
• The image of Pierrot, the Nutcracker, a princess or a pirate would be suitable for an autumn ball event.
• A ghost, Frankenstein, skeleton or pumpkin mask will come in handy for a Halloween celebration.
Making a paper mask with your own hands will not take more than half an hour, but will become a bright addition to a child's costume.
Necessary:
• Light gray and dark gray cardboard (thick paper).
• White cardboard.
• Not a large piece of cotton wool.
• Black electrical tape.
• Thick cardboard (from a shoe box will do)
• Yellow and black markers.
• Scissors, tape, glue, paper clips.
Instructions:
1. Draw the wolf's appearance on dark gray cardboard with a pencil. (For symmetry, it is better to fold the cardboard in half). Next, the mask needs to be cut out.
2. Then you need to draw the eyes. Use a yellow marker for the pupils and outline the eyes with black.
3. Cut out eyebrows, ears and cheeks for the wolf's face from light-grey cardboard. Glue all the elements to the base using glue and secure with paper clips until completely dry.
The child needed a Peter Pan mask for the play and instead of the hassle of cutting it out, we decided to order a ready-made mask from BUMagic. It would have been better to make it ourselves, because we were absolutely unhappy with the order. The mask arrived with a torn string and a hole! In reality, it does not match the one in the photo at all. I wrote a complaint to the store itself, and they responded: "We are not responsible for the condition of the mask after transportation." Not customer-oriented, money was wasted, and the child was left without a mask and in tears