The cake is the main decoration of the festive table, which is loved not only by children but also by adults. To preserve the visual beauty of the sweet treat, you can draw it on paper using pencils and paints of different colors.
Drawing tools
Cake (a drawing for children can be created using various tools) is usually imprinted on paper in bright colors. The more of them, the better.
Pencils
The main tool will be a simple pencil, with which you can create initial sketches. When choosing this tool, you need to pay attention to the marks in the form of letters and numbers on its surface.
There are two main types of simple pencils – hard and soft. Hard ones are marked with the Russian letter “T” or the English letter “H”. Soft ones have the Russian letter “M” or the English letter “B” on their surface. They can be used to create dark, dense lines.
There is also a medium version of pencils, which is designated by 2 letters: "TM" or "HB". This is a universal tool that is well suited for beginning artists.
Paints
Watercolor or gouache used to paint the cake should have "edible" shades. Different brushes can be used to apply paints to the surface of the paper.

Their main varieties are as follows:
- round;
- fan-shaped;
- flat;
- oval.
The choice depends on the tasks the artist sets for himself.
For example:
- If you need to apply many strokes, it is better to use a fan brush;
- using a flat brush you can create long strokes;
- The strokes created with a round brush are small. With these tools, you can create a drawing in which the strokes will be completely invisible, since one color will smoothly transition into another.
When choosing a brush, you need to pay attention not only to its shape, but also to its rigidity and elasticity. It is also important to ensure that no paint remains on the brushes after painting. To do this, you should buy white spirit for oil paints or a solvent. It is better to look at the label of the tube of paint, where it should be indicated that it should be used for dissolving.
Paper
Paper plays an important role in drawing. It is necessary to find the right material before you start drawing a festive culinary masterpiece. It is better to do the work on separate sheets of high-quality paper.
There are 3 main types of surface:
- smooth;
- average;
- rough.
Medium smooth paper is best for pencil drawing.
Samples
If you want to draw a cake when it is not nearby, you can do one of two things:
- Draw based on your individual imagination.
- Copy from ready-made samples. For example, you can find several photos of a cake and try to copy from one of them.
Master classes
Cakes for children can be drawn in different ways and for different occasions.
Pencil Drawing of Birthday Cake
Many people associate cake with birthday and, conversely, birthday with cake. In this case, the pastry must be decorated with several candles.
This festive cake is created with a pencil in 4 steps:
| No. | Stage | Sequence of actions |
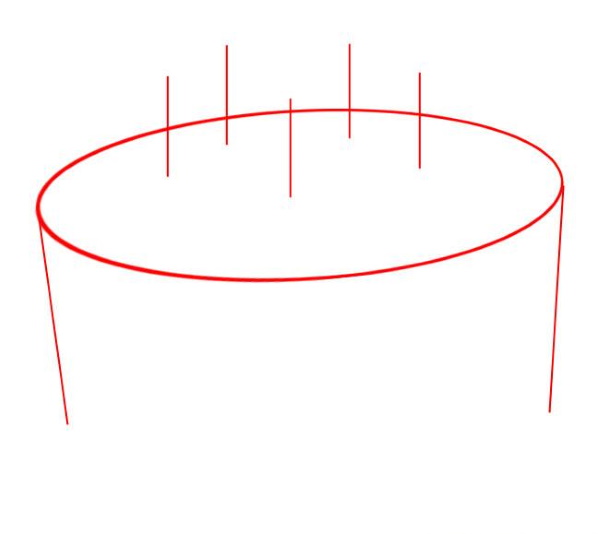 | Creating a sketch | 1. Draw an oval. This will be the top of the cake. 2. Draw 1 vertical line under the oval on the left and right. They will mark the side of the cake. 3. Draw several short vertical lines on the surface of the cake. These will be candles. Their number can vary. |
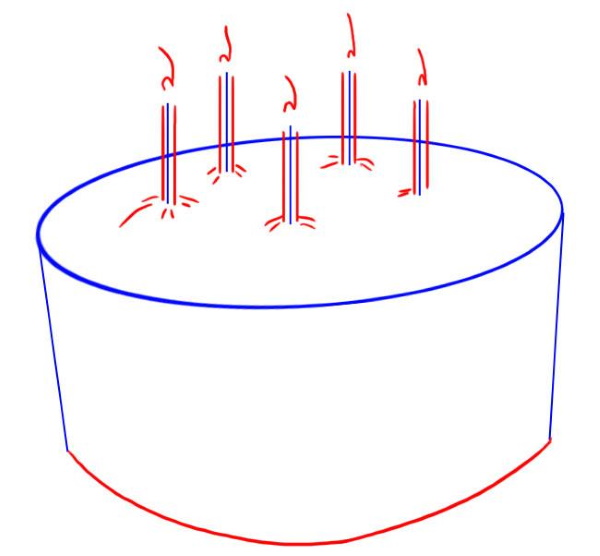 | Cake and candle detailing | 1. Draw a curved line at the bottom. This line should connect the ends of the 2 vertical segments drawn in the previous step.
2. Proceed to the final drawing of the candles. A few mm to the left and right of the previously drawn straight lines, which are the basis, draw segments indicating the boundaries of the candles. 3. Draw a flame above each candle. It can be represented as a curved line. 4. Draw a few short strokes under each candle. They will show that the surface of the cake where the candle is inserted has become looser. |
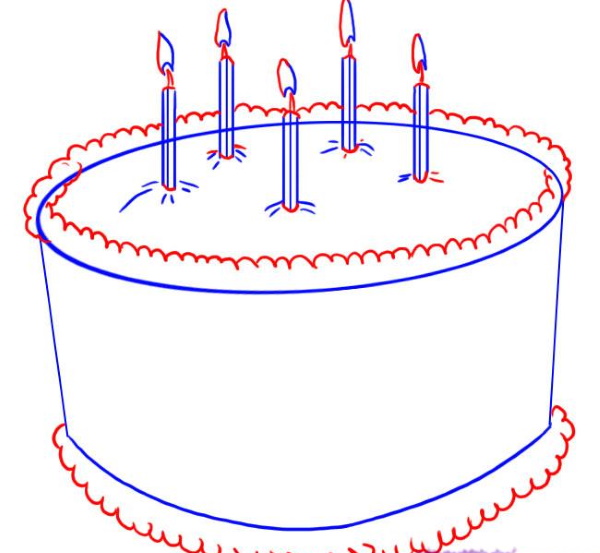 | Cake decoration | 1. Draw the glaze on top and bottom. It should be represented by a wavy line.
2. Finish drawing the wick and lights |
| Coloring the cake | Here you can use different colors. Preference should be given to those that will make the holiday baking appetizing |
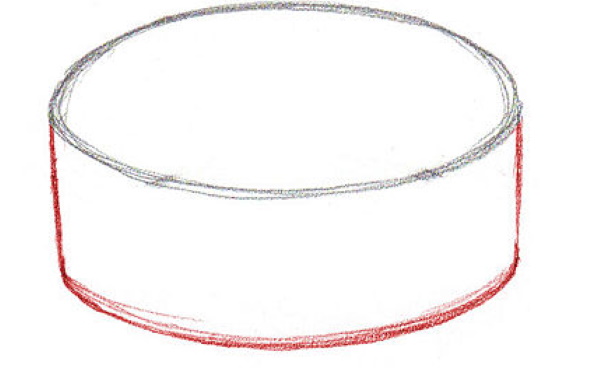
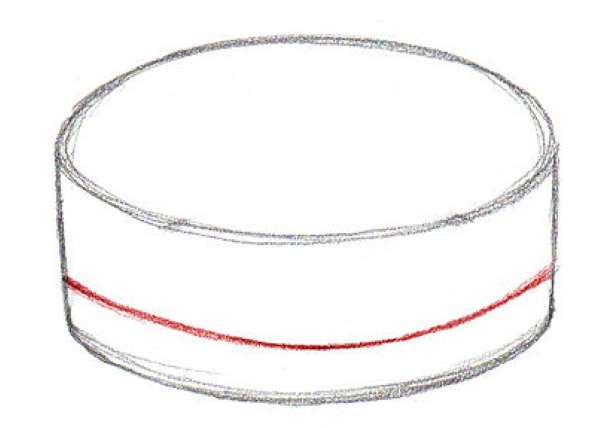
Simple cake pencil drawing
The cake (a drawing for children can be created using one simple pencil) can be imagined as a two-tiered pastry, the top of which is decorated with a single candle.
The work on creating such a drawing takes place in the following stages:
- Draw a vertical line in the middle of the sheet.

- At the top end of the line draw a burning candle. It itself is represented by a quadrangle, and its flame is represented by two smooth lines.

- Draw the top layer of the cake, immediately drawing a line of cream on it.
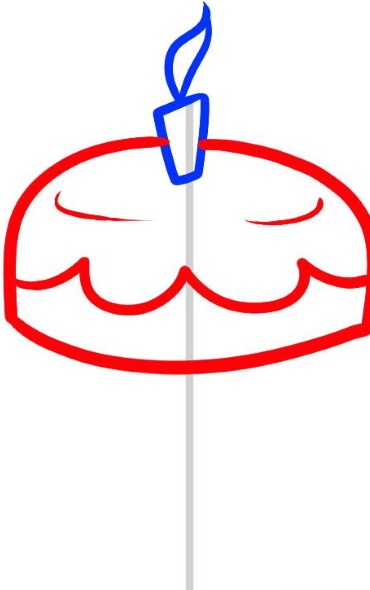
- Make the lower floor wider. First, it is better to draw the cream by drawing a wavy line.
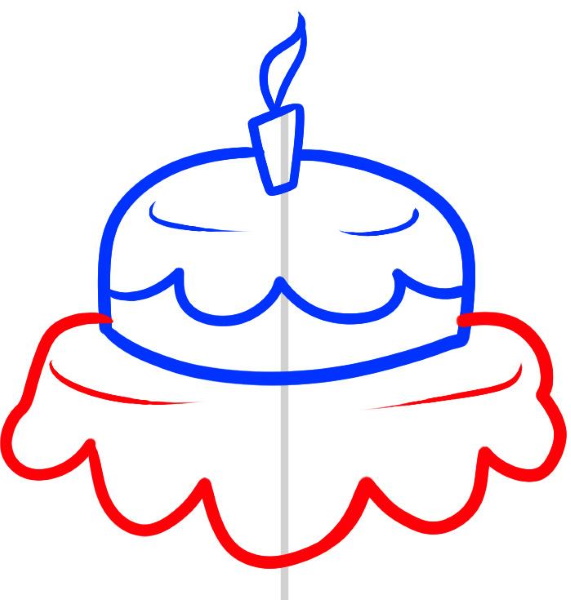
- Finish drawing the bottom part of the cake. To do this, first draw 2 vertical lines on the sides, and then an arc connecting them.
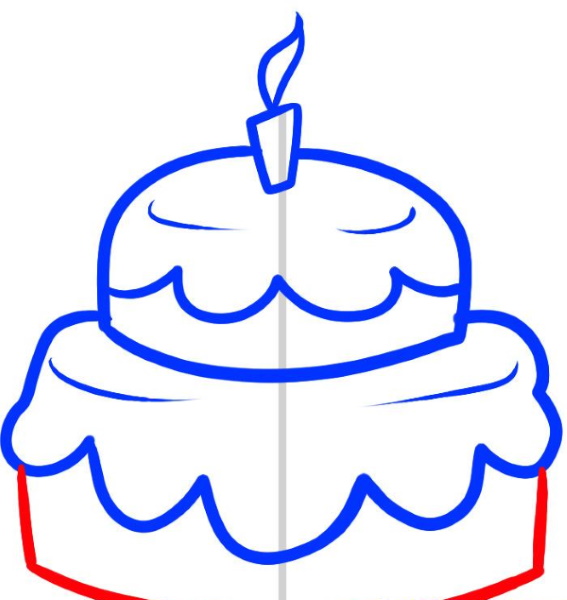
Cake, simple drawing for children to copy. - Paint a two-tiered cake. Colors can be chosen according to individual preference.
Wedding cake pencil drawing
The cake is the main dish not only at a birthday party, but also at a wedding. In this case, it is larger and has several tiers.
The work on drawing a wedding cake goes through the following stages:
- Draw a vertical line in the center of the sheet.
- Draw the top floor. To do this, first draw an oval, then draw one short vertical line down to the left and right of it and connect these lines at the bottom with an arc.
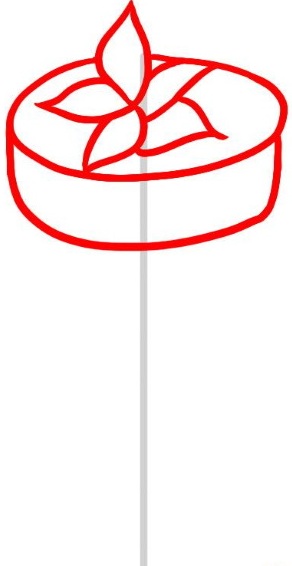
- On the surface, depict a flower, which can be represented by several petals.
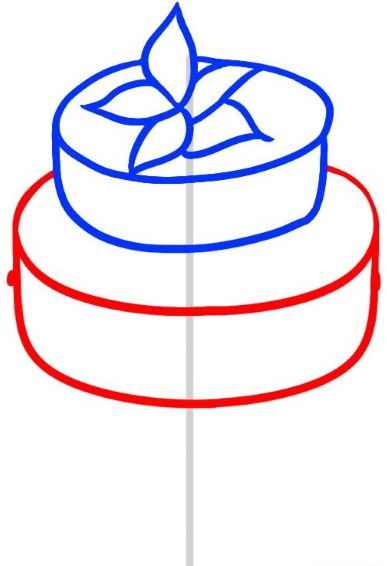
- The next layer of the cake should be depicted as wider, but otherwise it is drawn using the same principle.
- Go to the last – 3rd floor. It will be the widest.
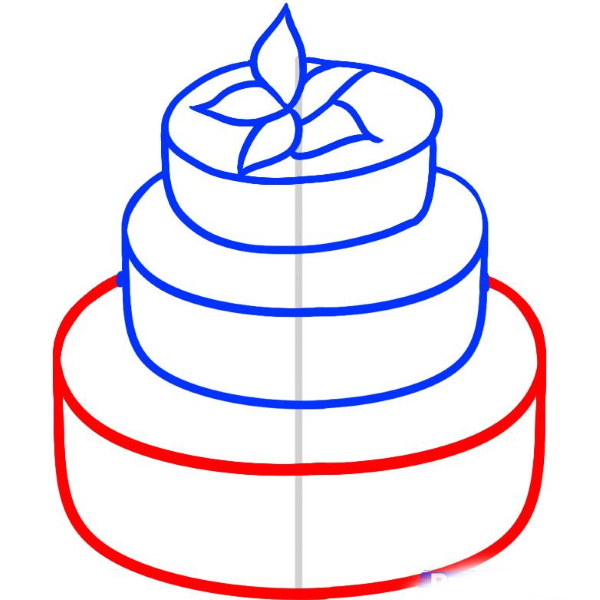
- Decorate the center of the flower with blobs of icing.
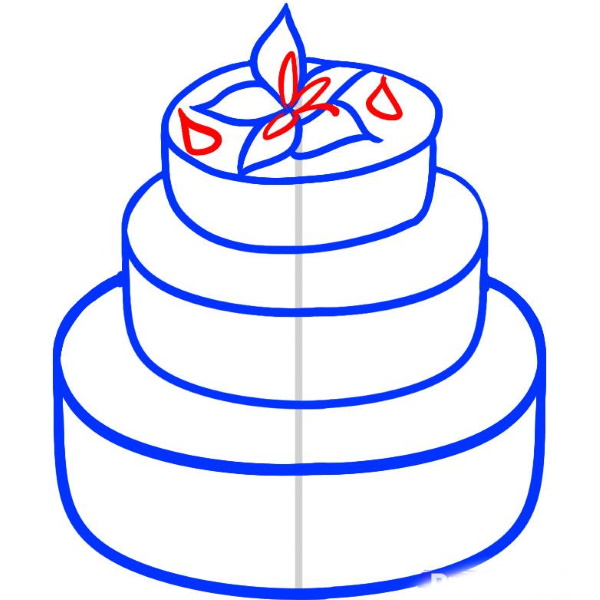
- Color the finished three-tiered festive cake.
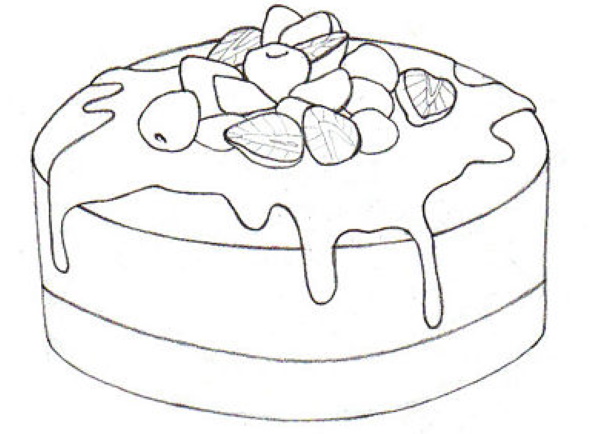
Pencil drawing of strawberry cake
The cake decorated with fresh strawberries looks delicious. You can draw it using a simple pencil and several colored pencils.
Cake (a drawing for children's treats can be done with colored pencils) with strawberries goes through the following stages:
- Draw an oval at the bottom of the sheet. This will be the bottom of the cake. It is better to make the oval larger so that the berries do not go beyond its edges.
- Draw 1 straight vertical line to the left and right of the oval. Draw another oval between the top edges of these lines. This will be the top of the cake.
- Remove the back part of the lower oval.
- Draw an arced line on the side of the cake, which will mark the border between the two layers.
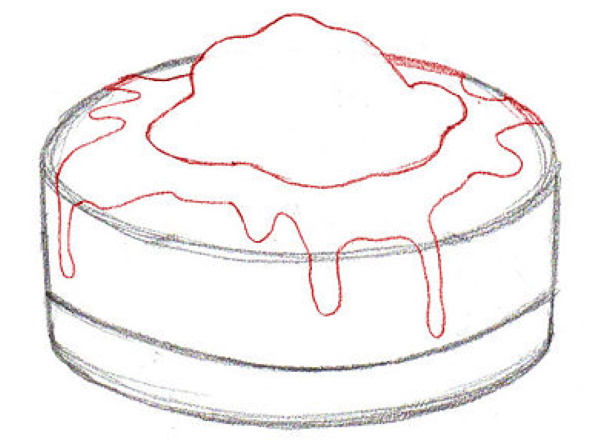
- Sketch out some strawberries on top and draw some spreading syrup.
- Give the strawberry its natural shape, depicting both whole berries and halves.
- Draw a scattering of small circles and dots on the side of the cake. This will imitate the porosity of the dough.
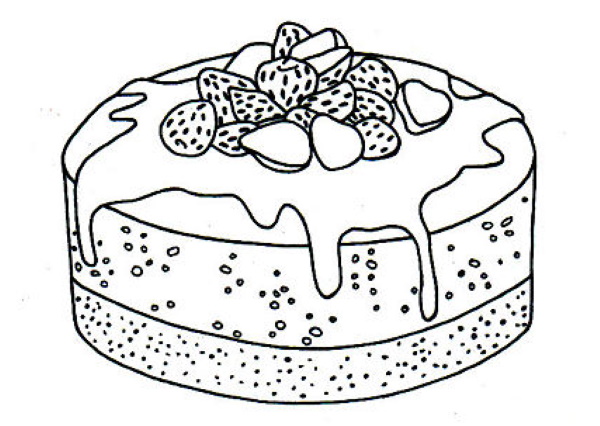
- Outline all the lines, making them clearer. You can use a black marker for this.
- Color the cake. Here you can get by with 3 colors.
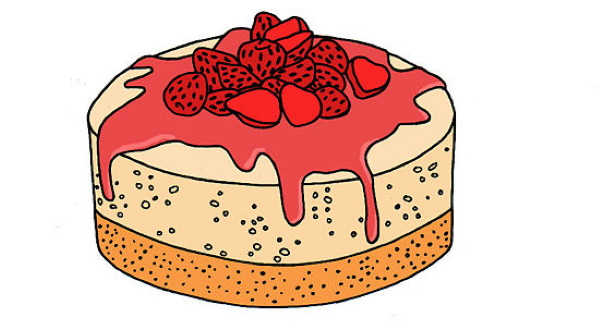
- For example, depict strawberries and syrup in red, the top cake in beige, and the bottom cake in yellow.
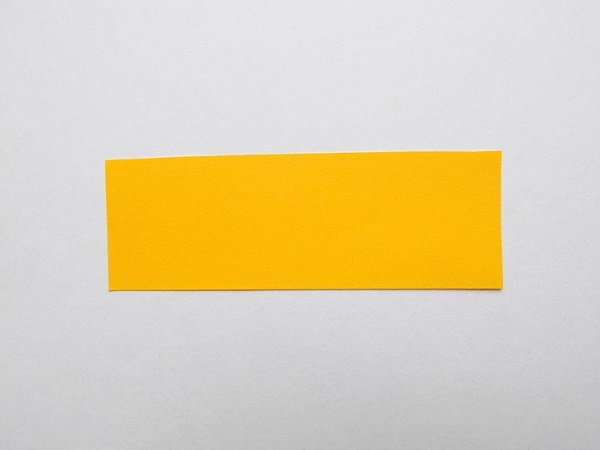
Gouache painting with applique
To create a gouache drawing with applique you will need:
- paints;
- album sheet;
- colored paper. Light yellow or light orange work best.
The work takes place in the following stages:
- Cut out a rectangle from prepared colored paper, for example, light orange.
- Glue the cut-out figure onto a white album sheet, but not in the middle, but so that it is located closer to the bottom edge. In this case, there will be space at the top for candles that will decorate the cake.
- Draw a horizontal stripe on the rectangle glued to the album sheet. It should go approximately in the middle and divide the rectangle into 2 equal parts. You can use pale yellow paint for this. As a result, you will get 2 identical cakes.
- Considering that such a cake will require only 4 layers, draw 2 more stripes. It is easy to determine their location: each of the 2 layers into which the cake is divided should also be divided into 2 equal halves.
- Using the same paint, draw a stripe down the middle of the top cake, then the same stripe down the middle of the bottom cake. The result should be 4 identical cakes.
- Decorate the top layer of the cake. To do this, draw a wavy line using orange paint.
- Place the first candle on the cake. It can be yellow. It is better to place it in the middle. It is easy to draw a candle: all you need to do is draw a short vertical strip.
- Place 2 candles to the left and right of the central one. They have the same color and are drawn in the same way.
- Draw a tablecloth on which the cake is placed. To do this, draw a horizontal orange stripe at the bottom of the sheet under the glued rectangle. To make the tablecloth look beautiful to match the cake, place several yellow circles along this stripe.
- Continue working with the cake, adding a few small yellow circles to the top layer. They can be located under the wavy line that was drawn earlier.
- Using red paint, make lights appear above the candles. It is enough to leave 5 spots - 1 above each candle.
- Use red paint to decorate one of the layers – the one above the bottom one. All you need to do is draw a wavy line.
- To decorate the bottom layer, use green and red paint. Use green to draw 2 zigzag lines along the cake that intersect with each other, forming many diamonds. In the middle of each of these diamonds, put 1 red dot.
- Decorate the remaining untouched cake layer with the 1st black zigzag line.
- Fill the cake with chocolate. To do this, draw 1 horizontal black stripe along its outline at the top. Draw a black wavy line under this stripe.
Gouache drawing without applique
It is easier to draw a cake without an applique, because you don’t need to cut anything out of paper.
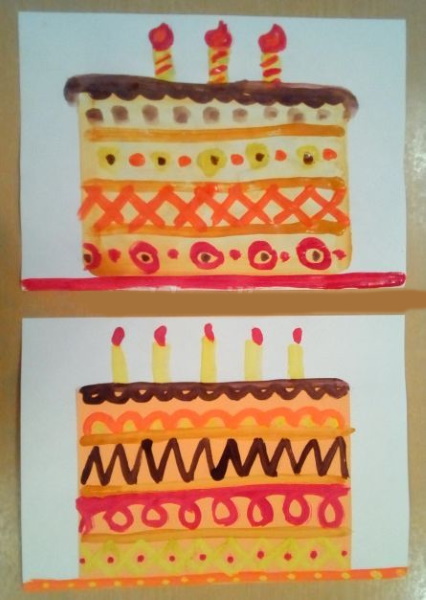
The steps to create such an image are as follows:
- Draw a rectangle on a sheet of paper using ochre. Just like in the example above, it should not be located in the center of the sheet, but closer to its bottom edge. The drawn rectangle should be completely filled with ochre.
- Use a yellow strip to divide the cake into 2 halves. You will get 2 large layers – top and bottom.
- There should be 4 layers in total, so you should divide each of the 2 layers in half.
- Proceed to decorating the cake with decorations. To do this, decorate the bottom layer with red paint, drawing several circles and dots. It is better to make the circles with dots in a row and alternate with each other. In this case, in the center of each circle you can put 1 black dot.
- Move to the layer above and decorate it with bright orange zigzag lines. They should intersect with each other to form a row of diamonds.
- Decorate the next highest cake layer with alternating green circles and red dots. You can also put a black dot in the center of each circle.
- Decorate the top layer with small black circles arranged in a row.
- "Pour" chocolate over the cake. To do this, draw a black stripe above the top layer, and immediately below it, a wavy line of the same color, corresponding to the chocolate.
- Place a few beautiful burning candles on the cake and "lay" a tablecloth underneath it. The tablecloth can be a simple red stripe running under the bottom cake.
- To draw a candle, you need to draw a short horizontal stripe with yellow gouache above the cake in the center. There should be another one of the same stripes on the left and right.
- Draw a red spot above each of the 3 candles. This is a flame.
- Decorate the surface of the candles with short, thin, diagonal red lines.
Drawing of a three-tier cake using crayons or pastels
A cake (a drawing for children is distinguished by its brightness and scale) in the form of a high festive version can be created using wax crayons or pastels. However, the work begins with creating contours with a simple pencil, and then comes coloring.
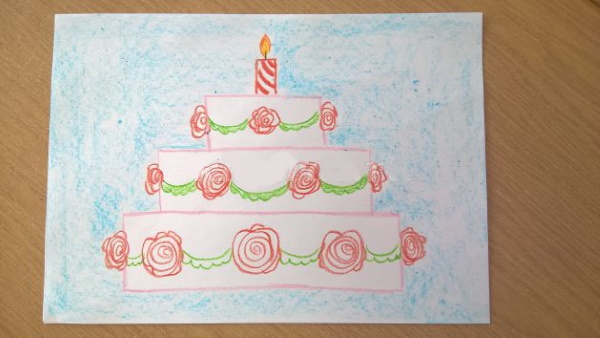
The steps to making a three-tier cake are as follows:
- Start with the bottom tier. It should be a rectangle resembling a brick.
- Make a sketch of the next highest tier. It is also represented by a rectangle, but only smaller.
- The third tier is depicted as the smallest rectangle.
- Proceed to coloring the cake. To do this, draw a spiral rose located in the center of the lower tier. Draw the same roses, represented by a spiral, to the left and right of the central one.
- Draw 1 rose on each side of the lower tier. They should be slightly smaller in size, because they are visually removed from the viewer. There should be 5 flowers on the lower tier.
- Decorate the middle tier using the same principle. The number of roses here should be 1 less: 2 flowers should be located within the rectangle itself, and 2 smaller roses should be on the sides - left and right.
- Decorate the top tier with spiral roses. Here, all the flowers can be smaller in size compared to those that were drawn earlier and are located on the cake below. The total number of roses on the top tier is 3: 1 should be located in the middle, and 2 more on the sides.
- Decorate the cake with a candle. To do this, draw a small rectangle over the top tier, similar to a brick, located vertically.
- Decorate the rectangle representing the candle with several diagonal stripes.
- At the top in the middle, use a short line to depict a wick and “light” it using orange and red colors.
- Take green chalk or pastel and draw arcs between the roses. There should be a wavy line under each arc. It is also done in green.
- Paint the resulting garlands, also using green color.
- Color the cake and background, choosing any color according to your mood. If the artist wants his cake to remain white, then the background should be shaded. For this, you can use, for example, blue chalk. To make the color uniform without visible strokes, you should color with the side of the chalk - flat.
Both adults and children will always be happy with a cake. An edible cake will cause more joy than a drawn one. However, its drawing will leave a memory and an aesthetic perception of the moment.
Video on how to draw a cake
How to draw a simple cake: