One of the most common hobbies of women with the onset of motherhood is knitting. The choice of children's things from yarn is very large. However, as the cold weather approaches, you especially want to knit your child not only a warm, but also a stylish hat.
Rules for choosing yarn and knitting needles
Knitting children's hats with knitting needles – is a process that requires properly selected materials for work. Before purchasing yarn for a product, you should think through its future appearance and pattern in detail. The type of yarn and the diameter of the knitting needles will depend on these indicators.
- To make things for children, soft materials are needed that are breathable and do not cause allergies. When knitting things for an adult, you should focus on the quality of the yarn: it should not shrink when washed, lose color in the sun, or provoke allergies.
- Composition. Natural yarns include:
- Wool – suitable for making winter items, but can be prickly and uncomfortable. Woolen items can also stretch, pill, or fade.
- Merino wool – has a large number of advantages: fineness of threads, softness, frost resistance, hypoallergenicity, strength and elasticity. Its only disadvantage is the price, which is high even for 1 skein of threads.
- Cashmere – wool is weightless, frost-resistant and even medicinal.
- Alpaca – knitted items made from this type of wool almost do not pill, are durable, and also have good thermoregulation: alpaca products are warm in winter and not hot in summer. The downside of the yarn is its coarseness, so acrylic or polyester are often added to it.
- Angora - its advantage is the softness of the yarn. The disadvantage of this wool is the fragility of the fiber, so durable materials are added to its composition.
- Mohair – its positive qualities are durability, an extended range of colors, elasticity of threads, and the ability to retain heat when the product gets wet.
Plant fibers include:
- Cotton – is a universal material for knitting things. It does not shrink when washed correctly, is hypoallergenic, and also has a large color palette. Its disadvantages are fading in the sun and shrinkage when washed incorrectly. However, its disadvantages were eliminated in mercerized cotton. A cotton processing process called mercerization was invented.
- Flax – its differences from cotton are good hygroscopicity and high air permeability.
- Bamboo – it is added to yarn to make it softer.
Artificial fibers – their addition to yarn increases the strength of the material, increases elasticity, prevents wool from pilling and fading. Their disadvantages are poor air permeability, static electricity, which accumulates fibers, and allergenicity.
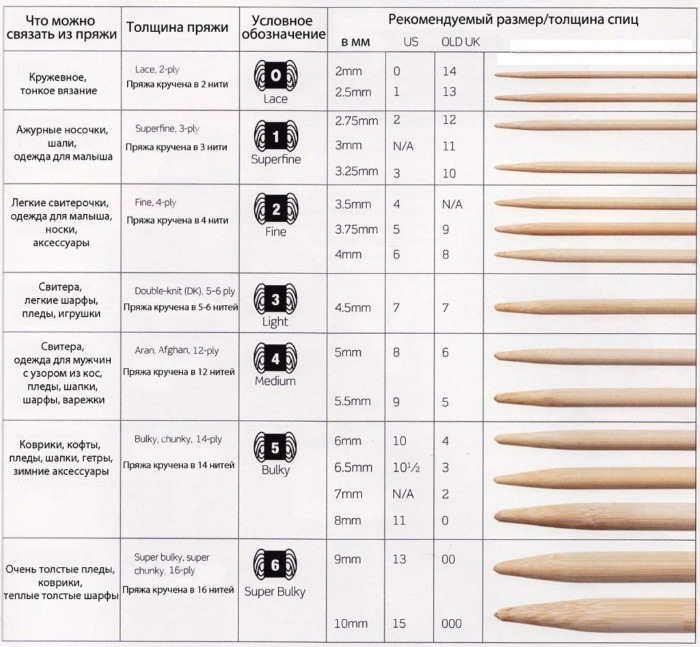
— when purchasing yarn, you should pay attention to the product label. It contains almost all the necessary parameters: the purpose of the yarn, its thickness, length, and the size of the needles needed for knitting.
The diameter of the knitting needle should be twice the thickness of the yarn.
- The material the needles are made of is important. Metal or plastic needles are popular. Bamboo needles are also in demand, but due to their large diameter, they are used for large knitting items. Aluminum needles can leave a dark mark on light yarn, so they should be used when making dark items.
- An important criterion is the appearance of the needles. They should be smooth, and their edges should not be sharp, so that knitting does not catch on the bulges in the future.
To determine the knitting density, you need to make a sample with the selected pattern, yarn and knitting needles that will be used. The sample should be approximately 10x10 cm. Then it should be washed and dried. Next, a ruler is applied to the sample horizontally and vertically to find out how many loops and how many rows there are per 10 cm of the product.
Size range of products for newborns
The sizes of hats are presented in the table, which can help you choose a headdress based on your child’s age.
| Age of the child | Headdress size | Head circumference of a boy (average), cm | Head circumference of a girl (average), cm |
| Newborn | 36-38 | 35 | 34 |
| 1 month | 38 | 37.2 | 36.5 |
| 2 months | 40 | 39 | 38.3 |
| 3 months | 40-42 | 40.5 | 39.5 |
| 4 months | 42 | 41.7 | 40.6 |
| 5 months | 42-44 | 42.7 | 41.7 |
| 6 months | 44 | 43.5 | 42.3 |
| 7 months | 44 | 44 | 42.8 |
| 8 months | 44-46 | 44.5 | 43.5 |
| 9 months | 46 | 45 | 44.2 |
| 10 months | 46 | 45.5 | 44.5 |
| 11 months | 46 | 46 | 45 |
| 12 months | 46-48 | 46.5 | 45.5 |
Traditional shape boy's cap
To work you will need to purchase the following tools:
- olive-colored yarn – 25 g;
- white yarn – 5 g;
- straight knitting needles No. 2.
The knitting pattern for the hat is shown in Fig.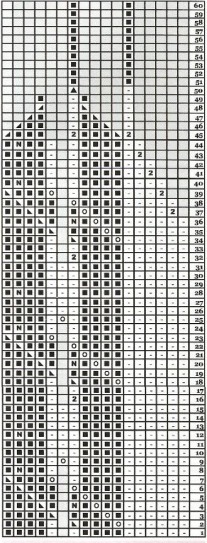
The hat pattern is knitted according to the diagram:
Row #1: 1 loop is put on the knitting needle and 1 crossed front loop is added, knitted from the yarn over.
Then you need to cast on 16 garter stitch loops, make 1 double draw through (you need to remove 2 loops, and knit the 3rd loop, pulling the removed loops through it).
Next, cast on 16 garter stitch loops, add 1 loop, a garter stitch loop, and add 1 loop again, and then continue knitting according to the pattern described above.
Row #2: the entire row is knitted in garter stitch.
The process of making a hat:
- Cast on 109 stitches of olive thread onto knitting needles.
- The product must be knitted with face loops between the edge loops of the main pattern according to the scheme: 24 rows with olive-colored thread, 6 rows with white yarn, 6 rows with olive-colored thread and again 6 rows with white yarn, and the remaining rows are knitted with olive-colored thread.
- After 15 cm from the cast-on edge, all loops should be closed and the product should be sewn at the back.
- The top seam is knitted like tulip petals.
- Next, on the inside of the “ears”, you need to cast on 9 loops and knit the ties with garter stitch.
For a newborn girl
A strawberry hat will look very beautiful on a newborn girl. It can be knitted on both straight and circular needles (they will be more convenient to knit with).
To work you will need to purchase the following tools:
- yarn - 50 g each of red and green colors;
- knitting needles on a fishing line No. 2.5.
The knitting pattern for the hat is shown in Fig.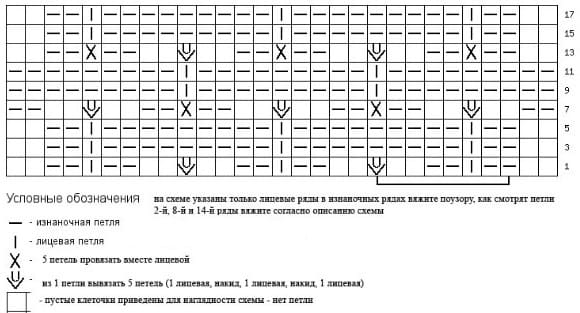
Stages of creating a header:
- Using red thread, cast on 108 stitches. Knitting is done with the front surface for 5 cm.
- You need to start knitting a pattern with dots to a height of 13 cm. The pattern is knitted with a jacquard pattern. To do this, you need to freely pull the threads of the second color along the back side, without tightening them tightly.
- To then move on to the leaf pattern, you should decrease 4 stitches evenly.
- After you start knitting the leaves, you need to make decreases for the crown. You need to divide the loops into 8 pieces and hang markers. In every second row, located to the left of the marker, you need to knit 2 loops together so that 8 loops are formed on the knitting needles. This will be the stem of the strawberry. Having knitted 8 loops up, to a length of 3 cm, you need to pull the thread inward, tighten it and straighten the stem back.
Winter model
To work you will need to purchase the following tools:
- yarn – 100 g;
- circular knitting needles No. 3;
- hook #3.
The knitting pattern for the hat is shown in Fig.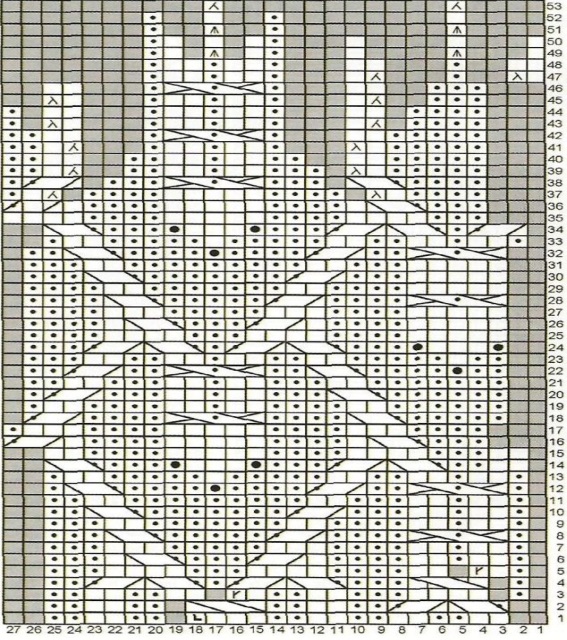
Stages of creating a header:
- Cast on 4 stitches on knitting needles No. 3, then knit the stitches in the following sequence: 1 edge stitch, 2 front stitches and 1 edge stitch.
- The purl rows are knitted according to the pattern. Also, ties 35 cm long are knitted.
- To create "ears" on the hat, knit increases on the sides according to the pattern: before the edge loop, you need to add 1 loop on both sides in the front row. The loops that are added must be introduced into the knitting of the elastic.
- Loops are added until there are 24 loops in the knitting.
- Next, the loops are collected according to the scheme: 24 pcs. "ears", 44 pcs. front part of the hat, 24 pcs. other "ears" and 28 pcs. to create the back part of the product. In total, there are 120 pcs.
- The knitting process continues in a circle.
- Next, the knitting process continues with a 2x2 elastic band over a length of 3 cm.
- A series of increases is knitted according to the pattern: 3 times it is necessary to knit 2 front loops and 2 back loops, then loops are collected in the sequence: 2 front, 1 loop is added, 2 back, 2 front and again 2 back. In total, there are 126 loops.
Spring
To work you will need to purchase the following tools:
- yarn – 100 g;
- knitting needles No. 2.5;
- double pointed needles No. 3.
The knitting pattern for the product is shown in Fig.
Stages of creating a header:
- Knitting is done from top to bottom. Initially, 14-16 loops are cast on with stocking needles and knitting is done according to the pattern:
Row #1: Using yarn overs, double the number of front loops.
Row #2: knit with knit stitches, and the yarn over should be a crossed stitch;
row #3: knit with front loops, adding 14-17 loops;
Row #4: knit the stitches in the following order: 2 knit, 1 purl, 2 knit, 1/2 purl. Knit until you reach 7 rows. - The product is knitted according to the pattern chart, and the loops are distributed in the following sequence: 6 loops according to the pattern A1, 0/1 purl loop. The chart includes loop increases. As a result, there will be 182 - 189 loops on the needles.
- Then knit pattern A2. Upon completion, the length of the hat will be about 20 cm. Next, you need to remove 1 loop in all sectors with purl loops and knit 4 front loops in the middle of all braids, 2 loops together with a crossed loop. There should be 140 - 147 of them in total.
- Change the knitting needles to No. 2.5 to knit in a circle with a 1x1 elastic band until the hat reaches a height of 23–24 cm.
- The last step is to close all the loops, tighten them at the top and secure the thread.
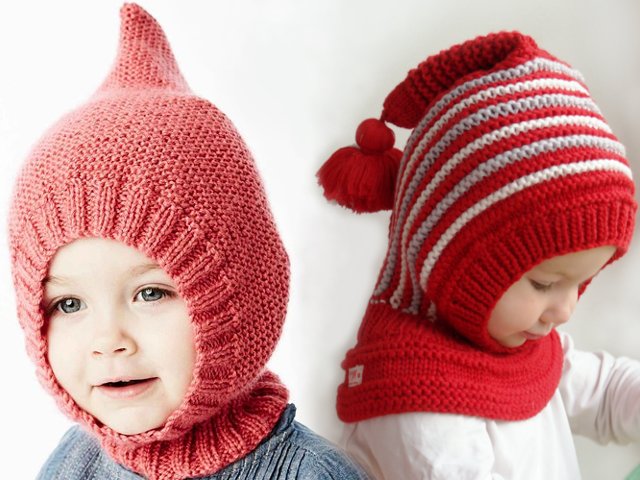
Newborn Hat Helmet with Braids
Knitting children's hats with knitting needles in the form of a helmet will allow you to maximally protect children's ears from the wind.
To work you will need to purchase the following tools:
- yarn – 150 g;
- knitting needles No. 3 and No. 3.5;
- circular knitting needles.
Stages of creating a header:
- Cast on 29 stitches on knitting needles No. 3.5 and knit 2 rows in stocking stitch.
- Using the “braid” pattern, you need to knit a strip 46 cm long. The remaining loops are removed with a pin.
- Next, the back part of the product is knitted. From the front part of one side of the strip, you need to dial 52 front loops from the edge loops. The next row should be knitted with front loops.
- The loops are divided into 3 parts: 16 loops for the middle and 18 loops on the sides.
- The middle loops are knitted with a 1x1 cm elastic band, knitting the 16th loop and the side loop along the edge together, like a heel.
- In every 6 rows, knit 2 loops together with the front loop 4 times so that at the end there are 8 loops left that need to be transferred to a pin.
- The front part of the product is knitted with knitting needles No. 3. On the opposite side, from the edge loops, you need to cast on 52 loops and knit 3-5 cm with a 1x1 elastic band.
- Next, the outer loops of the 1x1 elastic need to be sewn together to create an opening for the face.
- After this, the lower part of the neck is knitted with circular knitting needles using a 1x1 elastic band in a circle to the desired depth.
- Next, you need to distribute the loops: 19 loops for the back part, 1 loop for the raglan line, 15 loops for the side part, 1 loop for the raglan line, 19 loops for the front part, 1 loop for the raglan line, 15 loops for the side part, 1 loop for the raglan line and so on in a circle.
- In all front rows, you need to make a yarn over before and after the raglan line, and the raglan loop itself is knitted as a front loop.
- At the end, you should close the loops of the outer row.
- To decorate the hat, you can crochet it or add a pompom.
With frills
To work you will need to purchase the following tools:
- pink yarn – 50 g;
- cherry-colored yarn – 10 g;
- knitting needles No. 2.5;
- hook No. 2.5.
The diagram for making the hat is shown in Fig.
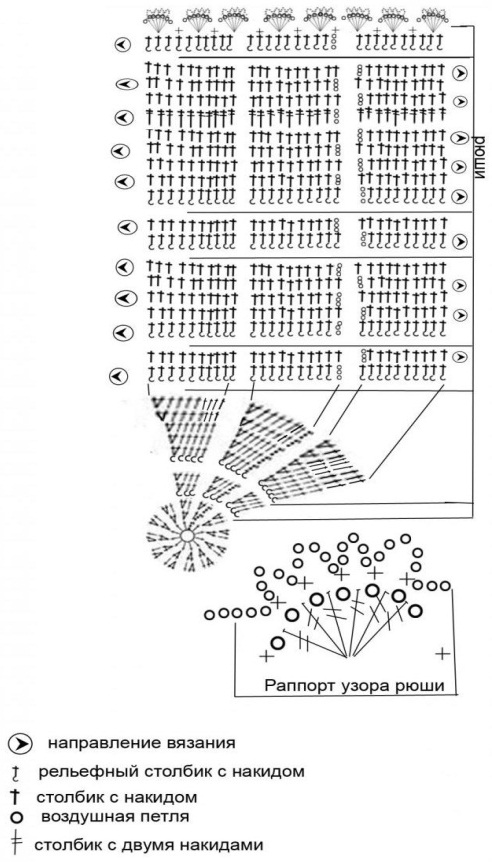
Stages of creating a header:
- You need to knit a 1x1 elastic band.
- Next, the main pattern is knitted in rows:
No. 1: the loops are knitted in the following order: 1 edge, 1 front, yarn over, 2 front together, 6 front, then you need to follow this pattern from the yarn over, the edge loop is knitted last;
No. 2-5: knit with face loops;
No. 6: loops are knitted in the following sequence: edge, 5 front loops, yarn over, 2 front loops together, 6 front loops, edge loop; - Next, knit a frill on the hat with cherry-colored yarn according to the row pattern:
No. 1: loops are knitted in the following order: edge, 3 front loops, yarn over, edge;
No. 2, 4: knit with purl stitches;
No. 3: knitting occurs in the following sequence of loops: edge, 3 front loops, yarn over, 1 front loop, yarn over, edge loop;
No. 5: the loops are knitted in the following sequence: edge, 4 front loops, yarn over, 1 front loop, yarn over, the pattern must be followed from 4 front loops to the end of the row;
№6: the thread needs to be changed again to pink yarn. The row consists of purl loops;
No. 7: the loops are closed with face loops;
- To further create the hat, cast on 84 stitches with pink thread and knit 2 cm with a 1x1 elastic band.
- Next, knit a ruffle 2 cm high.
- For the initial row of the frill, you need to cast on 84 loops with pink thread and knit 12 cm.
- The ruffle is knitted again and 84 loops are cast on with pink thread along its initial row. These loops must be divided into 3 equal parts and work only with the middle one.
- In all rows, the outer loops of the middle and side parts are knitted together. This is how it is knitted until all loops of the side parts are decreased.
- Along the edge of the hat, you need to cast on 82 loops and knit 2 cm of 1x1 elastic with pink yarn.
- Use a crochet hook to tie a chain of air loops 60 cm long and pull it through the bottom edge of the hat.
With ears
Children's hats with cat ears have recently become popular and attract attention to their owner. To create such a unique product, you can knit it yourself. For work, you will need to buy 100 g of yarn and circular knitting needles No. 3, No. 3.5.
The work is carried out according to the diagram.
Step-by-step work process:
- Cast on 88 stitches on #3 knitting needles and close them in a circle. You need to knit rows of hollow elastic according to the pattern:
No. 1, 3: the front loop must be thrown over, without knitting the thread, to the loop along the entire row;
No. 2, 4: remove the front loop, then knit the back loop and so on until the end of the row;
№5-11: knitting is done with a 1x1 elastic band. - The knitting needles are changed to №3.5, and the set-up row is knitted according to the pattern: 27 front loops and 1 back loop, the next 15 loops are knitted for the side pattern. The increases are made as follows: from the back loops, 2 loops must be knitted for the side part. In total, 22 loops are obtained.
- Then, repeating rows No. 7-12 according to the main pattern, another 37 rows are knitted.
- It is necessary to start decreasing the loops, in connection with which the knitting pattern of the hat changes. It is necessary to start knitting 2 outer loops so that they are facing the center of the pattern. So 4 rows are knitted so that 2 loops remain on the sides
- To complete the work, the top seam of the hat is sewn.
With a bow
To work you will need to purchase the following tools:
- yarn – 2 skeins;
- knitting needles No. 2.5.
The knitting pattern for the garter stitch is shown in Fig.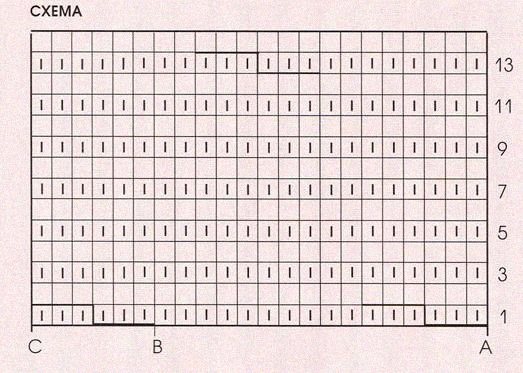
Stages of creating a header:
- You need to cast on 120 loops on the knitting needles. Then knit the rows according to the pattern:
No. 1: 1 front loop is inserted behind the back wall, then 1 back loop is knitted and so on until the end of the row;
No. 2-17: knitted with a 1x1 circular elastic pattern. - Another 130 rows are knitted using the front surface stitch.
- A row of 30 front loops is knitted.
- The product must be turned inside out and the loops closed, sewing the top seam.
- The ends are sewn together.
- Next, knit a bow. To do this, cast on 15 stitches and knit 9 cm with the front surface. After this, the stitches should be closed.
- The next step is to fold the 2 folds of the bow and sew the center of the bow on all sides.
- The seams should be sewn from the back side, and the lower folds are sewn from the front side.
- At the end, the bow should be gathered a little at the back.
Openwork hat
For the finished product you will need to purchase 50 g of yarn and knitting needles No. 3.
The knitting pattern for the hat is shown in Fig.
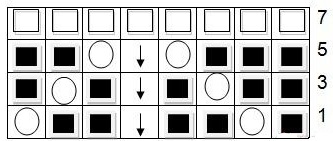
Stages of creating a header:
- Rows No. 1, 3, 5 and 7 are knitted with knit stitches, and rows No. 2, 4, 6 and 8 are knitted with purl stitches.
- To join 3 loops together, as shown in the diagram, you need to transfer 2 loops to the knitting needle on the right, without knitting them, but picking them up from the front wall from below. The 3rd loop is knitted as a front loop and pulled through the previously removed loops.
- When knitting the 2 remaining rows, you need to knit every 2 adjacent loops together, and pull the thread through the unused loops, tightening it.
With ties for the little ones
To work you will need to purchase a 100-gram skein of yarn and No. 3 knitting needles.
The diagram for making the hat is shown in Fig.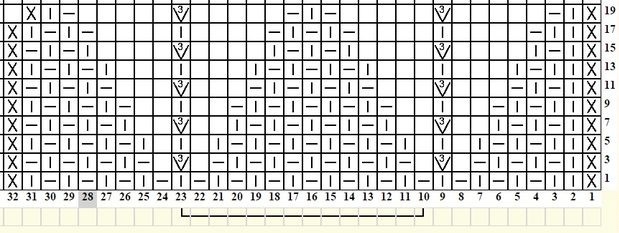
Stages of creating a header:
- You need to cast on 28 stitches onto the knitting needles.
- Along the length, you should form a 4 cm elastic band, alternating front and back loops.
- Continue knitting, alternating front and back stitches in rows of about 6 cm.
- The resulting piece of the product is divided into 6 parts. The rows, collected with face loops, are reduced by 6 loops (1 loop per part).
- You need to leave 3 loops on both sides for ties, but before that you need to finish knitting the remaining 6 loops.
For a child from 1 to 2 years old
Knitting children's hats with knitting needles for children aged 1-2 years will make this product not only warm, but also as comfortable as possible for the child, so that he does not have the desire to take it off his head.
To work you will need to purchase the following tools:
- yarn – 100 g;
- knitting needles No. 3 – 5 pcs.
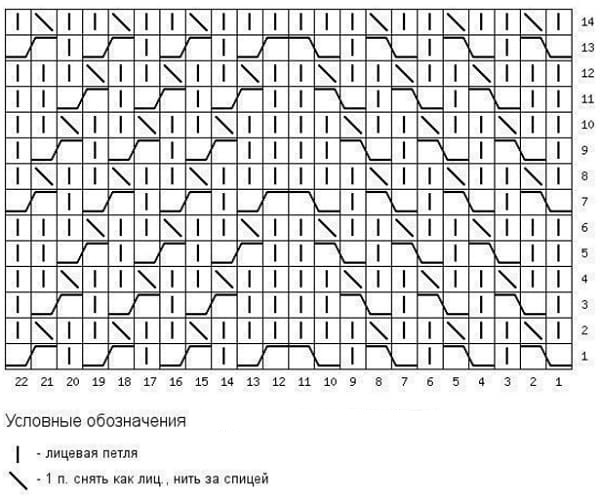
The knitting pattern for the product is shown in Fig.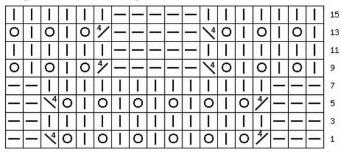
Stages of creating a header:
- You need to cast on 80 stitches on the knitting needles and knit the product with a 1x1 circular elastic pattern.
- Next, when the loops are multiples of 12, the creation of the main pattern begins. To do this, you need to add 4 loops to the current row.
- The process of creating a pattern is carried out according to the knitting pattern of rows:
No. 1, 5: loops are front;
No. 2, 3, 4: loops are knitted in the following sequence: 2 front loops along the edges, 8 back loops and 4 front loops in the middle;
No. 6, 7, 8: loops are knitted in the following sequence: 4 purl along the edges, 4 front loops and 8 purl loops in the middle; - Then, to form the crown, you need to decrease the loops in the rows according to the plan:
No. 1: the loops are knitted in the following sequence: 4 front loops on the sides, 2 loops in the middle are connected 2 times with a front loop and 8 front loops again;
No. 2: 2 loops are combined with 1 front loop, then knitting is done according to the pattern: 6 purl, 2 loops are combined with 1 front loop 2 times until the end of the row, and the 2 outer loops are knitted with 1 front loop;
No. 3, 4: knit stitches on the sides, and in the middle, 6 purl stitches alternate with 2 knit stitches;
No. 5: knit the front loops along the edges, and in the middle, 2 loops are threaded into 1 front loop, and then 2 front loops are knitted;
No. 6, 8: every 2 loops are connected with a front loop;
No. 7, 9: the loops are front. - The loops on the knitting needle are pulled from the wrong side with thread and secured.
For children 3 years old
Knitting children's hats with knitting needles on your own allows you to create a model that matches the desired item in its style and color. In addition, this will allow you to please little boys and girls in their whims and wishes.
For a girl
The list of materials for the work is listed in the table:
| Materials | Quantity |
| yarn | 155 g |
| knitting needles №3.25 | 3 pcs. |
Stages of creating a header:
- The first step is to cast on 98 stitches and knit 4 rows with a 2x2 elastic band.
- The rows have the following pattern:
No. 2, 5, 8, 11, 14 and 17 – loops are front and back;
No. 1, 3: 6 outer loops are knit, and the middle should be knitted with a 2x2 elastic band;
No. 4, 6: the number of outer loops increases to 8;
No. 7, 9: the number of outer loops increases to 10;
No. 10, 12: the number of outer loops increases to 12;
No. 13, 15: the number of outer loops increases to 14;
No. 16, 18: the number of outer loops increases to 16;
No. 19, 64: knitting is done in 2 loops with an elastic band in the middle part of the hat, with the addition of 2 loops at the edges, but with a decrease in their number in the elastic band; - Next, the first 49 loops are transferred to an additional knitting needle, and all loops are sewn together, starting from the middle part.
- Then you need to start knitting the ties of the required length. To do this, cast on 10 loops and knit them with a 1x1 elastic band. At the end, all the loops are closed, and the ties need to be sewn to the hat.
For a boy
The list of materials for the work is listed in the table.
| Materials | Quantity |
| light grey yarn | 50 g |
| dark grey yarn | 20 g |
| white yarn | 10 g |
| car heat decals | 4 pcs. |
| knitting needles No. 2.5 and No. 3.5 | 2 pcs. each |
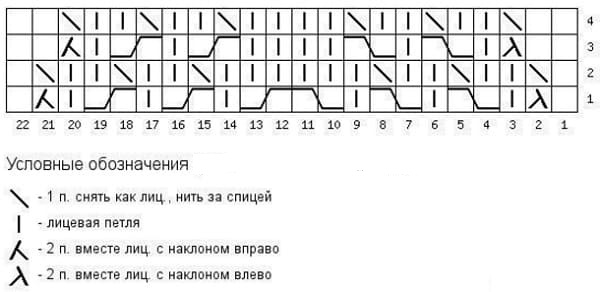
The diagram for creating a hat is shown in Fig.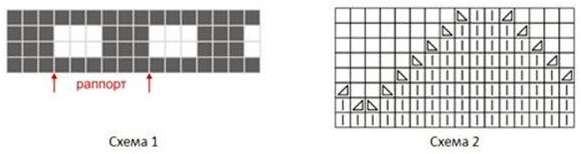
Stages of creating a header:
- Using knitting needles No. 2.5, cast on 96 loops of light gray yarn and knit 7 rows with a 1x1 elastic pattern.
- Next, you need to switch to knitting needles No. 3.5 and knit 7 rows of stocking stitch with light gray yarn, 2 rows with white yarn and 8 rows with dark gray thread.
- Knit 2 rows according to pattern No. 1 to form a dividing panel.
- Next, you need to knit 8 rows of garter stitch with dark gray thread, 2 rows with white yarn and 7 rows with light gray thread.
- After this, the resulting product must be divided into 4 parts and decreases must be made as shown in diagram No. 2.
- When there are 12 loops left, you need to pull them together, make a seam and sew on a light gray pompom.
- Using an iron and a damp cloth, you need to stick the thermal stickers in a random order.
Any handicraft, including knitting, is a very exciting process. At first it may seem that making children's hats from yarn is quite difficult, but once you get to the bottom of it, it becomes clear that you can knit them in a day. At the same time, you can be sure of the good quality of the product.
Article formatting: Vladimir the Great
Video about knitting baby hats
Knitted cap: