Crochet patterns are often incomprehensible to needlewomen, especially beginners. This article presents several master classes with detailed descriptions for each step, allowing you to knit any product step by step.
How to calculate the amount of yarn and choose the hook size for knitting
There are several ways to calculate the required amount of yarn. When knitting using master classes found on the Internet, as a rule, calculating the yarn is not required, except in cases of changing the size.
The amount of yarn used is influenced by the following factors:
- Hook sizeThe larger the hook, the less yarn you will need.
- Footage of threadsThe thicker the yarn, the less of it you need.
- On openwork patterns you need less thread than for dense figured patterns.
- Twisting yarnIf the threads inside the yarn are twisted weakly, the consumption decreases.
It is very difficult to calculate the exact amount of yarn needed, but you can make rough estimates.
How to calculate the amount of yarn based on the area of the product
In this method you will need to draw the product, preferably in a 1:1 scale:
- Divide the product into equal rectangles so as to fill the entire space. At the same time, part of the space beyond the drawn borders will also be captured - this will be the yarn reserve.
- Count the rectangles and multiply the resulting number by 2, since the picture shows only half (front or back) of the product.
- Knit one rectangle with similar or exactly the same yarn.
- Wash the rectangle according to the instructions on the packaging.
- Measure the area of the washed sample.
Then proceed using one of the following methods:
- Calculate through mass. Weigh the sample. Then use the formula: S (of all rectangles) * m (of the sample) / S (of the sample), where S is the area and m is the weight. This will give you the weight of the finished item, which must be divided by 100 (if there are 100 g in 1 skein) or by 50 (if there are 50 g in a skein).
- Count by footage. Unravel the sample, measure the length of the thread. To do this, you can fold the thread several times, counting how many times the thread was folded. Use the formula: l (threads in the sample) * number of rectangles / l (threads in 1 skein), where l is the length.
Other methods
There are less accurate methods for determining the amount of yarn used:
- Average parameters.
- Online calculators.
The disadvantage of these methods is that they do not take into account the factors that influence yarn consumption (they are listed above).
How to choose a hook
To choose a hook, you should knit several samples with different hooks. In this case, you should use the yarn from which the product will be knitted. You should knit several rows with double crochets.
If you don't like the result, finish the sample and start a new one with another hook (one size larger or smaller). If the hook catches on the yarn, it must be replaced with another one (one of a larger size).
How to knit a stylish women's cardigan: step-by-step description
Crocheting (patterns and descriptions of master classes of some original items are presented below) is considered more difficult compared to knitting, however, it is crocheting that is most often used to create light, openwork sweaters and shawls.
To knit a cardigan you will need:
- Yarn with a yardage of 102m/50g (or 204m/100g).
- Hook No. 5.0.
- Thick needle.
Amount of yarn depending on size:
- XS – 600 g.
- S – 650 g.
- M – 700 g.
The example shows the parameters for creating a cardigan of size S.
The data for changing the sizes is presented in the table:
| Parameter No. | Data for different sizes | ||
| XS | S | M | |
| (1) | 87 | 95 | 103 |
| (2) | 79 | 85 | 91 |
| (3) | 19 | 20 | 21 |
| (4) | 43 | 47 | 51 |
| (5) | 0 | 1 | 2 |
| (6) | 21 | 23 | 25 |
| (7) | 45 | 47 | 51 |
| (8) | 67 | 69 | 73 |
| (9) | 2 | 3 | 4 |
| (10) | 47 | 48.5 | 50.5 |
Patterns
The product uses several patterns.
Basic pattern:
- Cast on an odd number of VP + 3 for lifting.
- Knit a strong column in every 2nd VP + 1 VP between columns.
- Start the second row with 2 VP for lifting, finish with 2 strong columns without VP between them.
- Each odd row ends with one strong column, each even row ends with two.
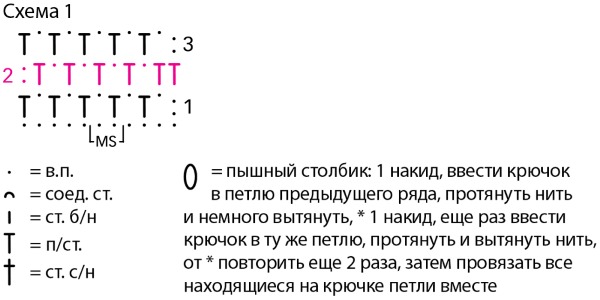
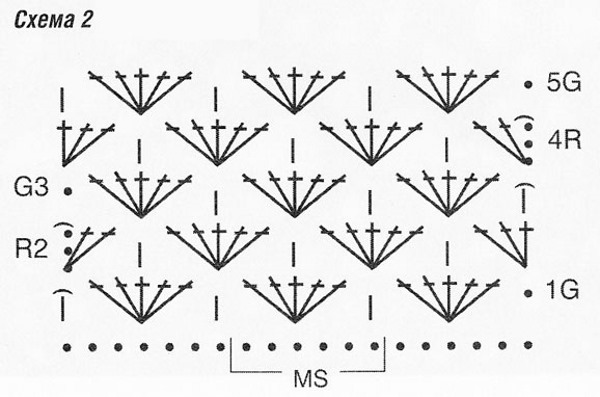
Pattern with lush columns (PC):
- Cast on stitches (the number must be a multiple of 4 + 3 stitches).
- Knit 2 rows according to pattern 1.
- First row: 3 VP – lift, then knit PS in every 4th loop (every 2nd VP between columns). Between PS 2 VP. Finish with CC1N.
- Second row: 3 VP – lift, 2 VP, 1 PS. Finish with 2 VP + SS1N.
- Repeat 2nd row.
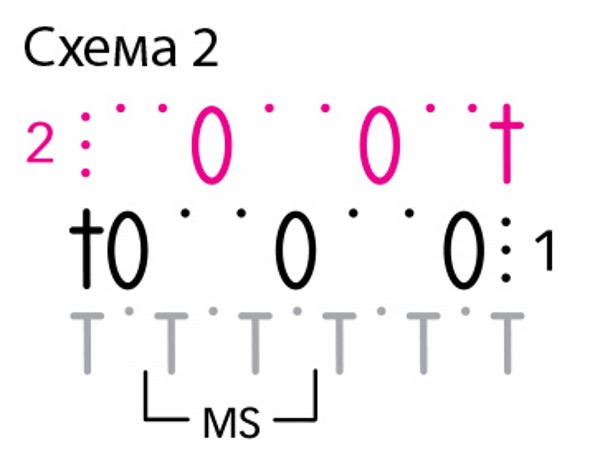
Pattern with PS (circular):
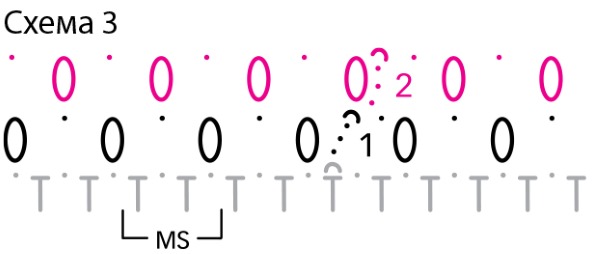
- Cast on stitches (quantity multiple of 4).
- Knit 1 row from pattern 1, close the knitting into a circle using a slip stitch (SL).
- Knit all rows according to the following pattern: 3 VP (lift), 1 PS + 1 VC, repeat until the end of the row, SP.
- In the 2nd row (after the strong columns), knit lush columns into every second VP, then into each VP.
Pockets
The cardigan requires 2 pockets. To do this, cast on 33 VP, two of which are for lifting. Knit 12 cm with the main pattern, then 2 rows of pattern 2. In this example, the knitting density is 18 sts by 12 rows in a 10x10 sample.
Back
Cast on 95 VP (parameter #(1)) and 2 VP for lifting. Knit 36 cm with pattern 1. Make armholes: skip 2 sts from each end of the fabric. In each odd row, decrease the number of loops (do not knit 2 sts from the ends) until the number of loops reaches 85 (parameter #(2)). From the beginning of the armholes, knit 20 cm (parameter #(3)) with the main knitting.
Shelves
Knit a chain of 47 (parameter No. (4)) air loops. Knit 36 cm with the main pattern. On one side, make decreases according to the same pattern as on the back. Decreases on the left side - right shelf, on the left side - right. After 9 cm from the left edge (for the left shelf), skip 5 p.
In the first odd row, skip 4 sts, then 3 sts, 6 sts and 1 st (parameter #(5)). As a result, 23 sts will remain (parameter #(6)). Knit like this to the end. The shelves should match the height of the back.
Sleeves
Cast on 47 VP (parameter #(7)) + 2 sts for lifting. Knit pattern 1. In the 4th row, add 11 sts on one side, and in the 5th row – on the other side. As a result, you will get 69 sts (parameter #(8)). Knit the added loops with strong columns, from the second row – with the main pattern.
To make a low sleeve cap, after 42 cm of the main pattern, skip 2 sts from each end of the fabric. In each odd row, skip 3 sts (parameter No. (9)). The total length of the sleeve should be 48.5 cm (parameter No. (10)).
Assembling a cardigan
Sew pockets to the fronts (in the center). Sew the fronts, back and sleeves from the inside with a needle so that the seams are not visible. All edges of the product (fronts, sleeves, neck and bottom) are bound with 2 rows of pattern 3.
To preserve the corners, knit 3 SS into each extreme loop of the corner.
After assembly, hand wash the sweater according to the washing instructions on the yarn packaging.
Step-by-step knitting of an original shawl
The shawl is often worn in spring and autumn, sometimes in summer.
What you will need to knit a shawl:
- Yarn of your choice (preferably several colors).
- Hook No. 4.0.
How to knit 1 piece
The shawl consists of several square pieces joined together to form a triangle or rectangle.
Options for color distribution in the product:
- Make the entire shawl in one color.
- Make the details in different colors or shades of the same color.
- Make multi-colored details, that is, several colors are combined in 1 detail.
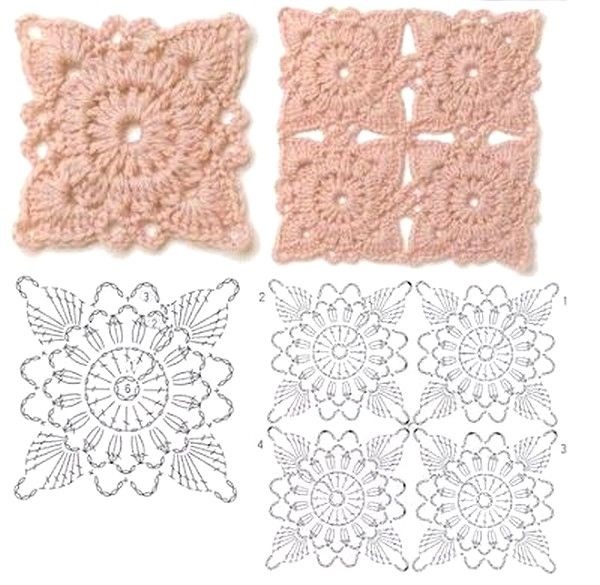
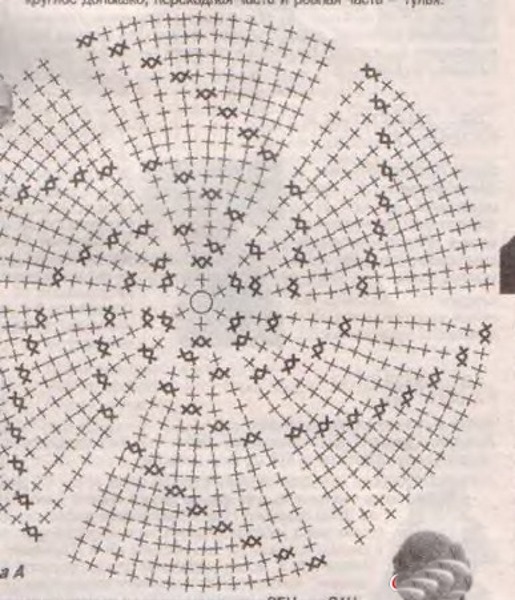
How to knit 1 piece from the diagram above:
- Make a chain of 6 VP, close into a circle.
- Knit 4 VP and (1 CC1N + 1 VP) * 15. Close the row.
- In each VP, knit 1 PS, consisting of 3 CCH, and 3 VP between the lush columns. The first PS consists of 3 lifting VP and 2 CCH. You will get 16 PS. Close the knitting.
- Make 1 VP. Then repeat the following pattern 4 times: 1 SC; (5 VP, 1 SC in the next VP chain) * 2; 5 CC1N in the next chain consisting of VP; 5 VP and 5 CC1N in the same chain. Close the row.
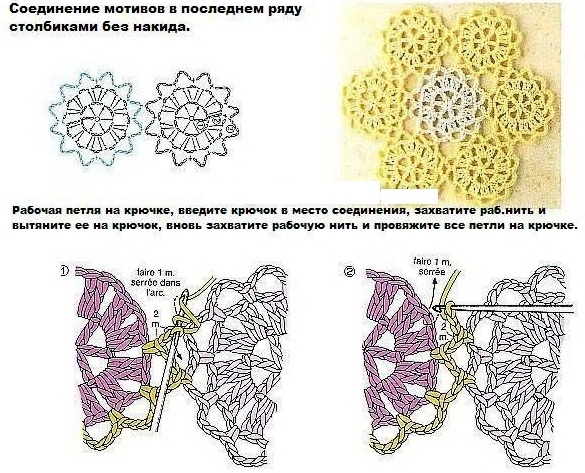
How to connect the parts
To connect the elements, use the air loops of the last row - 4 chains at the corners and 8 at the edges.
Connecting parts with separate pieces of thread is not only inconvenient, but also unreliable, so it is recommended to knit all the parts without the last row.
After all the parts are connected, proceed to knitting the last rows, but when knitting chains of two elements, cross them. Thus, the elements will be connected by crossing chains of VP. The edges can be decorated in any way you like. The easiest way is to tie the edges with CC1N or SC.
Shawl Knitting Patterns and Ideas
There are many different crochet shawls available, varying in size, shape and pattern.
Below are 5 patterns for knitting a shawl:
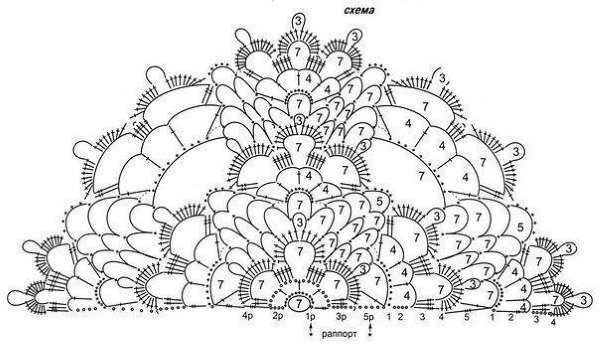
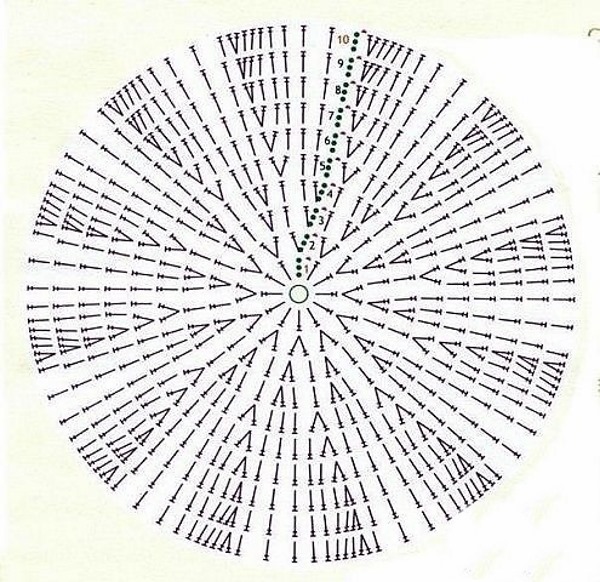
- Semi-circular shawl. This shawl is knitted according to rapports, each of which consists of 5 rows. Rapports must be repeated until the desired dimensions are achieved. The lines in the diagram indicate chains of air loops, the number of which is indicated next to the line.
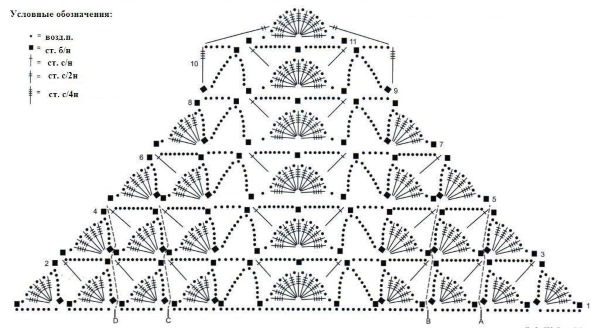
- Triangular shawl with scale-like pattern. Knitting starts from the long side, so you should cast on more stitches than indicated in the pattern. That is, the pattern reflects the last rows, which give an idea of knitting the main part of the product.
- Pattern "Stars". Translucent fabric of unusual shape is suitable for warm season.
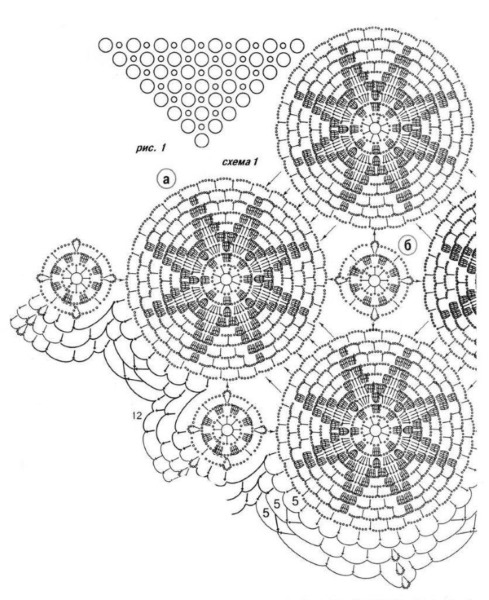
It is recommended to increase the number of rows with air loops along the edges so that the stars are not located too close to the edges.
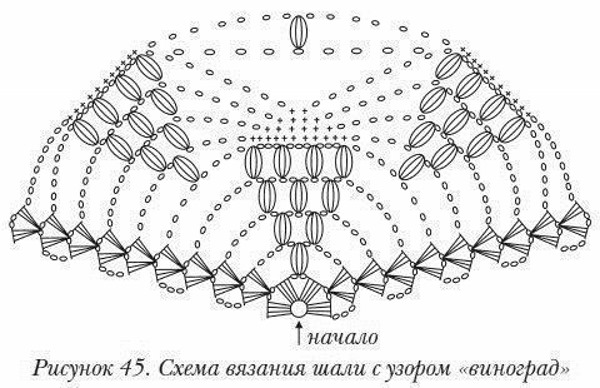
- Triangular shawl "Bunches of grapes". In this example, knitting begins from the lower corner of the shawl - with an amigurami ring. In each strip, the number of "clusters" increases by one. It is recommended to tie the upper edge of the product with the same pattern as shown in the diagram on the side.
- Rectangular shawl.
 The shawl is knitted in turning rows. The number of VPs in the cast-on row is determined individually.
How to Knit a Stole: Step-by-Step Guide
Crocheting (patterns and descriptions of unusual items, in particular, a stole, are presented in this article) involves knitting a whole fabric or individual motifs that are connected into a fabric.
Materials and tools for flower stole:
- 300 g of medium thickness yarn;
- hook No. 5.0;
- needle (when connecting motifs with a needle);
- scissors.
Step-by-step knitting of one motif:
- Knit with two strands.
- Start knitting with an amigurami ring made of 6 VP.
- Cast on 18 sc.
- To make the initial ring more fixed, use special plastic rings instead of amigura – sc are collected on them.
- Start knitting the petals - each petal consists of a chain of 15 VP.
- Attach the petals to the ring with 1 sc.
- Tie each chain with 18 sc.
It is recommended to connect the motifs with a needle after finishing knitting all the motifs or with sc as you knit the motifs.
How to decorate the edges:
- Make brushes of the required size.
- Attach tassels to the side petals.
- Trim the ends of the tassel so that the threads are the same length.
How to crochet a cardigan step by step
The three-color cardigan is suitable for autumn - early spring. Two sizes are considered below: XS and S - written with a slash.
What you will need for knitting:
- 300/350 g of yarn, 160 m/100 g (3 colors);
- 2 or 4 buttons;
- hooks No. 6.0 and 7.0.
Pattern
The pattern consists of two symmetrical rows.
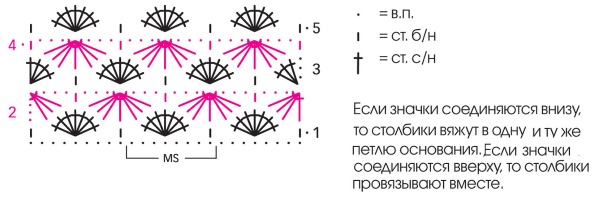
Cast on a chain of VP + 3 VP for lifting. Start the first row with 1 SC in the 4th air loop.
In every 4th VP, knit, alternating, the following:
- 7 CCH in one loop;
- 1 sc.
Second row:
- 3 VP lift.
- 3 CCH with a common top (knitted in the columns of the previous row).
- 3 VP.
- 1 sc in the center dc1.
- 3 VP.
- 7 CCH with a common top (knitted in CCH and SC from the previous row).
- Repeat steps 3-6 almost to the end of the row.
- Finish the row with four dc1c with one top (the last column is made into the first sc from the 1st row).
Third row:
- 3 VP lift.
- 3 СС1Н into the base loop of the chain.
- Alternating elements from the first row.
- 4 CCH in the last loop of the row.
Knit 2 rows with each color.
Back and shelves
The pattern of the product is shown in the figure below.
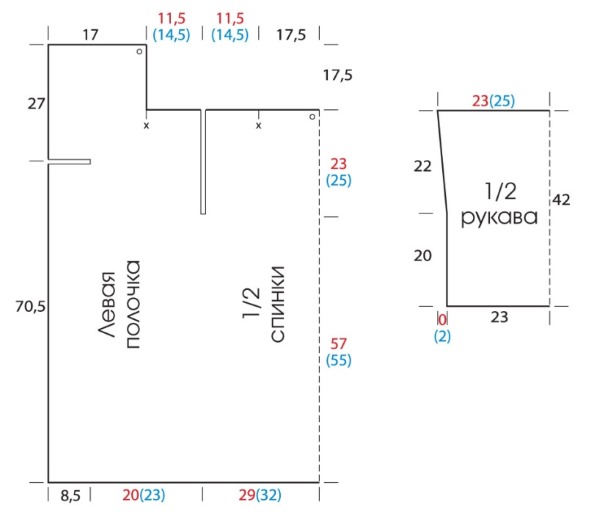
Cast on 161/177 VP and 3 lifting VP. Knit 57/55 cm with the main pattern. Indent 40/44 loops on each side (for the shelves). Knit another 23/25 cm of the back. Knit the shelves of the same height separately from the back. If desired, you can make a lapel - a turn-down of the upper part of the shelf.
To do this, when the product reaches a height of 70.5 cm, skip 12 loops on the left shelf, and cast on the same number of loops in the next row. Mirror the right shelf. If desired, make a collar.
Sleeves
Cast on 65 + 3 VP, knit 42 cm of the main pattern. When knitting a cardigan of size S, knit 20 cm, then make increases of 1 CCH1N on each side in every 6th row.
Assembling a cardigan
Sew the sleeves into tubes, make seams on the shoulders, sides of the product and collar. Sew the collar into the neck. Bind the edges of the cardigan with one row of sc (at the corners, instead of 1 sc, make 3 sc in one loop). From the wrong side, tie the edges with connecting posts for the back wall of the loops.
Sew on buttons. There is no need to make holes for buttons, as they are holes in the pattern. Before wearing the cardigan, it must be hand washed in warm water.
Fashionable Spring Jacket: Step-by-Step Crochet Instructions
Crochet (patterns and descriptions of some products are presented in this article) usually does not involve circular knitting, so parts of the product must be sewn together at the end. In the master class on knitting a jacket, the data is given for two sizes: XS and S - through a fraction.
To knit an openwork jacket you will need:
- 5/6 skeins of yarn measuring 210m/100g.
- Needles No. 4.0.
- Hook No. 3.5.
- Hook No. 4.0.
Patterns
The jacket uses 3 patterns.
1st main pattern:
- Dial VP (a number that is a multiple of 10 + 13 + 3).
- Make a CC1H in the 4th VP, then another 8 CC1H (you should have 9 columns in total and a lift). *Make a chain of 8 VP. Skip 3 VP, make 10 CC1H* — repeat to the end of the row.
- Cast on 3 VP for lifting + 2 VP. *Make 4 CC1N, skipping 3 loops. Cast on a chain consisting of 5 VP. Knit 2 SC into the chain of the previous row. Make a chain of 5 VP*. Repeat the required number of times indicated in * *. Finish knitting: 2 VP and 1 CC1N.
- Cast on lifting loops + 2 VP. In the first column, knit 1СС1Н. Cast on 5 VP. Repeat the following required number of times: 2 SC in the VP chain, 2 SC in 2 SC from the previous point, 2 SC in the chain of loops, a chain of 8 VP. The end of the row is symmetrical to its beginning.
- Start with 5 VP. Knit 4 CC1N (the first is knitted into the top of the column, the rest - into the chain of loops). *Cast 5 VP. Knit 2 SC into the tops of the 3rd and 4th columns. Cast on 5 VP. Knit 4 CC1N into the chain of loops * repeat to the end of the row. Knit the end of the row symmetrically to the beginning, but replace the lifting loops with 1 CC1N.
- Repeat steps 2-5.
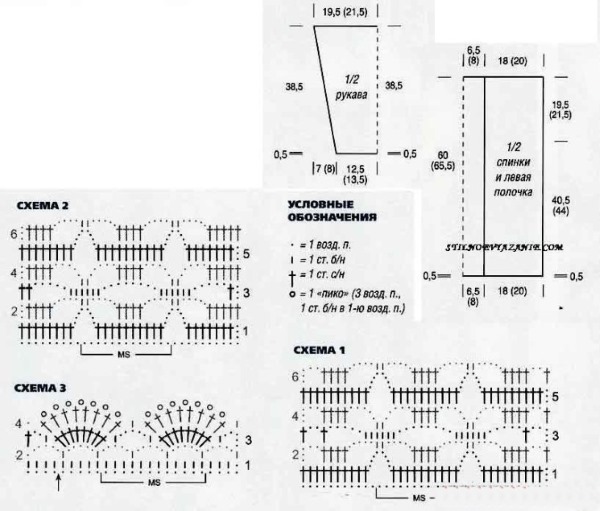
The 2nd main pattern is knitted like the 1st, but the 2 VP at the beginning and end are not knitted.
Pattern for the border:
- Dial VP (their number is a multiple of 12 + 1 +1).
- Knit the entire row with SC. Replace the first column with 1 VP.
- Knit 1 sc + 5 ch. Knit the next column, skipping 3 ch.
- *Cast 5 VP. Knit 1 SC into the chain, 8 CC1N into the next chain, 1 SC into the next. Cast on 5 VP* repeat as many times as necessary. At the end of the row, after the SC, knit 2 VP and 1 CC1N.
- *Make a lift from 1 VP. In the tops of the columns, tie 1 CCH, in the chain of loops - 1 SC* - repeat to the end of the row.
- Make 1 picot at the tops of the columns.
Knitting the back
Cast on 89/102 VP with hook No. 3.5. Knit a row of SC. With hook No. 4.0, knit the 1st main pattern 60.5 / 66 cm. In the last row, replace 8 VP with 3 VP. Knitting density of the main patterns in the sample 10x10 - 7.5 rows. x 18 sts.
Shelves
With hook №3.5 cast on 35/39 loops. Knit the first row with sc. Knit with the 1st main pattern (for size S – with the 2nd main pattern) until the height of the back is reached. Knit the last row as on the back. Knit the second shelf symmetrically to the first.
Sleeves
Using hook #3.5, cast on 48/52 stitches. Knit the first row with sc.
Continue knitting with the same pattern as the fronts.
In each even row, make increases on both sides 14 x 0.5 cm / in each row 16 x 0.5 cm. Knit 39 cm. In the last row, replace 8 VP with 3 VP.
Assembly
Make seams: on the sleeves, shoulder and side. Bind the product, including the sleeves, with a pattern for the border.
Make the ties:
- Cast on 220 stitches.
- Knit 5 cm in garter stitch.
- Close the loops.
- Sew the edges along the long side.
Sew ties to the shelves. After finishing knitting, the jacket should be hand washed.
Unusual crochet hat
Crochet (patterns and descriptions are not suitable for knitting), according to popular belief, does not allow you to create as many different products, but both methods are equally common. Products such as cardigans and hats are often made with knitting needles, but openwork is often made with a crochet hook.
To knit a warm hat you will need:
- Yarn meter 200m/50g or 400m/100g.
- Yarn meter 288m/100g.
- Hook No. 4.0.
For size 56, 125g of yarn was used. If desired, you can insulate the hat with a lining. It is knitted with yarn of 115m/50g, consumption is 25g.
How to knit:
- Make a slip stitch. Knit 1 VP and 5 SC.
- Make 2 sc in each loop – you will get 12 sc in total.
- In each subsequent row, make increases according to the diagram.
- When the circle radius reaches 7 cm, alternate rows with increases with regular rows of SC (1 to 1). Knit in this way until the circle diameter reaches the required size (to find out the head size, you need to measure the circumference of the head at its widest point).
- Make 3 shelves with the pattern "lush column of 3 sc". In this case, knit the columns in every 2nd loop.
- Tie the edge of the hat with the “Crayfish Walk” pattern.
- To prevent the hat from slipping, tie the edge on the inside with a textured elastic band (1 or 2 rows).
The hat is decorated with a chamomile, knitted according to the following pattern:
- Wind the thread around your finger 7-8 times.
- On the winding, knit 24 sc.
- Cast on a chain of 20 VP, attach to the core, skipping 2 VP from the initial loop. Cast on 7 more chains.
- Cast on 2 VP, turn the flower over and secure the VP into the free loop. Turn the flower to the front side.
- Knit 30 sc on the chain.
- Repeat steps 4-5 for each chain.
It is recommended to place a large button without holes in the center of the chamomile.
How to crochet a bag
The master class described below tells how to knit different bags with one pattern.
Materials and tools:
- Yarn of two colors, one meter.
- Beads.
- Button.
- Suitable hook.
The product consists of motifs connected together.
How to tie a motif
Instructions for knitting one motif (row by row):
- Make a slip stitch. Cast on 3 VP and 11 CSC.
- Knit a single crochet. Start making increases according to the pattern (the pattern does not take into account the differences in the rows).
- Knit a single crochet. Start making increases according to the diagram (the diagram does not take into account differences in the pattern of the rows).
- Knit СС1Н behind the back wall.
- Change the thread to a thread of a different color. At the top of each column, tie 1 lush column consisting of 4 CCH.
- All the following rows are knitted with CCH1 in the main color, continuing to make increases.
It is necessary to knit at least 4 motifs (for a small bag).
General rules for connecting motifs
The specificity of such bags lies in the way the motifs are connected.
How to connect 4 motifs:
- For one motif, bend the edges so that the fold lines touch each other and are equal.
- At the point where the folds meet, sew the two motifs together.
- Also connect all the motives together.
- Sew a bead to each connection point of the motifs.
To connect the front and back parts of the product, knit them with 1 row of SC. At the top, you need to leave a small gap for the handle. Sew a button from the inside.
Different variants of bags from motifs
From the motifs you can create different types of bags: from a clutch to a beach bag.
Various bag options:
- Clutch. Consists of 4 motifs: 2 at the back and 2 at the front. It is recommended to choose store-bought handles.
- Small backpack. One of the motifs will serve as a "lid" for the backpack. It is recommended to knit the straps yourself from CCH1N.
- Shoulder bag. Consists of 8 motifs, with 4 motifs connected sequentially one after another. The strap and side parts are knitted in stripes and connected to the main part with a needle or rows of sc.
- Large bag or beach bag. Connect a large number of motifs (from 20 on 2 sides). Connect the parts with 1 row of SC. Next to the handle there should be 1 half-motif (half of the main motif).
To connect store-bought handles to a bag, you should bring the handle to the fabric, then knit 1 VP through each loop so that the loop itself wraps around the handle (insert the hook behind the handle).
The finished bag should be washed carefully, as store-bought handles can be damaged when machine washed.
How to knit unusual slippers for home
Crocheting, the patterns and descriptions of which are usually easy to read, is not the most popular hobby, but everyone wears knitted things. Knitted accessories are used in everyday life (napkins, blankets, slippers).
Tools and materials for slippers:
- Thick yarn.
- Hook.
- Additional details for decoration.
Slippers are knitted in several stages. To change the size, you need to change the knitting density or the number of rows in the sole.
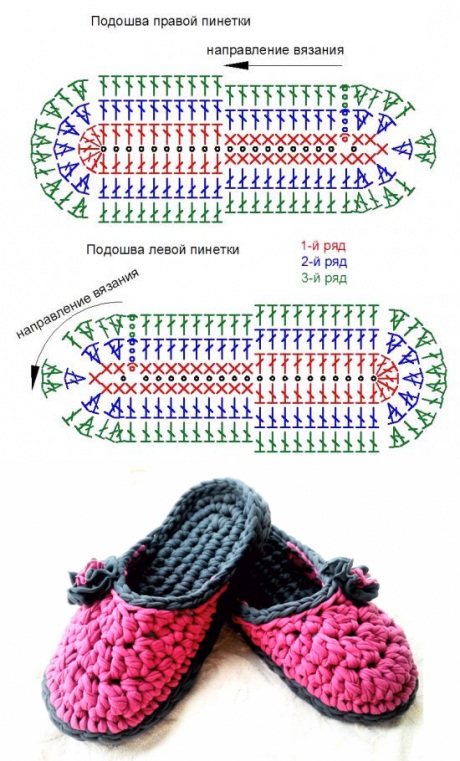
General rules for knitting soles
All soles for slippers are knitted in strict compliance with the following rules:
- The initial chain of VP is tied on both sides.
- If in the first row the back part is knitted from sc, then the front part is knitted from half-columns or dc1h. In the following rows, both parts are knitted the same way.
- It is essential to make allowances at the front and back so that the end and beginning of the sole are rounded.
- It is necessary to knit 2/4 of the sole part. 4 parts are knitted if a thick sole is required. In this case, the parts are connected to each other using a hook.
All sole patterns are made according to the rules listed above. Otherwise, the result may not be what was expected.
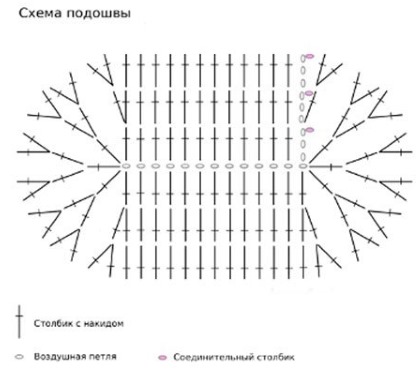
Sole patterns
There are several different sole options:
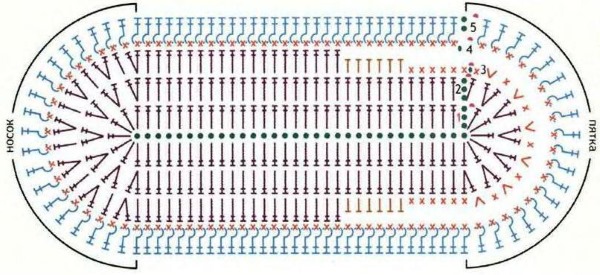
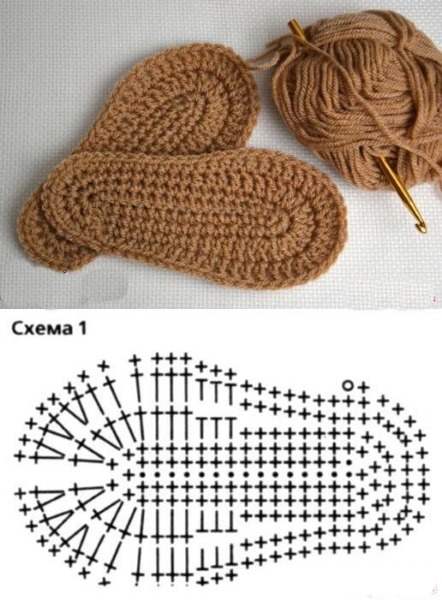
- The number of loops in the initial row is 20 VP. The basic pattern is CC1H, but in the first row the back part is knitted from SC. Increases in the front begin immediately after the VP chain is cast on.
- The initial chain consists of 25 loops. The basic pattern is sc, but after the chain in the front part, half-columns and dc1n are knitted. The increase pattern is more complex compared to the previous pattern.
- For the initial chain, dial 32 VP. The basic pattern is CC1H. Unlike the previous patterns, in this sole the difference between the back and front parts is formed in the 3rd row. Then the piece is tied with SC and purl relief columns.
- At the beginning, dial 15 VP. For knitting, 2 patterns are used: SC and CC1N - half columns are also used. The product is knitted with one row of SC.
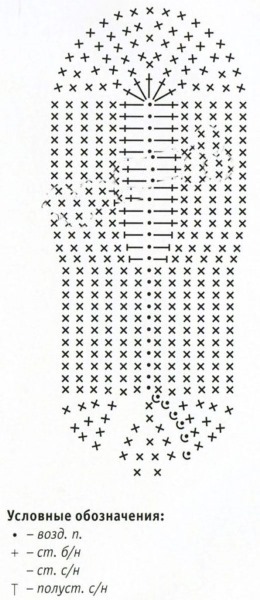
- At the beginning, dial 13 VP. In this sole, the toe is not different from the heel.
 This option is not suitable for everyone; it is mainly used when knitting children's slippers.
How to knit the top of the slippers
You should start knitting the upper after the sole is ready.
There are several ways to knit the top part:
- Cast on the initial stitches of the piece from the last row.
- Knit the piece separately and connect it to the sole with a needle or crochet hook.
Different shapes of the top part:
- Two intersecting stripes.
- Closed top.
- One wide strip.
The first and third methods involve knitting a rectangular fabric of the required width and length. It is recommended to knit the closed top from the sole.
From the second row, start making 1 decrease on each side and 1 decrease in the center (knit 2 central loops with two columns with a common top). The upper part can be decorated with a pompom, a bow or a flower made of satin ribbon.
Stylish mittens: step-by-step description and knitting pattern
Descriptions and patterns for crocheting mittens are less common than for knitting.
To knit two-color mittens you will need:
- Thin yarn of the same length in two colors.
- Hook No. 3.5.
Main part
Cast on a chain of 11 + 1 VP. Start knitting from the second loop. Knit 11 SC. Knit 27 rows. In this case, the rise always consists of 1 VP. Fold the fabric in half along the long part. To connect the ends, knit 1 SC in two loops, each of which is on the edge. Cast on 3 VP for the rise. Then alternate 1 CC1N and 2 CC1N in one loop. You should get 36 columns.
Make a lift, 1 front relief column with 1 yarn over (RSC). Leave the thread without cutting. Change the thread. Knit 2 lush columns, consisting of 4 CSC1N. Between the columns 1 VP. After the columns, dial 2 VP, skip 2 loops after the columns, knit 2 lush columns through 1 VP. Repeat knitting lush columns according to the described pattern. Close the row with a connecting loop.
Pull the loop through so that it increases in size, so that the knitting does not unravel. Return to the first thread. Cast on 3 VP, in the LRSN of the row knitted with the first thread, knit LRSN. Between the columns 1 VP, between each two columns 2 VP. Return to the second thread. Next to the lush columns are chains of VP.
You need to insert the hook under the chain and then between two lush columns.
Knit 2 lush columns like this. Cast on 1 VP between them, then 2 VP after them. Knit the entire row this way. Finish the circle with a slip stitch. Go to the first thread. Cast on 6 + 1 VP, LRSN. Next 3 VP, LRSN, 1 VP, LRSN. Close the knitting with a slip stitch.
Knit 2 more rows of each color. Start forming the hole for the thumb from the 5th row, knitted with the second thread. To do this, knit 1 puffy column between two lush columns. Between the columns of the row knitted with the first thread, also knit 1 puffy column. Cast on 2 VP. Skip 3 black stripes, in the 4th strip knit 2 puffy columns.
Continue knitting according to the usual pattern. Return to the feather thread. Cast on 4 VP. Skip the space allocated for the finger. Start knitting the columns from the second column after 3 black stripes. Continue knitting according to the pattern. Knit 7 rows of each color, without touching the part allocated for the finger (the last row will be knitted with the second thread). Cut the second thread.
The rest of the piece is knitted with the first thread. Knit a slip stitch into the loop between the lush stitches to the right of the hook. Cast on 3 VP. Next, knit 1 CCH (or 3 lifting VP; knitted into the loop between the lush stitches), 1 LRS (into the top of the LRS), 2 CCH with a common top under the loop between the LRS, 1 LRS. Close the row.
Cast on 2 VP. In the next loop, knit 1 CCH. Skip 1 column, in the next (relief) knit a LRSN. Knit like this to the end of the row. Next, make a yarn over, insert the hook into the first loop, catching it by the front wall, and into the LRSN.
Knit half of the relief column. Knit 3 more halves in this way. Knit 4 loops together. Cut the thread about 30 cm from the product. Pass the thread between the tops of the columns. Pass the thread through the loop, tighten the ring. Cut the thread, hide it.
Thumb
Attach the second thread where the finger joins the main part of the mitten. Knit 4 cells according to the usual pattern. The next row is knitted with the first thread according to the pattern. Knit 3 cells, then 5 VP, connect with the 1st loop of the row. Cast on 3 VP, 1 LRSN, 3 VP. Go to the second thread.
Work 1 puff stitch into the same stitch, 2 ch, 1 puff stitch into the chain stitches (they are next to each other). Repeat to the end of the row, add 1 dc into the hole between the finger and the main piece. To join the knitting into a circle, work 1 ch and 1 sc into the top of the first puff stitch.
Go to the first thread. Knit 2 lush columns, 3 VP, 2 lush columns. Cut the first thread and hide. Finish knitting the finger using the same pattern as the main part of the mitten.
How to finish knitting
Continue the elastic band downwards, knitting 2 rows of purl relief columns (27 columns in each row). Knit another mitten. Wash the product by hand, gradually increasing the water temperature so that the threads do not dye each other. Color combinations can be completely different. The photo shows a color combination option.

The diagrams and descriptions in this article will help you knit various crochet items. Each of the ideas can be slightly changed so that the knitted item is unique.
Author: mariamur1
Article formatting: Anna Vinnitskaya
Video about types of crochet patterns
30 crochet patterns and knitting charts: