Cat pillows crocheted can be used to decorate the interior, as well as for sleeping at home and on the road. To learn how to knit them, novice craftsmen should learn what types of such pillows there are, as well as look at knitting patterns and descriptions for them.
What types of knitted cat pillows are there?
The shapes and sizes of cat pillows depend on their purpose.
What are they like:
- Bolster pillow. It looks like a thick "sausage" that can be placed under the lower back to make it more comfortable to sit. Such pillows are also used to cover the space between a child's mattress and the wall so that the baby's arms and legs do not get stuck. Some craftswomen knit long and narrow bolsters in the shape of cats and place them on the windowsill to cover the cracks from which cold air blows in during the winter.
- Travel cat pillow. It looks like a "sausage" rolled into an arc. This pillow is placed under the neck to make it more comfortable to doze in a sitting position. The product is compact, so you can take it with you on trips and use it in airplanes or cars.
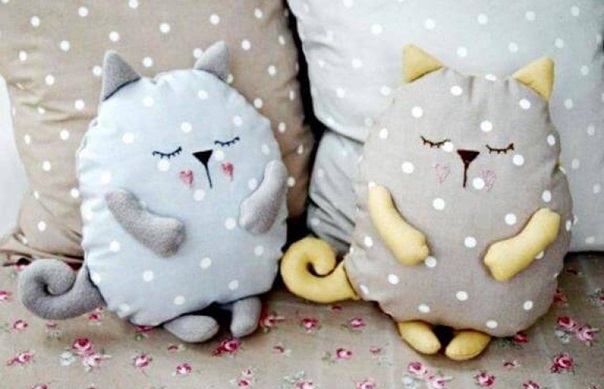
- Sleepy pillow. It looks like a medium-sized flat soft toy. Such pillows are knitted for children so that they can take a soft kitten with them to bed. The flat shape of such a pillow allows you to put it under your head and hug it with your hands. Such products are knitted from smooth and soft threads, and also decorated with embroidery.
- Seat cushion. Similar to a "sleepy", but thinner and wider. Such pillows are used as a base when you have to sit on a hard surface for a long time. The decor of such products should be soft and flat, so that nothing interferes with sitting comfortably.
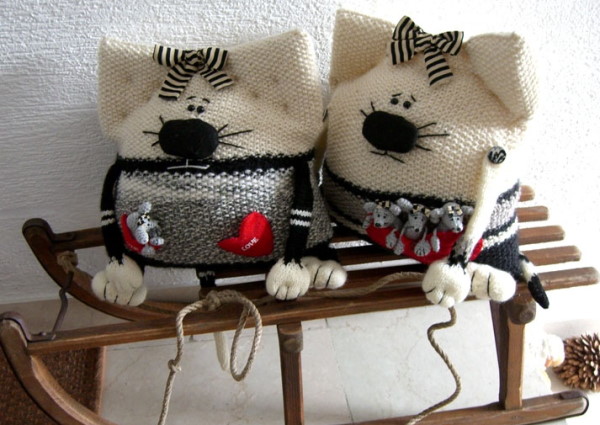
- Decorative cat pillow. These products can be of any shape and size. They are intended for interior decoration, so you can use voluminous beads and other hard elements as decoration.
You can knit cat pillows from any soft yarn. It is not recommended to use rough and prickly threads, as they are unpleasant to the skin. Moreover, you should not knit sleeping pillows for children from such yarn. It is better to use plush, acrylic, wool and knitwear.
Abbreviations and symbols for loops in instructions
The cat pillow can be crocheted using a graphic diagram and a text description. To read the instructions correctly, you need to know how to decipher the symbols and abbreviations.
| Action | Letter designation in the text |
| Air loop | VP |
| Half-column | PST |
| Single crochet | STBN |
| Double crochet | STSN |
| Double crochet stitch | STS2N |
| Connecting loop | SP |
The article below provides step-by-step instructions for knitting various cat-shaped pillows.
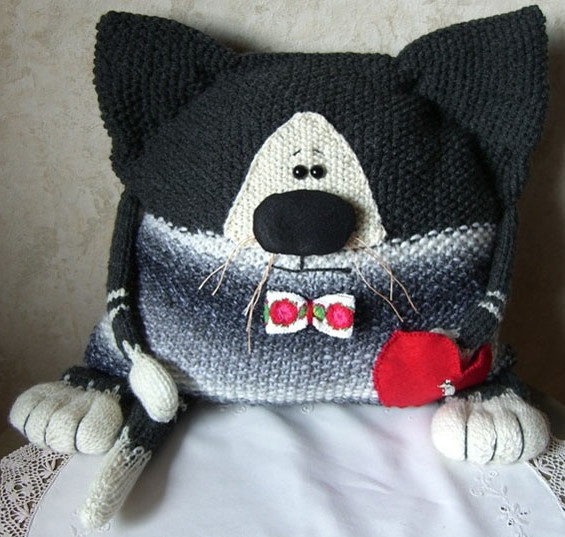
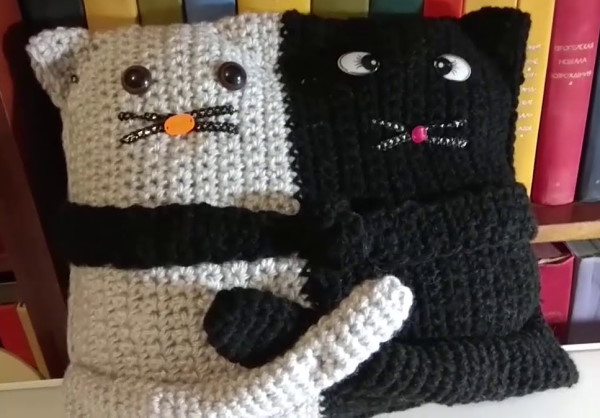
Master class on knitting a decorative crochet cat pillow
A crochet cat pillow (the diagram and description can be changed by the master to increase or decrease the size of the product), for beginners, should be knitted without intricate patterns, and also have a simple shape, for example: a square.
To work you will need:
- 3 skeins of black plush yarn, 50 g each;
- 1.5 skeins of white plush yarn, 50 g each;
- acrylic yarn of 3 colors: white, pink, green;
- hooks No. 5 and No. 3;
- scissors;
- a large needle with a wide eye and a blunt end;
- pins;
- a rectangle of thick cardboard measuring 2x5 cm.
You will also need stuffing for the pillow. It is advisable to buy synthetic padding. It is light and soft, and does not stick out of the small holes between the threads.
Pillow base
The rectangular fabric should be knitted with single crochet stitches.
Procedure:
- Using hook #5 and black plush yarn, cast on a chain of 45 VP.
- Knit 5 rows.
- Change the thread to white. Knit 3 rows.
- Change the thread to black and knit 5 rows.
- Repeat the steps described in points 3 and 4 3 more times.
- Knit 32 rows using black plush yarn.
- Change the thread to white, knit 3 rows.
- Change the thread to black, knit 5 rows.
- Repeat the steps described in points 7 and 8 3 more times.
Fasten the thread and cut off the excess.
Paws and tail
All 4 paws are knitted according to 1 pattern, STBN in a circle.
Procedure:
- Using hook #5, cast on 5 VP from white plush yarn. Gather them into a ring.
- Knit 1 row.
- The next 6 rows should be knitted with 2 increases.
- Knit 2 rows.
- Change the thread to black and knit 2 rows.
- Change the thread to white and knit 2 rows.
- Knit 2 more rows with white threads.
- Knit 6 rows with black threads.
- The next 3 rows should be knitted with decreases. Leave an opening for stuffing.
- Fasten the thread, cut off the excess.
Crochet cat pillow. Pattern and description
The tail is knitted in a similar way, first by making a chain of 3 VP.
Ears
How to knit an ear:
- Using hook #3, make a chain of 10 VP using pink acrylic thread.
- Knit 1 row of SCCH.
- Moving to the next row, skip 2 loops, knit 6 SC, skip 2 more loops.
- On the new row, skip 1 loop, knit 4 SCCH, skip 1 more loop.
- Skip 1 stitch, knit 2 SC, skip stitch.
- Fasten the thread, cut off the excess.
- Tie the blank with black plush yarn in 1 row of STBN, using hook No. 5.
Knit the other ear in the same way.
Details of the face
From white plush yarn you need to knit 2 round cheeks. To do this, with hook No. 5 you need to dial 3 VP, collect them into a ring. Knit 1 row STBN, knit the next 5 rows STCH, making 1 increase in each chain. Fasten the thread and cut off the excess.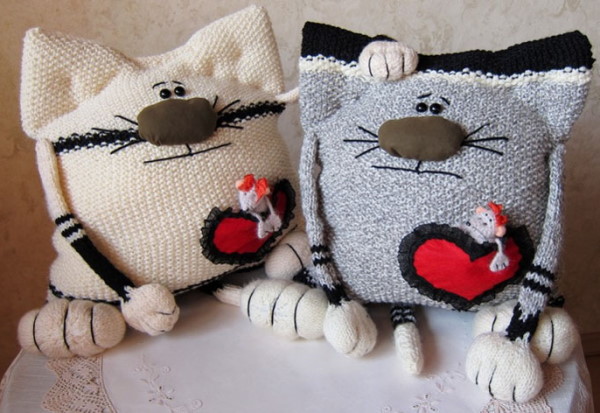
You also need to knit 2 round blanks for the eyes from white acrylic yarn.
Procedure:
- Using hook #3, cast on 3 VP. Gather them into a ring.
- Knit 1 row of STBN.
- Knit 5 rows of CTC2H, making 1 increase in each row.
- Knit the last row with STBN.
Knit 2 irises from green acrylic yarn. Using hook #3, make a chain of 3 VP, gather into a ring, knit the next 4 rows with STBN. Fasten the thread and cut off the excess.
Make 2 pupils.
Procedure:
- Wind the plush yarn across the cardboard triangle 5 times.
- Use scissors to cut the end of the thread and carefully cut the winding with scissors on both sides.
- Stack the scraps on top of each other.
- Cut a thread about 3 cm long. Wrap it around the bundle of threads in the middle. Tighten the double knot.
- Fluff up the resulting pompom with your fingers. Carefully trim off any protruding ends.
Make the second pupil in the same way.
Make a nose from the same pompom. Since acrylic yarn is thinner than plush yarn, you need to make about 10 turns around the cardboard blank.
Assembling the product
Once all the elements are connected, you can begin assembling the product.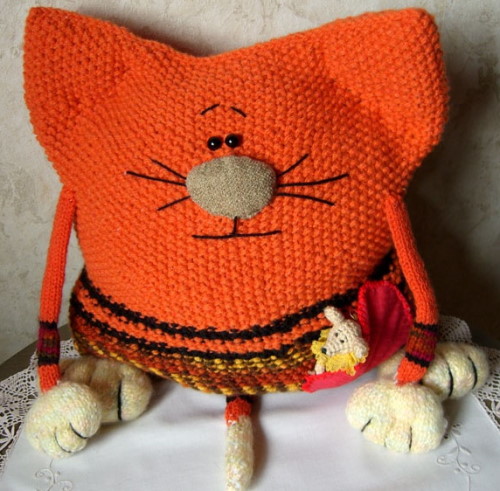
Procedure:
- Fold the fabric (base) in half so that the front side is on top.
- Place the muzzle elements and pin them in place.
- Using a sewing needle, sew green irises onto the white eye blanks with green thread.
- Using black thread, sew the pupils to the center of the irises.
- Sew the eyes to the base with white thread.
- Sew the cheeks a little lower.
- Using pink thread, sew on the nose, positioning it above the cheeks.
- Using white acrylic yarn, embroider the cat's whiskers and eyelashes, making long stitches. Secure the threads on the back side.
- Connect the edges of the base to each other by knitting them with a PST. Leave an opening at the bottom for stuffing.
- Attach the ears to the upper corners of the pillow by knitting the edges with a stitch.
- Stuff the paws and tail tightly with synthetic padding.
- Attach the paws to the cushion seams using sl st. Attach the tail to the back.
- Stuff the pillow with synthetic padding.
Close the hole by knitting the edges with a sp.
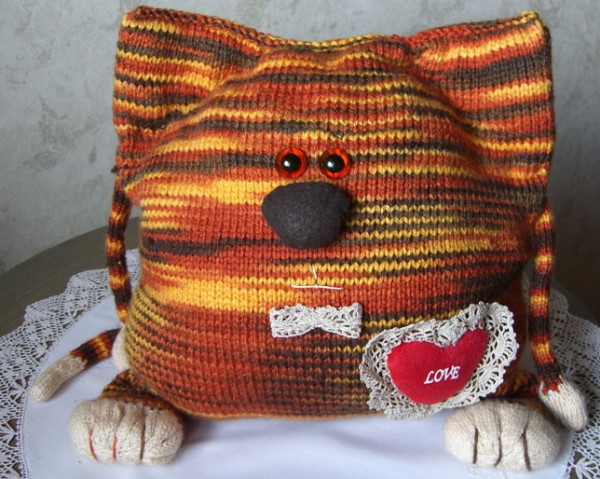
Master class on knitting a cat pillow in the form of a bolster
A crochet cat pillow (the diagram and description are easy, so they can be used by beginner craftsmen), knitted from multi-colored yarn, is suitable for decorating a child's room. For work, you can use the remains of threads of different shades. It is desirable that they are of the same thickness. To decorate the cat's muzzle, you will need plastic eyes with a special mount.
Head
Procedure:
- Make a ring of 5 VP, knit 1 row of SC.
- Knit 10 rows of SC, making 2 increases in each new chain.
- Continue knitting without adding STBN, changing the color of the yarn to get stripes of different widths. You need to knit 30 rows.
- Knit the last 10 rows with 2 decreases in each. Leave an opening for stuffing.
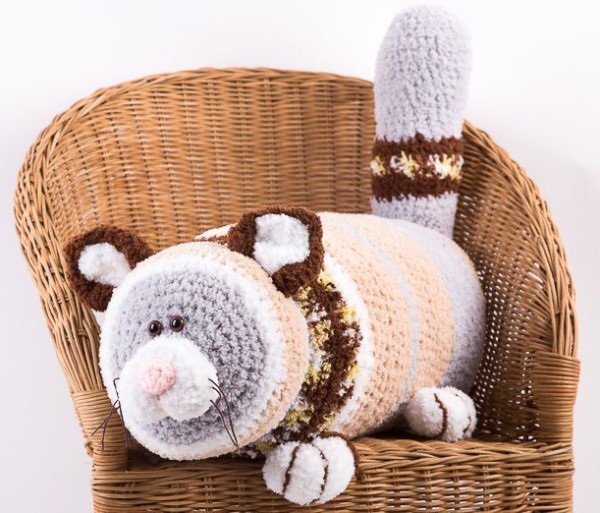
Fill the head with padding polyester, tighten the hole. Secure the thread and cut off the excess.
Torso
Procedure:
- Make a ring of 6 VP, knit 1 row of SC.
- Knit 9 rows of SC, making 2 increases in each new chain.
- Continue knitting without adding STBN, changing the threads to get colored stripes. You need to knit a piece of fabric about 35 cm long.
- Knit the last 9 rows with 2 decreases in each new chain. Leave an opening for stuffing.
Stuff the body tightly with synthetic padding.
Paws and tail
The paws will be the same.
How to knit:
- Make a ring of 3 VP, knit 1 row of SC.
- Knit 6 new rows, making 1 increase in each.
- Knit the remaining 20 rows with STBN, changing the color of the threads.
- Knit the last 6 rows with 1 decrease in each of them. Leave openings for stuffing.
Stuff the paws, close the holes.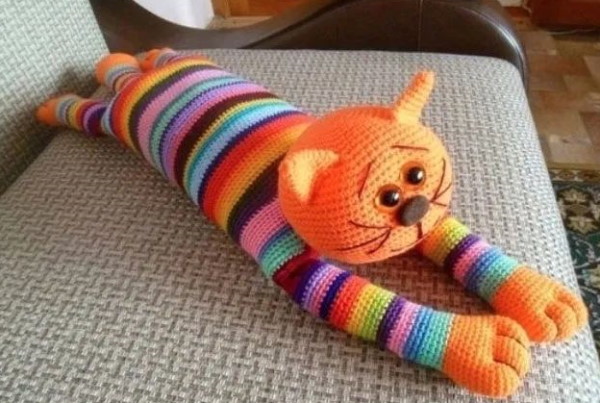
The tail is knitted in the same way, with 1 amendment: in point 3, the number of rows should be increased to 30. Loosely stuff the tail with padding polyester. Close the opening.
Ears
How to tie an ear:
- Cast on a chain of 10 VP.
- Knit 1 row СТС2Н.
- In the next row, knit 8 СТС2Н.
- Knit 6 CTC2H.
- Knit 4 CTC2H.
- Fasten the thread, cut off the excess.
- Tie the workpiece along the edges with STBN.
Knit the other ear in the same way.
Assembling the product
Procedure:
- Attach the ears to the head by knitting SP.
- Sew on the head with a sewing needle.
- Sew the tail on the other side of the pillow.
- Sew on 2 front and 2 back paws.
- Attach the eyes to the cat's head.
Using dark threads, embroider a triangular nose and moustache in the form of long stitches.
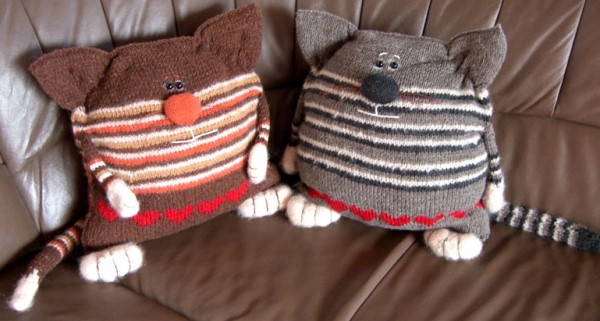
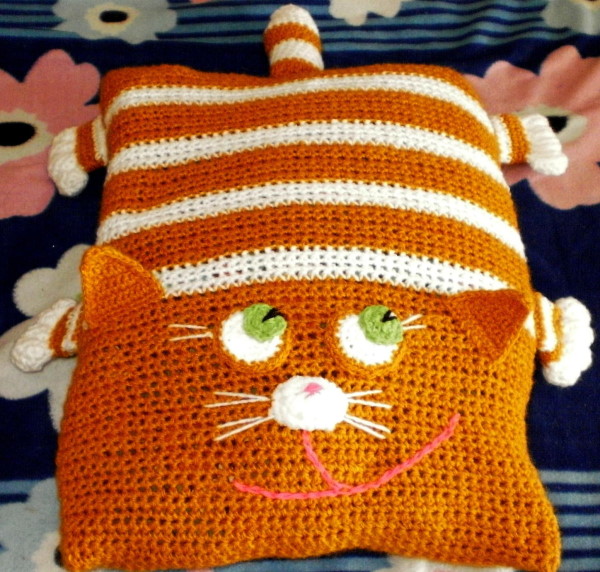
Master class on knitting a cat-pillow-sleeping
A crochet cat pillow (the diagram and description for it are presented further in the article), knitted for sleeping, should be soft. Plush yarn or threads consisting of a mixture of wool and acrylic are suitable for work.
What else is needed for work:
- a hook of a suitable size;
- scissors;
- scraps of colored fabric (linen and cotton will do);
- soap remnant;
- sewing threads;
- measuring tape;
- a thick needle with a blunt end.
You need to knit 4 elements and then sew them together.
Pillow base
Procedure:
- Cast on a chain of 45 VP.
- Knit a STBN fabric consisting of 80 rows.
- At the end, the thread needs to be secured and cut.
- Fold the fabric in half. Knit the edges with a stitch. Leave an opening for stuffing.
Fill the pillow loosely with stuffing. Tighten the hole.
Ears
For the ears you need to knit 4 parts according to 1 pattern.
Procedure:
- Cast on a chain of 10 VP.
- Knit 1 row СТС2Н.
- On the next row, knit 8 СТС2Н.
- Knit 6 CTC2H.
- Knit 2 CTC2H.
- Fasten the thread and cut off the excess.
- Tie the piece along the edges with STBN.
Having knitted 4 identical blanks, you need to fold them in pairs and knit along the side edges of the SP. Fill the blanks with filler.
Tail
Procedure:
- Cast on 3 VP and gather them into a ring.
- Knit 1 row of STBN.
- Knit the next 6 rows with STBN, making 2 increases in each of them.
- Knit 25 rows of SCCH.
- Knit the next 6 rows with STBN, making decreases in each new chain.
- Leave an opening for stuffing.
Tightly stuff the workpiece, tighten the hole. Secure the thread and cut off the excess.
Decorative elements
For decoration you need to prepare several fabric blanks.
Procedure:
- Turn 1 of the pieces over with the wrong side up.
- Using a piece of soap, draw 2 small triangles. They should be slightly smaller than the knitted ear blanks.
- Take a larger piece of fabric, preferably a different color. Draw a semicircle on its back side.
- Measure the volume of the pillow with a tape measure.
- On the back of the longest piece, draw a rectangle equal in length to the volume of the pillow, 5 cm wide.
- From the smallest piece of fabric, cut out a triangle-shaped piece. This will be the cat's nose.
- Cut out the blanks.
- If you have an overlock, the edges of the fabric need to be processed. If you don't have such a tool, you can carefully hem the material by turning it up 5 mm.
Turn the semicircle over to the front side, with the rounded part facing up. Using sewing threads of a contrasting color, embroider the cat's closed eyes with long eyelashes, as well as the whiskers. Sew on the nose using threads that match the color.
Assembling the product
How to sew the product:
- Sew the ears to the top of the pillow using a thick needle and yarn.
- Sew the tail to the lower left corner of the pillow.
- Raise the tail up. Find its center and sew it to the side seam of the pillow with a few stitches.
- Sew the triangular pieces to the front of the ears using a regular needle and sewing thread.
- Sew the semicircle to the front side of the pillow, stitching along the contour.
- Wrap the ribbon around the pillow, passing it under the semicircle. Sew the ends with a blind stitch.
To prevent the ribbon from slipping, you can “grab” it with several stitches in different places.
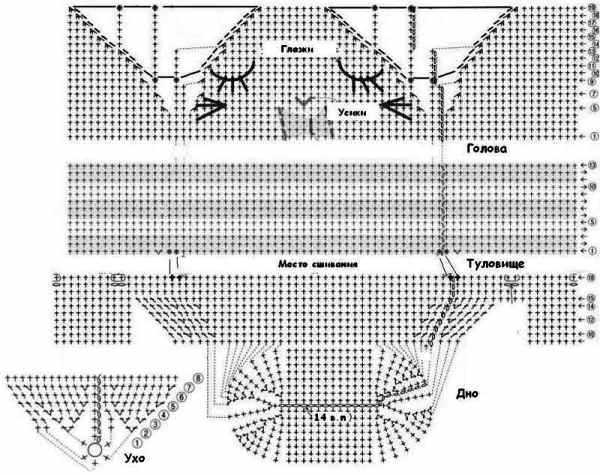
Master class on knitting a cat seat cushion
A crochet cat pillow (the diagram and description are simple, experienced craftsmen can use more complex patterns for knitting the base of the pillow), knitted in a circle, is used as a bedding for sitting on a hard stool.
To work you will need:
- brown wool yarn;
- hook No. 4;
- acrylic yarn 2 colors: white, black;
- measuring tape;
- a piece of thin foam rubber (about 3 cm thick);
- scissors;
- sewing threads and needle.
You will also need a sheet of thick cardboard and a simple pencil.
Torso
Procedure:
- Use a tape measure to measure the width of the seat.
- On the cardboard, draw a circle whose diameter will match the width of the chair seat.
- Cut out the blank with scissors. Put it aside.
- From woolen thread, make a chain of 6 VP. Close into a ring.
- Knit 1 row of STBN.
- Next row knit STCH with 2 increases.
- Knit a new row with STBN, make 2 increases.
- Next, you need to knit in a circle, alternating STBN and STSN. In each new row, make increases. The knitted fabric should be applied to the cardboard blank to knit a piece of the desired size.
- When the fabric is ready, you need to knit 2 more rows of STBN.
Knit the 2nd part of the body in the same way.
Ears
Procedure:
- From woolen thread, make a chain of 12 VP.
- Knit a row of SCCH.
- In the next row, knit 9 SC.
- Knit 6 SC.
- Knit 4 SC.
- Tie the piece along the edges with STBN.
Knit the other ear in the same way.
Eyes with pupils and a nose
Procedure:
- From white acrylic yarn, make a chain of 3 VP. Close into a ring.
- Knit a row of STBN.
- The next 6 rows are knitted with SCCH, making 2 increases in each new chain.
- Fasten the thread and cut off the excess.
Knit the second piece in the same way.
For the pupils and nose, use a black thread. All 3 elements are knitted according to 1 pattern: a ring of 3 VP, 1 row of STBN, 2 rows of STBN with 2 increases. At the end, the threads are secured and the excess is cut off.
Tail
Procedure:
- From woolen thread, make a chain of 7 VP.
- Knit a row of STBN.
- Knit a row of SCCH.
- Alternate STBN and STSN in each new row. Knit 29 rows.
The last row is tied with acres consisting of 10 VP.
Paws
The cat's limbs will be round.
How to knit:
- Cast on 5 VP from woolen thread. Close into a ring.
- Knit 10 SC through the ring.
- The next 8 rows are knitted with SC, making 2 increases in each new chain.
Knit 3 more paws.
Stuffing and assembly of the product
Procedure:
- Place the cardboard template on the foam rubber, trace around it and cut out the circle.
- Place one of the knitted circles on the table with the front side facing up.
- Sew on the eyes, add pupils. Sew on the nose.
- Embroider the cat's whiskers with white thread.
- Turn the workpiece face down.
- Place a foam circle on top.
- Cover it with another crochet circle.
- Connect the edges of the knitted parts by knitting a single crochet stitch.
- Turn the pillow over so that the front side is facing up.
- Attach the ears by knitting SP.
Attach the tail and round paws to the sides.
It is not difficult to learn how to crochet cat pillows. Beginners will find diagrams and text descriptions helpful. Having crocheted several pillows of simple shapes, you can begin to learn how to crochet more complex items with voluminous and multi-colored patterns.
Video about cat pillow
Knitted cat pillow toy: