The Colosseum is the largest ancient building that has survived to this day. Anyone who wants to can draw This centuries-old construction was drawn on paper using only a pencil.
Drawing the Colosseum with a simple pencil step by step
The Colosseum can be depicted with one simple pencil. For convenience, the drawing process is divided into stages with a step-by-step description.
Creating a basic outline
It all starts with creating a basic outline. To do this, you need to find a ready-made drawing or photo of the Colosseum. It is impossible to do without such reference material: even professional historians and architects will not be able to remember exactly what this structure looks like.
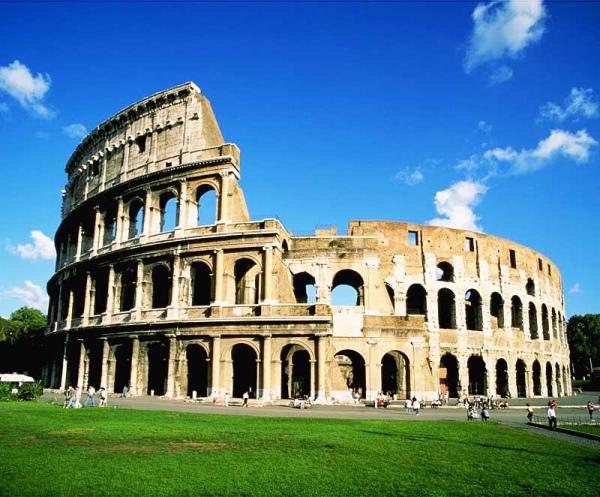
It is important to remember every detail here. Having a drawing of the Colosseum or its photograph in front of your eyes, a novice artist will be able to draw faster and more confidently, and most importantly, will be able to maintain proportions.
Once the desired sample has been found, you can begin working on the drawing of the ancient structure.
First, the main line is drawn, which must be strictly vertical. in the middle of a sheet of paper used as a canvas.
Then you should add 2 more lines of approximately the same size. One should be to the left of the main central line, and the other one, respectively, to the right. These side lines are not quite vertical. They should be slightly inclined.
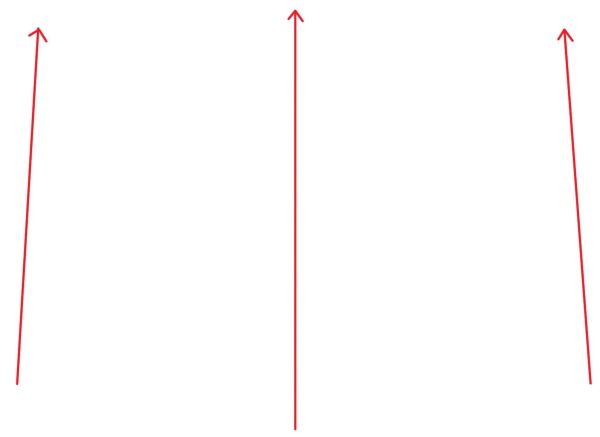
The line on the left, as it goes up, leans slightly to the right, and the line on the right, as it goes up, leans slightly to the left.. Each of these 2 lines should, as the height increases, slightly tilt towards the main central line.
This is because the real Colosseum looks exactly like this in photographs. Its width does not change with increasing height, but as a person looks up from below, its upper part seems to narrow.
A similar visual effect occurs when looking at a railroad track that goes into the distance. The rails, which are always parallel, will in this case seem to converge with each other in the distance.
This is an optical illusion, but it must be taken into account when creating a drawing, otherwise the picture will turn out unrealistic. From a geometric point of view, the Colosseum is a cylinder whose walls are rounded and the structure itself is devoid of corners.It is important to show this in the drawing.
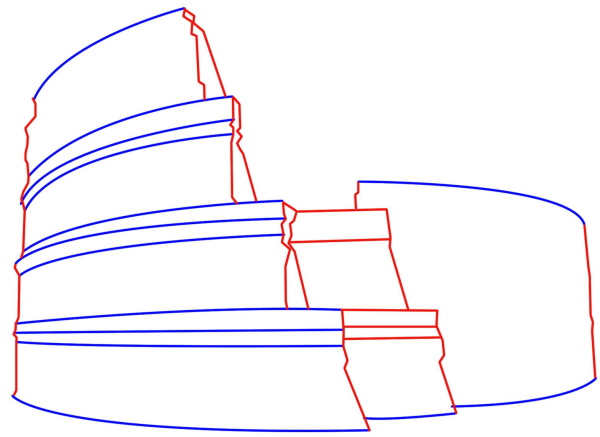
To do this, you need to draw 5 lines starting from one edge of the building, passing across the central vertical line and ending at the other edge of the structure.
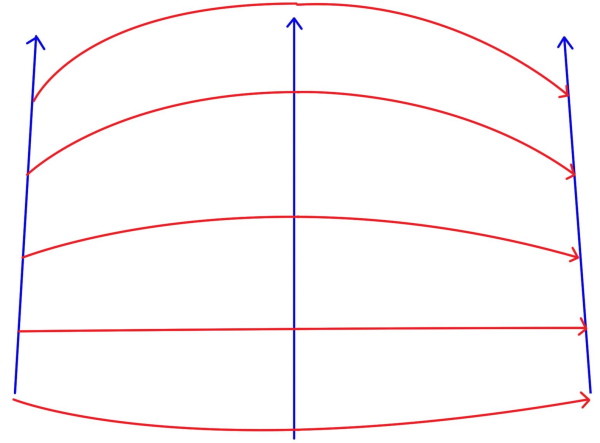
Namely:
- The 1st line runs at the very bottom: it should be an arc. If you start drawing it from the left edge, it should be slightly rounded first downwards, and then, after crossing the central vertical line, upwards;
- The 2nd line should be slightly higher than the 1st, it is straight horizontal, without rounding;
- The 3rd line is above the 2nd. It is, like the lowest one, arcuate, but it only curves in the opposite direction: first upwards, and then, after crossing the central vertical line, downwards;
- The 4th line goes even higher and is rounded a little more than the 3rd;
- The 5th line runs at the very top. Its rounding is even more pronounced.
Drawing of walls
Once the basic outline is ready, you can start drawing the walls. It is necessary to look at the sample carefully. Between the floors of the Colosseum there should be not 1, but 3 lines. Therefore, it is necessary to add 2 more to the 2nd, 3rd and 4th lines, passing from one end to the other.
It is important to take into account that these lines should gradually move away from each other by a small distance as they approach the central vertical axis. This is the same optical illusion that was already mentioned above.
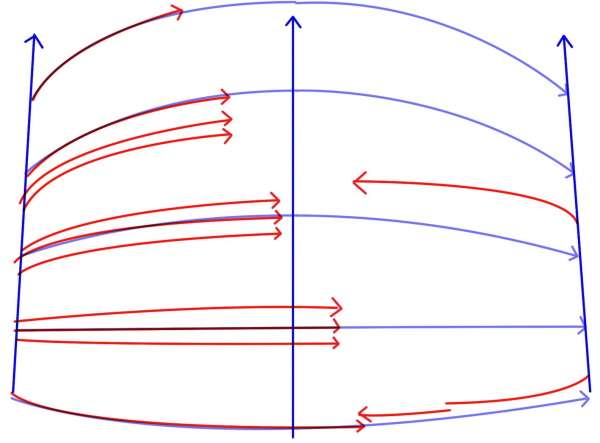
Since the structure is half destroyed, the walls must be interrupted:
- the bottom strip, consisting of 3 lines, should end slightly to the right of the vertical axis;
- the next three lines end, on the contrary, slightly to the left of the vertical axis;
- the top strip of 3 lines ends further to the left;
- On the right, you need to draw a couple more arc lines that will mark the inner wall that is revealed to the eye. One of these 2 lines runs slightly above the lowest one, and the other one is approximately in the center of the Colosseum.
You should look at the sample again and notice that some walls are solid and straight, while others are crumbling and uneven.. To give the drawing shape and volume, it is necessary to add 1 broken line to the edges of the wall on each floor. All auxiliary lines should be removed with an eraser.
Windows of the Colosseum
Drawing windows and arched openings of an ancient building is considered one of the difficult and tedious stages. There is monotonous work ahead. It is necessary to draw down the guide lines of all the arches, of which there are many at the Colosseum. This must be done, otherwise the drawing will not acquire the recognizable features of the structure.
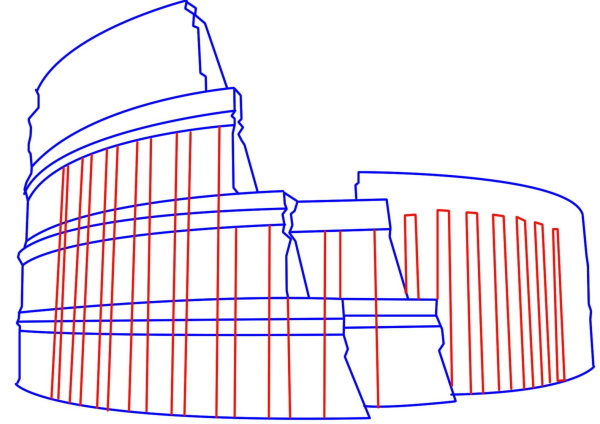
It is best to start from the middle, where the lines are almost vertical. When moving to the sides from the middle, they should tilt slightly. Everything that is to the left of the middle tilts to the right. Lines that are located to the right of the middle tilt to the left.
Once all the vertical lines for the arched openings have been drawn, you can begin drawing the arches themselves. A stencil made of plastic, for example, will help here. You can also try drawing arched openings that round at the top by hand.
RThe drawing will not be three-dimensional if you do not add the inner parts of the arches. They should be represented by lines that repeat the shape of the arches.
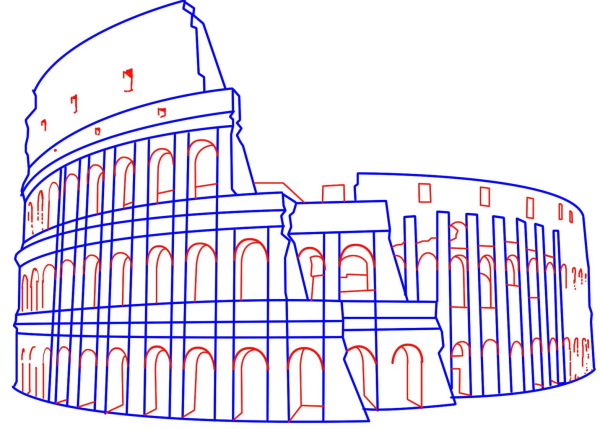
Detailing
The Colosseum (a pencil drawing necessarily includes detailing) on paper will be similar to the real thing if you look closely at the sample and try to redraw the smallest details. These include various openings in the wall and elements on the roof and windows.
In particular, you need to add a few small squares on the roof. These will be small windows. If you do everything correctly, the drawing will change significantly.
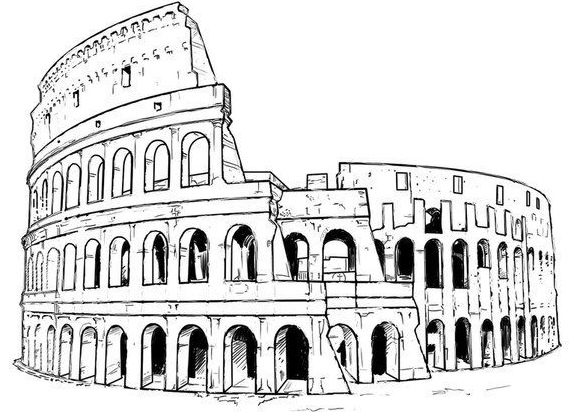
Shadow casting
Working with shadows is the final stage of creating the Colosseum on paper. Since this drawing is not planned to be colored in different colors, it is necessary to ensure that the shaded and lightened areas are correctly displayed here.
 Usually:
- the lower arched openings are shaded, because almost no light gets through here;
- the arches on the upper floor remain light;
- The walls are shaded depending on which side of the Colosseum the sun is on. For example, if the sun is shining from the right, the left outer surface of the building's wall should be shaded with intersecting lines. The shadow that the building casts on the ground is drawn at the bottom in the same way.
If there are still areas that appear flat, it is worth taking another close look at the sample and trying to spot any errors.
Simple instructions for children without details
The Colosseum (it is better to draw it with a hard pencil lead) can be drawn by children, but without the smallest details and correct light and shadow.
Such a drawing, despite the fact that it will be simple, should be as similar to the Colosseum as possible. It would be useful to use a ready-made sample to draw while looking at it. The tools required are an eraser and a simple pencil.
If it is necessary to paint over the image, you can additionally prepare:
- felt-tip pens;
- colored pencils;
- paints.

The work takes place in 4 main stages:
| Stage | Description |
| Creating a contour | You need to draw lines while looking at the picture. The outline of the Colosseum should be an irregular pentagon - a figure similar to the letter "L". For convenience, you can first draw a rectangle, and then simply remove its upper right part. The lines should not be straight, because the building is old and destroyed. |
| Divide the drawing into 4 floors | Between the 1st and 2nd floors, it is necessary to draw 2 parallel straight lines. In this case, one line should be lowered so that 2 obtuse angles are formed. There are also 2 straight lines between the 2nd and 3rd floors and another 2 between the 3rd and 4th floors. |
| Drawing arched openings in the wall and small windows on the upper floor | The arches should be represented by elongated semi-ovals. They are located on the first 3 floors: on the 1st you can make 8 pieces, on the 2nd - 7, on the 3rd - 6. On the 4th floor, draw 2 small square windows, and on the right side of the 2nd floor, you need to add another ledge, on which there will be 2 arches. |
| Give the building the shape of an ellipse | Since this building has the shape of an ellipse, it should be extended to the right. To do this, you need to draw another irregular rectangle and divide it into 3 floors with a pair of parallel lines. |
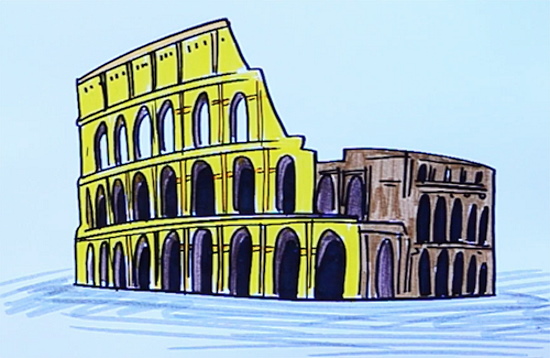
Master class on painting a colored Colosseum with paints
The Colosseum (the pencil drawing is done in both black and white and color) is easy to paint.
In this case, you will need a brush and the following colors:
- blue;
- yellow;
- brown;
- violet.
Blue paint can be considered the main one, because it is this paint that will be used to create the outlines of the drawing.
The work on the creation of the Colosseum is carried out in the following stages:
- Draw the outline of the structure with blue paint. It will be something like a rectangle, but with slightly rounded sides at the bottom and top. The right part of this "rectangle" is missing, because the walls of the Colosseum are destroyed.
- The resulting sketch is divided into 4 parts, each of which will represent a separate floor. This is done using several arc lines.
- Separate the floors from each other with a pair of arced lines. The first such pair starts on the left, passes through the middle of the Colosseum and ends before reaching the right edge. The paired line separating the 2nd and 3rd floors should end approximately in the middle. The next pair of lines, passing between the 3rd and 4th floors, is even shorter: it ends slightly to the left of the middle. The shortest is the top paired line.
- To show the destroyed walls of the upper floors in the drawing, it is necessary to connect the right ends of the upper lines with each other. The role of connectors here will be played by inclined segments.
- Draw arched openings on the three lower floors in blue. They should be on the left side of the middle of the Colosseum, and on the right. The latter are smaller in size and it is not necessary to use double lines when drawing them. The same arches that are on the left should be larger; inside each of them there is a line of similar shape, giving the drawing volume.
- Continue working with the left part of the drawing. Between all the adjacent arches, a pair of vertical lines should be drawn. This is done with the same blue paint.
- When all the stripes between the arched openings are drawn, move to the right side of the drawing. Here, on the contrary, it is necessary to draw horizontal stripes that will demonstrate the border between the floors.
- Work out the top floor of the building in detail. There are no arches here, but there are very small window openings, each of which can be represented by 1 point. Blue paint is still used for this. There should be vertical stripes between every 3 windows on the top floor.
 To color the Colosseum you need:
- Start from the bottom. Here you should paint the area where the building is located in blue. You can brush several times from left to right or from right to left.
- Take yellow paint and paint the left part of the structure. When painting, the arched openings should remain untouched.
- Use brown paint to paint the right side of the Colosseum.
- Paint the arches. Purple paint is used for this.
If you don’t have the opportunity to see the real Colosseum with your own eyes, then you can try to draw it on paper with a simple pencil.
At first, it may seem that drawing the Colosseum is a difficult task. But in reality, if you follow the recommendations correctly, a beginner or professional artist should not have any problems.
Video on the topic: how to draw the Colosseum
How to draw the Colosseum for kids: