Not every one is bought clothing model can meet your immediate needs. To satisfy the maximum of the conditions set for yourself, it is enough to buy a piece of fabric of your favorite color, make a pattern for a loose-fitting dress intended for the summer, and make the item yourself.
Basics of cutting
The pattern of a loose-fitting dress is not particularly difficult. Its correct execution consists of taking precise and careful measurements for the drawing. The maximum approximation of the completed drawing to the figure depends on this.
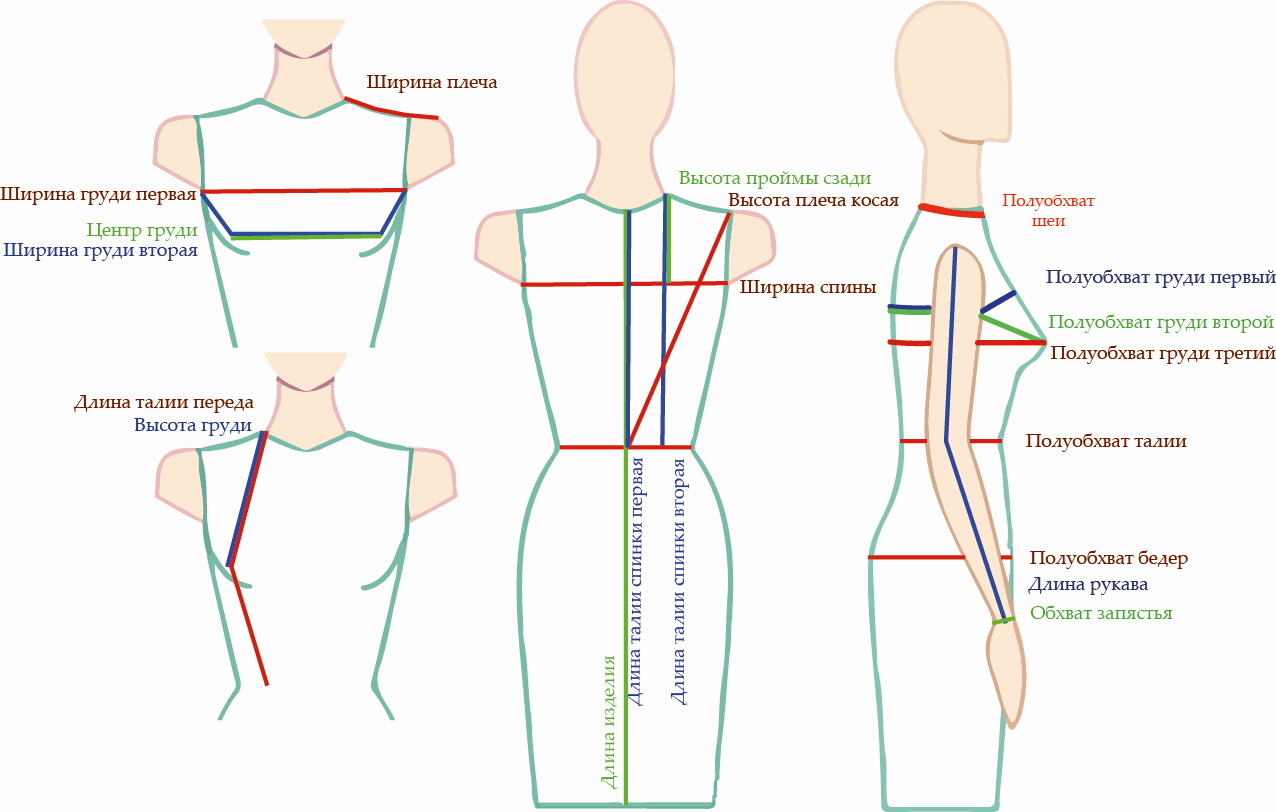
Below is a table of measurements for making the basic frame of a standard straight-cut dress.
| Measurement abbreviation | Name of the measurement | The measurement process | Allowance for freedom of movement (cm) |
| Posh | Half neck circumference | The measuring tape is wrapped around the neck at its base. On the back, it is placed above the 7th cervical vertebra, and on the front, it is joined above the depression. | — |
| Pog I | Half bust 1st | The measurement is taken horizontally through the most convex parts of the shoulder blades, then through the back corners of the armpits, and connected above the chest. | 4 |
| Pog II | Half bust 2nd | The measurement is carried out in the same way as the first, but the measuring tape is placed in front along the most protruding areas of the chest. | 4 |
| Sweat | Half waist circumference | The measurement is taken below the chest level through the narrowing area on the figure in a horizontal direction. | 3 |
| Pob | Half hip circumference | The parameter is also measured in a horizontal position, directing the measuring tape along the convex areas of the buttocks, and connecting at the place of the maximum protrusion of the abdomen. For more accurate measurement, you can use the palm, pointing the fingers down at the place of the protrusion of the abdomen. | 2 |
| PShg | Half the width of the chest | This measurement is the area located between the front armpits, taken above the convex points of the chest. | |
| Cg | Center of the chest | To determine this measurement, you need to measure the distance between the nipples. | |
| PShs | Half the width of the back | It is measured from the left to the right corner of the armpits. | 0.5 |
| Ds | Back length | The measurement is taken from the base of the neck through the bulges of the shoulder blades to the waist level, indicated by the control tape. | 0.5 |
| Vg | Chest height | The measurement is taken from the junction of the neck and shoulder to the nipple. | |
| Road accident | Front length to waist | This measurement is a continuation of the previous one and ends at the waist level. | 0.5 |
| Vpr | Armhole height | The measurement is taken from the junction of the neck and shoulder to the level of the back armpits. | 0.5 |
| VPK | Shoulder height oblique | This measurement shows the distance from the junction of the waist with the spine to the junction of the collarbone with the shoulder. | |
| Shp | Shoulder width | This measurement is taken diagonally from the base of the neck to the area where the arm connects to the body. | 1-1.5
|
| Du | Skirt length | The measurement is taken vertically along the side seam from the waist line to the level required by the model plus hem allowance. | |
| Or | Arm circumference | The measurement is taken by covering the upper part of the arm near the armpits. | |
| Ol | Elbow circumference | The measurement is taken across the arm at the level of the elbow joint. | |
| Oz | Wrist circumference | The measurement is carried out in the same way as the previous one, only in the wrist area. | |
| Dr. | Sleeve length | The measurement is taken vertically from the point where the clavicle articulates with the shoulder to the required level according to the selected model. | |
| Pspr | Armhole depth | 2 | |
| Pshr | Sprout width | 0.7 | |
| Por | Sleeve width | 3-7 and more |
For ease of execution of the dress pattern, it is necessary to use half sizes of the measurements. The drawing of the basic basis of the pattern of a summer dress of a straight silhouette is standard and is executed on the basis of the measurements taken.
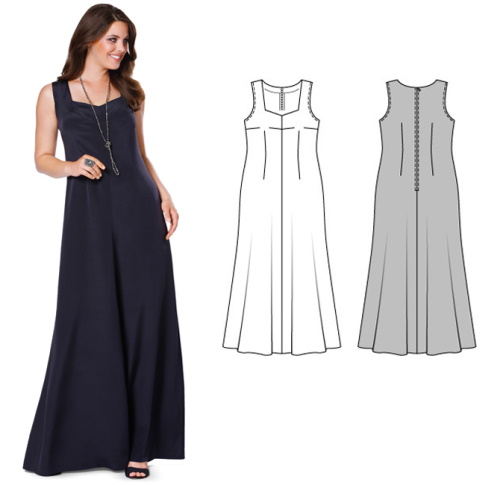
But by making certain changes to the pattern design, you can create a variety of different models and styles. Below are instructions for constructing the basis of a straight-cut dress pattern with maximum length.
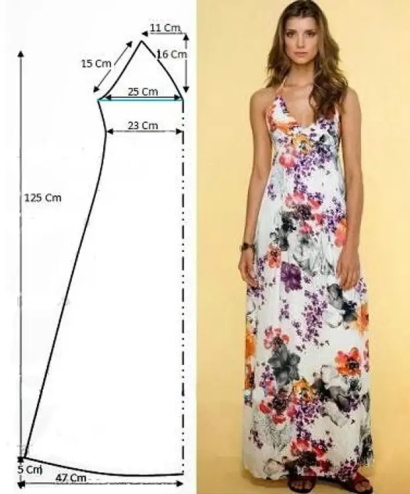
Maxi
A pattern for a loose-fitting dress for a hot summer can be made using paper, preferably in a roll, a ruler, a pencil, and templates.
- Stepping back from the top edge of the paper about 10 cm, you need to draw a right angle. Later, the half-girths and widths of the measurements will be laid off horizontally, and their lengths and heights vertically.
- Having marked the top of the right angle with the letter A, to the right you should put aside the measurement Pog II + 4 cm (allowance for free fit). This will be the . . .
- Next, determine the waist line, which will be located perpendicular to the straight line dropped from point A at a distance of measurement Ds + 0.5 cm. Designate the resulting point as T. Next, draw a horizontal line through T until it intersects with the vertical line from point . The resulting point is .
- At a distance of 21-22 cm down from point T, mark the hip line. These will be points B and .
- The final horizontal line defining the basic grid of the pattern drawing is the bottom line. In the variant under consideration, this is maxi. The value from the waist level to the bottom line of the base is equal to the measurement of the figure Du to the middle of the ankle or more. The resulting points denote H and .
- Now it is necessary to determine the location of the chest level, which is the basis for calculating armholes and shoulder darts. To do this, measure Bpr + 0.5 cm (point G) down from point A and continue it in the horizontal direction until it intersects with segment . The resulting point is called accordingly .
Next, you need to plot the armhole curve of the product:
- To do this, first determine the width boundaries of the back and front, which indicate the place where the sleeve is connected to the product. Taking the measurement Pshs + 0.5 cm, put it to the right of p. G and put .
- Accordingly, from the point to the left, a value equal to (ПШг + 4 cm) + (Пож II – Пож I) is set aside and the point is determined.
- After which, from the formed intersections, perpendiculars are restored to segment A. We obtain and .
- The next stage of construction is the formation of the neckline of the back. To determine the location of the base of the neck, the Posh measurement should be divided into 3 parts and add 0.5 cm allowance.
- The obtained value is put to the right of point A and is designated .
- Then calculate 1/3 of the given segment and measure it down from point A. The result is point...
- Additionally, by constructing an auxiliary rectangle from the obtained points, a smooth line is created for the neckline of the back.
- Then proceed to constructing the shoulder cut. To do this, take a compass (this can also be done using a measuring tape) with a solution equal to the measurement of Dp and from t. make a notch in the area of the rectangle.
- Next, using a compass opening equal to the measurement Bpk + 0.5 cm, make a similar notch from point T. At the intersection of the arcs, point T is formed. The segment between points T will be the shoulder cut line of the product.
- Next, from p. to the left, draw a perpendicular to the segment , where p. is obtained. It is necessary to find the point of contact of the armhole curve with the segment . To find it, the segment should be divided by 3 and add an allowance of 2 cm. The resulting point is designated .
- The next point of contact of the armhole curve is located on the segment . It can be calculated by dividing this section into two equal parts. T. is formed. Through T. , a smooth curve is drawn, forming the armhole line of the back pattern.
Now you can move on to drawing the pattern for the front of the dress:
- First, it is necessary to determine the position of the highest point of the shoulder cut of the front half of the product. To do this, take the measurement Дтп + 0.5 cm and put it from up. You get .
- Next, determine the width of the neckline of the front to the left of the point. It is equal to segment A. The result is segment .
- Then the depth of the neckline is indicated. In most cases, it depends on the chosen model of the product, but its standard round shape is at the level of 9-10 cm from the highest point of the base of the neck. Therefore, this distance is measured down from and obtained.
- The resulting points are connected with a smooth concave line. This will be the neckline of the front of the dress.
Next, calculate and draw the bust dart that goes to the shoulder cut:
- To calculate the center of the dart, take half the measurement Цг + 0.5 cm and put it along the chest line to the left of t. . The result is t.
- A perpendicular is drawn through it up and down until it intersects with the hip line for further construction of darts in the waist area.
- To determine the exact location of the beginning of the bust dart, it is necessary to make a mark on the restored perpendicular using a compass opening equal to the measurement Bg from the point below.
- The resulting point will be the beginning of the dart. Then, using the same compass solution, but from the point in the upper left part, draw a small arc on which the required size of the dart will be marked.
- To determine the second border of the dart, you should set aside from the point to the drawn arc a segment equal to (Pog II – Pog I) x 2 + 2 cm.
- At the intersection of the obtained lines, a t.... Straight lines are formed and determine the finished bust dart.
- Now, to construct the shoulder cut of the front of the dress, it is necessary to determine the auxiliary point. It is located above the point on the segment and is equal to the size of the segment minus 1 cm.
- Next, using a compass solution equal to the distance from the point, make a notch at the top, at the presumed end of the shoulder cut.
- The second notch, equal to the measurement Dp, is drawn from t. to the intersection with the previous arc. T. is obtained. The segment is the shoulder cut of the dress front pattern.
Next, the final stage of constructing the drawing of the pattern base is carried out, which consists of determining the armhole line of the front part of the product.
- First, you need to calculate the auxiliary point. It is located on the line above the point at a distance equal to 1/3.
- Next, t. is connected to t. The resulting segment is divided in half and a perpendicular measuring 1 cm is restored from it.
- Through t., an auxiliary perpendicular, and form the second part of the armhole of the dress pattern base. In t., the armhole lines of the back and front halves of the dress should smoothly join.
Midi
The pattern of a loose-fitting summer midi dress is practically no different in its construction from a maxi one. The only difference is in the location of the bottom line of the product, which corresponds to the measurement of the length of the skirt from the waist to the middle of the knee joint. Otherwise, the drawing is completely similar to the previous model.
After constructing the basic pattern of a loose-fitting dress, proceed to the placement of the cut details on the fabric. All components of the back and front of the pattern, as well as the sleeves, should be placed on the fabric only along the warp threads.
The exceptions are facings, ruffles, flounces, and round collars. These parts can be cut out along the bias of the threads.
Since the patterns of the base parts represent their half part, then when laying out the parts on the fabric, it must first be folded in half in the direction of the base threads.
When cutting out the product, special attention should be paid to seam allowances. Depending on their location and the quality of the material, the size may vary. So, the generally accepted allowances for connecting seams of the main parts are considered to be 1-1.5 cm.
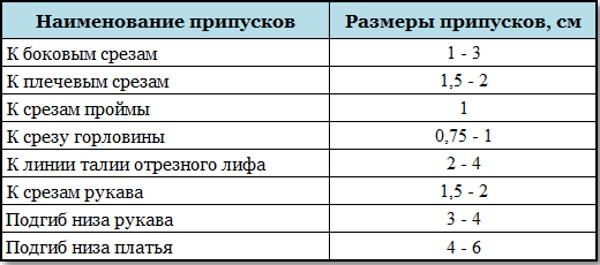
In case of increased fabric flow, the width of the allowances can increase to 2-2.5 cm. Further processing of the cuts with a three- or 5-thread overlock stitch ensures their durability and strength.
After the correct distribution of the pattern pieces on the fabric, taking into account all seam allowances, they are cut out with preliminary application of auxiliary dotted lines along the contour of the main parts. Then, in a certain sequence, the main parts are basted and then secured with machine stitches.
The approximate order of joining the cutting parts is as follows:
- Stitching the bust darts.
- Making shoulder and side seams.
- Connecting the sleeve cuts (if the style includes sleeves).
- Sewing sleeves into closed armholes.
- Hemming the lower edges of the sleeves and the bottom of the garment.
- Processing the neckline with facing, piping, piping, etc.
Short
The construction of the pattern of the base of a loose-fitting dress above the knee length is also performed similarly to the previous models. The difference is the length of the product, corresponding to the Du measurement. Its value in this case is less than the distance from the waist to the knee.
On straps
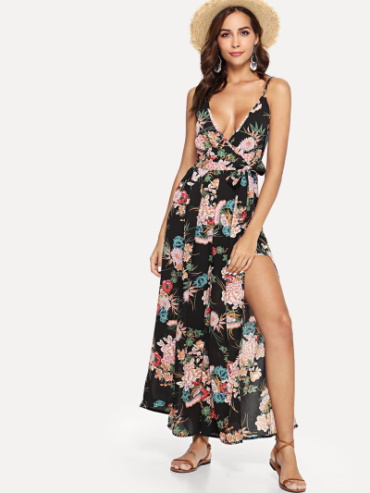
The pattern for a loose-fitting summer dress with straps requires some adjustment of the basic base.
It consists of cutting off the upper parts of the drawing parts according to the shape corresponding to the selected model. The top line of the product can be either smooth or figured.
When modeling a style with straps, the cutting path is at the level of the corners of the armpits, while preserving part of the darts on the front half of the pattern.
The straps can be made in various variations, according to individual wishes.
Their further attachment to the product is carried out in the process of processing the upper edge of the dress with a facing, reinforced with adhesive interlining or interlining. The remaining actions remain the same as in the previous versions.
Off the shoulder
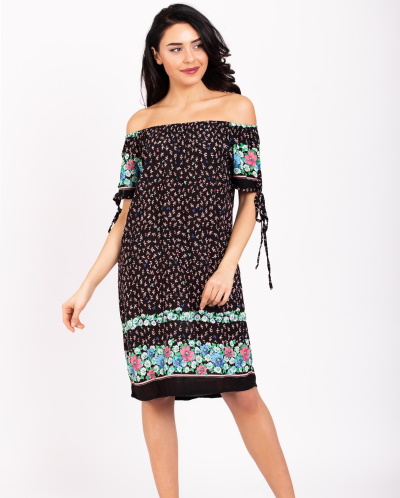
There is an analogy between the patterns for strappy and off-the-shoulder models. They both have no upper parts.
The difference is that in an off-shoulder dress, the cutting off of parts is carried out at the level of half the armhole of the garment.
To correctly mark the cutting line, you should measure the concave lines of the back and front armholes and find their middle.
From the obtained points, horizontal lines are drawn, perpendicular to the middle fold of the patterns. Particular attention should be paid to the sides of the bust dart.
The distance of each of them from the starting point to the cutting line should be the same.
A similar operation must be carried out on the sleeve pattern (if it is provided by the style). To do this, first find the center of the sleeve cap, measuring it strictly along the curve of the drawing. Then determine the middle of each of the obtained parts. By connecting the marked places with a dotted line, you get a cutting line.
With a shuttlecock
To decorate a summer dress with open shoulders with an original flounce made of the same fabric, trim or wide lace, there is no need to make changes to the pattern.
To make such a decoration, it is enough to cut out a flounce from the fabric (preferably in a spiral direction) and fix it along the cutting line described in the previous model. The connection of the finishing element to the product can also be done in various ways.
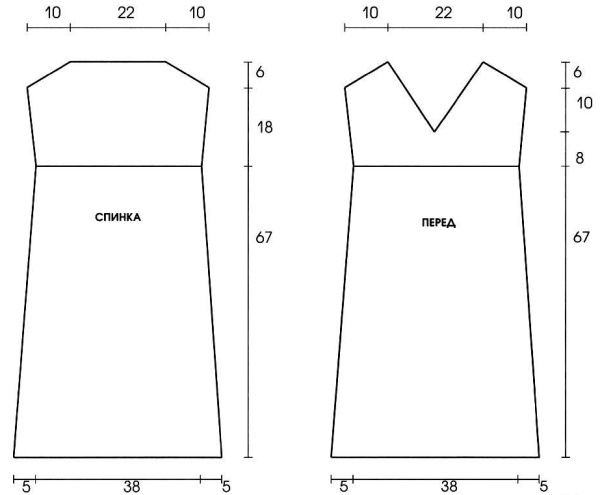
Beach tunic dress
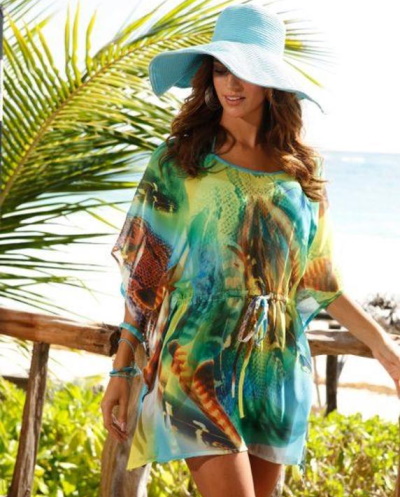
Most beach tunic dresses are distinguished by their simplicity and unpretentious cut.
Since they are loose, do not restrict movement, and their purpose is not to emphasize the advantages of the figure, the drawing of the pattern of such a style is very simple and accessible to any beginner.
To construct it, it is enough to draw two rectangles with parameters corresponding to some measurements of the female figure, namely the circumference of the neck, chest, hips, length of the product and shoulder width (if the model does not provide for a dropped sleeve).
The remaining nuances in the form of rounded or concave lower cuts, figured necklines, and so on are implemented in the process of modeling the selected style.
Chiffon dress
According to experienced craftsmen, a pattern for a loose-fitting summer dress made of chiffon fabric should contain a flare. This is due to its lightness, low tear resistance, and increased flowability of the fabric.
To this list we can add that chiffon does not hold its shape well, but at the same time it creates folds and soft folds perfectly. Therefore, a chiffon dress with a slight to maximum flare will be exactly what you need.
To expand the basic pattern base of the front of the dress, first draw perpendiculars to the lower edge of the garment from the starting point of the dart. Then cut them to the very beginning of the bust dart. Its solution in the shoulder cut area is connected. At the same time, a fold is formed in the lower part of the pattern.
On the back of the pattern, this manipulation is carried out in the place of the intended shoulder darts.
The drawing is cut vertically up to the shoulder cut, and the resulting parts are moved apart to the required size.
If the model involves significant expansion, then the pattern pieces are cut in several places.
Oversized dress
Dresses in this style include patterns that are one or two levels larger than the required size.
Since each subsequent size differs from the previous one by 2 cm in many parameters, then to construct a drawing of the basic base, you should add 2 cm, 4 cm, and so on to the individual measurements, depending on the desired result.
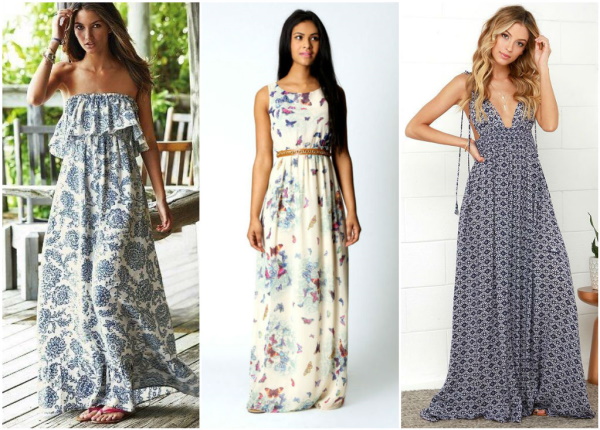
Original options for loose-fitting dresses
Because of women's desire to hide various figure flaws, couturiers come up with more and more variations of loose-fitting dresses. By introducing various folds, tucks, cuts, darts, draperies, and weaves, they embody the most incredible ideas that create a unique image for any woman. Below are some of their ideas.
Regardless of the flaws or defects of the figure, any woman can look attractive and elegant. A correctly chosen style that emphasizes the advantages and hides the necessary places will provide her with inner peace and comfort.
And the patterns of loose-fitting dresses recommended in this article, intended for summer, will give every woman the opportunity to make her ideas and dreams come true.
Video about loose-fitting dresses
Master class on sewing a loose-fitting dress:
I really liked the dress. Tell me, what is the name of the magazine? Thank you.