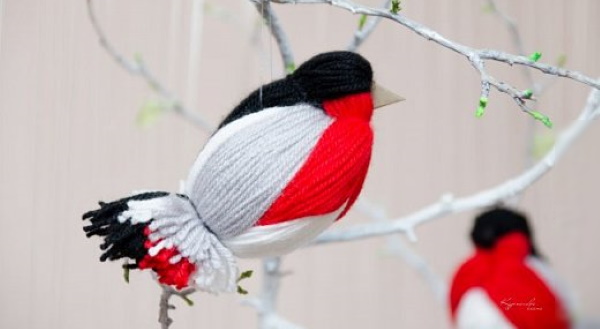
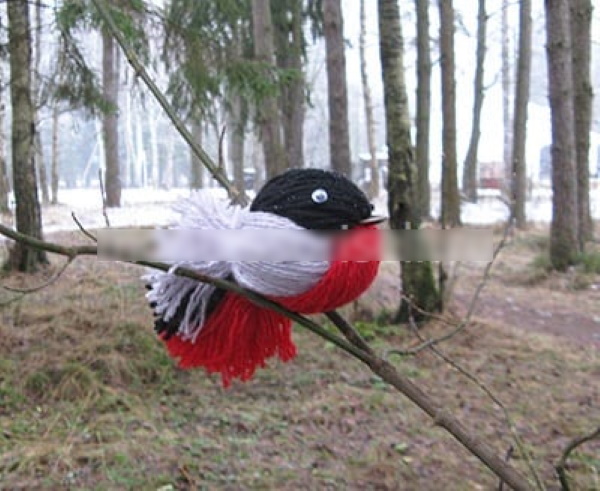
Children can make simple crafts, such as a bullfinch made of threads, for the New Year and decorate their room. The process is not complicated, you won’t need a lot of materials or accessories, so both beginners and experienced needlewomen can cope with creating a bird from threads and yarn.
Tools and materials
The materials and tools required for the work depend solely on the choice of the craftsman. In order to avoid difficulties when creating a bullfinch from threads, it is best to prepare everything you need in advance. All the goods that may be needed to create the craft can be purchased in stores with goods for handicrafts.
To make the bird bright and look like a real one, you can choose bright shades of thread.
Thus, the basic materials and tools that will be needed for the craft can be presented in the following list:
- threads that match the color of the plumage: black, red, gray;
- cardboard;
- wire;
- the seed of a fruit, such as a peach;
- scissors;
- glue;
- 2 artificial eyes used to create toys;
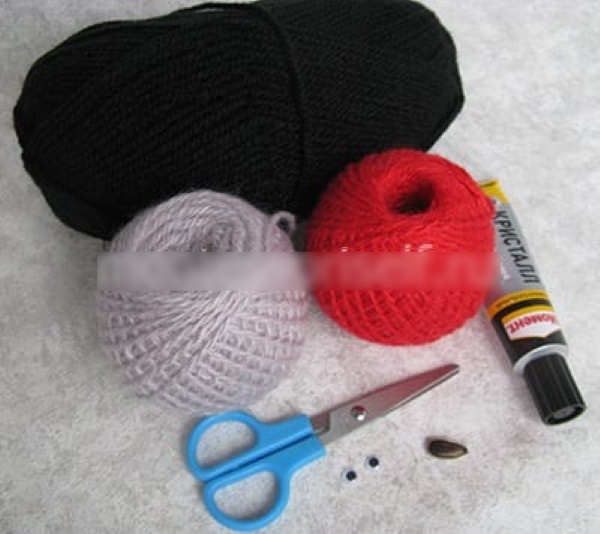
- depending on the type of craft - pompoms.
Bullfinch made of wool thread
A bullfinch made of threads, which can be made by both an adult and a child, can become a gift or a New Year's decoration. For work, you will need the previously described materials. You can buy these materials in stores with goods for handicrafts and in household departments.
Work should be done in accordance with the following list:
- Cut the yarn into 30-35 cm long pieces. If the yarn is thick, you will need a few of these pieces. The number of pieces of wool thread depends on its thickness. On average, no more than 60 pieces are needed.
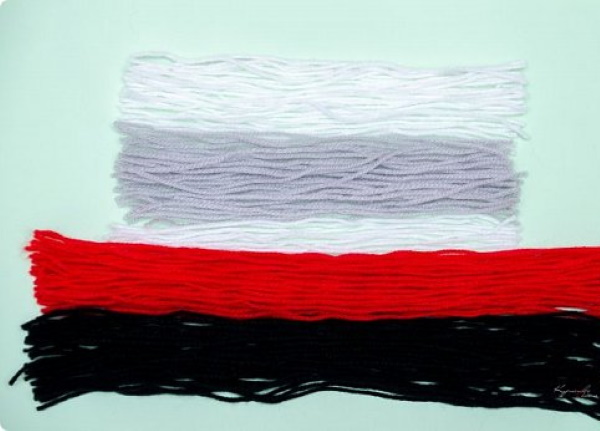
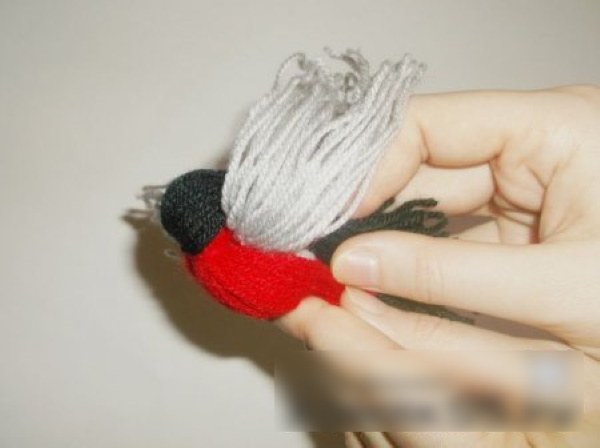
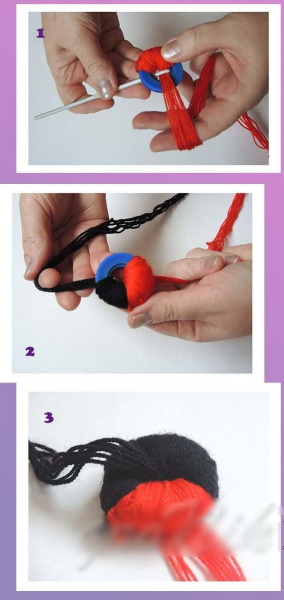
- Take red threads, put black threads on top. Measure the center of the resulting bunch and tie them exactly in the middle with a black thread as tightly as possible.
- Bend the entire bunch of black threads in half, place it on the red one and tie it approximately in the center with a gray thread. The ends of the gray thread can be put aside.
- Take a bunch of gray yarn, put it under the free red bunch. Bend the end of the gray yarn, bend the bunch of red yarn down. With the free gray threads that were put aside in step 3, tie the 2nd bent end of the red yarn to the future tail of the bullfinch.
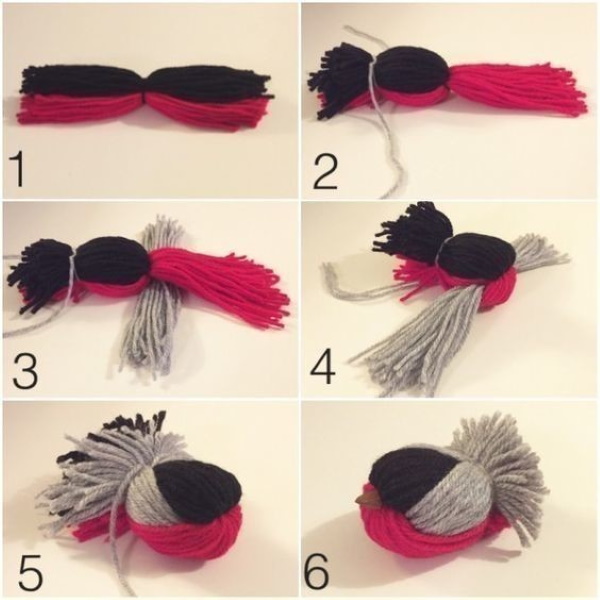
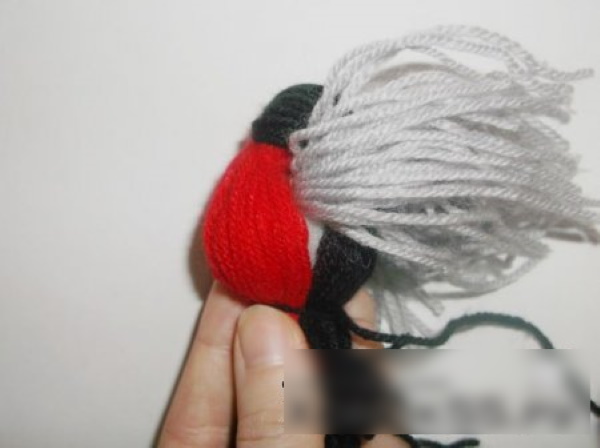
- To form the wings, bring the ends of the gray yarn to the tail from the bottom up. Make symmetrical wings on both sides. Tie with the same gray threads.
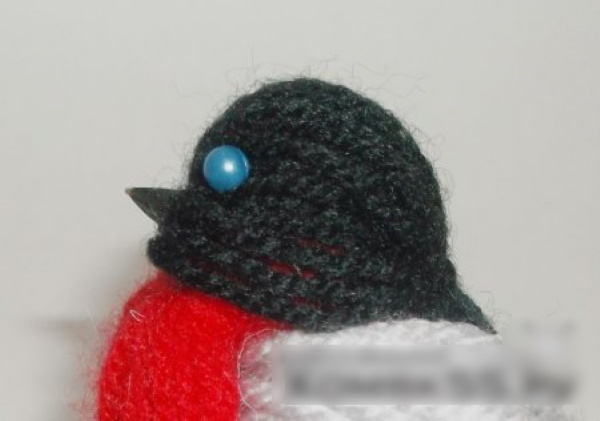
- Pull and align all the threads, giving the bird a more realistic appearance. Glue the seed, which will become the beak, to the bullfinch's head, glue the eyes a little higher. To prevent anything from coming off, it is recommended to use Moment glue, not PVA.
How to make a bullfinch from threads - a simple step-by-step method. - This step completes the creation of the bullfinch.
Made of multi-colored wool
A bullfinch made of threads, which can be made for Christmas or New Year, can be made in just a few hours. So, you can replace the threads with multi-colored wool. The necessary materials are slightly different: the threads, accordingly, are replaced with wool, and the threads that tied the parts of the bird can be replaced with thin elastic bands. While working on the bullfinch according to this master class, you can get acquainted with wool for felting, since this is what the bullfinch will be made of.
You can knit a bullfinch from wool using the following master class:
- Prepare the base onto which the wool will be wound.
- Prepare tufts of wool that match the color of the bullfinch's plumage. Take strands of red and black colors. Form a cross, lay the red and black strands.
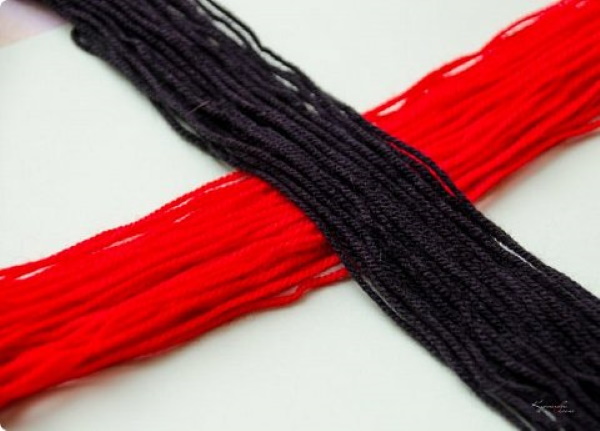
- Bend the ends of 2 strands in different directions. Tie the black wool bundle as tightly as possible at its base. Leave the red one free. It will not fall apart due to the fact that the black wool is tied.
- Take a small strand of black, wind it on the base. Place a white strand on the base. To prevent the wool from sliding off the workpiece, you can sew it with 2 small stitches.
- Place a large tuft of gray wool on these strands. Divide the gray strand in half and tie the 2 parts tightly. The gray wool forms the wings. All strands except the gray ones should be tied tightly in the tail area.
- Raise the future wings up. Put the wings on the back and tie them at the base of the future tail.
- To make the tail thinner, tie it together with the wings. You can also adjust the length of the tail, you can trim it with sharp scissors.
- Glue the eyes and beak onto the head.
- Optional extra step: add wire legs.
From pompoms
A bullfinch made of threads, which you can make together with schoolchildren in class, will become a classroom decoration during the New Year holidays. Children may like acrylic yarn, as it is bright, can fluff up after cutting, and does not fade in the sun. To make a bullfinch from this yarn, you need to wind enough yarn on the base to make a pompom.
This master class will require the following materials:
- Beads or seed beads (2 pcs);
- Acrylic yarn in grey, black, white, pink and red;
- A small piece of felt for the beak;
- Blanks for pompoms;
- Scissors;
- Hook;
- Superglue.
The pom-pom bullfinch is made according to the following steps:
- Prepare 2 blanks: a small one for the head and a larger one for the body. Prepare several skeins of thread, no longer than 1 meter. The thickness of the skein depends on the thickness of the thread.
- To form the head, you should wind red threads on a small blank, arrange them so that they take up a third of the blank. The remaining part should be occupied by black threads.
- Wind the yarn into several very tight layers. A crochet hook can help with this.
- Tie some black and grey threads onto the blank for the bullfinch's body. They will later become part of the tail. Start winding white threads near the tail. Winding direction - make 2 turns to the right, then 2 turns in the opposite direction, towards the tail.
- Wind the pink threads. Start winding to the right of the white threads, make 2 turns and return in the opposite direction, capturing the white threads.
- Tie red threads to the right of the pink ones, braid the workpiece with turns to the right, then move to the left, then to the right again. And thus, close the layer of pink threads with red turns. It is necessary to ensure that the winding thickness is uniform. These actions form the bird's belly.
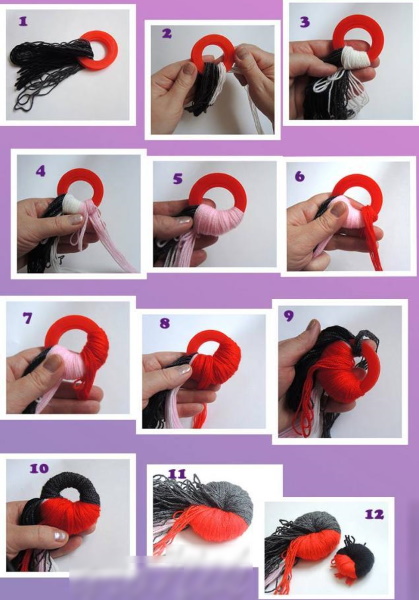
- On the 2nd half of the circle, wind gray threads. The yarn of this color forms the bullfinch's back. Thus, on the blank, 2 colors for the bird's body should be wound in equal quantities. For the head, 2 colors should be wound - a third of the blank is braided with red, and the remaining two thirds are braided with black.
- The remaining skeins of grey and black are used for the wings. Their length is approximately 10 cm.
- Once the body is fully formed, you should pull the threads for the wings. Distribute the length of the threads evenly on both sides.
- Without touching the bullfinch's tail, cut the rest of the winding. To prevent the pompom from untying, take a strong thread and tie it at least 2 times. The tying of the head and body is slightly different in its placement: when tying the head with strong threads, you should move them to the red threads of the head. When tying the body blank, you should place the threads at the junction of the red and gray colors.
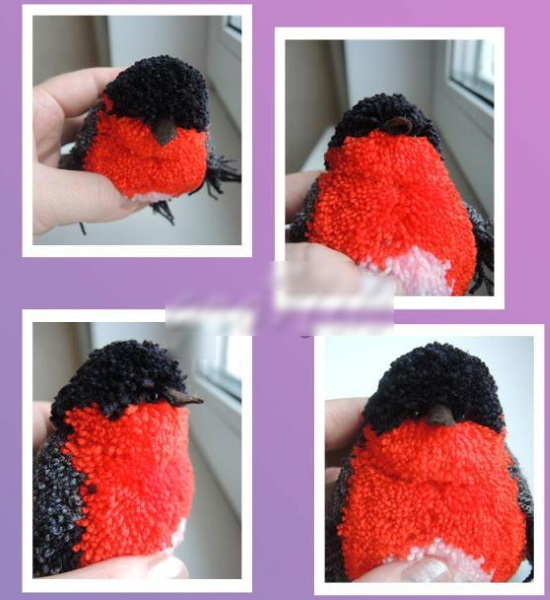
- Carefully remove the rings so that the threads do not shift and the bullfinch's appearance does not change. Tie the head and body of the bullfinch with the remaining ends of the binding threads. Tie the threads from the back.
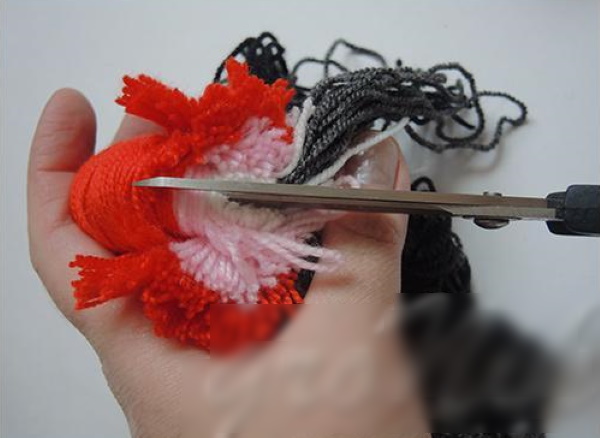
- Trim the yarn that forms the pompom with sharp scissors. The scissors must be sharp, otherwise the threads will fluff up a lot and spoil the appearance of the finished product.
- Trim the bottom of the tail, check the threads all over the bird's body: if any piece of thread is sticking out, trim it. Also trim both wings to make them more realistic.
- Take round beads, cut a triangle out of felt, fold its 2 corners like an envelope. In the place where the red and black colors border each other, spread the threads with your fingers, form indentations for the eyes.
- Put a drop of superglue into these recesses and place the beads there. The beak is glued on last.
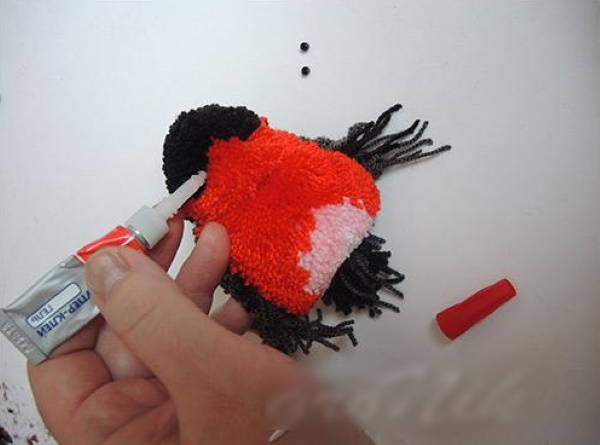
- Once the glue is completely dry, trim it as needed.
- The creation of the bullfinch is complete.
From threads and cardboard
A bullfinch made of threads, which you can make together with your child for the New Year, has its own distinctive feature - a red chest. You can create this bird from threads and cardboard, focusing on the master class below. As described earlier, for the bullfinch you will need threads, glue, cardboard, eyes, scissors, paper.
The master class below can help you create a bullfinch from threads and cardboard:
- Draw the outline of a bullfinch on a sheet of paper. Leave a hole in the center of the stencil through which the threads will be threaded.
- Place the template on black cardboard and trace with a pencil. Make the 2nd blank using the same principle.
- Place both pieces on top of each other without gluing them together.
- Form the bullfinch's chest by winding red yarn onto the blanks. It should be threaded through the hole in the template. The upper part of the template should be threaded with gray and white threads. In this case, start with gray yarn.
- Wind white threads onto the workpiece. Use sharp scissors to cut the threads along the edge of the workpiece.
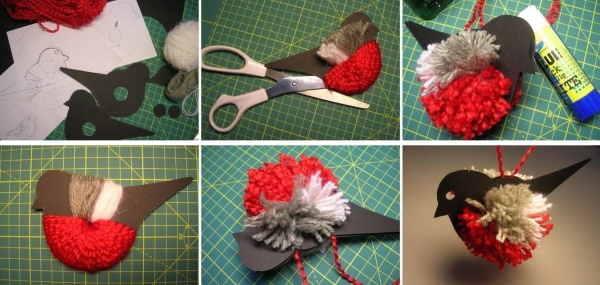
- Tie the threads together to create a pompom. To do this, take a piece of thread and tie all the threads together.
- In this step, glue the 2 blanks together. Glue on the toy eyes. The creation of the bird from cardboard and threads is complete.
Useful tips for making a bullfinch and decorating it
In order for the bird craft to last longer and please everyone who looks at it, you should choose high-quality materials and yarn from well-known companies. Some threads can fade over time and become more faded. You also need to be smart about choosing the glue, since PVA glue is not always suitable for crafts. For example, it is not intended for gluing threads or gluing toy eyes to yarn.
When working with superglue, you need to follow some rules: for example, it is better to glue the parts in ventilated rooms, do not give such glue to children and work with gloves. Superglue can very quickly glue your fingers together, so you should protect your hands with gloves. There are several types of yarn that are best suited for this type of craft.
Some examples are presented in the table below:
| Yarn material | Description of yarn | Advantages |
| wool | Made from sheep wool. It is distinguished by its length, thickness, softness and dyeability. | Strong, durable yarn that retains color for a long time. |
| viscose | Made from natural cellulose. | A soft and silky thread that is almost not electrified. |
| acrylic | A fiber that is similar in properties to wool and is resistant to light. | Yarn that does not fade under the influence of light. Soft, warm and fluffy, it is considered the most suitable for a bullfinch made of threads. |
A bullfinch made of threads can decorate a New Year tree, it can be made even with children, since creating a bird from threads does not require much knowledge and additional fittings. Students can also create a bullfinch to decorate a seasonal tree. A seasonal tree is a tree that demonstrates different seasons. For many people, the bullfinch is associated with winter and cold weather, so it can be made as one of the symbols of winter.
Bullfinch - applique
One of the advantages of this method is that you can find any picture of a bird and create a great gift or interior decoration using bright yarn. Even a child can handle creating an applique from yarn, so it can be included in the program of classes for schoolchildren.
To work you will need:
- Cardboard;
- Sewing accessories;
- Pencil, felt-tip pen;
- Napkins;
- Glue.
A master class on creating an applique may look like this:
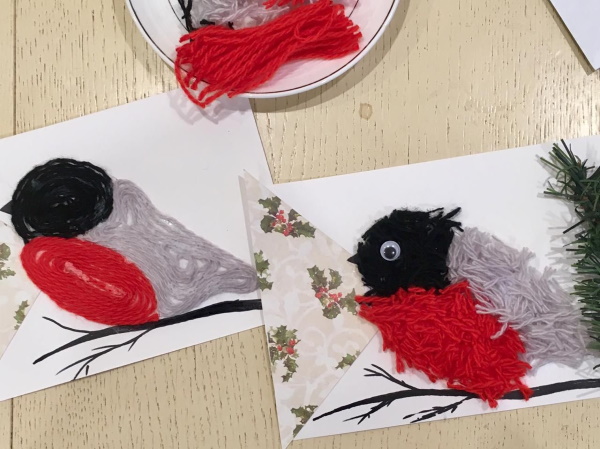
- Prepare a picture with a bullfinch, which will need to be covered with yarn.
- Cut the yarn into small pieces, no more than 5 mm.
- The essence of the process is that the yarn must be applied in small quantities to the cardboard using glue. You need to drop a small amount of glue on the cardboard, put a little yarn on this place and press it. Napkins can help with this.
- To avoid empty spaces, you can use additional threads, gluing them in these places.
- The paws are drawn with a felt-tip pen or pencil. You can also work on the background for the bird, for example, add trees or snow.
A bullfinch made of threads can be a New Year's craft for school or kindergarten. Children will quickly cope with creating a bird from yarn and threads, since this craft does not require a lot of materials and accessories. For older needlewomen, a bullfinch made of felted wool or a bullfinch made of pompoms is more suitable. All materials can be purchased at a store with goods for needlework or in household departments.
Video on how to make a bullfinch from threads
How to make a bullfinch from threads: