Learning the technique of creating bird images is a fun and rewarding activity. For example, it could be a bullfinch on a branch. Children love drawing and are ready to learn it. Any complex images are best done with a simple pencil at first. This will allow you to draw the bird in more detail.
Pencil drawing of a bird
Before starting the creative process, you need to learn more about the bullfinch with your child. This is a bird that arrives in winter, which stands out as a bright spot against the snowy background of a forest or an alley with trees.
Bullfinches easily endure frosts and snowstorms; they do not fly away to warmer climates for the winter, but move closer to human habitation and find food and shelter there.
Bullfinch on a branch: pencil drawing
A bullfinch on a branch (a drawing for children is best done in sequence) can be done with one simple pencil. This will allow you to make the picture as close to reality as possible and work out the smallest details.
The stages of such work will be as follows:
| Stage | Description |
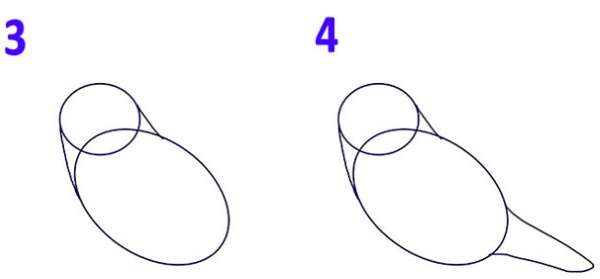
| 1 | Create a sketch using a pencil, which will become the basis of the future painting. To do this: 1. Draw the body on a clean sheet of paper. 2. On the top of the body, mark the head in the form of an oval and a wing on the side. |
| 2 | Start drawing the details that make the picture realistic and dynamic. First, you need to draw the beak and cheeks of the bird. For this, geometric figures are used - triangles, one of which (the outer one) is slightly elongated, the other is blunt. To unite them together, you should draw a vertical line between them. The oval is created by drawing the cheeks. |
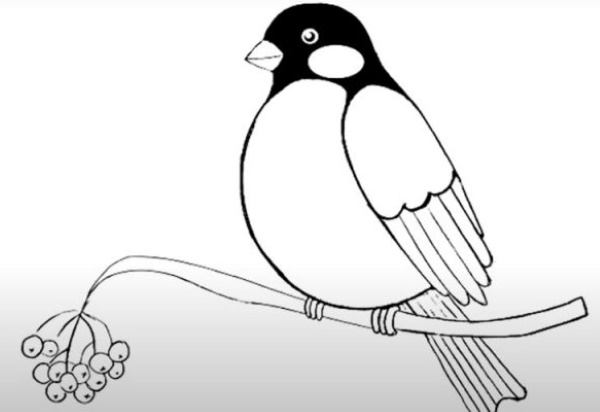
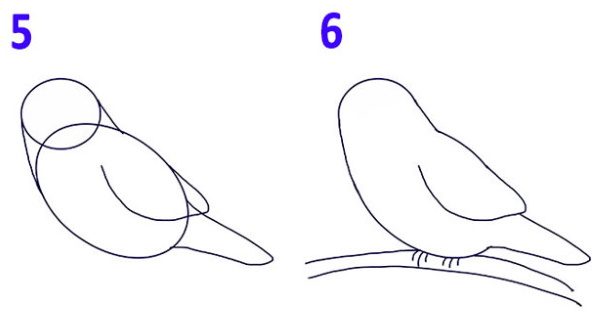
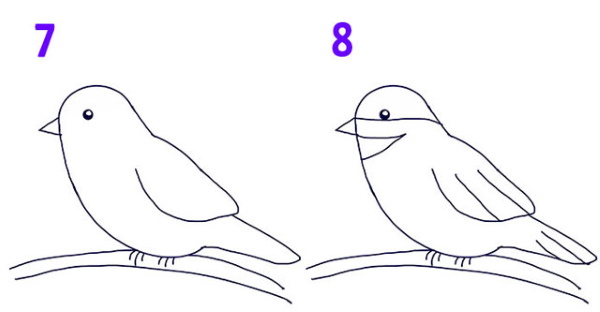
| 3 | Finish drawing the remaining details: 1. Draw an eye and leave a small highlight, which will make the eye almost alive. 2. Draw the paws slightly bent, the bullfinch will use them to hold onto the branch. 3. If desired, draw a rowan tree or a snowy alley of trees. 4. Outline the bird and color the head with strokes. You can use a hard pencil so that the shading is not too intense. The cheek, eye and beak will remain untouched. 5. Take paints or pencils and color the picture. |
New Year's picture
For such a holiday, you can make a drawing of a bullfinch on a Christmas tree branch. You can use it to decorate a hall, a children's room or a foyer. It is better to draw a bullfinch on a branch for children or together with them step by step.
The procedure is as follows:
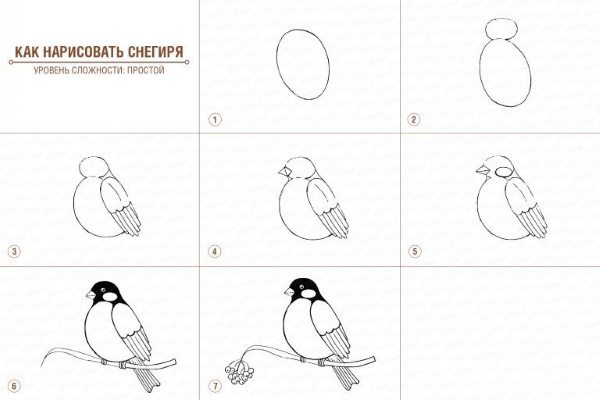
- Draw 4 whole squares and 2 halves.
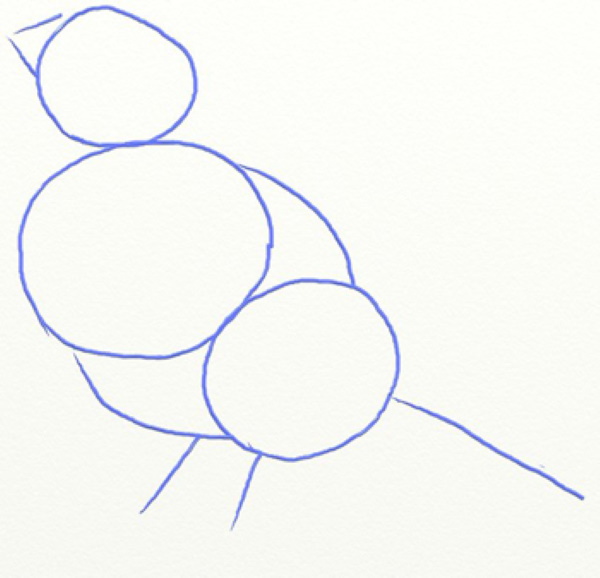
- Mark 3 circles of different diameters. The result will be the outline of the future drawing.
- On the topmost of all created circles, on its left side, draw a small triangle. This will be the beak. To the right of the lower circle, draw a straight line. It is necessary to set the level for drawing the paws. After this, draw the outline of the body, and it will be clear that this is a bird.
- Trace the finished contours of the body.
- Outline the remaining parts of the future bird with a simple pencil. The tail, beak, and paws are made clearer and more detailed. The eye is drawn here and unnecessary strokes are erased.
The drawing will be realistic and completely easy to make. By adding a few small details you can hang it on the wall. For decoration for the holiday, it is better to color the drawing with colored pencils.
Bullfinch from the cartoon
This picture will appeal to little artists. To make it, you will need a sheet of paper from an album and a felt-tip pen.
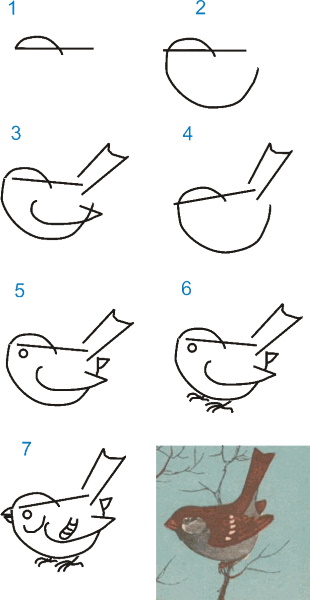
The drawing process is simple and consists of the following steps:
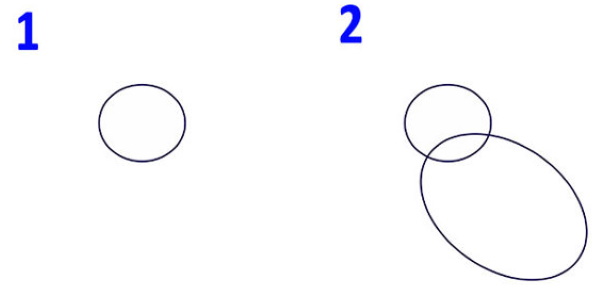
- In the center of the sheet, make a small oval, tilted to one side. For example, to the right.
- Draw another oval on top, slightly overlapping the first one. It is smaller and more rounded. This is the head and body of the future bird.
- Draw the wing. It will be in the form of a small, slightly elongated oval on the right side of the bird's body. It is drawn at an angle, making it narrow and drawing it in the middle of the bullfinch's body. At the end, you can make a wavy line that continues the outline of the wing.
- The lower segment is filled with the end of sharp feathers that smoothly go up the wing. Another line connects the wing to the head.
- Draw a beak from two triangles connected by their long ends.
- Connecting the beak into one whole and drawing the line further, draw the cheek. It is also oval and slightly convex.
- The eye will be round with an inquisitive pupil. A white stroke gives it life.
- Draw a straight line under the body. This will be the branch on which the bird sits. It is of different thickness along the contour. The bird's paws embrace the branch. Between them, you can see the tail. It is drawn with 2 parallel lines connected at the end by the letter W.
- Finish drawing the details and color it.
Bullfinch on a snowy branch
Bullfinch on a branch (a drawing for children can be done with both pencils and paints) with colored pencils for drawing on paper will require the presence of:
- simple and colored pencils;
- eraser;
- album sheet.
The stages of image creation will be as follows:
- Having visually divided the sheet into 2 parts, draw 2 arcs in the upper segment, with the right end pointing down.
- Extend the left edge upwards and to the left with a small semi-arc. This will be the bird's beak. Make the lower part of the beak a little shorter underneath.
- Connect the drawn beak to the head with a smooth line. It is drawn in the form of an elongated ball.
- Draw an eye on the head.
- Continuing the line of the upper arc, taking it a little lower, create the back of the bullfinch. On the left side of the head, an arc is drawn, creating the chest. Next to the back, a wing is made with several lines.
- Outline the tail peeking out from under the wing. It should be drawn as 2 feathers lowered down. The outline of the body is completed by paws, which are drawn from below. Their claws look forward, and only 1 remains behind.
- Using small strokes and a pencil, outline the silhouette of the bird.
- Paint the head black. Leave a white semicircle around the eyes. The pupil will also be black, but the highlight next to it will be white. Lightly paint the beak, leaving the tip white.
- To place accents and make the color more expressive, add a little black to the feathers on the head. In some places, the shading is not so intense, for example, along the eye line. This will give the drawing volume.
- Paint the back and the middle part of the wing grey. The shading is done with varying intensity. White may show through in some places.
- Make the bullfinch's chest red. Paint it with uneven short strokes, creating volume. The color will be paler on the neck and at the base of the wings.
- Make the picture more lively with a pink shade. To do this, apply a few strokes with a pink pencil to the chest and wings. The neck area can be covered more intensively. The bird's feet will also be pink.
- On the wings make 2 dark and 1 gray stripes. The tail will also be gray.
Creating a drawing with a gel pen
To work you will need:
- paper;
- pencil;
- black gel pen;
- several colored pencils.
The steps to create an image are as follows:
- To create a sketch, mark the 1st line, which denotes the head. To the left of it, draw a beak from 2 triangles located next to each other.
- Draw a line down from the beak. It creates the outline of the chest. Draw an eye and pupil on the head, and also make a white highlight.
- Draw another line from the back of the head to create the back. Draw a wing behind it in the form of a strongly drawn circle.
- On the wing, draw the outlines of the feathers, and at the bottom, draw the paws.
- Draw the tail at the back. This is done with 2 lines, connected at the ends with 2 thresholds.
- The neck and the line coming from it are painted blue, and the chest is painted red. The head, tail, and wing will be black. Only in some places can you make gray stripes.
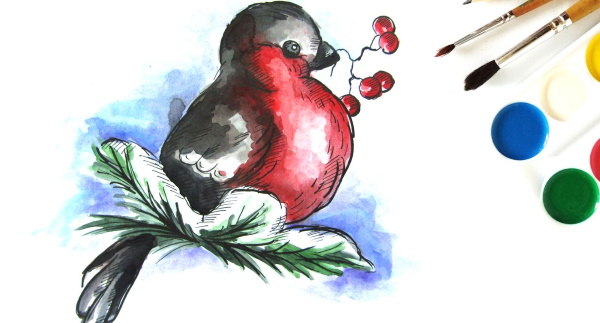
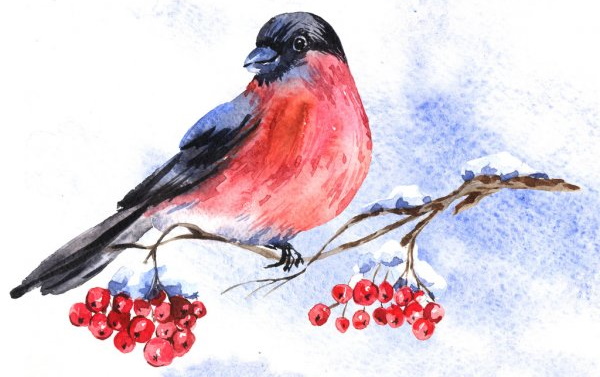
Watercolor drawing
A bullfinch on a branch (a drawing for children can be done in various techniques) in watercolor will not be easy for small children to draw. However, middle-aged children will cope with such an image.
To work you will need:
- paper;
- simple pencil;
- water container;
- watercolor paints;
- brush;
- eraser.
The stages of work will be as follows:
- Draw the outline of the bird in any way accessible to the child. You can use the techniques described above or use your own imagination.
- Wet the sheet with clean water and cover the breast with the first, almost transparent layer of red paint.
- Make the head dark, but leave a light spot under the pupil.
- Place a purple color at the bottom of the body, not too intense. The transition should be made unnoticeable by mixing the colors in several places. This will create the effect of a smooth transition from one color to another.
- The beak and wing area are painted light blue. The bottom of the beak, covered in grey, is slightly shaded with red.
- After the paints have dried, paint the wings in a denser shade of blue. The same color is applied to the tail area.
- Draw the details of the image. For this, you need a thin brush. With it, barely noticeable blue strokes are made on the chest along the line of feather growth. Particular attention should be paid to the lower part of the wings. This will create the necessary shadows, making the drawing more realistic.
- After drying, cover the chest and feather outlines again, but with a more saturated red tone. This will give the bird the necessary volume.
- The head is once again covered with a thin black tone, leaving a small rim around the eyes gray. Black paint is also applied to the beak. However, it is applied in light stripes so that all the shades of paint and white highlights are visible.
- Create the desired texture on the back and wing with gray, while only lightly touching the paper with the brush. Create a mottled texture on the bird's back with light touches of gray paint. The paws at the top will remain gray.
- Apply a thin black tone along the top of the wing, creating the effect of iridescent feathers. Do the same on the tip of the tail.
- Once again, draw a black brush over the head, paws and beak, as well as near these areas. Always touch lightly and in a shading manner.
- To create the desired texture, use a clean brush to go over the wing. Then, without washing off the remaining paint, make a few strokes on the back and lower part of the wing. This will create a small penumbra.
- The upper branches of the tree are marked with brown. The color is applied unevenly, more in some places and less in others. You can add a blue tint at the bottom.
- The background is made by mixing blue and violet paint tones. Moreover, it is better to mix them directly on the sheet. This will make the picture more dynamic.
The drawing may be different. For example, a bullfinch may hold a rowan branch in its beak or simply sit, covered with snow.
Techniques and methods used in the drawings
A bullfinch on a branch (a drawing for children is an important stage in the development of creative abilities) can be depicted on paper using various techniques and methods.
If younger schoolchildren simply learn to hold a pencil, correctly place the color, distribute the picture in space, then older children master more complex methods of depicting a person, an animal, objects. With the help of simple movements, creating the necessary forms and structures, children achieve realistic images.
There are several types of bird images:
| Image type | Description |
| Creating an object image | The drawing should contain the characteristics of a specific type of bird: sparrow, bullfinch, swallow. |
| Development of a plot composition | It could be a tree with a bird sitting on it, a yard, a field, or in complex compositions – a multitude of objects and figures. They are usually made collectively, by gluing or drawing on a prepared base of the picture. This approach develops collective thinking and creativity. The teacher must ensure that all processes are carried out consistently and the proportions of the picture are observed, creating a common plot. In addition, the children must prepare a background drawing in advance. It is first painted with the main color, then details are made, for example, clouds or the sun. Birds are drawn at the end of the work. |
There are the following traditional techniques for creating drawings:
- using a simple pencil;
- colored wax crayons or pencils;
- felt-tip pens or markers;
- coal;
- using several types of materials at the same time: colored and regular pencils, paints, crayons;
- using watercolor paints, which can be regular or honey. Here it is important to teach children to create new shades and regulate their density by mixing colors.
Also, recently many new ways of creating drawings have appeared, among which the following stand out:
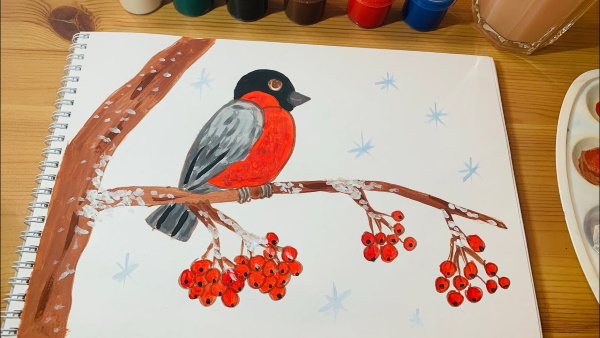
- vertical sharp application of gouache with a practically dry, hard brush. As a result, you can achieve incredible volume and relief of the coating;
- finger painting. The technique is popular with preschool children. It can be used on par with classic options or together with them;
- palm painting. It's similar to finger painting, but here the entire palm is used;
- grattage. Based on scratching a design on a surface previously painted with wax or a thick layer of paint. The designs are unusual and beautiful;
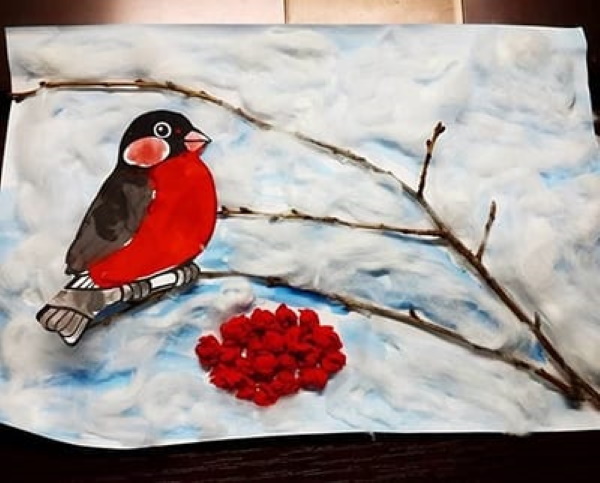
- drawing with loose substance: rock salt, river sand, semolina;
- dot paintingThe drawing is created with paints, by applying them point by point with fingers, sticks, or an eraser;
- on crumpled paperThe image turns out to be three-dimensional and attractive;
- on pre-moistened paperThe result is a surreal, blurry picture;
- stampingHere, pre-made stamps are used to create the main plot;
- blotography. It is difficult to obtain a picture of a bullfinch using this technique. However, you can use your imagination by blowing drops of paint from a straw in a special way.
Basic drawing techniques
The drawing consists of individual details that together form a picture.
When creating a sketch, the following are used:
| Reception | Description |
| Lines | This is the basis of any drawing created with a pencil as a sketch. Lines can be:
Their main task is to create the desired outline of an object, its shape and dynamics. |
| Hatching | Using this technique you can create:
This type of drawing helps children develop coordination of finger and hand movements. Shading can be:
|
| Dot | This is a brush or marker stroke that can be very effective in some cases. |
| Working on wet paper | Used when you need to achieve an unusual color effect. |
| Filling | This is a variation of different tones of one color. Several techniques are used to create it. For example, first the paint is applied in a thick tone, then it is slightly smeared with a dry brush. |
All these techniques are interesting for children, and they use them with pleasure. The creation of drawings of birds, in particular bullfinches, should be accompanied by a story for children about what kind of bird it is, why it lives in winter near people and can often be seen on tree branches. This will help to understand the character of the bird, and therefore make the drawing more realistic. It does not matter what technique the child uses, the main thing is that it is interesting for him.
Video on how to draw a bullfinch
How to draw a bullfinch: