The stained glass is presented in the form of patterns with squiggles, which are often intended for children's creativity. Thanks to such an unconventional technique, it is permissible to easily create a beautiful craft. Paper, plywood, cardboard, plastic, glass can be used as a base. To draw a wall picture, it is advisable to use opaque materials.
Types of stained glass paints, features and techniques of use
It is permissible to paint stained glass using both pouring and painting techniques.
For these purposes, it is necessary to prepare acrylic or stained glass paints intended for painting on glass surfaces:
| Type of paints | Features and application techniques |
| Acrylic | The composition includes 3 main ingredients in the form of an acrylic emulsion of polymer, water and pigment. They are sold in jars or tubes. The acrylic composition can dry in a short time, then acquire elasticity and stability. At the same time, after drying, the material will withstand changes in humidity and temperature. It will be problematic to scrape off or sand off the dried coating. The shade will be saturated, but matte. At the same time, all colors will not fade and burn out after some time. Acrylic paints of different tones can be combined with each other. After use, the brush can be easily washed with water. If the tool is dry, you can use a solvent. |
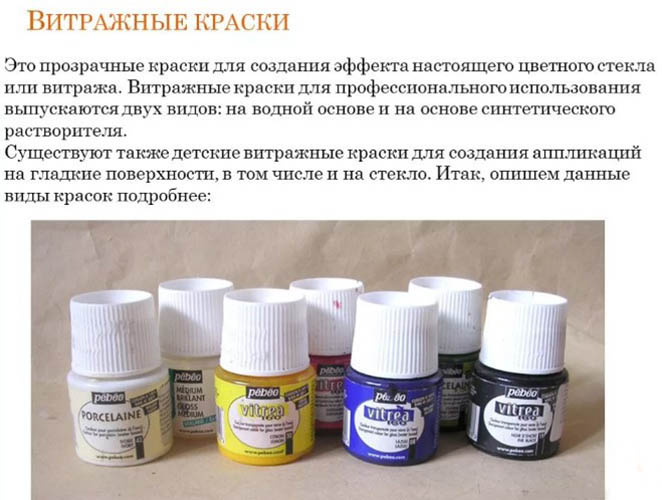
| Stained glass | They can be non-fired and fired. The first ones require about 1-3 days to dry completely. The ornament needs to be fixed with nitro varnish. The second type of paints after application should be heated in the oven so that they harden and are not susceptible to external influences. The firing temperature should be indicated by the manufacturer on the packaging. If firing is not performed, after 7 days the coating will dry out and become hard, but the risk of smudging the paints ahead of time increases. The paints are made on a water basis, so they need to be diluted with this particular liquid. The brush must be washed with water after use. Stained glass paints, unlike acrylic ones, are brighter and thicker, because they contain a synthetic solvent. All shades are normally applied to the coating, while such material is suitable for working on a vertical surface. |
Some specialists use self-prepared paints for their work:
- Based on nitro lacquer. NC-2141 or other similar material is used. The product must be diluted with solvent 647 in a ratio of 1:0.4, respectively. For tinting, a construction colorant or art paint with the addition of oils is required. The dye must be added in small quantities until the optimal shade intensity is achieved.
- Based on gelatin. You need to dissolve 6 g of gelatin in 200 ml of boiling water. The consistency should be similar to paste. Then you need to add dye for fabric material to the mixture. The completed pattern must be fixed with nitro varnish.
- Based on BF-2 glue. 1 part of glue should be diluted with 2 parts of acetone, then tinting should be done with any pigment based on alcohol. In this case, it is acceptable to use a paste that is suitable for a ballpoint pen. The emulsion should be stirred in a glass container and tested on a glass surface. If necessary, it is acceptable to add pigment to achieve the desired intensity.
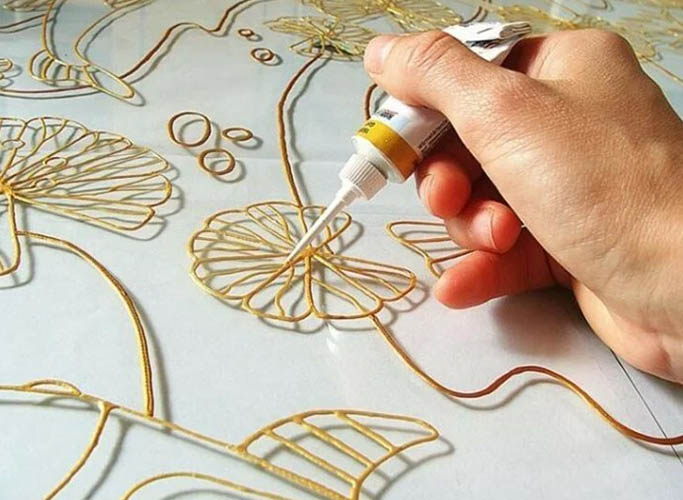
To outline the borders of the ornament, you need to use a special paste of thick texture. This tool helps to imitate metal frames for pieces of smalt in poured and painted crafts.
A water base is used in the production of the outline. This paste is sold in tubes. With the help of this product, it is permissible to outline the contours of the pattern, which will then be filled with pigments. The outline is also suitable for the design of volumetric ornaments.
It is possible to make contour paste yourself using PVA glue.
For these purposes it is necessary to prepare:
- bronze powder or silver powder – 40 g;
- PVA glue – 50 ml;
- natural black mascara – 30 ml.
Method of creation:
- Constantly stirring the glue, add mascara, then powder.
- Stir the mixture until the consistency resembles sour cream.
- The mixture cannot be stored, so prepare the product as needed.
- Stir the paste before each use.
- Apply the composition with a brush, creating a roller. Beginners are recommended to use a pastry syringe.
Materials and tools for stained glass painting
It is permissible to draw a stained glass not only on glass, but also on a sheet of paper.
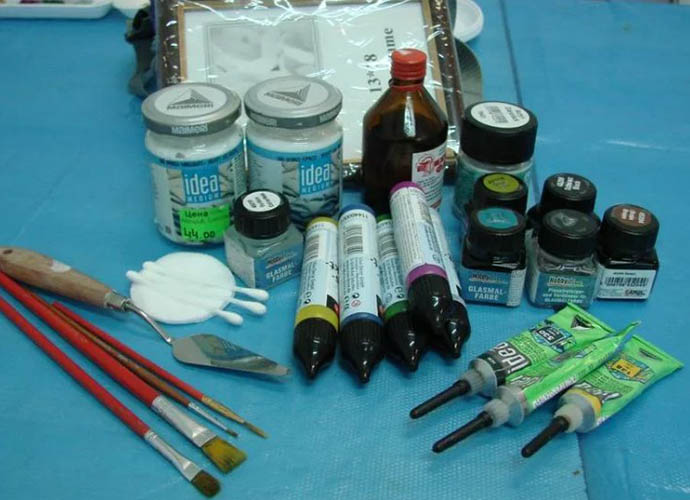
For these purposes, you need to prepare the required tools and materials:
- Acrylic varnish without shade with a sketch and a felt-tip pen to transfer the pattern.
- Base for drawing. Special glass or glass surfaces in the form of mirrors, doors, windows will do. The glass should be free of rainbow spots, plaque, and chips.
- Brush. A thin tool is required to draw small elements and contours. It is better to use a large brush to draw thick fragments. If the paints are equipped with attachments, it is permissible not to use brushes.
- Contours. They must match the stained glass paint, so it is better to take materials of the same brand.
- Paints. It is advisable for beginning craftsmen to prepare stained glass paints of a non-firing type or use varnish to fix the ornament.
- Palette knife (necessary for shading pigments).
- Alcohol, water or other solvent. The choice will depend on the base of the paint composition. You also need to prepare alcohol to degrease the coating.
Additionally, you should prepare toothpicks with cotton swabs and a palette for correcting the elements of the pattern, as well as a rag to wipe the attachments with brushes.
The room should be well ventilated, but the lighting should not be bright. It is recommended to cover the floor and table surface with film or fabric to avoid staining.
Surface and stencil preparation
You can draw a stained glass window on any surface, but first you need to clean the base well with water in combination with a cleaning agent or alcohol. Initially, you need to use a matting paste. In order for the ornament to be as smooth as possible, the surface must be completely clean. Additionally, you need to try on the stencil so that all the sizes match.
Spray adhesive should be applied to the back of the stencil. When frosting glass, this procedure is very important. It is necessary to apply the adhesive evenly to the stencil surface, because this material can be used many times.
When preparing, it is necessary to glue the stencil tightly and qualitatively. To protect the glass surface from dirt, and the stencil from deformation, it is recommended to smooth the sketch through a sheet of paper.
The matting paste should be spread evenly using a disposable spoon. This product is not considered aggressive, so it is safe for the skin. However, traces will remain on the glass surface, so you cannot allow drops to fall past.
The pattern should be evenly covered with a thick layer of paint. Initially, the drawing will be blurry. It is necessary to put the craft aside for 15 minutes so that the paste is evenly distributed over the glass. Excess product can be collected back into the container, because the paste is reusable.
The glass surface must be washed immediately, otherwise the paint will eat away unnecessary space. The water stream must be strong for washing. All movements must be energetic and sharp.
Using self-adhesive reusable stencils, it is possible to create beautiful designs on the surface of glass or paper. The template can be purchased at a store that specializes in selling stained glass products. It is also possible to make a stencil yourself, choosing the necessary sketch.
When choosing a sketch, it is advisable to give preference to blanks with few empty areas and details. Otherwise, the ornament on the stained glass will look unsightly.
The drawing must necessarily match the future craft in size. On the finished stencil, all elements are numbered to make it convenient to paint the stained glass.
Making stained glass windows from paper
You can draw a stained glass window on paper. For these purposes, you need to prepare:
- corrugated paper of any color (the color should be in harmony with the shades of mica);
- PVA glue;
- A2 sheet of paper;
- regular or double-sided tape with scissors and a stationery knife;
- gift mica of any shade (everything will depend on the chosen pattern);
- black marker with brush and black gouache.
Option for making a stained glass window from paper:
- Transfer the stained glass outline onto a sheet of paper or create the pattern yourself.
- Outline the outline with gouache or a black marker.
- Use scissors or a utility knife to cut out any excess outline elements.
- Cut the gift mica into the necessary parts of the corresponding shades. Then fix it on the back side of the pattern with PVA glue, regular or double-sided tape.
- Cut off the excess with a stationery knife or scissors. Fill in all the elements of the drawing in a similar manner.
- Use corrugated paper of any shade to design the background. Fix this detail with glue or tape on the back of the drawing.
- The finished work can be used to decorate the interior.
Tips for choosing a design
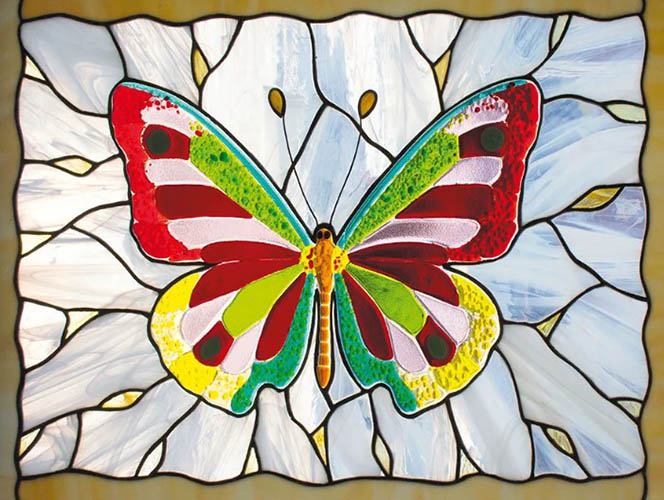
The theme of the image will depend on your own preferences. Often, artists choose drawings of animals, birds, flower bouquets or landscapes. The difference between the images is in the application technique.
There are 4 ways to create stained glass painting:
- Without outline. It is not in great demand among masters, because the finished composition does not have transitions with clear contours. The technique is similar to regular watercolor, but with the use of a varnish coating. The advantage is considered to be an arbitrary combination of shades. This type of ornaments will be more complex than in the contour technique. In this regard, it is necessary to spend a lot of time and effort to master this method.
- Contour. In this case, a sketch is used, presented as a black and white image, with clearly drawn contours. Empty areas between the contours must be filled with coloring pigment to achieve a beautiful composition. The advantage of this technique is that you can preview the future version of the pattern. This painting method is suitable for beginners.
- Multilayered. It helps to create realistic images. When covering one layer with another, it is permissible to use a wet or dry method. In the first case, you need to combine the previous layer with the new one before it hardens. In the second case, the bottom layer must initially dry completely. When drawing in multiple layers, it is permissible to highlight the play of light and shadow. However, this method is only suitable for experienced craftsmen.
- Point. Suitable for decorating clothes, book covers, glass surfaces. In this case, it is necessary to apply the coloring pigment to the coating point by point. The points will differ from each other in size, intensity and shade. This method of stained glass painting is suitable for beginners, because it does not take much time and does not require the implementation of complex elements. When working, you can use various attachments to design points of different volumes.
Stained glass painting is used mainly for decorating furniture items. Each painting technique helps to create unusual products.
Tips for choosing a design:
- If the interior is designed in a modern style, the stained glass should convey a painting or landscape.
- Initially, you need to decide on the plot in order to complement and convey the atmosphere of the room.
- Images made in dark shades will visually reduce the space. If the room is small, stained glass painting is recommended to be done in brighter and lighter tones.
- With a large number of different details, painting will become tiring after some time. In this case, it is advisable to give preference to lighter patterns, so that there is only one main detail and several small elements around the perimeter.
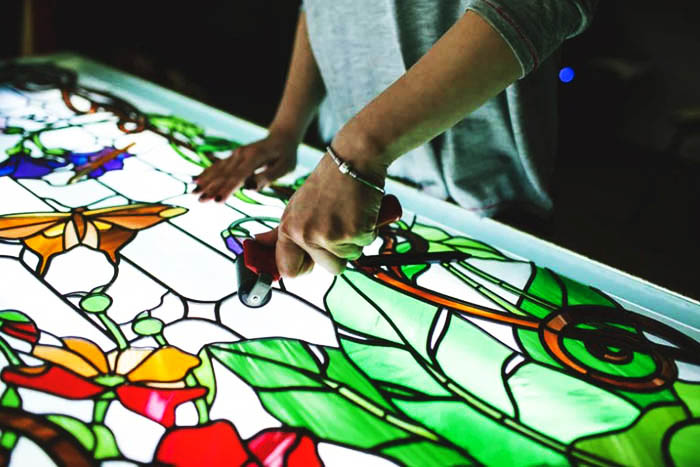
Step-by-step glass painting
Both experienced and novice craftsmen can paint stained glass on glass. Beginners are advised to choose simple designs that do not contain many details. After mastering the technique and gaining experience, you can move on to creating more complex works.
Step-by-step glass painting:
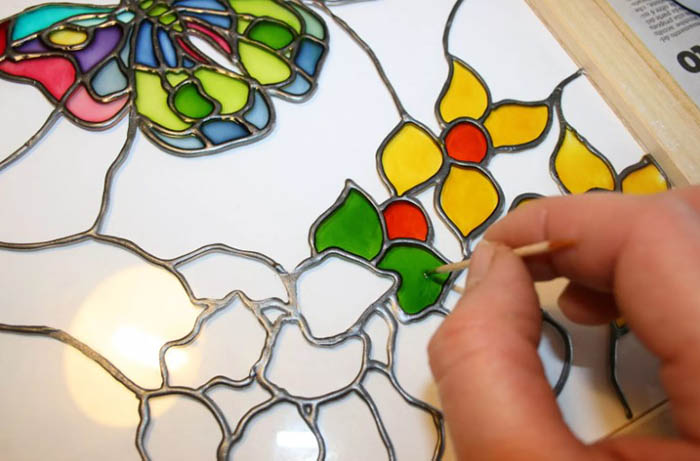
- Rub the work surface with alcohol to degrease. As a result, the coloring pigment is easier to apply and will last for a long period of time.
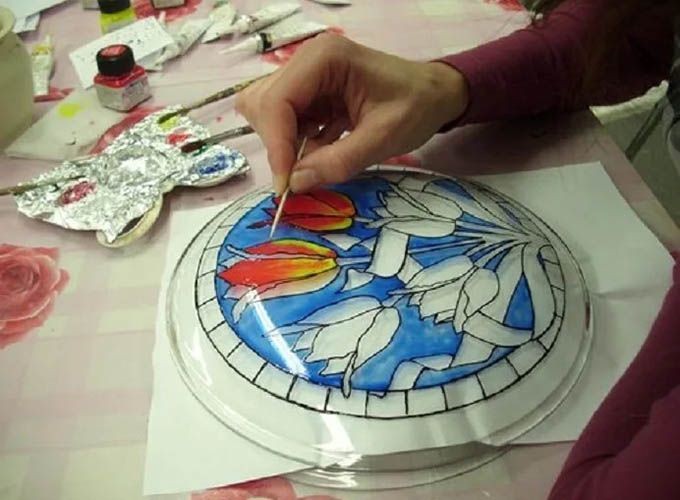
- Apply the stencil to the glass surface, securing it with paper tape if necessary. Carefully outline the contours with a marker.
- Carefully remove the stencil so that the lines do not smudge. In this case, the sheet with the drawing can be placed behind the glass.
- Moving from the middle to the borders, apply the outline along the lines. The stripe should be solid and have the same thickness. Initially, the outlines will be uneven, which is considered normal for beginners. When experience is gained, the lines will be clearer.
- Leave the applied outline to dry. The time is often indicated on the packaging. If you do not wait until the drying is complete, the lines will be blurred, which will lead to damage to the image.
- Fill each detail with coloring pigment. Move from the center to the borders of the pattern. It is recommended to combine shades exclusively on the palette.
- Once all the elements of the drawing have been worked out, you can move on to the background.
- Dry the completed painting to protect the product from dust particles. The drying period will depend on the paint base.
- If the pigment is water-based, treat the craft with clear acrylic varnish or bake it in the oven to fix the pattern.
Both adults and children can master the stained glass technique. With the help of this drawing technique, it is possible to develop creative potential and discover new abilities.
This technique is characterized by special lines, often placed in a chaotic order to create various figures, for example, in the form of a wave-like rectangle, drops, triangle, rhombus.
It is also acceptable to depict more conscious, clear contours that act as an element of the pattern. To create a beautiful ornament on paper or glass, it is acceptable to use a different color palette.
Video about stained glass
Master class on making stained glass for the door "Irises":