The Elven Tower, as children often call the 300-meter Eiffel structure, is considered a household name among art objects in painting, and almost every young artist has a drawing depicting this architectural landmark.
From a perspective point of view, the city landscape of France is interesting with projection, as the tower can be depicted from different angles. And it will always be beautiful. The recognizable fragment of the base of the Eiffel Tower can be paint on a small canvas, drawing all the detailsBut children should still learn to demonstrate the integrity of decoration in densely built cities.
What you need for drawing
The Elven Tower (the drawing can be done in pencil and line techniques) as a central element in modern painting, can be drawn with several types of pencils. Accordingly, you need to choose paper that allows you to make a beautiful and neat drawing.
Children will find it most convenient to work with the following materials:
- simple and graphite art pencils;
- colored soft pencils;
- pastel pencil;
- the paper is smooth;
- Watercolor paper.
Depending on the chosen method and technique of drawing, you should choose the right tools. Office paper is suitable for drawing with simple pencils, sometimes colored ones. It will produce a clear, expressive drawing. If desired, it can be replaced with writing paper.
Graphite pencils are placed on smooth, thick paper. It is also suitable for shading and drawings, precise and clear lines. For drawing, you will also need an eraser, so the canvas density should be 90-110 g/m2.
Drawing and graphic paper is suitable for pastel and charcoal pencils. It contains cotton, cellulose, and the grainy texture allows you to create deep lines. Its density is higher, up to 250 g / m2. You will need a silicone eraser for it. For colored pencils of any hardness, it is advisable to choose paper with a density of 120-140 g/m2 for shading and mixing colors.
Master classes
Below will be presented master classes on drawing the Eiffel Tower in different techniques. For this, accordingly, you will need pencils of different hardness. This property especially concerns colored and graphite creative tools. Also, paper materials that should be chosen for a specific master class will be described.
With soft colored pencils
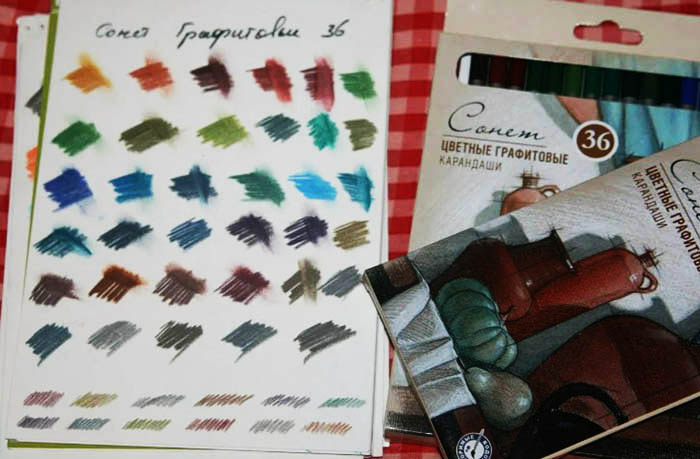
The most beautiful and bright drawings of children are made with colored pencils, so this section will describe a master class using artistic colored pencils. Drawing sets are suitable only if the child draws for pleasure at home.

Those with good skills and a confident hand choose pencils, distinguishing them by hardness:
| 2H, 3H, 4H | Thin pencils for creating shading. |
| H (No. 4), F (No. 3) | Intermediate lines are obtained with such pencils; it is permissible to regulate the degree of pressure. |
| B (No. 1) | A universal pencil for drawing contours and simple sketches. |
| HB (No. 2) | Thicker and denser, the lead is suitable for tinting small areas of the drawing. |
| 2B, 3B | Thick pencils; suitable for drawing thick outlines. |
| 4B | It has a richer and denser texture. |
| 5B, 6B | The densest leads, which are suitable for shading and drawing thick lines on large areas of the drawing. |
"H" stands for the hardness, and "B" for the softness of the lead. Sometimes the values are marked with "T" and "M" letters. In this format, the hardest pencils are found with the value T9, instead of H9.
The Elf Tower is a drawing that can be done by a preschooler or primary school student. This simple work will require art pencils with the appropriate markings. A sheet of office paper will do as a base. However, pencils can make its surface more glossy.
In this regard, it is recommended to purchase thick sheets, as well as an eraser for erasing colored lead.
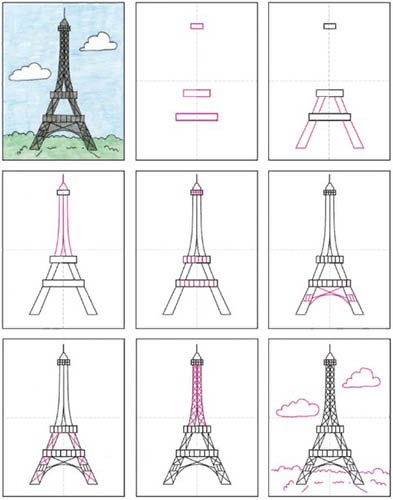
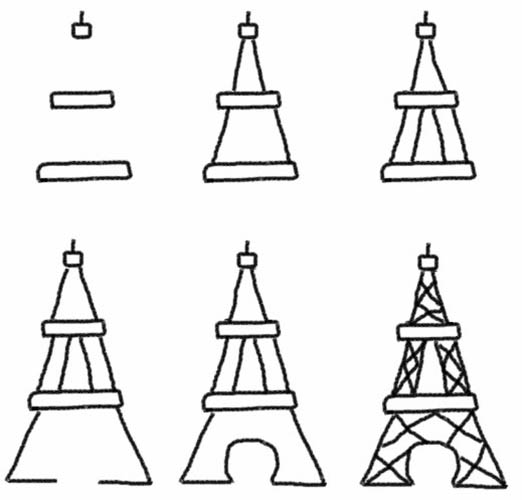
Stages of work:
- The sheet of paper should be placed in a vertical orientation.
- Using a black or grey pencil, draw a 13*3 cm rectangle, 1-2 cm down from the central line.
- Stepping back another 4 cm down from the drawn rectangle, you need to draw a second one measuring 17*4 cm.
- From the central figure, you should step back 10 cm upwards and draw a third rectangle measuring 5*2 cm.
- The middle and lower rectangles need to be connected - draw 2 diagonal lines on each side, running them from the bottom side of the central rectangle to the top side of the lower rectangle.
- From the bottom figure, draw the same lines and add bases in the form of horizontal lines to obtain a closed quadrangular figure.
- From the top figure, draw two lines going down but widening towards the upper corners of the middle rectangle.
- From the middle of the bottom edge of the small rectangle, draw one straight line, which will split into two at the point where the side lines widen. You will get two structures with curves that support the top of the tower.
- Above the top rectangle you need to draw a small dome and a vertical line in the center above it.
- All rectangles should be shaded with vertical lines.
- On the lower side supports you need to draw squares and shade them in the same way.
- Place an arc in the shape of a rainbow under the lower rectangle, and draw two crossed lines above it, going from the corners of the rectangle to the lower corners formed by the arc.
- The side supports along the entire height of the tower must be filled with a pattern in the form of crossed lines running from the upper to the lower corners.
- The largest vertical supports between the top and middle rectangles should be filled with the same pattern.
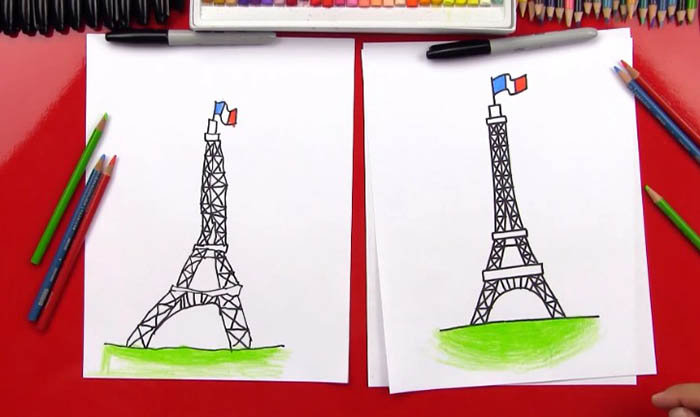
- All the resulting lines need to be outlined with a black pencil, and the gaps filled with a grassy green color.
- The horizontal rectangular crossbars can be painted grey to create a contrast with the green.
- The tower needs to have a background, so you should draw clouds with a blue pencil.
- At the level of the rainbow-shaped arc, you need to visually draw a line - this is the horizon, which is located below the central line.
- Here you can draw fields and bushes in dark green, schematically in the form of curls and vertical inclined lines.
- There will be an alley in the foreground, so from the bottom edge of the sheet you should draw the sides of the triangle (without connecting the lines to each other).
- If desired, you can create tiles on the alley - let it be red, and its gaps should be filled with a yellow pencil. So the alley will resemble stonework.
The resulting drawing can be inserted into a frame and used to decorate the child's room. For more expressive strokes, you can add a detailed drawing of the ornament on the tower - with a thin 2H pencil under a ruler or by hand draw patterns on the supports, and then darken the recesses with a 3H pencil.
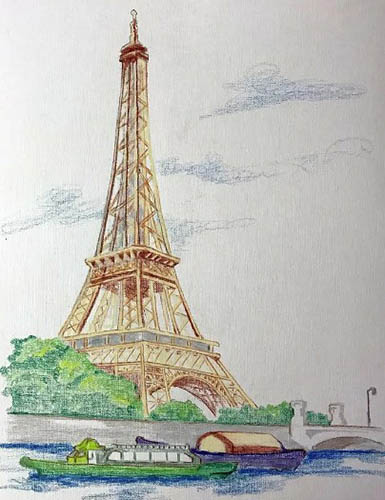
Contour with simple pencils
The Elven Tower (the drawing is done in contour technique with simple slate pencils of varying degrees of softness) is of interest to artists due to its small details and the possibility of drawing the interweaving of all the beams, supports and crossbars.
It is worth noting that the lead consists of graphite and clay, which gives a denser and harder composition. Unlike graphite pencils, lead compositions do not break so quickly, they can be changed in a mechanical pencil, also selecting the desired size by thickness.
The urban landscape combines the features of using several genres at the same time. For example, the Eiffel Tower can be drawn schematically, as in drafting, and the background can be made blurry, using shading and gradient techniques.
The outline drawing is usually done by hand on a white or plain background, with the tower acting as an architectural focal point in the landscape.
Stages of work:
- On paper with a density of up to 160 g/m2 you need to draw the shape of the tower with a simple pencil. These steps can be borrowed from the previous master class.
- The tower should be located on the left side of the drawing, and on the right there will be an alley and stairs to the river.
- The lower part of the tower is covered by a bridge, so there is no need to draw the lower part in detail.
- When the image scheme is ready, you can move on to the details. All lines should be drawn with a simple pencil, there is volume - crossbars, beams and vertical supports should be outlined with a pencil No. 3 (F).
- You need to step back 0.5 cm from the horizontal lines and draw duplicate lines to show volume and perspective.
- The architecture of the city landscape will always take up most of the sheet. Therefore, the rainbow-shaped arches should be made double. The resulting planes can be shaded, placing them in shadow.
- The vertical lines should be duplicated on the right side, except for those located to the left of the center of the Eiffel Tower. The volume is not visible on that side, so it should be added only on the right.
- There are supports between the bottom and middle rectangles. The left one is visible from an angle, so the duplicate line on the right should show this.
- The resulting cavity can be shaded with a 2H pencil to make the lines light and not too thick.
- The central crossbar also has volume at the bottom. It needs to be highlighted in the same way as with the bottom one. By additionally drawing a duplicate horizontal line from the bottom side of the middle rectangle, the resulting plane can be left without shading. Lighting clearly gets there when looking at it from below.
- Next, all unpainted parts need to be detailed and filled with "crosses" so that the crossed lines imitate metal beams and supports. In reality, the tower looks like an area of intertwined piles of metal plates.
- To the right of the tower there will be a park and stairs. You need to schematically draw the outline of the trees, horizontal lines to imitate the stairs.
- On the left, almost under the image of the tower (the left support), there is a bridge. You can draw a diagonal up from the foot of the tower to the left edge of the sheet.
- Below the diagonal, draw schematically arcs simulating passages for ships.
The finished drawing can be detailed with hatching, doing it where there is a shadow. Darker areas can be worked with a 2B pencil, and light ones - with an HB. You should also consider the direction of the lines in perspective. If they are diagonal, then from the edge of the sheet they should tend to the center.
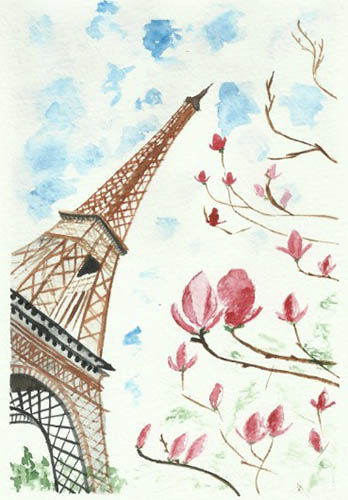
Art sketch with pastel pencils
The Elven Tower in the technique of drawing with pastel pencils will be slightly different from the one that can be obtained in a drawing with dry pastels. Pencils are soft, have different shades, and on paper they look bright, like real paints. The main difference is the thickness of the line - it is always thicker than in regular drawing sets.
Stages of work:
- First, you need to create a composition for working with pastel pencils. The tower is located in the center of the drawing, but on the right it is partially covered by the foliage of the tree. This landscape is suitable for pastels and bright shades.
- In the center of the sheet (you can use a watercolor sheet to give the drawing texture), you need to draw two lines that taper towards the top, but do not intersect at one point.
- Stepping back 1 cm from them, you need to duplicate the previous step. Volumetric supports are already present in the drawing.
- Next, you need to give the tower volume. To the left of the outer line, you need to draw another one; this will allow you to form the side of the visible part of the tower.
- Parallel lines should be drawn on the central side of the tower. Between the two outer lines on the left side, diagonals should be drawn to obtain visual volume.
- All horizontal lines should be duplicated and filled in with a pastel beige pencil.
- The vertical supports of the tower will have an orange tint.
- The lower part of the side supports needs to be finished with a brown pencil.
- On top of the colored layer, you can apply patterns with a pastel white pencil to show the depth and thickness of the tower walls.
- In the space between the front and rear supports, you need to draw lines in black pastel, showing the volume of the structure.
- Arches should be drawn in light tones, they are located closest to the artist.
- It will be easier for children to work with several colors, so the most neutral gray shade of pastel can be used to work on the ceiling of the arch, which is not illuminated, and daylight practically does not reach it.
- On the right, you can draw a tree and foliage by randomly distributing strokes – from light yellow at the top to dark red at the bottom.
- You should also add fewer green strokes to make the tree seem even brighter. Let it be an autumn accent.
- The sky needs to be painted blue, leaving white areas unpainted with pastel.
- On the left you need to draw a lantern - draw a vertical line with black pastel, and draw a semicircle on top.
- Three ovals can be placed above the semicircle. This design should be painted black at the bottom of each figure, and gray at the top. Thus, each oval will be darkened at the bottom, as if illuminated by the sun from above.
- The glass of the lantern can be painted with blue strokes and orange-blue tinting.
Pastel pencil drawings can be covered with PVA glue to give them shine. The glossy strokes will shimmer beautifully when the light hits them.
In perspective with a graphite pencil
Graphite pencils are considered a type of carbon, which is originally a carbon paste. When solidified, a hard, dense rod is formed. The mineral has a natural softness, so unlike slate pencils (graphite mixed with clay), a graphite pencil is better suited for drawing on thick paper.
The Elven Tower (a drawing made with a graphite pencil, similar to a charcoal sketch) drawn in this technique will look less detailed. Due to the softness of the graphite rod, its thickness will be greater than that of a regular pencil.
Therefore, the lines in the drawing will be large, without the subtlety inherent to the lead. For reference, the table of markings is presented below:
| Shades | Marking in the world | Marking in the Russian Federation | Labeling in the USA |
| Black | IN | M | №1 |
| Black 90% | NV | TM | №2 |
| Black 70% | F | - | №2,5 |
| Black-gray 50% | H | T | №3 |
| Gray 70% | 2H | 2T | №4 |
Although the human eye can distinguish more than 150 shades of gray, the primary colors of graphite with a difference in the presence of black in the composition by 20-30% as it decreases in it are suitable for painting.

For the next master class, the basic graphite pencils of medium hardness are suitable - B, F, H and 2H. Graphite with the marking 4B and higher is considered an artistic pencil. Marking 3H and higher are technical pencils, and they will cost more.
Stages of drawing:
- First, you need to draw a sketch. This is easy to do with a thick HB pencil, drawing vertical lines that widen from the middle of the drawing to the base.
- Next, you need to draw horizontal lines equidistant from each other in places of greatest expansion of the side supports. Two double lines form "crossbars" that can be decorated with strokes. For this, you can take a pencil F.
- The side supports tapering towards the top should be shaded with parallel horizontal and perpendicular lines so as to obtain many squares. For this you will need a pencil H.
- Using a 2H pencil, draw crossed lines in each square. This will simulate the many metal rods inside the tower.
- The central two horizontal lines need to be shaded with vertical lines so that they stand out from the overall design.
- The dome needs to be highlighted - draw a circle, sharpening the upper and lower parts. There will be a shadow on one side, so part of the figure needs to be painted over with black HB graphite.
- With pencil B you can make the final touches – outline large vertical lines on one side to give the drawing dynamism. The darkest graphite will give the thickest line.
This quick sketch is achieved using graphite pencils.
The Elven Tower, as a basis for creating a drawing in children's creativity in pencil technique, is considered the simplest. The stages of creating a sketch allow children to understand how geometric figures can look in the overall picture. The ideas about perspective in painting are clearly visible in the lines and diagonals, and the shades of the pencils allow you to notice the shadows and play of light.
Video about drawing