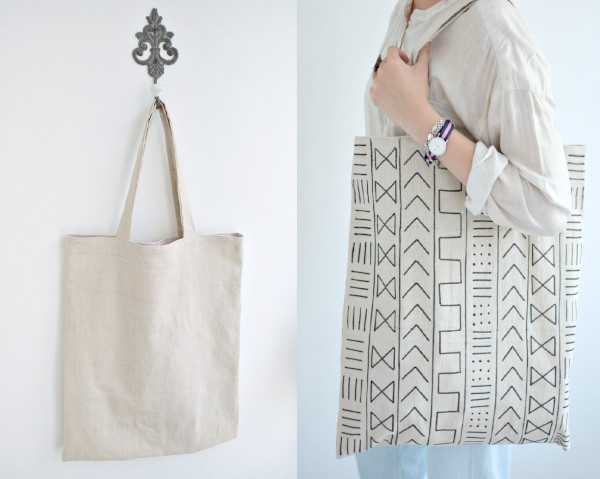
A shopping bag is a versatile accessory that can be used for a variety of purposes. It is convenient for everyday walks, shopping or studying.
Shopper (translated from English - "shopping bag") is a large, comfortable and roomy bag, usually of a neutral soft color or combination of shades, made of thick fabric.
This accessory has an attractive appearance. and functionality. You can sew it yourself using ready-made master classes.
Schemes with description of works for beginners
Non-woven fabrics such as burlap, canvas, or linen work well for this project. You can use scrap fabric or buy special cotton or canvas fabric for crafts.
The design of the bag can be different. But the size, shape and handles should be as suitable as possible for the need of use. You can add pockets or other details as desired.
For the pattern, you can make a drawing on graph paper, taking into account the required dimensions and shape. After that, it is transferred to the fabric. It is necessary to process the edges of the fabric to prevent it from fraying.
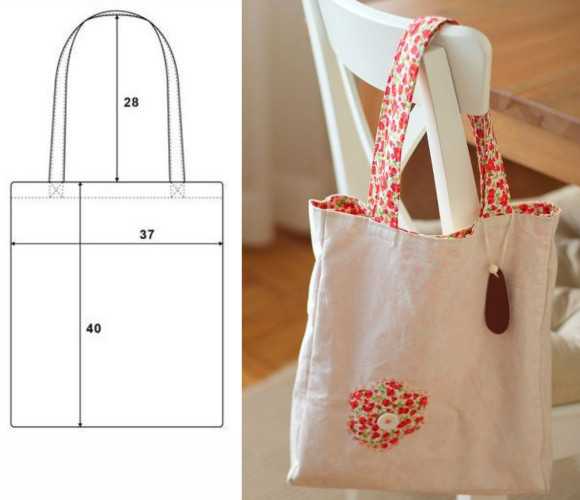
Simple pattern
To make a shopper bag, you will need a certain set of materials:
| Type of material | Brief description |
| Textile | The main material for sewing a bag is selected depending on the purpose and style of the product. |
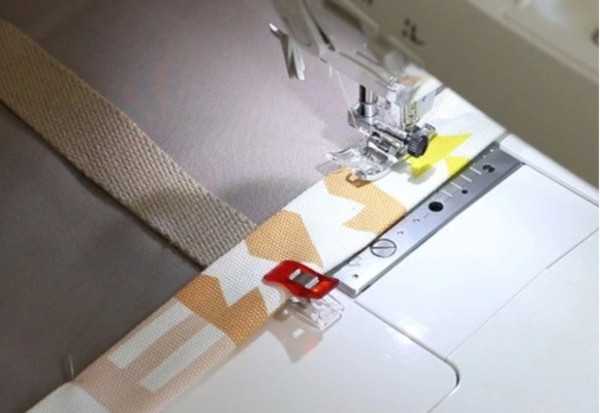
| Grosgrain tape | Used for handles. Adds functionality and aesthetic appeal to the bag. |
You need to choose a high-quality, dense fabric for your bag. It can be cotton, linen or synthetic fabric, depending on your preferences and needs.
For work you will also need the following tools:
| Type of instruments | Brief description |
| tailor's chalk or other tool for marking fabric | eliminates the need to make adjustments after cutting and saves fabric |
| ruler | helps to take precise measurements and make a pattern |
| tailor's scissors | are used for cutting fabric |
| tailor's pins | are used to fix pattern pieces on fabric and temporarily fasten seams |
| sewing machine | allows you to make high quality seams |
| threads | are matched to the fabric tone for durability and aesthetics |
| iron and ironing board | necessary for the final processing of the finished bag - removing folds and giving shape |
Before cutting and sewing, it is recommended to decatize the fabric so that it shrinks. This is especially important for natural fabrics such as cotton or linen. Decating will prevent the product from deforming after washing.
To carry out the decatization procedure:
- Place the material in warm water with a small amount of shampoo or fabric conditioner.
- Leave it in water for 10-15 minutes.
- Remove and squeeze gently.
- Lay the fabric out on a thick cotton cloth or board and let it dry naturally. Make sure the fabric is completely dry before continuing sewing.
The fabric is cut according to the drawings of the main pattern (80x45 cm) and handles 92 cm long.
The shopper bag, which can be sewn according to the pattern below, will be simple:
- Cut the fabric according to the prepared patterns, leaving allowances on the sides and bottom of 0.3–0.5 mm for seams. To do this, first apply the necessary marks to the fabric before cutting and use sharp scissors. Depending on the quality of the fabric and the type of seam, the allowance may be increased. The main pattern should be placed face down.
- Sew the side and bottom edges of the bag along the front side, stepping back 0.7 cm from the edge of the fabric. Overcasting can be skipped if a sufficiently strong fabric is used. It is important to securely fasten the edges to avoid deformation of the bag in the future. Puncture the edges of the holes and secure the threads. The connected elements should be carefully ironed.
- Cut the overcast corner of the bag diagonally. This technique allows you to avoid rough seams and sharp corners in the finished product.
- Turn the bag inside out. When processing the edges of the bag, you need to be careful and cautious, do not catch the threads.
- When processing the bottom of the bag, stitch at a distance of 1.3 cm from the edge of the product. Iron. Process the side parts of the bag in the same way.
- Fold the top edge of the bag towards the wrong side by 3 cm and fix it. Fold it again in the same direction, making a 2nd hem (there should be 2 layers of fabric in total). Iron the seam. Finish the top edge of the product with a finishing stitch.
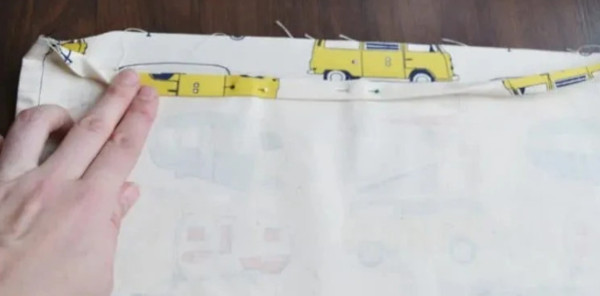
- Sew the edging of the bag, making an invisible seam.
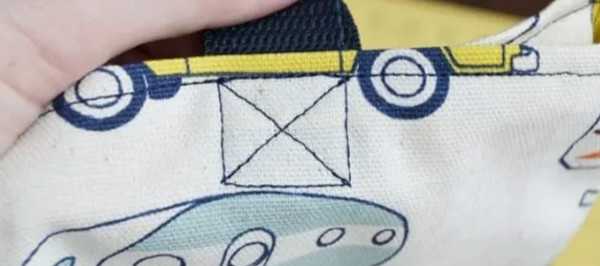
- Sew the bag handles, depicting a cross and a square. The method depends on the type of fastening chosen: in the form of a loop or a more traditional option - hanging straps.
- Iron the bag on a flat surface to remove creases and wrinkles.
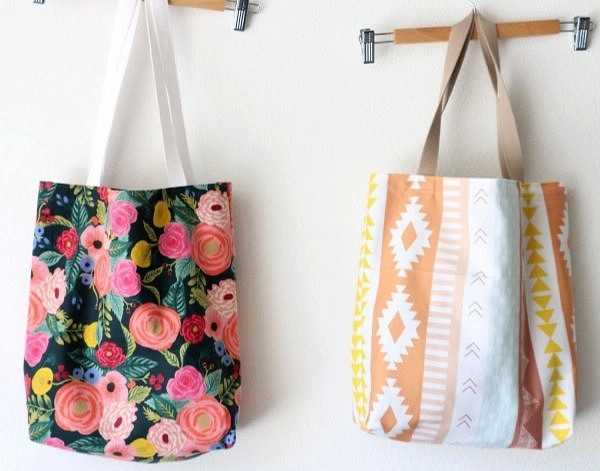
Lined with pocket
A shopper bag, which can be sewn using the tools described below, will be reliable and strong:
- sewing machine;
- to cut out pieces from fabric you need tailor's scissors;
- to temporarily connect the parts of the product, use tailor's pins, while clips-clamps that securely hold the fabric in the desired position will be a good solution;
- tailor's chalk or other tool for marking fabric;
- To cut the fabric accurately, you will need a ruler or measuring tape;
- After sewing, the bag must be ironed.
Materials:
- main fabric and lining fabric;
- threads to match the fabrics;
- material for the bag handles (a strip of the main fabric, rapeseed tape or synthetic cord), while it is important that it is strong enough and can easily withstand the load.
Before you start sewing, it is recommended to decatize the main fabric.
Patterns should be made according to preliminary measurements obtained from calculating the size of the finished product:
- The main part is 46x92 cm. It is a rectangle.
- Lining - 46x86 cm. Its size should be slightly smaller than the size of the main part of the bag.
- Pocket - 15x23 cm.
- The bag handles are each approximately 70 cm long.
Sizes may vary depending on preferences and available materials. Once the patterns are transferred to the fabric, you need to carefully cut out the details of the product.
Step-by-step process of sewing a shopper bag with lining:
- Fold the edges of the main part 2 times by 0.5 and 2.5 cm respectively and iron. This will strengthen the edges of the fabric.
- All pocket edges are finished with a zigzag stitch. This ensures optimum seam strength.
- Fold the sides and bottom of the pocket by 1 cm and iron to give it strength and an aesthetic appearance.
- Sew the pocket to the base. Ensure that the pocket pieces and the main part of the bag are precisely aligned. Inspect the seam for any curvature and correct if necessary.
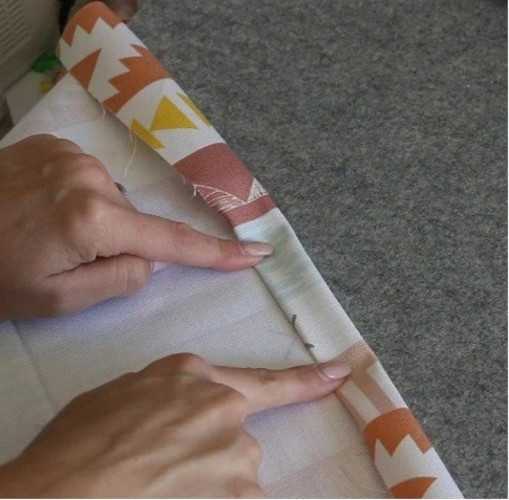
- Place the lining on the top of the bag, fold the fabric over and slightly fold it inward, overlapping the edge of the bag. Hide the wrong side of the fabric in the side seam and secure by stitching along the edge of the bag. Repeat on the other side. To prevent shifting, you can pre-fix the soles with temporary stitches. To minimize the likelihood of skewing, start working from the side of the bag and move towards the middle. Pay attention to the neatness of the bag seams, as they will be visible from the front side.
- Sew the handles after the lining is securely fixed. Baste the elements to the inner surface of the seam. Hide the ends of the handles under the hem. Do not attach them too tightly, as this may make it difficult to turn them out later. If the base part and the pocket are made of different materials, you can use adhesive materials to join the parts. Note that the placement of the handles affects the final shape of the bag. For example, higher fastening will give the bag a more elongated look. You can fasten the handles with a cross stitch to ensure reliable fastening and eliminate the risk of the bottom of the bag falling out.
- Grabbing the edges of the seams, carefully turn the bag inside out through the neck.
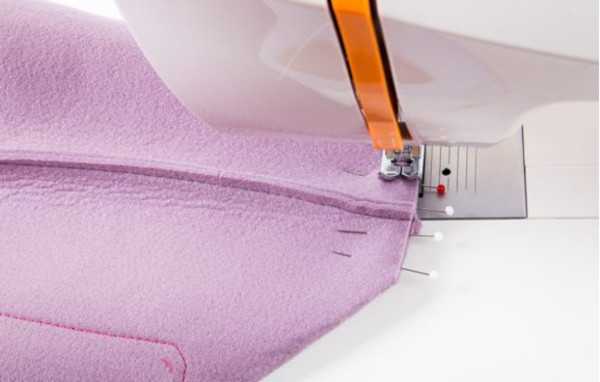
- Sew the sides and bottom of the bag 0.7 cm from the edge. The front seam should be even and neat, without distortions. After sewing, carefully iron the seam to give the product shape.
- Trim the bottom corners of the bag so that they are beveled. It is important to do this carefully so that the corners are uniform and sharp. Smooth the processed corners with an iron.

- Repeat step 7, turning the bag inside out. Smooth out the corners and sides to ensure the bag fits snugly. Inspect the outside of the bag to ensure the seams are good on all sides.
- Sew the bottom of the bag and its sides. Leave about 1 cm from the edge of the seam. This is important not only to improve the appearance of the finished product, but also to increase the strength and durability of the bag. Iron the seam, pressing the iron in one direction along the seam line. The seam should be flat and neat. Pay attention to the coincidence of the pattern on the fabric.
- Depending on the type of fabric, follow the manufacturer's recommendations regarding the iron temperature and ironing features and iron the item. Thinner synthetic material is ironed at a low temperature, and thicker fabric - at a high temperature. Do not stay on one area for too long to avoid possible marks from the iron. Lift the iron and let the surface cool for a while. Repeat the process on all parts of the bag that require ironing.
From old jeans
A shopper bag, which can be sewn from any old jeans, can be cut directly onto the fabric.
What is needed to create the product:
- old jeans (preferably not stretchy);
- sewing machine;
- threads that match the color of the jeans;
- scissors;
- iron.
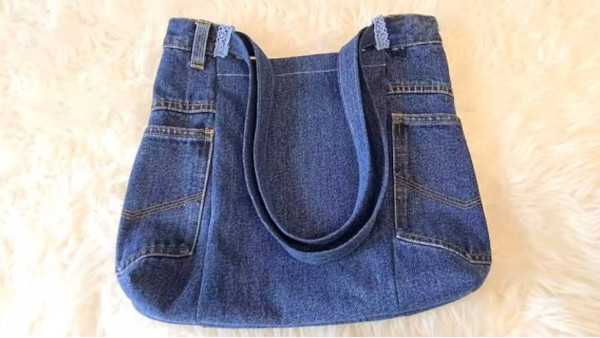
The bag can be of any size, it depends on the size of the jeans.
Before you start working, turn the jeans inside out and remove all metal elements, such as rivets and buttons, to avoid deformation or damage during the sewing process. Smooth out the material to make further work easier.
How to make a pattern:
- Turn the jeans inside out. Place them on a flat surface with the front side down. You will need the back part with pockets and the legs for work. You can leave the belt.
- Using a pencil, marker or pen, measure the width and height of the future bag on the fabric. Do this carefully so as not to tear the denim with the sharp end of the pencil. You can use the entire width of the jeans. Cut off the side seams.
- Proceed to cutting out the bag. If you do not have special tailoring scissors, use regular ones. The only difference is that you will have to make more blade movements. This will increase the accuracy of cutting out the bag parts.
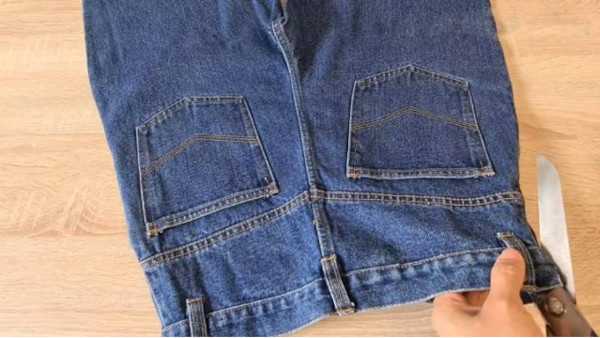
You should get 4 parts:
- 2 side ones from the back of jeans (the same size);
- front and back made of trousers (also the same).
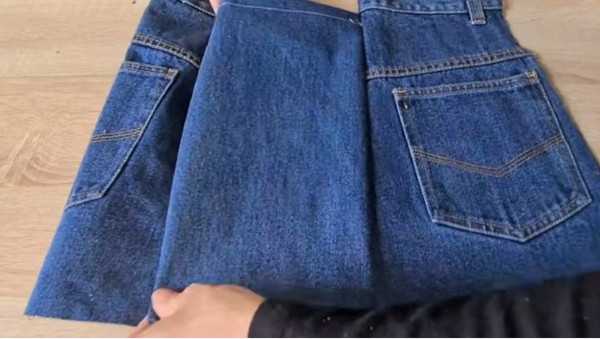
The following steps can be done on a sewing machine or by hand. Depending on the method chosen, the final appearance of the bag will differ.
- Place the edges of the side and front pieces with the right sides facing inward and pin them in place. Lay out the pieces so that the necessary seams touch each other without skewing.
- Sew the sides of the bag with an open seam. The seam should be wide enough so that the fabric does not come apart. Sew with a double stitch. Leave a gap of about 2-3 cm to insert the handles.
- Repeat steps 1 and 2 for the other side and back pieces.
- Connect the 2 resulting parts at one edge, securing with pins. Stitch on a sewing machine.
- Repeat step 4 for the remaining edge.
- Sew the bottom of the bag using a sewing machine, leaving 2-3 cm of free material.
- Turn the jeans inside out.
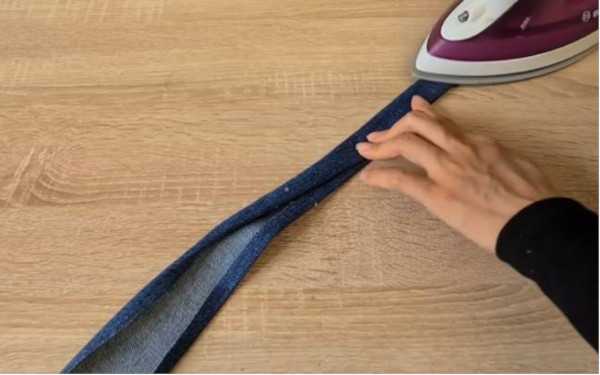
- Using the leftover fabric, make the bag handles (approximately 70x8 cm). Fold the material in half lengthwise and fold the edges before sewing. Iron. Attach the handles to the sides of the bag, inserting them into the previously made gaps.
- Topstitch the open seams of the bag, then hide the excess fabric under the seam. The handles can be sewn into the side seams or hung over the top of the bag with decorative stitches.
- Trim off unnecessary edges.
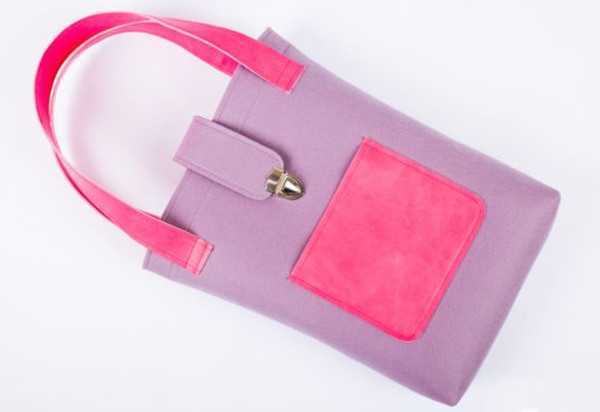
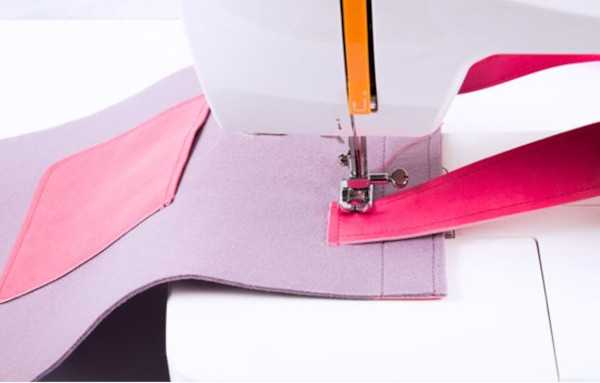
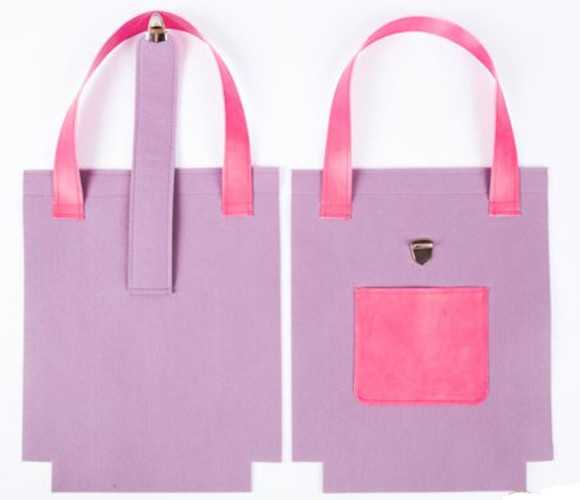
Made of leather and felt with a lock
A shopper bag, which can be sewn from felt and artificial leather, will be durable and have an aesthetic appearance.
The list below contains the tools and materials that will be needed for the master class:
| Name | Brief description |
| Decorative felt | It is a soft material with a recommended thickness of 2 mm. Size - 33x53 cm. |
| Artificial leather | Material with a recommended density of 300 g/m2, which is used as an alternative to natural leather. Size - 50x35 cm. |
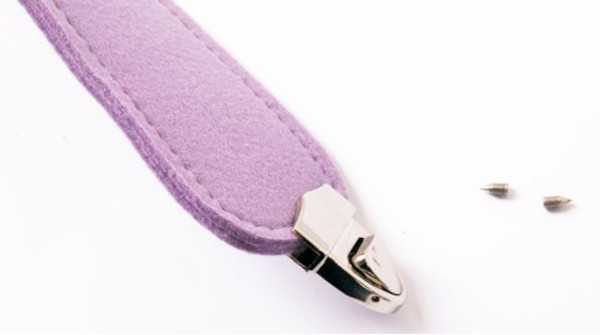
| Bag Lock | You will need a 40x30 mm lock. This is a small but important element that ensures a secure closure of the bag. It can serve as an additional decoration. |
| Tailor's scissors | A tool needed for working with felt and imitation leather. They differ from regular scissors by the pointed tip of one blade, as well as the size. |
| Needles for stabbing | Used when creating a bag to temporarily connect parts. |
| Machine needles | For work you will need universal No. 110 for a strong seam. |
| Graphite pencil | They can be used to make marks on felt and leather before cutting out pieces. |
| Sewing threads | Required: 40/2 polyester. |
| Sewing machine |
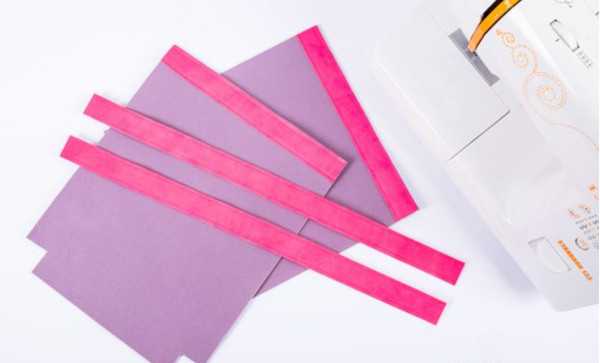
Pattern of a shopper bag, which is made of felt:
- 2 bases measuring 33x26.5 mm. Pre-cut corners measuring 3x3 mm from 2 sides of each base.
- Valve made of 2 strips measuring 29x4.5 mm (attached to the base).
Patterns made of artificial leather are also available:
- pocket size 13.5x12.5 mm;
- 4 strips measuring 3x50 mm, which are needed for the bag handles;
- 2 strips measuring 3x27 mm – for edging.
To create a bag, you need to complete the following preparation steps:
- Cut out the pieces from felt and leather according to the pattern.
- Place the cut out pieces on a flat surface: the front side should be on top, the back side should be on the bottom.
After completing these steps, you can begin sewing:
- Sew the handles by attaching 2 strips to each other from the wrong side along the long side. This ensures the strength and durability of the handles. The joints should be neatly ironed.
- Sew on the trim. It is located in the places where the bag has the greatest contact with surfaces. It is attached to the top of the base of the product, making its edges more neat and elegant. The strip of leather is carefully ironed to give it shape and sewn along the perimeter of the top of the bag, hiding the cuts.
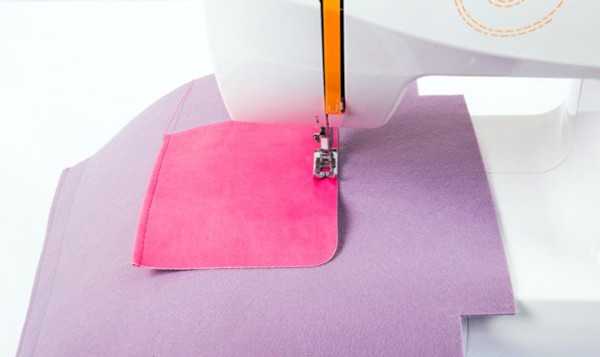
- Sew a pocket to the main part of the bag. It is necessary to ensure a tight fit and a strong connection. Bend 7 mm of fabric from the top, then stitch. The fabric is carefully folded and sewn to the base.
- Sew a felt flap. It gives the bag a finished look and ensures functionality. The seam should be even and strong.
A shopper bag with a flap will be protected from weather influences.
To do this, you need to sew the lock to the flap and the base of the bag:
- Divide the lock into 2 main parts: the mechanism and the body.
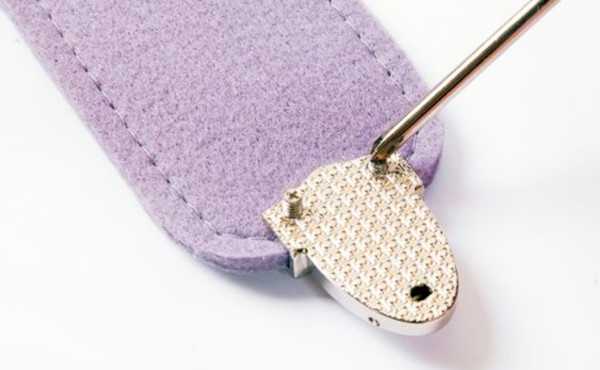
- Place the top part of the lock (mechanism) onto the bag flap.
- The upper part of the lock is fixed to the bag flap with special screws using a screwdriver. Screw the screws in so that the upper part of the lock is firmly attached to the bag.
- Make slits on the base of the bag where the lock is installed - the exact locations of the holes can be made independently, taking into account the dimensions of the lock. When creating slits, be careful not to damage the bag itself.

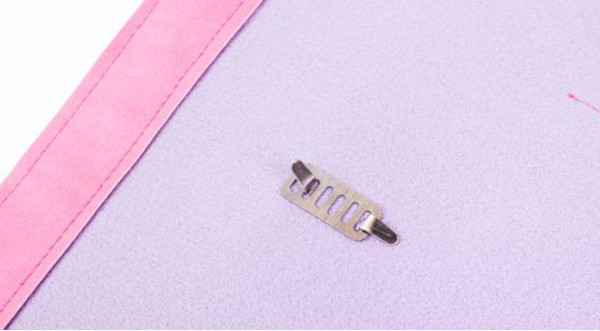
- Insert the lower part of the lock (base) into the created holes.
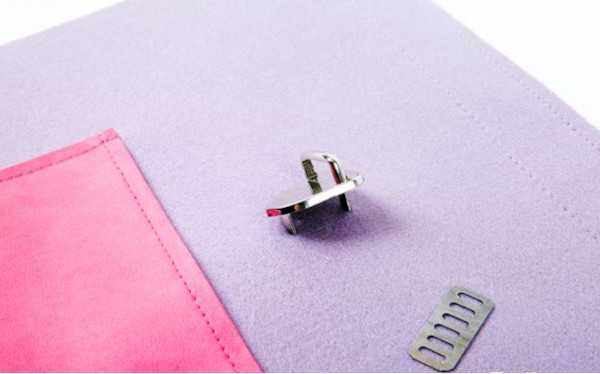
- Insert the cheek (antennae) of the lock base into the special hole of the fixing plate, which is located at the base of the lock body. bend it. This step fixes the lock and prevents it from being accidentally opened.
Once you've made sure the lock is securely attached to the bag, the mechanism is working properly, and the tabs are folded back, continue:
- Place the flap on the base at an equal distance from the top edge. The indent may depend on the desired appearance of the shopper bag: the larger the flap, the larger the bag. Place the flap in the center of the main part of the shopper so that its edge coincides with the edge of the main pocket.
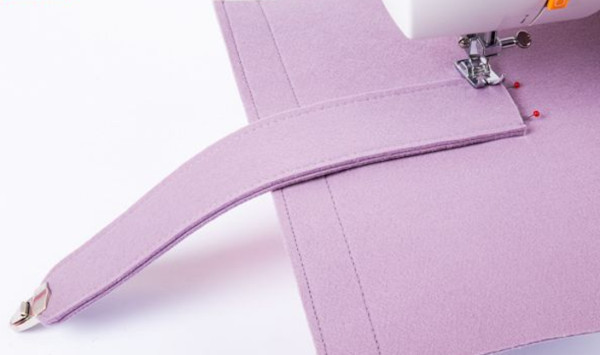
- To secure the valve, sew along the outline using strong thread.
- The handles are attached to the base of the bag using a thread and a needle. It is important to pay attention to the reliability of the handles, since they are the ones that bear the brunt of the load when using the bag.
- Sew the sides and bottom of the bag together to create a 3D look and define the shape. Join them around the perimeter of the bag, stitching neatly along the seams. The seams should be straight and match each other. They should be strong enough to withstand the weight of the bag's contents.
- Trim the corners of the bag with scissors so that they are even and neat. You can finish the open edges with bias tape or trim. Overcasting and tacks are also suitable for this. Glue or sew the selected trim to the corners of the bag.
- Turn the bag inside out.
Sewing a shopper bag is not a complicated process, but it requires concentration, attention and accuracy. You can decorate the product in various ways, such as embroidery, adding additional details or changing the shape of the handles.
Decorative elements such as buckles, chains, beads are also used. Decorating will make the bag unique and personalized.
Video about the shopper bag
DIY Shopper Bag with Lining in 1 Hour: