The Tilda Hare is a popular toy sewn at the end of the last century by Norwegian resident Toni Finnanger. As a result of her work, the pattern rag doll with long ears has gained enormous popularity worldwide, and thanks to simple patterns, not only a professional, but also a novice craftsman can make it.
What is needed
A pattern of a hare with long ears is a necessary element for making a classic version of a popular fabric doll, which is an animal with an elongated body, a flattened head and an oval-shaped muzzle. On the face of the hare, its nose and mouth are clearly visible, as well as its eyes, which resemble 2 black dots.
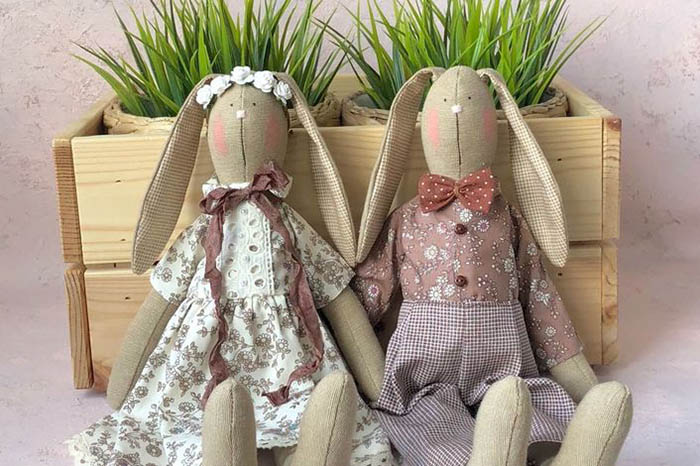
The most noticeable parts of the hare's body are its long ears, extended front and back legs. The legs and body of the toy may not be made proportionally to each other.
How to choose fabric
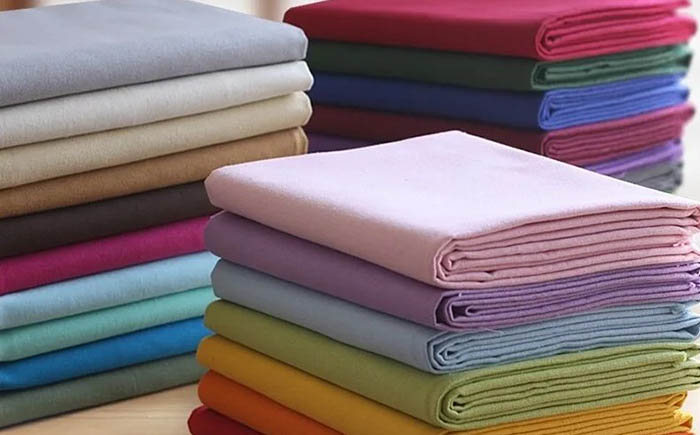
When choosing a material for making a toy, experts recommend choosing cotton fabric, calico, linen or poplin. Experts justify their choice by the safety of the fabric for small children, as well as its ease of work. It is also acceptable to use fleece or flannel fabrics.
The color scheme of the material should be done in pastel, calm, but not faded shades.
Silk, jersey and mohair are used to make the hare's clothes. Sintepon or regular cotton wool is used for stuffing. Lace, buttons, elastic bands and satin ribbons can also be used to decorate the toy's clothes.
Necessary materials
Materials needed to make the toy:
- textiles (cotton, linen, interlining) for the main part of the pattern;
- synthetic filler used for stuffing;
- fabric for making ears and head;
- material (velvet, silk, knitwear, satin) for making a hare costume;
- paint or cosmetic blush.
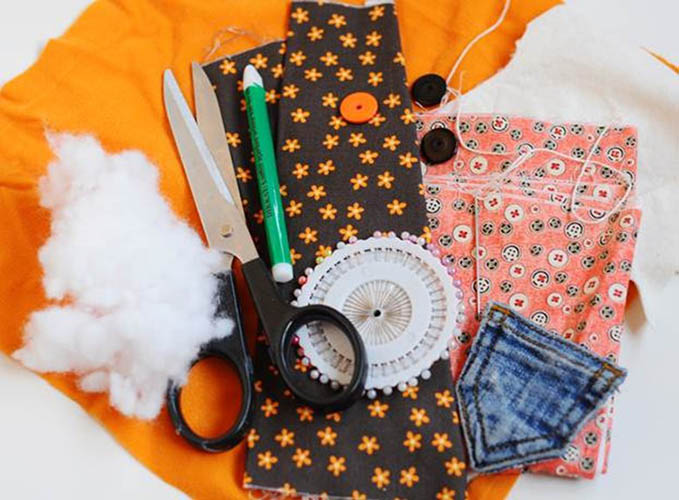
You can use satin ribbons, beads or lace as decoration.
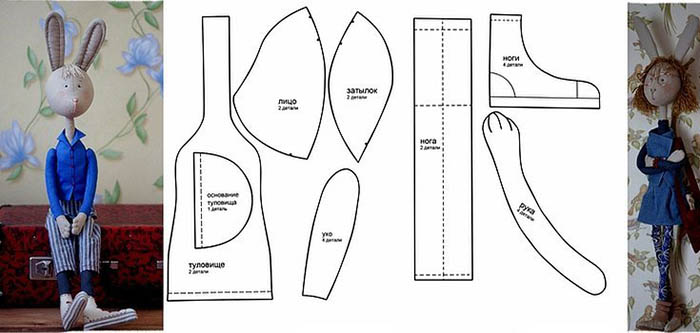
How to make a Tilda hare
The Tilda Hare is made from a cotton (linen, poplin) base with the addition of knitted inserts. Synthetic filler is used as stuffing.
You will also need:
- cotton threads;
- dye;
- decorative elements (buttons and lace);
- thin wire;
- sewing machine;
- iron;
- pencil.
Progress of work:
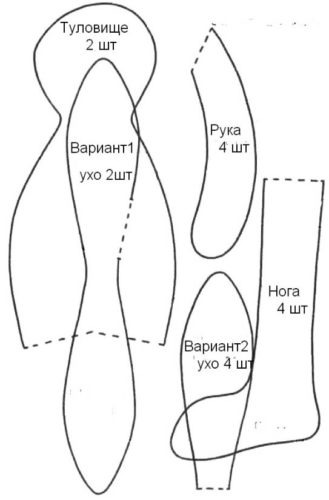
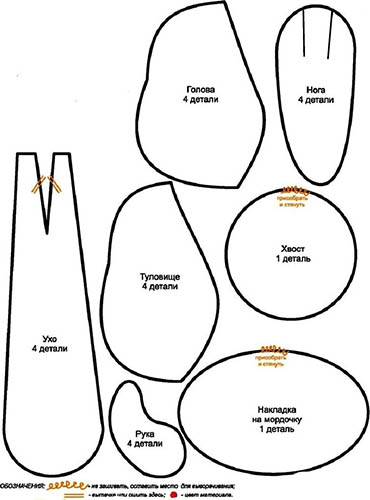
- First of all, you should transfer the pattern to the cotton fabric folded in half. To do this, the fabric you are using should be folded in half with the right side facing inward, and the pattern should be placed on the wrong side, tracing its contours with a pencil, dry soap or chalk with an allowance for seams (1.5 cm), created by a dotted line.
- The cut out pattern pieces need to be secured by joining the seams and stitched using a sewing machine. The dotted lines applied to the fabric should be left untouched.
- You need to make notches on the resulting toy pattern, and then, turning it inside out, fill it with synthetic padding.
- The cut of the lower paws must be carefully sewn by hand, and then, using a sewing machine, the front and back paws should be sewn to the body of the hare, having first folded the lower seams.
- From the fabric folded in half with the right side facing, you need to cut out the ears of the hare and stitch them with a blind stitch from the wrong side. The finished ears should be turned right side out.
- The thin wire folded according to the shape of the pattern must be inserted inside the workpiece, distributed along the edges and the ends fixed with a pin. It is recommended to sew the ends of the wire using any (even contrasting) thread.
- The remaining wire should be cut off, and the remaining small ends should be twisted, secured with tape and placed inside the ear.
- Using paint, you can draw shoes or boots on the hare's feet.
The hare's body is assembled and requires the step-by-step creation of each part, its filling with padding polyester and hand sewing. First, a model of the toy's body is made, and then the front and back paws are sewn to it one by one. Lastly, the ears are attached to the hare's head with a blind stitch.
Making a hare's head
After the finished model of the hare is stuffed with synthetic padding, you can begin making the toy’s muzzle.
To do this:
- On the finished product, you should schematically determine the places for the nose and mouth of the toy, and then embroider them with black or pink floss threads, using the technique of a regular stitch.
- The eyes are also embroidered with threads, or made using beads, buttons or snaps.
- Using blush on the cheeks of the hare, you need to apply the blush with a cotton swab and blend it a little with the sticks.
Making clothes for a toy
Clothes for the hare are sewn using patterns made according to the sample, and for its production you can use any knitted, silk or velveteen fabric, decorating it with lace, satin ribbons, beads or rhinestones.
You can also buy a ready-made set of clothes for a fabric bunny, which is sold online.
How to sew a dress for a hare
Steps to make a classic dress with a lace-decorated skirt and pantaloons:
| Stage of work | Step-by-step production |
| Making trousers | 1. Using a template, the pattern should be transferred to the fabric, leaving a mandatory seam allowance between the contours of the product of 1-1.5 cm. 2. The drawn elements should be cut out, folded in half and, pinned to match the seam line, stitched from the inside. The bottom of the trousers should be folded back and, after ironing the bottom, decorated along the seam with lace or satin ribbons. 3. The prepared trousers need to be connected by placing them inside each other so that their back seams match, pinned and stitched. The edges of the seams can be processed with a zigzag. 4. The finished trousers should be turned right side out and ironed. 5. You need to insert the elastic band into the prepared places in the product. |
| Making a skirt | 1. Using a pencil and a template, the pattern should be transferred onto the material, adding an additional distance of 1-1.5 cm for seam allowance, and then cut out of it.
2. After folding the skirt along the edges from the wrong side, it should be stitched using a sewing machine. The finished seams are processed with a zigzag. 3. Sew lace or satin ribbon along the bottom edge of the product. 4. The finished skirt should be turned right side out, ironed through a wet gauze cloth and the elastic should be inserted into the prepared hole. |
| Making the top | 1. Using a template, the pattern is transferred to the fabric, with a mandatory allowance of 1-1.5 cm.
2. All elements of the product must be cut out with scissors, folded in half with the right side down and stitched on the machine, having first made holes in them for the arms and neck. 3. Insert elastic into the neck area of the top, and then attach it to the skirt with a blind stitch. 4. The sleeves or neckline of the bodice can be decorated with lace or satin ribbons. |
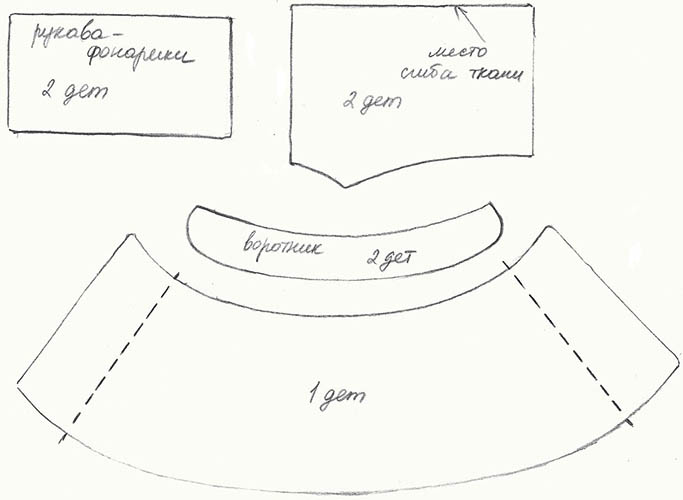
How to sew a panama hat for a Tilda bunny
The headdress for the toy is sewn from cotton material of exactly the same color as the main outfit of the hare, and to make it you need:
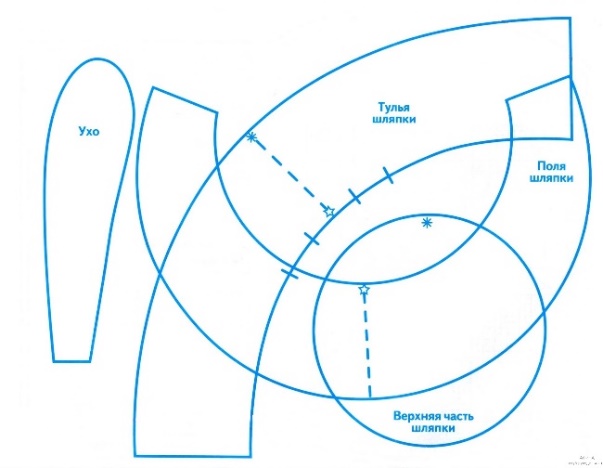
- Using a pencil or soap, transfer the pattern parts onto the prepared fabric.
- The cut out parts should be carefully ironed and then stitched from the wrong side. At the beginning of the work, the crowns should be connected, and then the bottom should be carefully sewn to them from the wrong side.
Easter Bunny
A pattern of a hare with long ears is the central element for making an Easter bunny, popular in Catholic countries, hiding painted eggs inside. Making a toy will not only please the child, but will also become a wonderful decoration for an Easter composition.
For the hare you will need:
- cotton and knitted fabric;
- office glue;
- thin wire;
- marker.
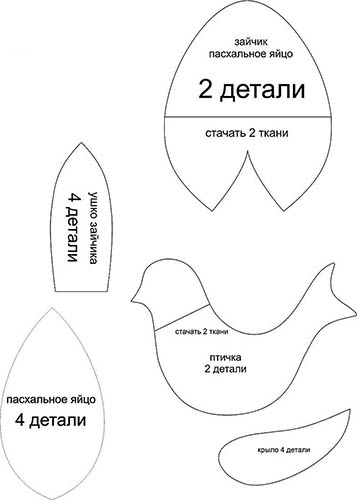
Manufacturing stages:
- The main and auxiliary fabrics need to be folded in half with the right side facing inward. Having applied the pattern to them, it needs to be traced along the contour with a pencil, dry soap or chalk, leaving dotted allowances of 1-1.5 cm, and all the parts need to be connected with pins.
- The prepared patterns need to be sewn according to the template (without touching the zigzag lines), and then cut out using scissors.
- All the seams on the hare's body need to be aligned and stitched together with the darts that give it an oval shape. The finished pattern needs to be separated from the excess fabric and turned right side out.
- The finished body must be filled with synthetic padding.
- You need to insert wire inside the ear pattern, carefully distributing it along the edges. By bending its ends, you can give the ears the necessary shape and attach them to the body with threads, having previously bent the remains of the twisted ends of the wire inside the ear.
- Using floss and a regular stitch, you need to embroider the bunny's nose and mouth, and use a marker to draw its eyes.
- You can place the rabbit on a decorative stand cut out of corrugated cardboard.
Bunny Simpleton with a Bow
The pattern of a hare with long ears for making a doll Prostushka is 28–30 cm long and is made of 3 parts:
- bases (head and hind legs);
- front paws;
- ears.
The toy is made from non-woven fabric and synthetic padding with the help of:
- special pattern;
- scissors;
- threads and needles;
- sewing machine with accessories;
- any decorative elements (buttons, elastic bands, ribbons, lace).
Progress of work:
- The cardboard pattern should be placed on the interlining fabric folded in half with the front side facing outwards and traced along the outline with a pencil, chalk or a dry piece of soap. When creating the pattern, it is necessary to step back from the outline of the pattern by 1-1.5 cm, leaving space for darts, marking it with a dotted line.
- After drawing the outline, all parts of the product must be cut out, pinned to align the seams and stitched on a sewing machine.
- The stitched elements of the toy should be turned right side out and filled with synthetic padding.
- Carefully, using the allowances, manually attach the head and paws to the hare’s body using a blind stitch.
- From the remaining interlining, you need to cut out strips of ears and iron them from the wrong side through a damp gauze cloth, pin them together, and then carefully sew them with a machine stitch.
- Insert the wire into the prepared ears, carefully distribute it along the edges of the pattern and connect it at the base of the ears with a pin. The ends of the wire should be sewn with thread and hidden inside the ears.
- The finished ears should be attached to the hare's head by hand.
- Using floss threads and the regular stitch technique, you need to embroider the mouth and nose on the hare’s face, and use buttons or a marker to make the toy’s eyes.
- You can make a bow from the ends of the satin ribbon and place it on the toy’s chest or head.
Teddy Hare Cutie
The pattern of a hare with long ears, called Teddy Cutie, differs from other rag dolls in the structure of its paws and ears, as well as the presence of a fluffy, furry tail.
The toy is made of artificial fur. Synthetic padding is used as stuffing, and special decorative elements used in the manufacture of rag or plush toys are required to make the eyes.
Progress of work:
- At the first stage of work, using a cardboard template and a pencil, you should draw a pattern of the toy on the back of the fabric, making sure to leave some space for seam allowances.
- The drawn elements of the toy need to be cut out, sewn on a sewing machine and turned inside out.
- The prepared parts of the hare's legs must be connected to each other with blind stitches, after sewing all the darts, filling them with padding polyester and sewing up the holes with a blind stitch.
- All parts of the hare's body should be sewn together with blind stitches.
- On the hare's face, you need to embroider the mouth and nose of the toy with floss, and for the eyes, experts recommend using beads or special decorative elements used in the manufacture of soft toys.
- You can dress the toy in a dress and panties trimmed with lace, and attach a satin bow to its ears.
Hare Mi
The long-eared hare Mi is made of faux fur with sections of cotton fabric needed for his ears and feet. Particularly noteworthy are the patterns of the toy's ears, which reach the length of the body and are sewn to the head with a blind stitch.
Progress of work:
- Using a pencil (chalk) and a template, the pattern must be transferred to the back side of the fabric folded in half, taking into account the space for spare seams obtained by deviating from the outline of the pattern by 1-1.5 cm.
- The cut out fabric patterns need to be secured with pins and sewn on a sewing machine with a mandatory allowance of 5 mm, which is necessary for filling the toy with synthetic padding.
- Using a template, you need to transfer the ear pattern onto the fabric (it is not necessary to make allowances), cut it out, pin it and stitch it.
- From the same fur you need to make a small tail.
- The prepared parts need to be turned right side out, stuffed with padding polyester and hand stitched together using a blind stitch.
- Using floss threads and the regular stitch technique, you need to embroider the mouth, nose and brow ridges of the toy. To create eyes, you can use beads, buttons or ready-made elements fixed with office glue.
Sleepyhead
A hare with long ears, which is a comfort toy, is intended for children under 1 year old and helps to soothe the child's crying and make it easier for him to go to sleep. This toy is made in the form of a scarf (napkin) with paws and a muzzle from high-quality, hypoallergenic cotton fabric and is stuffed with synthetic filler or cotton wool.
Progress of work:
- Using a pencil and a template, you need to transfer the pattern onto the cotton fabric folded in half on the front side, taking into account the 6 cm allowances.
- You need to cut out all parts of the product with scissors, and then closer to the main line, you need to trim the allowances on the ears and tail of the hare.
- The ears and tail need to be turned inside out, straightened and ironed well through a wet gauze cloth.
- It is recommended to fold the head pattern in half, pin it and stitch it on a sewing machine. When stitching the part, it is necessary to leave an allowance for stuffing the toy.
- You need to make holes for the ears in the hare's head, then fold them in half and insert them into the holes. The fold of the ears should look towards the back of the hare's head, and the seam should be located in the center.
- After stitching a seam from one ear to the other, turn the hare's head right side out and, using a cotton swab, carefully pull out the ears.
- The finished head needs to be stuffed with synthetic padding, and then embroider the nose, mouth and eyes of the toy on it with floss thread.
- The lower part of the body needs to be cut to insert the tail, and the tail itself needs to be stuffed with synthetic padding, inserted into the cut and attached to the toy.
- The base of the body around the neck needs to be sewn, leaving a hole for attaching the head, and then trimming the allowances. At the last stage, the finished head should be attached to the body of the hare.
Features of the design of the hare's head
The nose and mouth of the toy should be embroidered with floss using the technique of a regular stitch. In contrast, when creating the eyes of a hare, experts advise using imagination, using buttons, beads or special decorative material. In the latter case, it should be fixed to the product using special glue.
When making a toy for a child, experts advise parents to take safety precautions, avoiding poorly secured elements. In this case, sew on button eyes or (beads) with regular threads. You can also use appliques for the hare's eyes.
Decorating professionals recommend sewing the toy's ears on manually with a blind stitch, using thin wire to fix their upright position. It is permissible to sew the ears on from the inside, pulling them out later with a cotton swab.
Making a hare with long ears is a fascinating process, accessible not only to professionals, but also to ordinary parents. Using special patterns, you can make a popular children's toy or an original decorative element, decorating it with embroidery, lace or rhinestones, dress it in a smart dress and give many pleasant moments to small children.
Video about making a toy hare Tilda
How to sew a Tilda hare in 10 minutes: