Drawing fly agaric mushrooms is not difficult, both adults and children can handle it. The main thing is to imagine, what does a mushroom look like or look at the picture, but you need to have the necessary tools and materials at hand.
What kids will need to draw a mushroom
To depict a fly agaric you will need the following tools:
| Tool | For what |
| Simple pencil | Drawing contours |
| Colored pencils or paints | Coloring images |
| Eraser | Removing extra lines |
Also, an artist cannot do without paper, which can be:
- taken from an album or an A4 sheet;
- pure white or colored;
- any size.
In pencil technique
If you decide to draw a fly agaric using only pencils, you need to make sure that their lead has medium hardness, because:
- a lead that is too hard will leave scratches on the sheet and after removing the extra lines with an eraser, they will be clearly visible and will spoil the overall picture;
- A lead that is too soft will smear across the surface, which will also have a negative effect on the drawing.
Fly agaric (a drawing for children is suitable due to its low complexity) for execution in pencil technique will require the following for work:
- eraser. It will help to remove extra lines that were mistakenly drawn in the wrong place;
- a ruler. It is convenient to use it to draw the pulp at the bottom of the cap;
- colored pencils. Three colors will be enough: red, green, blue. If you use a colored sheet, you should prepare a white pencil.
Red will be needed to color the mushroom cap. The spots on it, as well as the stem with the "skirt" can be left white. If the paper is colored, they will have to be colored with a white pencil. A green pencil is needed to color the grass, and a blue one - the sky.
In watercolor technique
If you need to depict a mushroom using watercolors, you will need the following:
- sheet of paper;
- paints;
- simple pencil;
- eraser.
Instead of colored pencils, watercolor paints are used in this case. To paint the hat in watercolor technique, it is recommended to use not only red, but also yellow paint. First, the hat is covered with yellow, and then with red.
The contours of the mushroom and other elements of the painting will be drawn with a simple pencil at the initial stage, so an eraser will be needed to remove erroneous or unnecessary lines.
In gouache technique
If you decide to draw the mushroom with gouache, you can do without a simple pencil and eraser.
To work you will need:
- several colors of paint: red, white, green, blue;
- water can. It is better to use a non-spillable one;
- a rag or soft cloth. To remove traces of paint from hands and brushes;
- brushes. They should be synthetic.
Fly agaric drawing with colored pencils. Master class for children
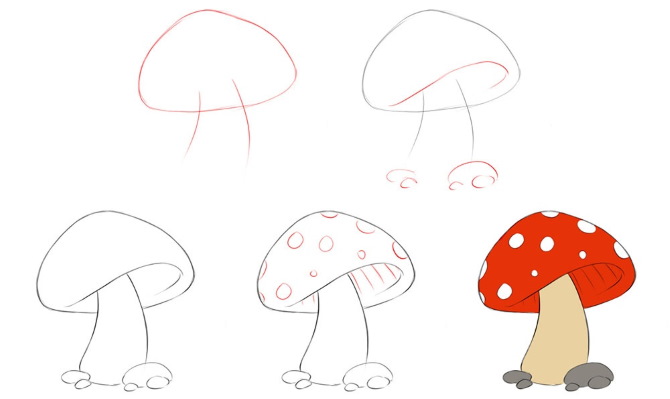
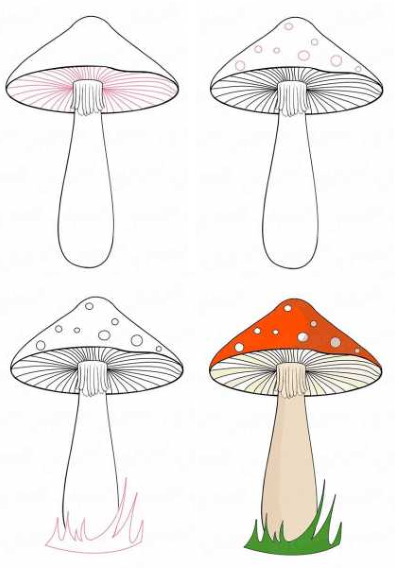
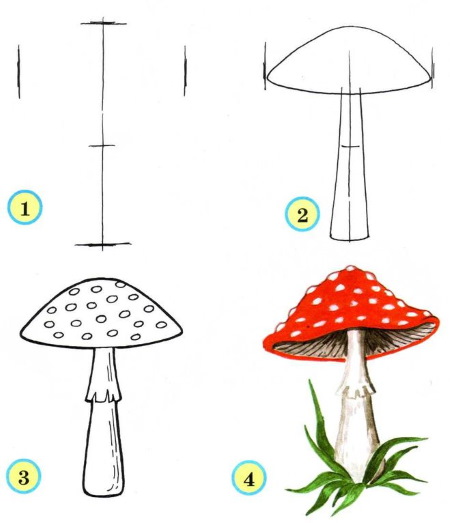
A fly agaric (a drawing for children when depicted with colored pencils will turn out bright) is easy to draw, following the step-by-step instructions.
Auxiliary lines
The image begins with auxiliary lines. These will be 2 straight lines, perpendicular to each other: 1 line runs horizontally, the 2nd – vertically. Auxiliary lines are needed to simplify the work in the future. They will serve as a guide when drawing the main elements of the fly agaric.
Leg
The stem of the mushroom can be represented by 2 vertical lines. They should be rounded. The degree of roundness depends on the thickness of the fly agaric. It is better to make the stem longer: it is narrower at the top and widens towards the bottom.
In order not to make a mistake with the position of the leg, you should pay attention to the previously drawn vertical auxiliary line. The right part of the leg should be symmetrical to the left part relative to this leg. The leg lines should end slightly above the horizontal auxiliary line.
Bottom of the hat
The steps in this phase are as follows:
- Above the stem of the fly agaric, you need to draw an oval, stretched to the left and to the right. This will not be the cap, but only its lower part. The oval should be attached to the upper part of the stem.
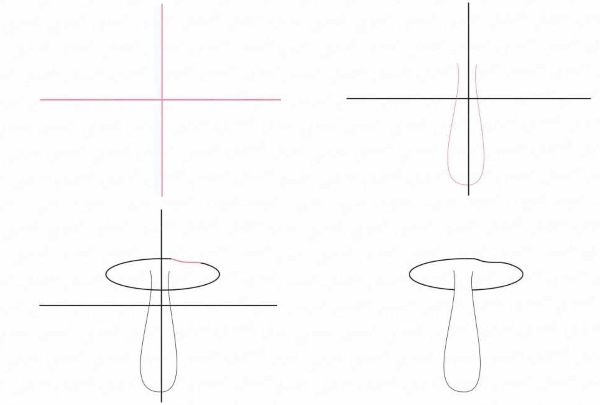
Here you need to pay attention to the position of the vertical auxiliary line. The oval should be positioned so that this line divides it in half. At the same time, the oval should not fall below the horizontal auxiliary line.
- Once you've made sure the oval is in the right place, you should outline it with a pencil to make it more distinct.
- Proceed to deleting the auxiliary lines that have fulfilled their function and helped to determine the exact position of the stem and the lower part of the cap, represented by an oval elongated horizontally.
- Now the undrawn mushroom is located in the center of the sheet, has the correct size and shape. An eraser will help to remove unnecessary lines. It is enough to erase them carefully, trying not to touch the main lines: the lower part of the cap and the stem.
Records
When examining a fly agaric, it is not difficult to notice that under its cap, in the upper part of the stem, there are fuzzy plates. They need to be depicted in the drawing, otherwise the mushroom will turn out implausible.
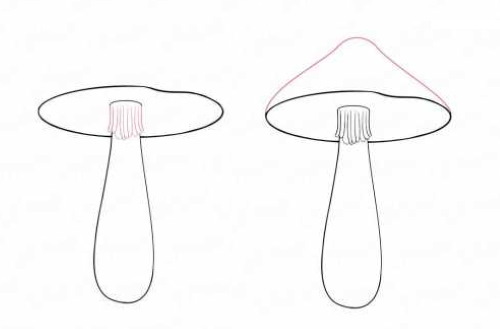
To do this, you need to draw a small arc connecting the 2 lines of the legs at their top. This will mark the place for the plates. They are thin, small and fit tightly to the leg.
Hat
Above the oval, which represents the lower part of the fly agaric cap, you need to draw a figure similar to a trapezoid. This will be the upper part of the cap - the most beautiful element of the mushroom.
It is enough to draw 1 line that starts from the left of the oval, goes diagonally up and to the right, rounds off, then goes down and to the right and ends on the right side of the oval.
Pulp
The lower part of the cap contains the fly agaric pulp. It is easier to depict it with a ruler. It is enough to apply the tool to the leaf and draw many thin lines from the stem to the oval, trying to place them at the same distance from each other.
The total number of lines in the mushroom pulp can be any, for example, 30, 40, 50. It depends on the size of the drawing. The distance between them can be 3-5 mm.
Controversies
The white spots on the red cap are the main decoration of the fly agaric. These are the mushroom's spores. They are randomly located all over the cap. To depict them, it is enough to draw many small circles of different sizes.
Grass
Fly agarics usually grow in the forest and hide behind green grass. To complete the picture, you need to draw grass under its stem.
If you want to show a fly agaric in the grass, then you need to:
- In different parts of the sheet, make a sketch of the grass with up and down strokes or "bunches". In the second option, you need to draw from one point, the tops should not be even, but can stick out in different directions.
- Add grass to empty spaces if necessary.
- Add other small vegetation.
Coloring
This is the final stage of drawing the mushroom.
When coloring, it is necessary to take into account that:
- the flesh of the mushroom, where many lines pass, should be left white or made light beige. You can also use pencils of gray and brown shades for this. The legs should have a similar color;
- The cap is the brightest part of the fly agaric. It should be colored with a red pencil, and the spots should be left untouched;
- the grass growing under the mushroom should be green;
- To make the drawing more realistic, you should draw a shadow on the surface of the mushroom. It should be present both on the cap and on the stem. In the case of the cap, you should use a darker red pencil. On the stem, you can put many gray dots to depict the shadow. To make the shadow in the grass, you need to add several dark green blades of grass.
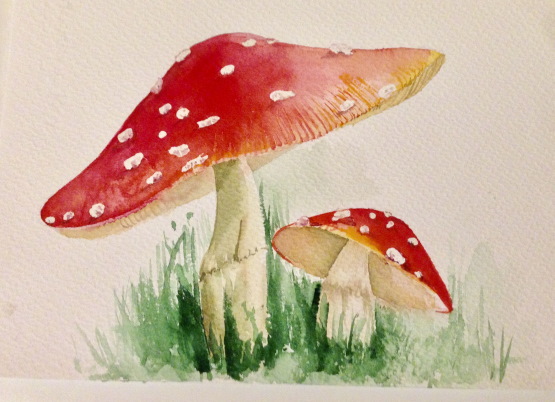
How to paint a fly agaric in watercolor
Drawing a fly agaric with watercolors for children will require:
- paints;
- brushes;
- simple pencil;
- eraser;
- paper.
To make the task easier, you can use a photograph of a mushroom for copying.
The steps to create an image are as follows:
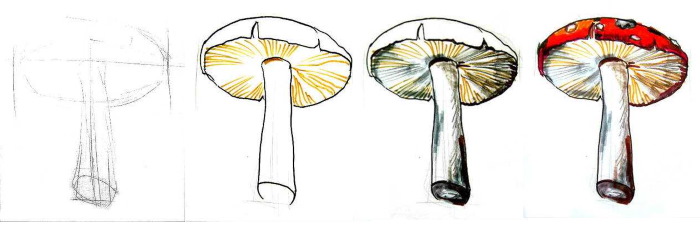
- Using a simple pencil, you need to depict a fly agaric and grass. The stem can be represented by 2 lines. It is important not to forget about the "skirt" around it. The hat looks like a triangle, only instead of corners it is rounded.
- At the bottom of the cap, you need to make a small opening, and inside it, draw many short lines. This will be the flesh of the mushroom.
- Draw the contours of the spots on the surface of the cap. They do not necessarily have to be round. Their shape can be different. It is enough to look at the photograph of the mushroom to make sure that the white spots are not circles.
- At the bottom of the cap, make the outlines of several hanging drops of dew.
- The grass growing under the mushroom can be represented using simple lines of different shapes.
- Proceed to coloring the mushroom and the grass growing under it. Paint the cap with yellow watercolor. Be careful not to accidentally paint over the white spots.
- At the bottom of the cap, where the flesh was drawn, draw a thin yellow stripe, leaving a small area unpainted, on which short thin lines were drawn.
- As a second layer, apply red paint to the hat. Before doing this, wait until the yellow paint dries. When working with red, try not to paint over the white spots.

- Move on to working with white paint. It is used to paint the stem together with the "skirt", white spots on the cap and the visible thin strip of the inner part of the cap.
- Work with light green paint. Use it to paint the background of the grass.
- Paint the sky background with blue paint. Paint the hanging dew drops at the bottom of the mushroom with the same color.
- Use bright green paint to draw the blades of grass.
- Add brown and green colors to the background.
How to draw a fly agaric with gouache
Fly agaric (a drawing for children using gouache requires colored cardboard for the base) is drawn with paint of 3 colors:
- green - for the grass growing under the mushroom;
- red – for the fly agaric cap;
- white – for the stem and spots on the cap.
The main tool for creativity will be a brush. You will also need a napkin and water, which is best poured into a spill-proof glass.
The steps to create an image are as follows:
- Dip the brush in water, then dip it in white paint and draw an oval stretched up and down at the bottom of the sheet. This will be the stem.
- Using the same paint, draw a “skirt” around the leg.
- Rinse the brush thoroughly in water so that no traces of white paint remain on it. Move on to working with the mushroom cap, using red paint. The cap is drawn above the stem at the top of the mushroom. It should look like a triangle, only the corners should be rounded.
- Wait until the gouache on the sheet of paper dries.
- Wash the brush to remove any traces of red paint.
- When the paint on the paper dries, dip the brush into green gouache and draw diagonal stripes under the stem. This will be the grass.
- After making sure that the red paint and the cap painted with it have dried, start drawing the main decoration of the fly agaric - white spots. To do this, dip the brush in white paint, and then put small dots on the cap.
Once the dots are placed, the fly agaric drawing can be considered complete. The fly agaric (a drawing for children can be a composition of small details) is first drawn with a pencil.
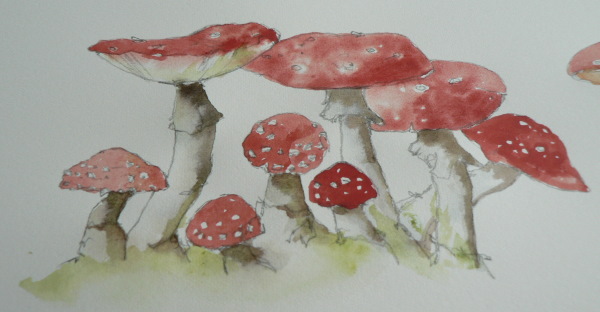
To depict several fly agarics in one drawing you need:
- Make a sketch. Use a simple pencil for this. First, draw a cap in the center of the sheet. It will belong to the main and largest mushroom. The shape of the cap should be close to an oval, but it should not be too smooth.
- Draw a "skirt" under the hat. This will be another oval, but smaller in size. It should be stretched horizontally. It also does not need to be made too even.
- Draw the cap of the 2nd fly agaric. It is located on the right side of the drawing. This cap can also be represented by a figure similar to an oval. However, it is important to make it stretch out at the top. The size of this mushroom, and therefore its cap, is about 2 times smaller compared to the main fly agaric, the cap and "skirt" of which were drawn in the previous step.
- On the opposite side, draw the outline of the cap of the 3rd mushroom. Its shape is approximately the same as that of the other 2 fly agarics. The size of this mushroom is approximately the same as that of the fly agaric located on the other side.
- Draw the legs of the main mushroom and the other two. To do this, just draw a couple of rounded lines. Don't forget that the small mushrooms should also be decorated with "skirts".
- If three fly agarics are not enough, you can depict one more - the smallest mushroom. It can be located between two large mushrooms.
- After the finished sketch, move on to coloring with gouache. For this, you will need green and yellow paint. They will be applied together, they will need to be mixed directly on the drawing. You need to move the brush vertically: this will simulate the growth of grass. You can paint over all areas except the mushrooms themselves.
- Once the background is painted, move on to working on the fly agarics. First, apply whitewash to the mushroom stems. You need to paint everything, including the "sarafan" located at the top. Then you need to dip the brush in red paint and outline the contours of the 3 large caps. It is better to leave the cap of the small mushroom white.
- Fill all the hats with red.
- Take black paint. It is necessary to outline the hats painted in red with it. Then, using a clean brush, moistened with water, carefully combine the black and red colors. It is important to create a smooth transition from one color to another. This process is smearing the border of two colors with water.
- Using a similar technique, add small dots and a few strokes of white to the surface of the caps.
- Draw a brush dipped in blue paint along the sides of the legs. The blue color can be obtained by mixing blue and white paint on a palette. The borders also need to be blurred with water.
- Use green paint to draw trees in the background. These can be fir trees. Using the same color, you need to depict several blades of grass in the foreground.
- Use black paint to outline all the mushrooms, including the caps and stems. This simple technique will highlight the main elements of the painting.
This completes the work on drawing the composition with mushrooms. If you wish, you can supplement the landscape: make the trees in the background more clearly drawn and add flowers and leaves. You can add flowers and leaves with your fingers, without using brushes.
The fly agaric is simple in design, its two main elements are the cap and the stem. To draw the picture correctly, just look at a photograph of the mushroom or go to the forest with your children and try to draw from life. A sheet of paper, a simple pencil, an eraser and several tools for coloring will help with this. These can be colored pencils, gouache or watercolors.
Video about drawing a mushroom
Fly agaric drawing for children: