Children begin to study shapes and colors from childhood using various methods, in particular, through appliques. These appliques are made up of geometric shapes that the child glues to a cardboard or paper base.
At what age can you start teaching geometric shapes to your child?
According to scientists, a child should be taught from birth, and this is carried out in several stages:
- After birth, the baby remembers almost nothing, but learns to look at the world in all its aspects. At this time, it is recommended to talk to the baby, pronouncing each figure, read short children's poems, sing songs.
- When the baby turns 6 months old, he will try to learn more about the world. To do this, he will touch and bite objects. It is important to choose the right toys. A set of soft squares with flowers, butterflies, and birds drawn on them will do.
- The next stage begins when the baby learns to speak. It is necessary to pronounce all the names of figures, starting with the simplest (circle, triangle, square). Then it will be the turn of the trapezoid, rectangle and others. At this stage, a toy pyramid, plastic blocks from which a tower is built, and drawing will help.
Thus, training can be done from the birth of a child, using different methods.
Learning geometric shapes: names, shapes, colors, sizes
As the child grows, he or she should recognize more and more shapes and colors.
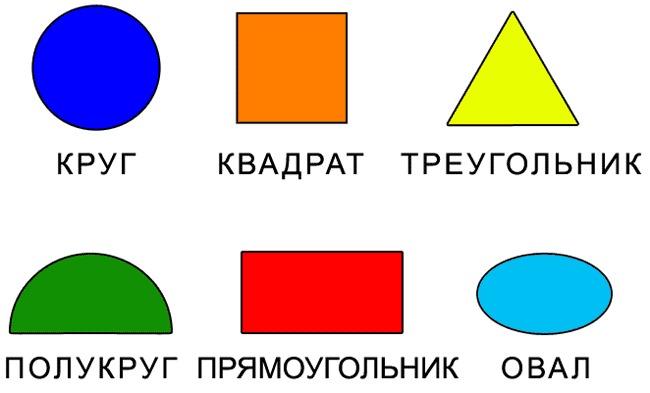
By the age of 2 you need to know:
- triangle;
- square;
- circle.
At this age, you need to know the basic colors:
- blue;
- red;
- yellow;
- green;
- white.
Some children at 2 years old know a few more colors:
- orange;
- violet;
- black;
- pink.
By the age of 6, the child learns about more complex, combined colors and shades, and becomes familiar with composite (consisting of basic) figures.
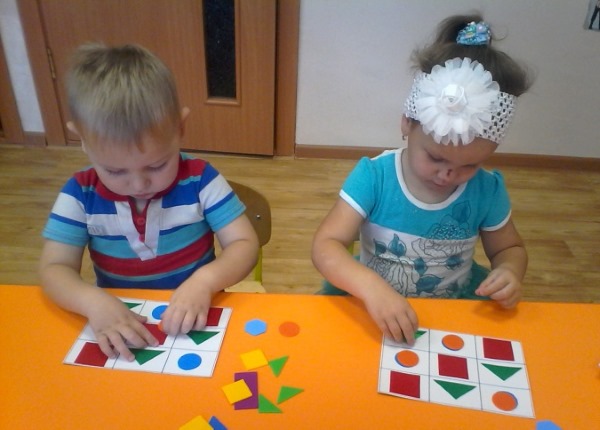
Children learn through games, they come in different levels of difficulty, so it is recommended to give them to the child in the following sequence:
- Draw circles, triangles, squares of different sizes and colors on cardboard. Call the images by their names, saying them out loud.
- Draw only the outlines of the figures on the cardboard, and all the outlines should be of different colors, so that the child can trace them with the corresponding colors, color them and pronounce the names out loud. At the age of 2 years, you should start comparing sizes.

- Cut out the figures and place them in prominent places around the house so that the child can look for the pictures. Each time the child finds an image, he or she should name the following characteristics: figure, color, and size.
- Game sets designed to study the above. For example, a pyramid, mushrooms of different colors and sizes on a stand, mosaics, and others. Such games will entertain the child and attract his attention.
- Search for geometric shapes in the surrounding world. For example, a table is a rectangle, a box is a square, and a ball is a circle. It is recommended to consider more complex shapes: a glass is a cylinder, and a party hat is a pyramid.
Many methods have been developed for studying shapes and colors. They are designed for children of different ages and also take into account their favorite activities.
Learning Complex Geometric Shapes with Simple Ones: Benefits of Classes for Kids
Geometric shapes, or compound shapes, are easier to learn through simple shapes. You need to cut out several squares, circles, and triangles and put them together.
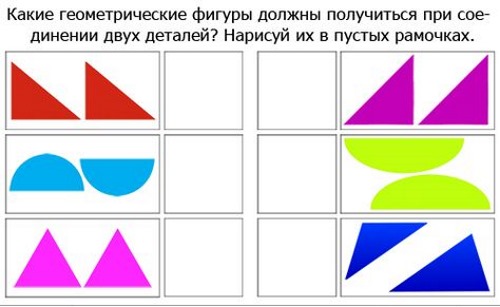
Examples of creating complex figures:
- Trapezoid: square + 2 triangles.
- Rectangle: 2 or more squares.
- Rhombus: 2 equal triangles.
- Parallelogram: 2 squares + 2 equal triangles.
The child must be fully involved in the learning process, otherwise the learning will be useless. Learning in a game format is the best way to attract the student's attention and make the process interesting. Making discoveries on their own, the kid will want to continue learning.
Descriptive Geometry Lessons for Kids
Descriptive geometry is aimed at developing spatial thinking. The child learns to imagine complex three-dimensional figures, breaking them down into simple and flat ones. The tasks involve not only choosing the right answers, but also explaining their choice and why other answers are incorrect.
Complete the figure using the example
Drawing will help reinforce the lesson.
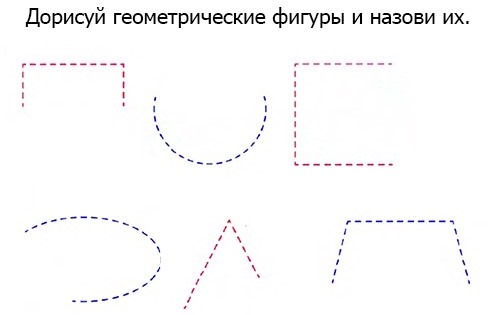
What needs to be done:
- Show the child the shapes, tell them about them, give examples of things of the corresponding shape that are in the room.
- Print out forms on which unfinished figures are depicted with a dotted line (an example of a form is given above).
- Task: continue the dotted line, say which image is a circle, square, rectangle.
- Discuss the results obtained.

Instead of dotted lines, there can be regular, but broken ones. This is a simplified version of the exercise. To make the task more difficult, you need to print out a form on which part of the figure is colored, but does not repeat the contours. This will confuse the child.
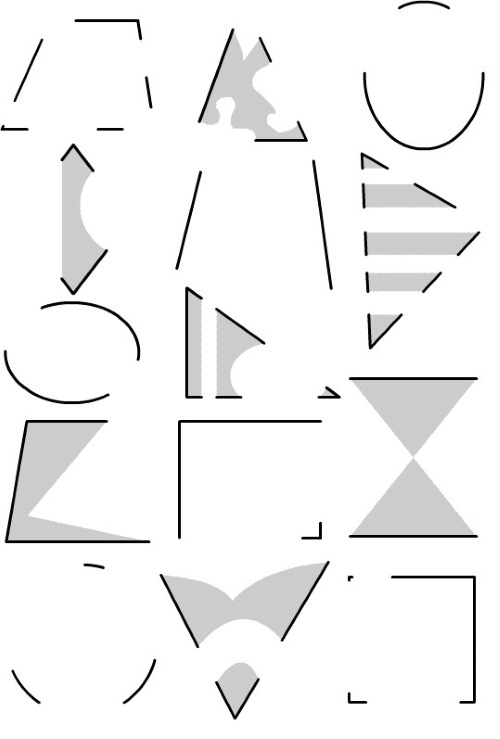
In addition to finishing drawing, there is a need to color the remaining part of the figure.
Tracing a figure by points
The dot-connecting exercise develops imagination by allowing one to imagine which dots need to be connected to form a given figure. This skill develops the ability to complete tasks according to a model, which will be useful at school. The child must draw with a pencil so that he can correct mistakes.
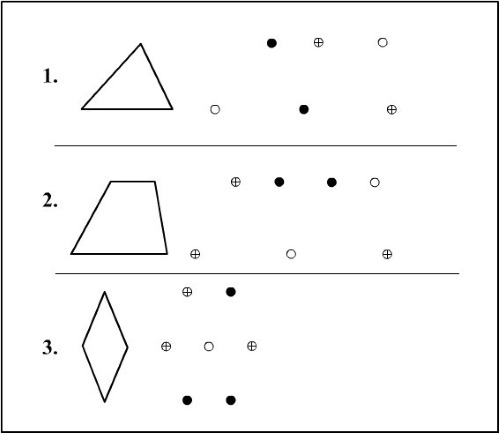
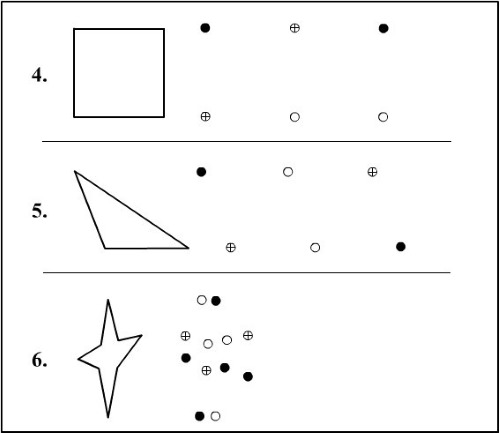
How to do the exercise:
- Print out assignment forms.
- On each form, on the left, there is a sample drawing, and on the right, there are a number of dots from which you need to create the same drawing.
- The child should notice that the dots are different: there are dots with crosses, black dots and white ones. Identical dots cannot be connected.
- On the right there are more dots than necessary - some will remain outside the drawing.
Find geometric shapes in an image
Figures made of geometric shapes attract children's attention. They become interested in how to divide a complex drawing into a simple one, and assemble a simple one into a complex one. This task suggests finding circles, squares, triangles. In a more complicated version, rectangles, trapezoids, ovals and rhombuses are added.
Easy Butterfly Drawing for Girls:
- Circles of different sizes – the body.
- 2 pairs of identical triangles – lower and upper wings.
- 2 pieces of small, medium and large circles – decoration of the wings.
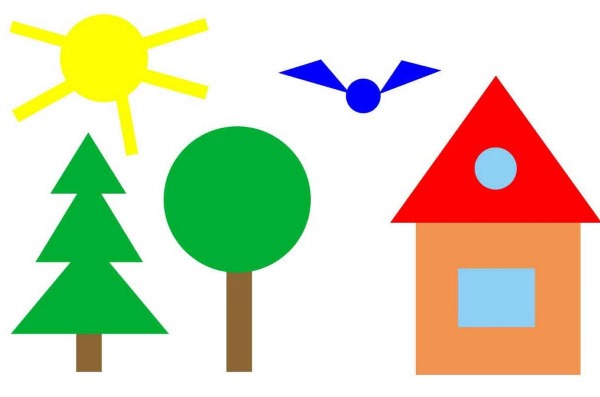
In the drawing "house" you can find:
- The square is the main part of the house.
- The rectangle is the door.
- Two circles or ovals are windows.
- The small circle is the door handle.
- The triangle is the roof.
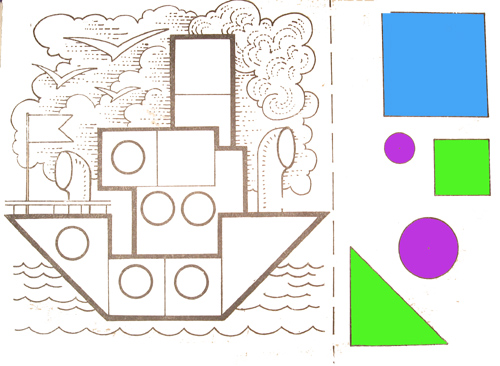
Advanced "boat" pattern:
- Trapezoid is the hull of a ship.
- 3 circles – cabin windows.
- 2 rectangles of different sizes - elevation on the deck.
- Triangles are sails.
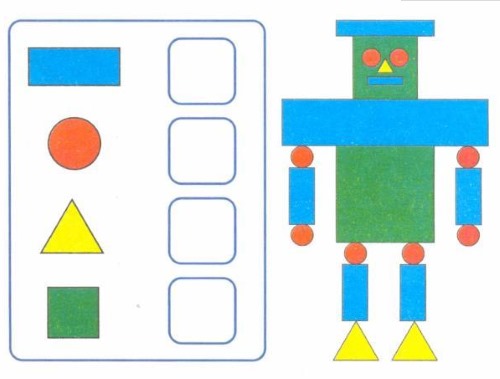
Drawing "robot":
- The square is the robot's body.
- 2 equal rectangles – legs.
- 2 identical equilateral triangles – feet.
- 2 equal diamonds – buttons on the robot’s body.
- Long rectangle – shoulders.
- 2 circles, 2 rectangles and 2 circles – arms.
- A small square is the face.
- 2 small circles – eyes.
- Triangle is the nose.
- The thin rectangle is the mouth.
- Trapezoid (the length should be longer than the square of the face) – hat.
Examples of drawings are arranged according to the level of difficulty (from easy to difficult).
Coloring geometric shapes
The task develops spatial thinking, as the child must color the figures so that one overlaps the other.
How to perform the exercise:
- Draw pairs of circle-square, triangle-circle, square-triangle and others on a sheet of paper so that their ends intersect, overlapping each other.
- Provide the child with a sheet of paper and colored pencils.
- Ask your child to color the figures so that one of the pair is on top of the other, saying the colors out loud.
To make the task easier, you need to show the child the three-dimensional figures in advance, give him the opportunity to move them and play with them.
Geometric Shapes Puzzle: How to Put the Right Shapes Together
Figures made of geometric shapes are not immediately clear to children. To simplify learning, it is recommended to assemble a kind of "puzzle".
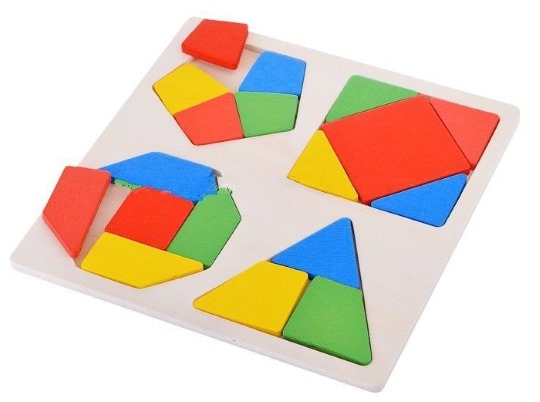
How to perform the first version of the exercise:
- Print out forms with simple shapes drawn on top and several complex shapes at the bottom.
- The child must find which of the options on the bottom of the sheet combines all the listed forms on the top of the sheet.
- It is also necessary to explain the answers obtained.
At first, simple drawings should be given in which the figures are connected without tilting. Also, the shape can contain only squares or only triangles.
The exercise develops imagination and orientation in the plane of figures.
Grouping simple shapes into complex ones
This task is the reverse of the previous one.
How to perform the exercise:
- Print several circles, squares, triangles and trapezoids on cardboard and cut them out.
- The child's task is to create as many different shapes as possible, consisting of the figures listed above.
- To learn numbers, you need to count each type of figure.
To make the task more difficult, the child must make a specific drawing (a bird, a ship).
Second option for performing the exercise:
- Show the child the colored image and provide the shapes needed to complete the drawing.
- The task is to create an identical image.
This option is intended for children aged 6 years and over.
Examples and step-by-step instructions for creating appliques from geometric shapes
Depending on the age of the child, applications are performed differently:
- Children under 2.5 years old do not know how to cut out, so an adult does it. At the discretion of the adult, the child or the adult himself can glue the paper parts to the cardboard. In the second case, you should consult with the child where exactly to glue the part.
- Children aged 2.5 to 5 years can cut with scissors, but they do it unevenly, so if necessary, you should correct the unevenness.
- From the age of 5, children learn to cut evenly, so adult participation in the process of creating an applique is minimal.
At a young age, a child tries to simplify the shape he sees. For example, clouds that look like curls are simplified to an oval.
For children 3-5 years old
Unusual pictures and the process of creating them can attract small children. The applique "Hedgehog" is unusual, but easy to create. Palms made of brown or black paper are used as needles.
They can be done in two ways:
- Place the child's palm on the paper on the back side of the sheet and trace it with a simple pencil. Cut out the palm along the outline.
- Paint the baby's palm with paint and attach it to the paper. Do not outline the contours. Cut out the detail.
You will need 4 palms.
You will also need the following parts:
- "Boat" consisting of an oval and a curved triangle. This detail will serve as the body and nose of the hedgehog.
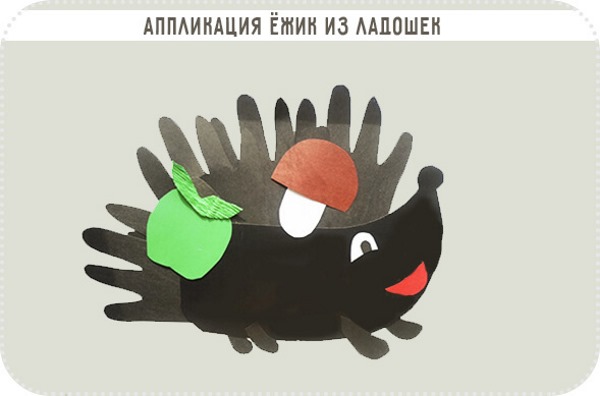
- A small circle is the tip of the nose.
- The red semicircle is the mouth.
- The white semicircle is part of the eye.
- The small black circle is the pupil.
- A circle with a cut-off top and bottom in green is an apple.
- Dark green diamonds – 2 apple leaves.
- The detail that looks like a white capsule is the mushroom stem.
- The brown semicircle is the mushroom cap.
- Four trapezoids of different sizes are the legs.
The parts should be glued in the order in which they are listed above. In this case, 2 palms are positioned with fingers up, one - diagonally, the last - to the side.
The end of the body is located near the last palm.
Application "Volumetric ladybug":
- Half of the black oval is the head.

- Two red or pink circles – the body. The circles need to be folded in half: glue one half to the cardboard, leave the other. Glue the half of the second circle next to the first so that the glued part forms a circle.
- Black circles are dots. They are located both on the glued and on the retreating parts of the body.
- Purchased eyes of different sizes.
- Draw the antennae and circles at their ends using a black marker.
The picture attracts with its volume. The child can play with the protruding parts of the ladybug.
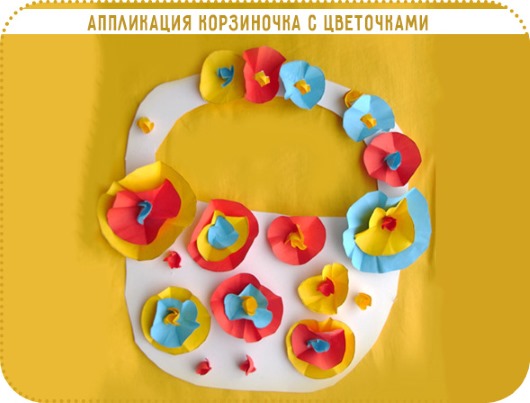
How to make the applique "flower meadow":
- Paint the cardboard sheet green.
- Fold a small square 4 times to make a smaller square. Trim 3 corners (except the fold corner). Unfold the sheet.
- Glue a circle of a contrasting color into the center of the petals obtained from the square.
- Make some flowers.
- Glue the flowers onto a painted piece of cardboard.
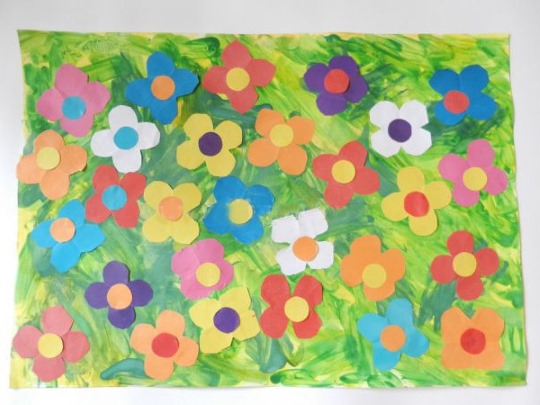
The picture will be multi-colored, so the child will be interested in looking at the flowers closer.
For 1st grade students
First-graders are able to create more complex appliques using new materials.
Application "Lilac":
- Paint a piece of cardboard with watercolor paint. If desired, you can make a smooth transition from one color to another (from red to purple, from purple to blue, or from blue to pale blue).
- Let the background dry.
- Cut out a rectangle and a circle for the vase.
- Glue the rectangle to the base first, and the circle on top of it.
- Cut 4 thin short strips from green corrugated paper. These strips will be the stems.
- Glue the stems evenly to the end of the vase.
- Cut out 6 oval or egg-shaped pieces from a colored napkin. These pieces will help to mark the borders of the lilac inflorescences.
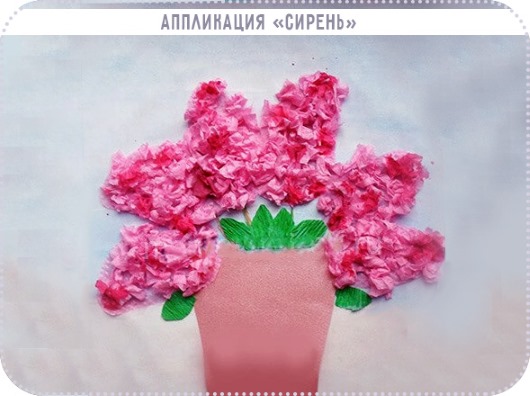
- Glue the parts next to the stems. Since there are more inflorescences than stems, it is necessary to correlate 4 inflorescences with the stems, and glue the rest along the edges of the vase.
- Cut the napkins into small squares.
- Some of them are crumpled into squares, the rest are torn first and then crumpled.
- Grease the inflorescence with glue and spread lumps of napkins on it.
- Repeat steps 9-11 for the remaining inflorescences.
- Cut out 6 sheets of corrugated paper: glue 4 onto the stems, the rest along the edges.
- In some places of the voluminous inflorescences, apply spots of pink watercolor paint.
Every child of 7 years old can make the applique "Caterpillar". The creation process takes a little time, so it is suitable for keeping the child busy for a short period of time.
How to do:
- Cut out several circles of the same size in different colors.
- Glue the circles one after another onto the cardboard. If desired, arrange the circles with rises, as if the caterpillar is crawling.
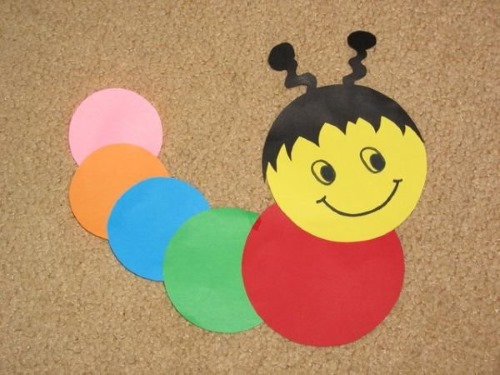
- On the first circle, draw a smile, glue on the eyes and finish drawing the eyelashes.
- Glue on the horns - two triangles.
For children of grades 2-4
The figures studied by children up to 11 years old allow creating complex and interesting drawings. Making combinations of geometric figures and cutting out small details develops fine motor skills. In particular, the applique "Mice" contributes to this.
Parts needed for your first mouse:
- The gray semicircle is the body.
- 2 black circles of different sizes – nose and eye.
- 2 identical grey circles – ears.
- 2 pieces of black wire – whiskers.
- A piece of thick white thread is the tail.
First you need to glue one ear to the base, then the body, which slightly overlaps the ear, then the rest of the parts.
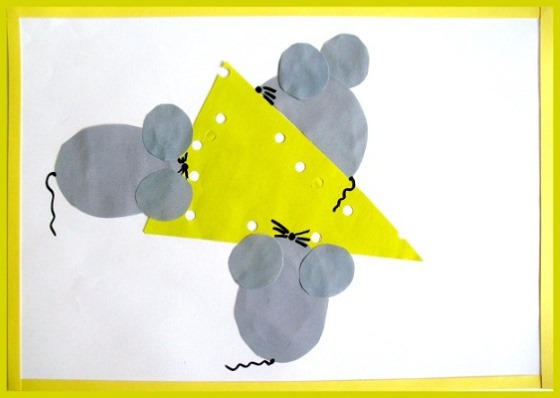
Parts needed for the second mouse:
- The grey oval with pointed ends is the body.
- 2 grey circles – ears.
- 2 small black circles – eyes.
- The larger black circle is the nose.
- 2 pieces of black wire – whiskers.
- A piece of thick white thread is the tail.
A piece of cheese is an equilateral yellow triangle. It needs to be folded in half and glued. Draw circles on the double triangle and cut them out with nail scissors. Cut the bottom of the triangle so that the triangle is equilateral.
How to arrange elements on a sheet:
- Glue the cheese so that the corner points towards the upper right diagonal.
- Glue the first mouse above the cheese closer to the base. Lower the tail down and to the right so that it is on the cheese.
- Place the second mouse under the cheese closer to its end so that its nose almost touches the edge of the cheese.
The background can be not only plain cardboard, but also cardboard with an unusual pattern (shirt check or circles). Children aged 8-10 are able to combine different elements, creating complex plots.
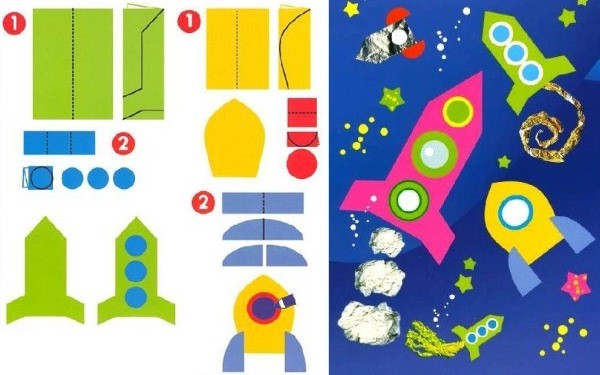
To create the applique "Space", you need to make the following rocket models:
- Cut out the rocket body shown in the photo below.
- Cut out 3 circles of the same size in a contrasting color.
- Cut out 3 smaller circles.
- Glue one circle from point 3 to each circle from point 2. This will create windows.
- Glue the windows onto the rocket body.
Second rocket model:
- Cut out the rocket body from the photo.
- Cut out two circles of different sizes.
- Glue into a small circle in a large one.
- Cut out an oval, cut it into 4 parts (2 parts are the rocket wings).
- Glue the window and wings to the rocket body.
You need to make several rockets and stick them to the sheet so that they fly in different directions. Fill the remaining area with small circles and stars. In cartoons, fire or smoke bursts out of the tail of the rockets, which can be depicted as ovals or a spiral detail.
Geometric applique "Transport"
Figures from geometric shapes form complete pictures when they are distributed correctly.
Below are considered applications of different types of transport. The application "Train" consists of two types of carriages: the first carriage and the rest. At the beginning are listed the figures necessary for the first carriage.
| Application | Figures that are used in the process of creating an applique | The part of the transport that the figure represents | Location Features |
| "Train" | Rectangle | Frame | The semicircle is to the left of the rectangle |
| Semicircle | |||
| Large and small rectangles | Driver's cabin | One of the rectangles is a window | |
| Triangle | Pipe | Part of the figure is covered by the rectangle of the body | |
| Smaller triangle | Flashlight | Partially covered by the semicircle of the body | |
| Rectangle | Wheel base | Glued under the body | |
| 3 circles | Wheels | They are located under the body and are attached to a rectangle. | |
| Larger circle | Wheel | It is glued under the driver's cabin, partially covering it. | |
| Thin rectangles | Chains connecting the cars | — | |
| Rectangles | Wagons | — | |
| 4 laps 1 car | |||
| "Bus" | Large rectangle | Frame | — |
| 2 laps | Wheels | They cover part of the body and are located closer to the edges of the rectangle. | |
| 2 rectangles | Doors | They are located near the wheels. | |
| 4 thinner rectangles | Windows doors | There are 2 windows for each door | |
| 2 squares | Windows on the body | Square windows are located at the edges of the doors, and a rectangular window is located between them. | |
| Rectangle | |||
| "Ship" | Triangle with cut edges | The main part of the ship | — |
| 3 circles | Windows | — | |
| Thin long rectangle | A stick to which sails are attached | Glued to the left of the middle of the main triangle | |
| Triangle | Sail | They are glued on both sides of the stick. | |
| Semicircle | |||
| Square | Flag | Located at the top of the stick | |
| Right triangles | |||
| "Truck" | 2 rectangles of different sizes | Driver's cabin and front part | The smaller rectangle is attached to the side of the larger one. |
| Square | Window | — | |
| Rectangle | Body | — | |
| 2 laps | Wheels | One circle is located under the driver's cabin, and the second - under the body. Some of the circles cover the part of the truck to which they are attached. | |
| Triangle | Cargo | — |
Applications from geometric figures "Animals"
Even the smallest ones can depict animals.
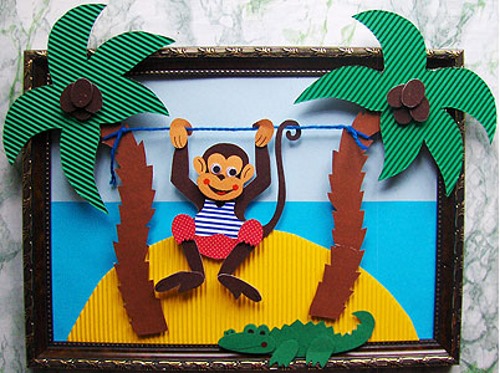
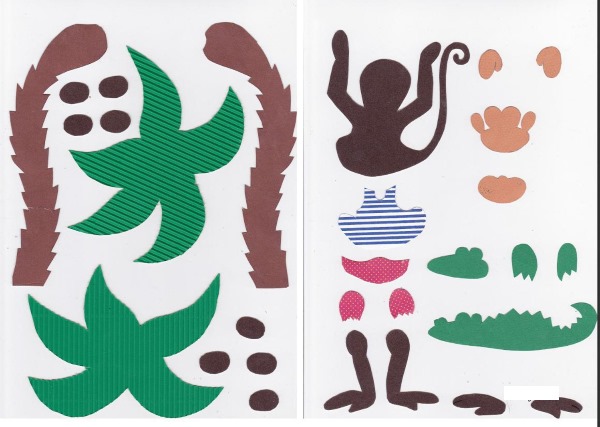
The applique "Monkey" consists of the following figures:
- Oval - body.
- 4 thin ovals – arms and legs.
- The curved thin oval is the tail.
- Circle is the face.
- 4 circles (2 small and 2 medium) – ears.
- The circle is the nose.
- 2 white and 2 black circles – eyes.
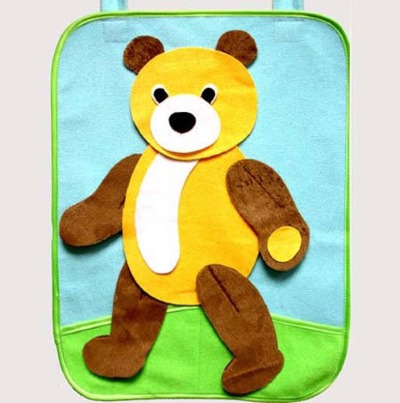
The "Bear" applique consists of the same figures, but 2 semicircles are used as ears, and the tail is not visible.
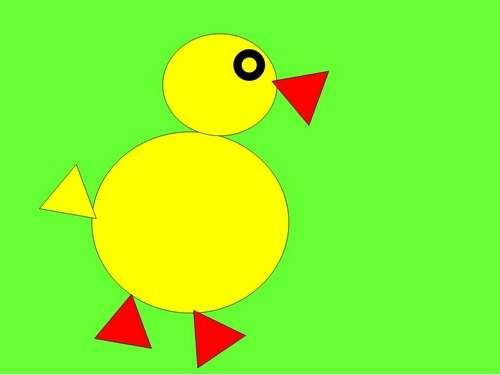
Application "Chicken":
- Cut out 2 ovals and glue them at a distance from each other. These ovals will become the wings.
- Cut out a yellow oval – the body of the future chicken. Glue the body between the wings so that it overlaps part of the wings.
- Glue a circle on top – the chicken’s face.
- Cut out a small orange circle. Glue an even smaller black circle inside.
- Glue the glued circles onto the side of the face, as if the chick is looking to the right or left.
- Cut out 3 red triangles.
- Glue one triangle to the side of the face next to the eye - this triangle will be the beak.
- Glue the remaining triangles under the body - these are the bird's legs.
- Glue one right-angled yellow triangle on the side where the beak is not located. This triangle is the tail.
To complete the picture, you need to add grass, consisting of ovals of different sizes and lengths, next to the chicken's feet. This way, the bird seems to be running around the field.
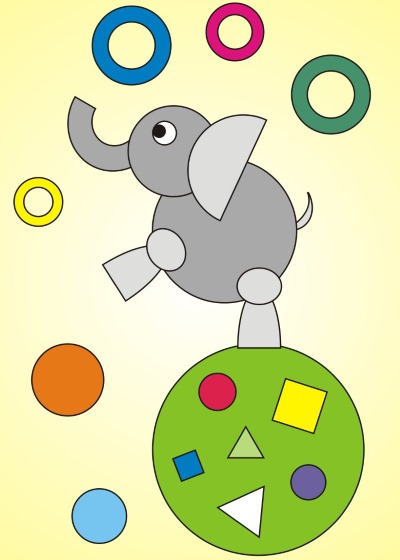
The elephant applique consists of the following parts:
- Circle is a body.
- Rectangles are the legs.
- Semicircles are feet.
- The thin triangle is the tail.
- The larger semicircle is the ear.
- A small circle is the head.
- Rectangle - trunk.
- White and black circles – eye.
It is recommended to let the child choose for himself which animal he wants to depict and how he wants to do it.
Drawings from geometric shapes: tasks for children
Having studied geometric shapes, the child needs to understand how to combine them into complex drawings.
Figures from geometric figures are the first stage of learning. The second stage is folding figures into drawings of surrounding objects.
Variants of exercises to test knowledge of geometric shapes:
- Print out a form with various objects on it. The child's task is to name the figures he sees in the objects presented.
- Divide the sheet into 2 parts. On the left side, draw pairs of two identical figures. The exercise consists of the child drawing on the right side figures that can be obtained from pairs of figures on the left (2 right triangles – a rectangle).
- Print out forms with various objects (train, ship, Christmas tree with balls). Task: count the number of each figure in the pictures.
- Print forms with pictures drawn on them and a certain amount of a certain figure specified. You need to find a picture that contains the specified amount of the specified figure.
The tasks listed above help the child remember figures and learn to count correctly. The child begins to get acquainted with geometric figures from birth, learning more and more information about the world around him. It is recommended to conduct training in the form of a game, making different combinations of figures with the child.
Author: mariamur1
Article formatting:Natalie Podolskaya
Video about geometric shapes
How to make figures from geometric shapes - crafts for children in this video: