Gnomes are heroes from fairy tales and legends. In English fantasy literature, they began to appear as secondary characters around the 18th century. Today, the word "gnome" is known throughout the world. These little people are loved by children and adults.
To teach a child to draw gnomes with a simple pencil, adults need to study the list of accessories needed for the lesson, as well as look at several step-by-step master classes.
What you need for drawing
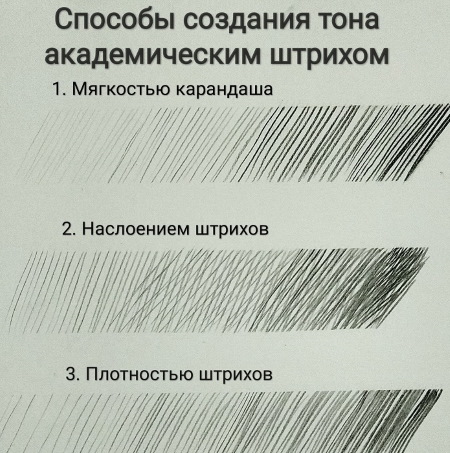
The table lists the main types of pencils that you will need for drawing, as well as letter designations of their degree of hardness.
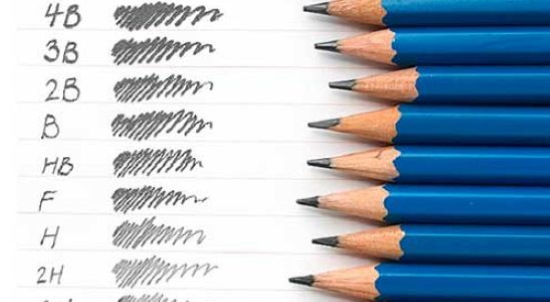
| Solid | T or H |
| Hard-soft | TM or HB |
| Soft | M or B |
| Very soft | 4M or 4B |
What else you will need for drawing:
- eraser with a sharp end;
- cotton pads;
- cotton swabs;
- sharpener.
The paper should be smooth and thick. Album sheets, drawing paper, or printer sheets with a density of at least 80 g/m² are suitable. You can use watercolor paper, but remember that pencil strokes are harder to shade on a rough surface. Therefore, watercolor sheets are more suitable for creating contour drawings, without applying shadows.
Further in the article you can consider several instructions on drawing images with gnomes, suitable for classes with children of different ages.
Contour drawing
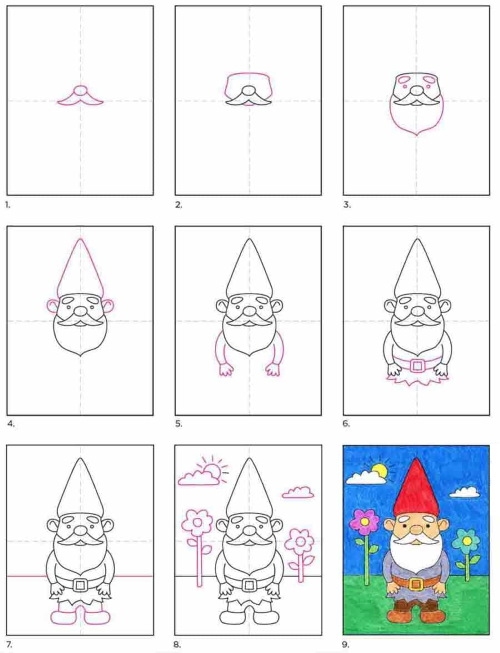
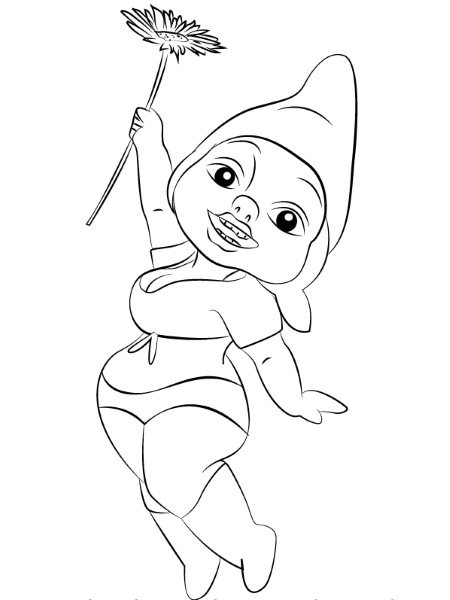
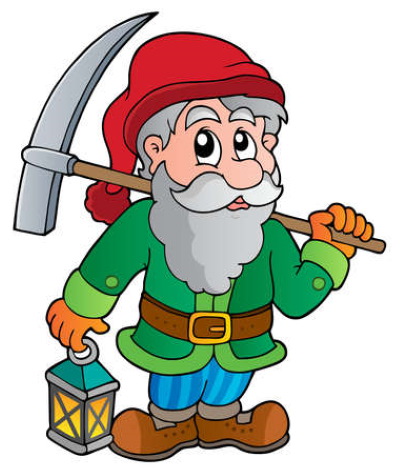
The gnome (a drawing for children aged 9 and over, without many small details) is a small creature. To demonstrate its size, you can draw a shorty against the background of an ordinary fly agaric. For work you will need only 2 pencils: hard and soft.
How to draw:
- Using a hard pencil, draw a small egg-shaped figure. This will be the gnome's head and body.
- Use thin lines to outline the position of the hands.
- Draw the gnome's legs and boots. Draw the folds on the pants and shoes.
- Draw a long cap.
- Add a pointed ear. Draw the auricle.
- Draw the gnome's eyes, big nose, mustache and foreskin.
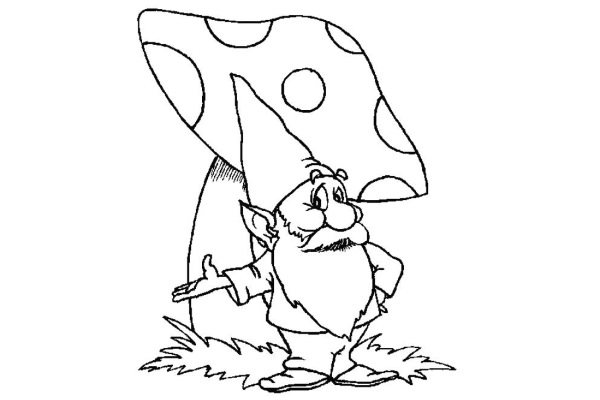
- Draw small, raised eyebrows.
- Finish drawing the sleeves and the bottom edge of the blouse. Mark the folds of the fabric on it.
- Use an eraser to erase extra lines.
- Draw hands.
- Draw a mushroom cap behind the gnome.
- Finish drawing the leg.
- Draw the grass using zigzag lines.
- Draw round spots on the mushroom cap.
- Use an eraser to remove excess lines.
- Use a soft pencil to outline the picture.
Use short strokes to indicate the shadow under the gnome's mustache, as well as under the fly agaric cap.
New Year's gnome
New Year's gnomes are Santa Claus's helpers. They make toys and help the wizard pack them. These gnomes wear Christmas clothes: a drooping cap with a tassel on the end, mittens and felt boots. They also adore striped pants.
This master class is suitable for children over 8 years old.
How to draw a Christmas gnome:
- Place a sheet of A4 paper vertically in front of you.
- Draw an egg-shaped figure in the center of the sheet.
- Find the center of the figure, go up a little higher, and make 2 marks parallel to each other. Connect them with an arched line. This is the bottom of the cap.
- Draw a fold on this part of the hat. Finish drawing a long cap. Its tip should hang down.
- On the top of the headdress, depict a tassel in the shape of an inverted drop.
- Draw a small line in the form of an inverted arc under the brim of the hat. This is the gnome's face.
- Draw small eyes with round highlights.
- Finish drawing the round nose.
- Add a beard.
- Draw a mustache.
- Use an eraser to remove excess lines.
- Draw the arms. On the sleeves, depict fur in the form of small ovals. Draw the mittens.
- Finish drawing long legs. Add felt boots.

- Draw a few buttons on the cap, as well as a square patch.
- Draw protruding bristles on the brush.
- Add short strokes to the beard. They will imitate individual strands of hair.
- Shade the face, mittens and buttons on the gnome's cap. Blend the strokes with a cotton swab.
- Using a hard-soft pencil, densely shade the cap, clothes and shoes. Blend the lines with a cotton pad.
- Use short strokes to indicate the shadow on the outline of the mustache.
- Darken the lines on the beard and shade it along the contour.
- Using a soft pencil, draw stripes on the gnome's pants and color them in every other stripe.
- Shade the patch on the cap.
- Paint over the eyes without touching the highlights.
Use a very soft pencil to outline the drawing. Draw the seams on the patch. Clean the background with an eraser.
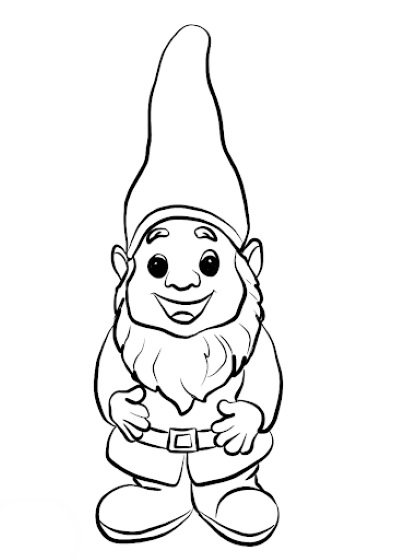
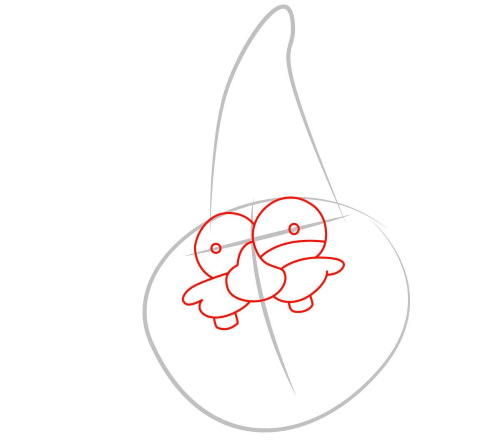
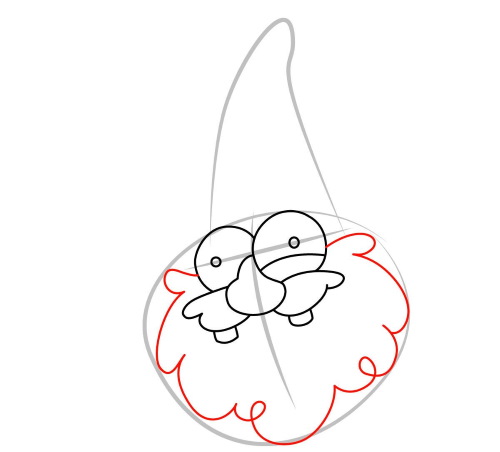
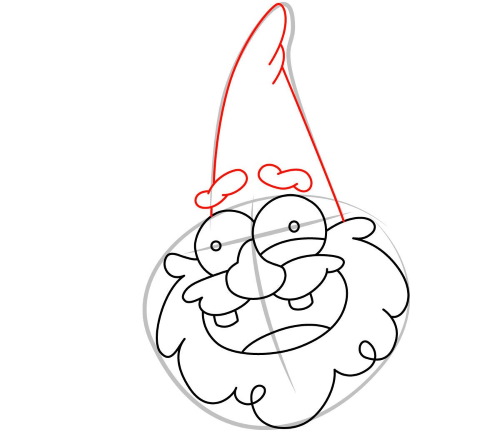
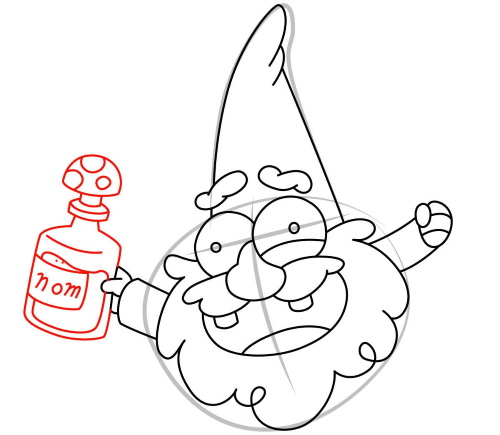
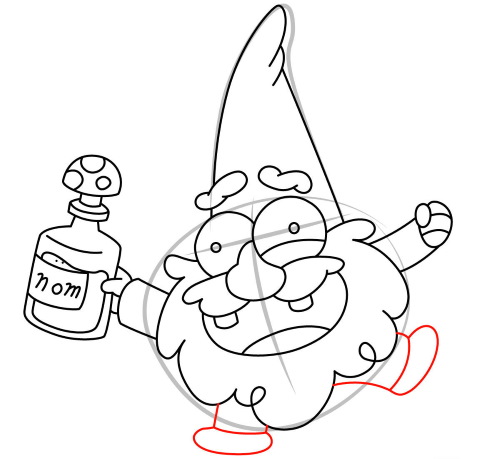
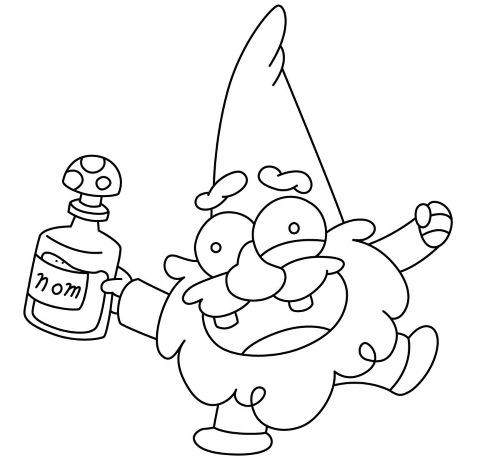
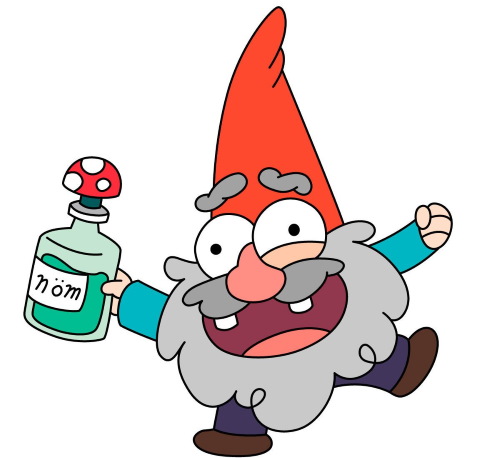
Gnome from Gravity Falls
Gnome (drawing for children from 5 years old, easy to do, because you do not need to apply shadows, and draw complex shapes) named Shmabulock, from the animated series "Gravity Falls", is a cheerful, but very strange character. He can not pronounce anything except his own name.
How to draw such a gnome:
- Draw an egg-shaped figure at a slight angle.
- Finish drawing a tall cap with a rounded end for the gnome.
- Draw a lush beard.
- Draw 2 large eyes.
- Use an eraser to erase the lines that go through them. Draw small pupils.
- Add a big nose.
- Draw on the mustache.
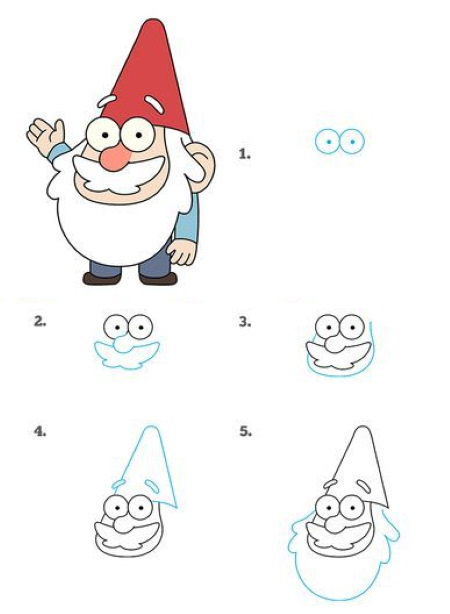
- Draw the eyebrows much higher than the eyes. They should be positioned like a "house".
- Draw an ear on the gnome.
- Use the eraser to remove any extra lines within the beard outline.
- Draw the hands and fingers.
- Add short legs and draw the shape of the shoes.
- Using a hard pencil, without pressing down, shade Shmabulock's face and hands.
- Color the nose, pressing a little harder on the pencil.
- Blend the strokes with a cotton swab.
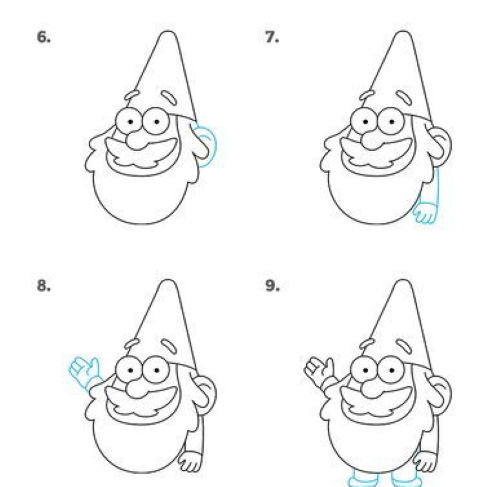
- Using a hard-soft pencil, without pressing, densely shade the gnome's cap and sleeves. Blend the lines with a cotton pad.
- Pressing the pencil a little harder, paint over the trousers. Blend the lines.
- Use a soft pencil to color the boots.
Trace the outline of the drawing and highlight the pupils.
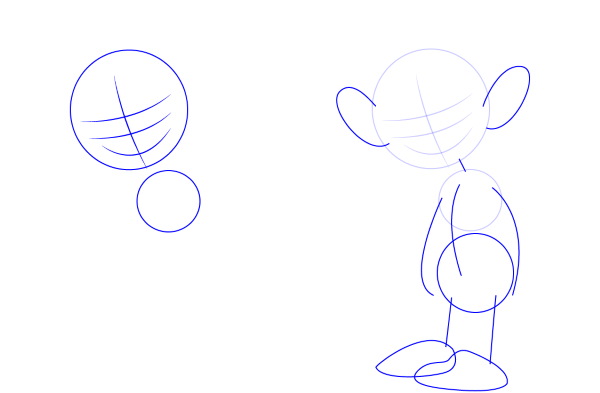
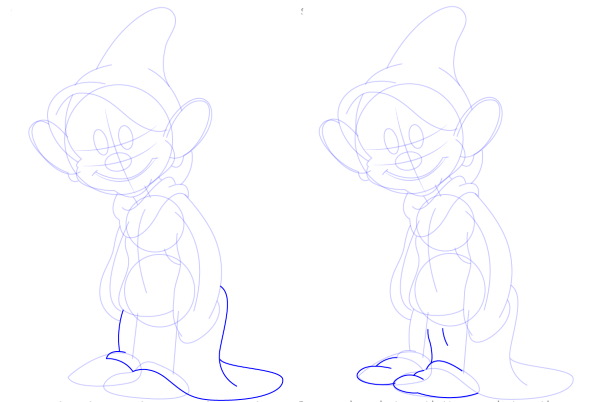
Dwarf from the cartoon about Snow White
This gnome is from the cartoon about Snow White. His name is Dopey. He loves to have fun and be naughty. It is not difficult to draw such a gnome. This master class is suitable for children aged 10 years and older.
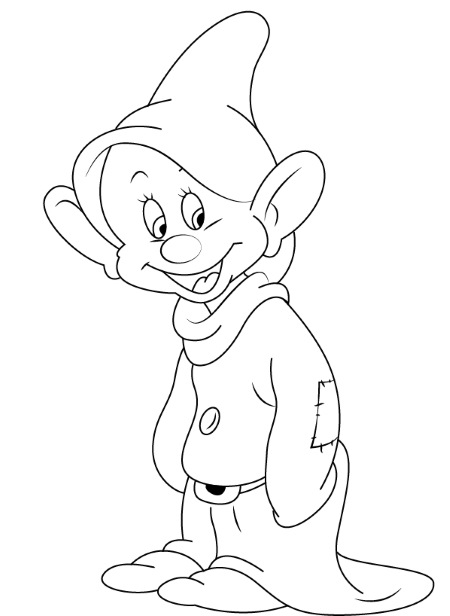
How to draw Simpleton:
- Using a hard pencil, draw a round head.
- Draw the neck at a slight angle.
- Draw the body in the form of an oval.
- Use a hard-soft pencil to draw the cap. Mark the folds of the fabric on it.
- Draw Simpleton's cheeks and chin.
- Erase extra lines.
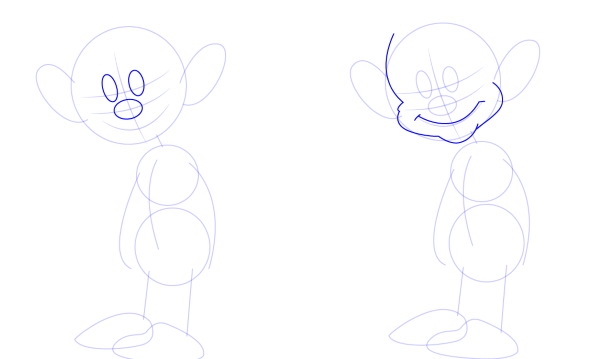
- Finish drawing the big ears.
- Add small oval eyes, close together.
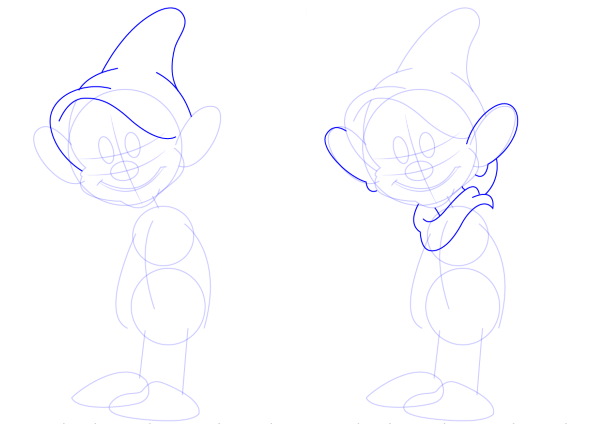
- Draw a baggy coat. Add a scarf.
- Draw on the boots.
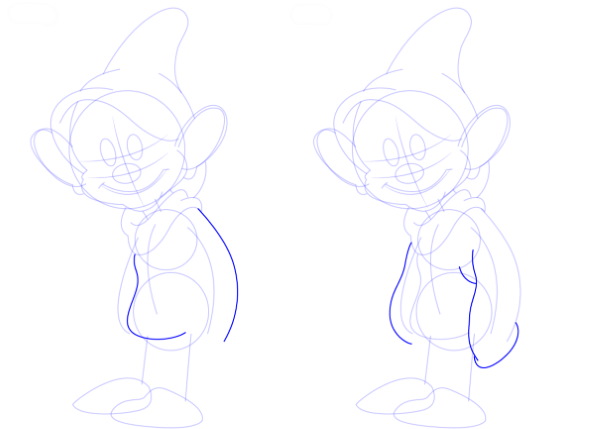
- Shade Simpleton's face, neck and ears with a hard pencil. Use a cotton swab to blend the strokes.
- Using a hard-soft pencil, without pressing, color the clothes and cap. Blend the strokes with a cotton pad.
- Color the boots, pressing a little harder on the pencil.
- Draw pupils and irises in the eyes. Color the irises.
- Using a soft pencil, without pressing, show the shadows under the folds of the fabric on the cap.
- Draw eyebrows on a simpleton.
- Outline the eyes. Color the pupils.
- Finish drawing a large nose.
- Draw wrinkles under the eyes.
- Finish drawing the smiling mouth. Color the tongue without pressing on the pencil, and shade the empty space with pressure.
- Without pressing on the pencil, shade the scarf. Blend the lines. Highlight the folds of the fabric.
- Draw a button on the raincoat. Lighten it with an eraser.
- Draw the belt. Color it.
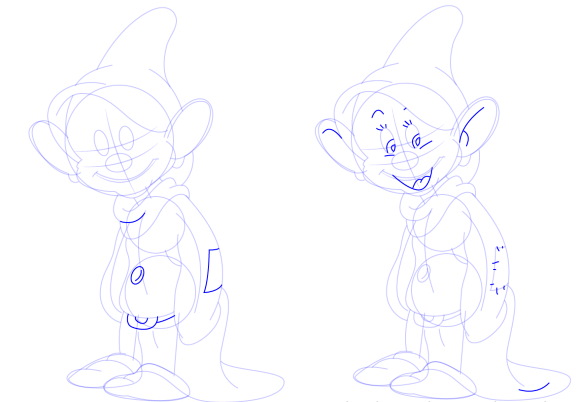
- Draw a patch on the sleeve. Paint it without pressing.
- Draw the folds of fabric on the cloak.
Trace the outline of the drawing.
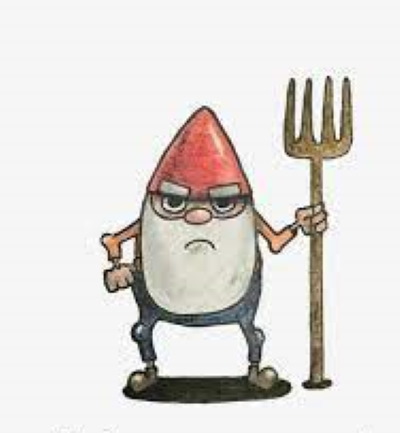
Evil gnome
A gnome (a drawing for children aged 7 and up, does not contain fine detailing, but is done with shadows) can be not only cheerful, but also evil. To turn an ordinary character into a negative one, you need to draw him frowning eyebrows and depict a menacing look.
How to draw:
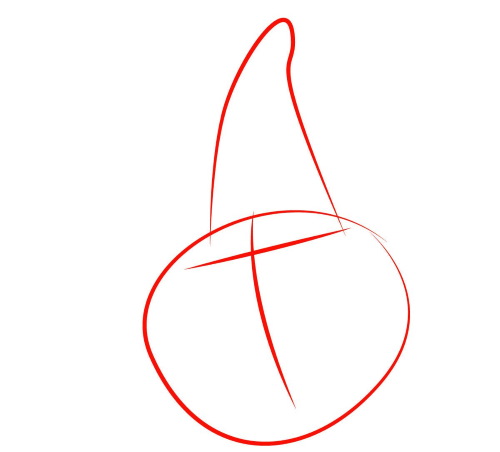
- Place a sheet of A4 paper vertically in front of you.
- Draw a large egg-shaped figure in the center of the sheet.
- Draw a small, triangular cap with a rounded top on top. The lower part of the cap should be straight. This line will help draw a menacing look on the gnome.
- Draw a line in the form of an inverted arc under the cap.
- Draw the gnome's eyes. They should not be round. They should be depicted so that the edge of the cap would cover the eyes by ¼.
- Draw the pupils.
- Draw eyebrows over the cap. They should be large and frowning.
- Draw an oval nose.
- Finish drawing the shape of the beard.
- Draw the mouth with an arched line.
- Finish drawing thin arms. Elbow joints should be rounded, as shown in the picture.
- Draw thin legs. The knees should also be convex.

- Draw the fingers on the hands and the shoes on the feet.
- Draw a pitchfork in the gnome's hand.
- Use a hard pencil to shade the beard, eyebrows and hands. Blend the strokes.
- Use a hard-soft pencil to color the cap. Blend all the lines.
- Draw a shadow on the face, under the cap.
- Shade the pitchfork and boots.
- Use a soft pencil to darken the left side of the cap.
- Color the gnome's pupils.
- Darken the left side of the pitchfork.
- Show shadow on boots.
- Without pressing on the pencil, shade the gnome's pants. Blend the strokes.
- Use a very soft pencil to outline the drawing.
- Draw an oval shadow under the gnome. Shade it densely.
- Darken the left side of the pants.
Use a sharp-edged eraser to lighten the highlights on the knees, elbows, right side of the cap, and also on the toes of the boots.
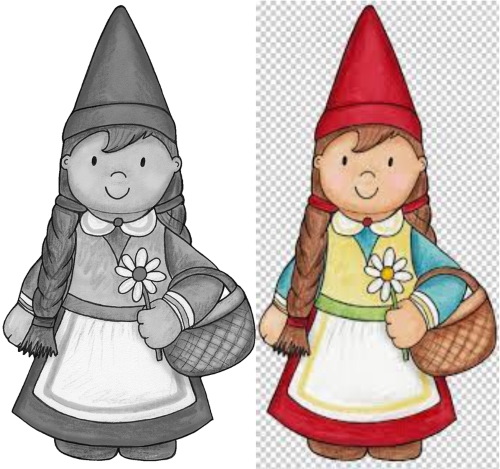
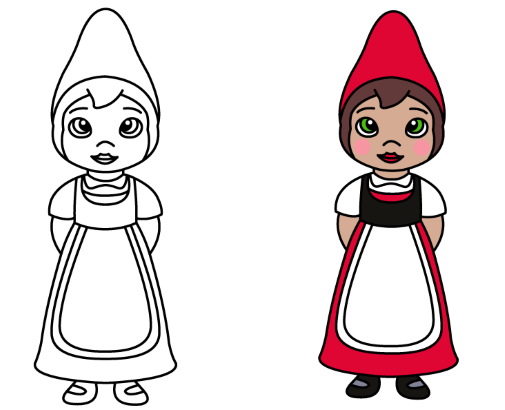
Gnome girl
A gnome is not always a little old man with a fluffy beard. Gnomes can be young and even small. There are boys and girls among them. This master class on drawing a girl gnome is suitable for children over 7 years old.
Procedure:
- Using a hard pencil, draw a round head.
- Finish drawing a small neck. Add a collar to the dress.
- Draw the shape of the dress.
- Draw hands.
- Draw 2 small legs under the hem.
- Draw the shape of the hairstyle. Add bangs, depict 2 thick braids.
- Draw a cap on the head.
- Draw a neckline and a button on the dress.
- Draw on the belt and apron.
- Draw a basket.
- Draw a chamomile in the girl's hand.
- Draw stripes on the sleeves.
- Using a hard-soft pencil, without pressing, shade the face, hands and the upper part of the dress.
- Shade the basket.
- Blend all lines.
- Draw stripes on the collar, apron and sleeves.

- Pressing a little harder on the pencil, paint over the sleeves of the dress.
- Shade the hair.
- Color the legs.
- Draw a shadow on the chin and also on the top of the dress.
- Use a soft pencil to shade the hem and cap.
- Mark the shadows on the cap by pressing lightly with the pencil.
- Draw folds of fabric on the apron.
- Select individual strands of hair and outline the shape of the braids more clearly.
- Mark the shadow on the basket. Draw a grid that will imitate weaving.
- Highlight the shadows on the sleeves.
- Draw a girl's face.
Trace the outline of the picture. Clean the background with an eraser.
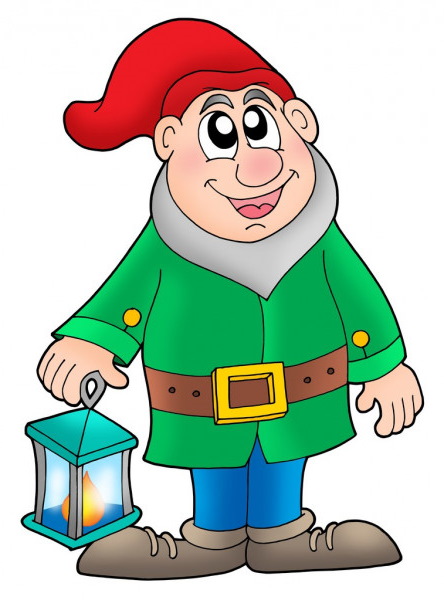
Gnome with a flashlight
The gnome (a drawing for children over 10 years old) with a lantern is the guardian of dreams. He wears a cap and mittens embroidered with a star pattern.
How to draw such a gnome:
- Using a hard pencil, draw an egg-shaped figure.
- Draw the shape of the cap on top.
- Outline the shape of the face. Draw a large nose.
- Draw mittens.
- Finish drawing the shape of the legs at the bottom.
- Draw the handle of the flashlight under one of the mittens. Then finish drawing the lid and the flashlight itself.
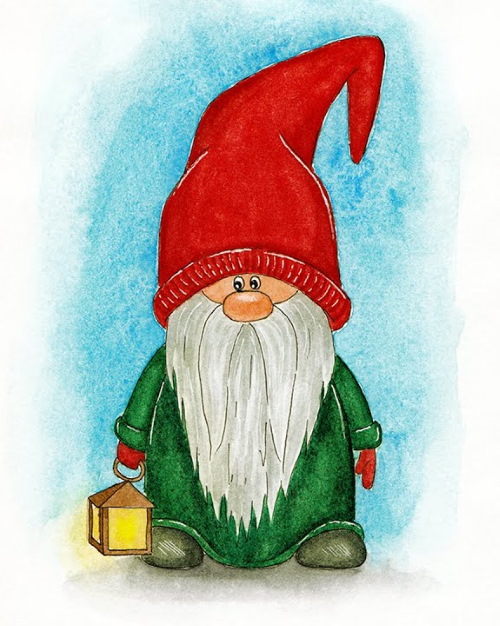
- Select the frame of the lantern, draw crossed slats.
- Use an eraser to erase the edges of the egg shape.
- Schematically depict the shape of a fluffy beard that will completely cover the gnome's body.
- Draw individual groups of strands.
- On the cap depict sweet fabrics.
- Shade the cap and the lower parts of the mittens. Blend the strokes.
- Mark the shadow under the mittens and around the lantern. Blend the strokes.
- Paint the walls of the lantern.
- Finish drawing strands of hair in the form of wavy lines.
- Use a hard-soft pencil to outline the shadows on the cheeks and nose. Blend the lines.
- Draw a mouth for the gnome.
- Select several large strands of hair on the beard.
- Shade the lid and frame of the lantern.
- Use a soft pencil to mark the shadow on the left side of the cap. Blend the strokes.
- Darken the upper parts of the mittens. Carefully shade the lines.
- Paint the edges of the shoes. Blend the strokes.
- Darken the inside of the lantern ring.
- Draw small eyes with highlights for the gnome. Color them in.
- Draw fine wrinkles in the corners of the eyes.
- Add small, slightly raised eyebrows.
- Trace the outline of the drawing. Highlight large strands of hair on the beard.
- Use a sharp-edged eraser to highlight the highlights on the gnome's nose and on the lantern cover.
On the cap and mittens, you need to highlight the stars. They can be lightened with an eraser with an abrasive tip, or drawn with a very soft pencil. In the 2nd version, the stars will be clear and dark.
Tips for young artists
A budding artist should know a few secrets:
- When shading large parts of a drawing, the lines should be drawn in one direction.
- The strokes should be shaded lengthwise, not across.
- It is not recommended to shade the graphite with your fingers. The drawing will be dirty. It is better to use cotton swabs or disks.
- If the eraser does not have sharp ends, you can cut them out with a stationery knife.
- To avoid rubbing the graphite with your hand, you need to cover the drawing with a clean sheet of paper.
- Drawings made with pencil should be stored in separate files. You can use folders for storage, but before putting the drawings in them, each picture should be sprayed with a special spray that will fix the graphite and prevent it from crumbling and staining other sheets.
During the drawing process, younger children can be told a fairy tale in which gnomes will be among the characters.
A child over 7 years old can be asked questions about who gnomes are, whether they are good or bad, and also asked to list the names of fairy tales or cartoons where these creatures are found. A lesson conducted in this way will help in developing the child's artistic skills, and will also be useful for expanding his horizons.
Author: Frolova Ekaterina
Video about drawing
Gnome drawing for kids: