Beaded products are a wonderful gift for any occasion and at the same time will elegantly complement the interior of any room. Even a novice needlewoman can master bead embroidery. To do this, you just need to familiarize yourself with the step-by-step lessons.
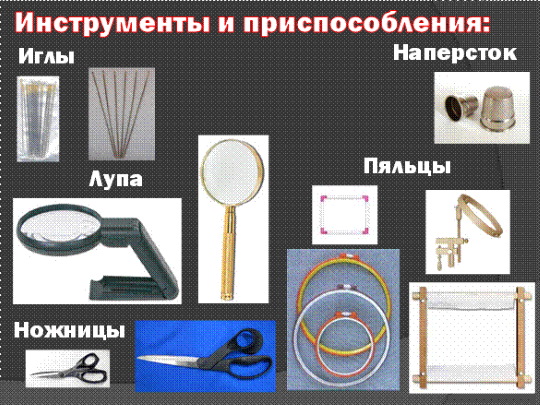
Materials, tools for embroidery
Bead embroidery for beginners (step-by-step stitches can be done without much difficulty) always includes studying the pattern and purchasing the basic materials. Shops for creative people sell the necessary embroidery tools.
Manufacturers offer complete sets with the necessary attributes. But you can buy everything yourself. It is better to buy good quality goods, since the final result depends on them.
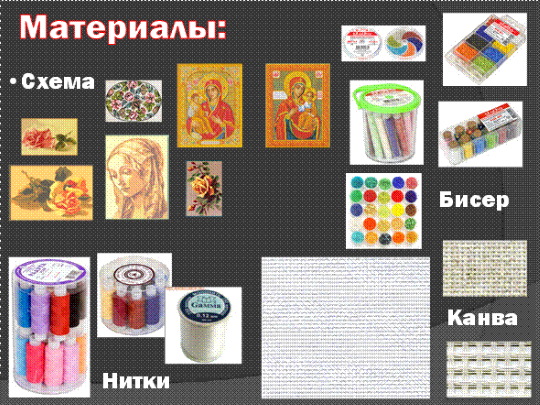
To work you will need the following:
| Name of materials at hand | Brief description |
| Canvas | It is recommended to purchase fabric that is virtually wrinkle-free and stain-resistant, so that the finished painting does not have to be ironed or washed frequently. |
| Special beading needles | They are produced under numbers 15, 13, 12, 10. Usually needlewomen use needle No. 12. |
| Embroidery frame or hoop | The fabric should not sag during work. It is better to stretch it on a special device. For such purposes, use a hoop attached to the table or a hoop on a leg. For large items, rectangular-shaped fixtures are suitable, where the entire image fits. |
| Mouline thread or other strong threads (for example, silk or nylon) | When choosing threads by size and color, you should focus on the size of the hole in the bead and the eye of the needle, the embroidery method, the fabric and the embroidery pattern. The thread will become stronger if it is treated with wax. For working with beads, it is best to take thin threads made of synthetic materials. |
| Rhinestones, sequins, glitter, stones, glass beads, beads | When starting the sewing process, it is recommended to check the quality of the beads: will the paint and mother-of-pearl on the beads remain in their original form when washing or steaming the finished product. |
| Graph paper | Necessary for the purpose of applying complex designs. |
| Pliers | To remove an unnecessary bead in a row of an embroidered image. |
Bead embroidery techniques
There are several methods of embroidering icons and paintings with beads. But most often in practice, counted and artistic embroidery are used. In the first case, the product is embroidered according to the proposed patterns; in the second method, free technique is used.
To embroider a product in an artistic way, it is necessary to transfer the image to the canvas. In this matter, ordinary carbon paper will help. Pictures are embroidered using vertical and horizontal techniques. Beads are sewn to a certain cell of the material.
In horizontal rows
Most often, church or monastery stitch is used in bead embroidery. These methods do not require specific skills, which is good for beginners.
First, insert the needle into the lower left corner of the fabric, securing the thread on the reverse side. After that, pull it to the upper right corner of the outer part of the product. Leave a small end of the thread (up to 5 mm) on the back of the fabric.
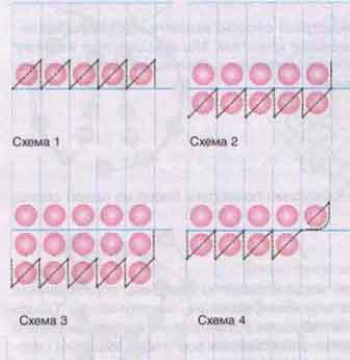
After this, the needle is threaded through the upper right corner and pulled out to the outside through the lower left. This action is repeated several times in a row.
Once these steps are completed, the beading stage begins. The needle with the bead of the desired color strung on it is threaded through the bottom left side of the fabric. Then it is pulled through the top right and threaded through the bottom of the next square of fabric.
After this, another bead is strung on the needle, which must be brought out in the upper right corner. In this way, a full row is stitched, firmly attaching the beads to the corresponding cells. It is necessary to carefully monitor the color of the beads so as not to stray from the pattern.
Having finished the 1st row, the needle is brought out to the face of the fabric through the upper right corner. The beads should be sewn at one angle. In this case, the finished product will look neat and professional even for beginner embroiderers.
In vertical rows
The vertical seam is similar to the horizontal one, but the process starts from the top left corner of the garment. The thread is brought out to the working part of the canvas at the bottom of the desired cell. Then a bead is strung on, and the needle is threaded through the upper part of the same square on the right side.
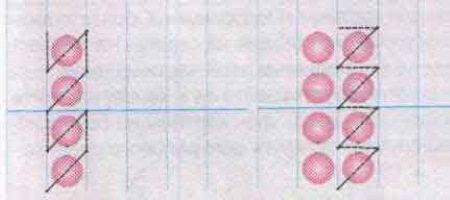
From the inside of the fabric, a seam is made on the right bottom of the same cell. After that, a needle is inserted from the inside into the right bottom corner of the same square. Then beads are put on, bringing the thread out from the bottom left side of the new cell.
To fix the 2nd vertical row, make a seam from the bottom up. After that, the needle should come out on the outer part of the material. Next, put a bead on the needle, which comes out on the upper right side of the same cell. On the inner part of the work, make a stitch that comes out on the upper left side of the square.
At the end of the row, you need to firmly fix the end of the thread, for which it is passed through the fabric several times. The remainder of the thread should be about 1-2 cm. After mastering the technique of embroidery in vertical and horizontal rows, you can learn to perform other embroidery methods that will emphasize the small details of the finished picture.
Beading sewing techniques. Step-by-step instructions
Bead embroidery for beginners, done step by step with the help of visual instructions, will be a good creative start.
Various stitches are used in the work. Some embroidery techniques are used more often than others. The stitches can be one-sided or two-sided.
Securing a single bead
Single beads are fixed like buttons or with smaller beads. The bead is attached to the canvas with a simple stitch. Sometimes a column is stitched using a small bead.

The bottom bead can be replaced with a sequin. And in the volumetric technique of bead embroidery, a column of several beads is made.
Stitch forward with the needle
First, you should secure the thread on the inside of the fabric, then bring it to the front side, string the bead and thread the needle back into the material. The needle should be as close to the bead as possible.
Then a small seam is made on the inside of the fabric. Returning to the outside of the canvas, the bead is put on again. Then the procedure is repeated. To ensure that the stitches are even and do not sag, you should follow the rule: 1 seam = 1 bead.
Forward stitch double-sided
The procedure for making this stitch is almost the same as for a one-sided seam.
However, a bead is also threaded onto the needle from the reverse side of the fabric, which makes the seam longer.
Line stitch
Line stitch (or curved embroidery) is used when working on paintings or icons with incomplete stitching. Each stitch corresponds to 1 bead. To get a continuous line, you should fix the beads as tightly as possible to each other, but not too tightly.
By sewing beads at a small distance, you get a dotted line. To get a strong and even line, you need to bring the thread through the stitched line stitch at the end of each row (additionally fixing the seam). The work will look more rigid than when using other embroidery techniques.
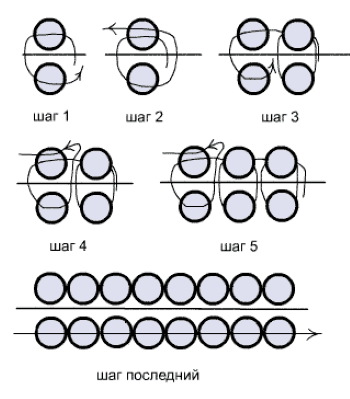
Stem suture
After fixing the thread on the back side of the product, the bead is put on the needle. After that, it is inserted into the embroidery base and pulled out from the back side of the bead. Then the next bead is strung. The needle must be pierced through the fabric behind the new bead.
After that, it is pulled between the penultimate and last beads. The needle is threaded through the last bead and another bead is strung. The beads are sewn quite close to each other.
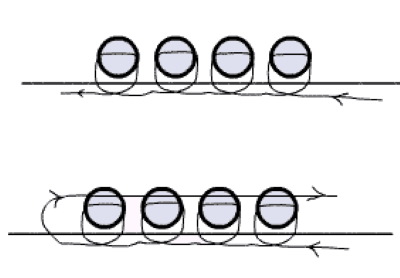
Seam in attachment
Bead embroidery for beginners (you can reproduce the stitch step by step using the advice in this section) is performed according to the algorithm:
- Fix the thread on the back of the canvas, pull it out to the outside. String on it the number of beads that will correspond to the size of the intended stitch.
- Place the resulting chain of beads on the desired line and sew it to the fabric.
- To secure it correctly, pull the needle out from the inside behind the bead, grab the thread with this bead. After that, return to the back side of the material.
- Repeat the procedure several times until each of the beads is secured on both sides with longitudinal seams.
These stitches are suitable for embroidery in rows, along the outline of a design or along a specific dotted line.
Double-sided seam fastening
The bead chain should be carefully placed along the outline of the image on one side of the product.
During the process of fixing the beads, they are also strung on the stitches on the back side of the embroidery. This stitch is perfect for decorating clothing items.
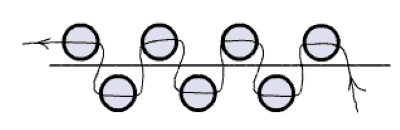
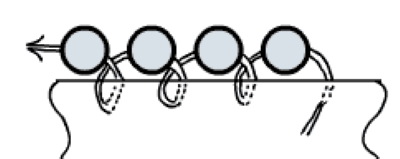
Monastery seam
These stitches resemble the beginning of a cross stitch. On the outside of the work, diagonal stitches are made with beads strung on them, and on the inside, the stitches are vertical. Each stitch on the working side corresponds to one bead.
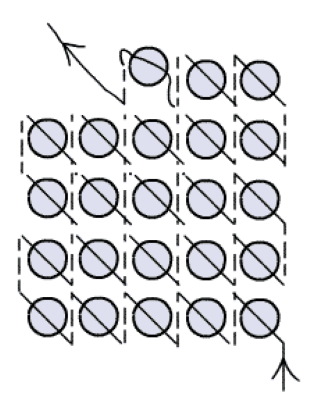
Then a diagonal stitch is made, after which the thread is brought out to the back side as close as possible to the beads. A vertical stitch is made on the inside, the thread is pulled to the face of the product again and a stitch with a bead is sewn diagonally. On the working part of the embroidery, diagonal stitches with beads come out, and on the back side - vertical stitches.
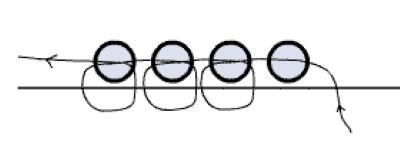
Backstitch
The back stitch (or arched stitch) is used if there is no need for close adhesion of beads to the canvas. From 2 to 4 beads are put on each stitch from the face of the product.
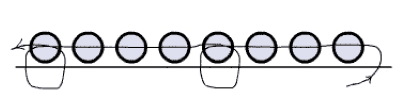
However, only the one that is at the intersection of the seams is attached to the canvas. With this sewing technique, the beads are not so close to each other.
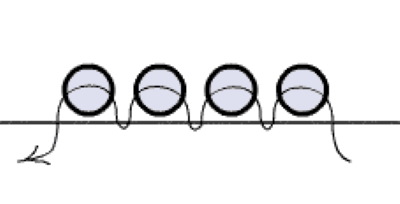
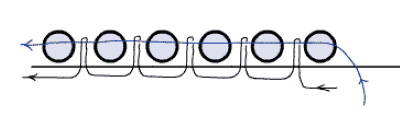
Overlock stitch
Sewn in the same way as traditional overlock stitches.
However, in the process of bringing the needle to the working side, a bead is threaded through the resulting upper loop each time.
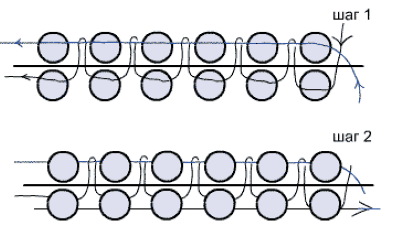
Double-sided combined seam
To recreate this type of seam, a running stitch and a stem stitch are made one after the other.
In this case, the work becomes more difficult.
Volumetric embroidery
In volumetric embroidery, a certain pattern is used. Mixed volumetric techniques are often used to create paintings, alternating stitches with beads and cross stitch.
When embroidering details with a cross, 2 cross stitches should be sewn. In the beading technique, only 1 stitch is made. The main thing is to choose the right needle for the job.
Completion and registration of work
Bead embroidery for beginners (even people without creative inclinations can do it step by step) is not limited to the embroidered image.
The finished work should be washed in warm water (no higher than 40°) and ironed if necessary.
It is better not to use washing powder so that undissolved crystals do not scratch the surface of the beads. A liquid product is suitable for such purposes. You need to dry the embroidery in a room away from sunlight, laying it out on a soft towel.
Correctly executed embroidery includes not only a beautiful image, but also its competent placement in a frame. Recently it has become fashionable to frame paintings using the “passe-partout” method. But with this method, embroidery defects are clearly visible.
The passe-partout should focus the view on the advantageous sides of the work. When choosing colors, it is recommended not to use close shades. Often they merge with each other. It is recommended to take opposite tones.It is better to give the work of tensioning to a specialist in a framing workshop. This will make it look neater and more attractive.
How to use embroidery patterns
The pattern is transferred to the canvas. For convenience, it is recommended to purchase a marker that disappears from the canvas on its own after a certain period of time. You should not draw the entire sketch on the fabric at once, since it will evaporate quite quickly. It is better to paint a small part of the canvas and work with it.
To transfer the pattern proportionally onto the canvas, you need to find the center of the fabric. To do this, you just need to fold it in four. The inner fold is the central point of the diagram.
You don't have to transfer the drawing to the canvas, but use only visual associations. But in this case, the chance of losing count and embroidering the picture incorrectly increases, which will be conspicuous.
Step-by-step lessons of bead embroidery for beginners. Patterns, secrets
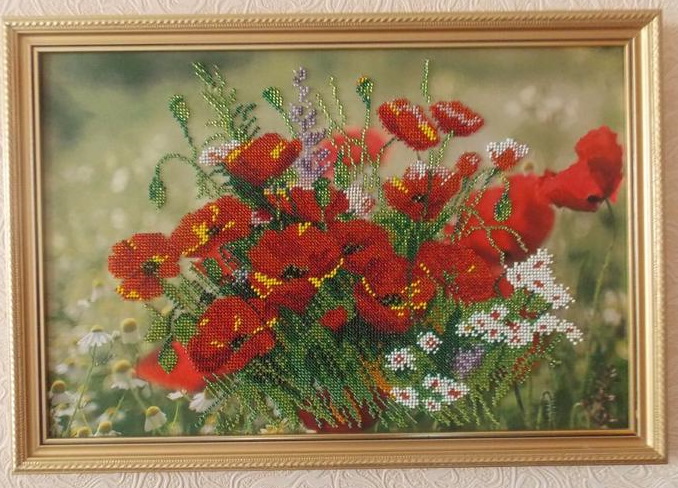
Pictures embroidered with beads are distinguished by bright shades and shimmer in the light. Engaged in this type of creativity, needlewomen create not only icons and accessories, but also decorate dresses, blouses and other interior items with beads. Before starting work, you should carefully study the main secrets of embroidery.
Paintings
When embroidering pictures you will need the following materials:
- thin beading needle;
- canvas;
- frame;
- threads;
- beads;
- scissors.
Step-by-step instructions for creating paintings:
- Stretch the fabric tightly over the frame and transfer the image onto it (either with a washable marker or with carbon paper).
- Thread the thread through the eye of the needle, tying a small knot at the end.
- Insert the needle into the beginning of the embroidery on the back side of the product. This way the knot will not be visible on the front side of the picture.
- The bead is strung onto a thread, after which the needle is inserted into the fabric as close to the bead as possible.
- Make a small stitch and bring the needle out to the outside of the picture.
- Fix the next bead on the canvas in the same way.
- This method stitches the entire image.
- Secure the last stitch on the back of the canvas by making a small knot.
The beads are laid out as close to each other as possible. However, care must be taken to ensure that no folds form on the canvas due to excessive tension of the thread.
Icons
For embroidery, in most cases, kits already include fabric with an image that requires partial beading. These kits are widely popular among beginner needlewomen.
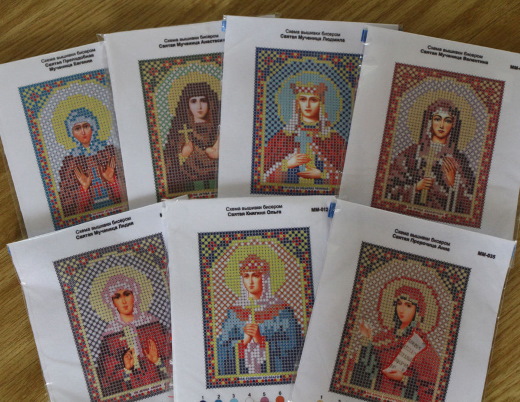
They include the necessary materials for work (canvas with a pattern, beads, needle, thread, decoding of the scheme) and provide easy mastery of the technique of creating different stitches. All that remains is to follow the step-by-step instructions in the process of work.
But if you want to embroider a specific icon that is not available for sale, you can use special-purpose programs to convert the image into a pattern.
It is believed that before starting embroidery, one should definitely ask for a blessing from a priest. And one more rule: every time you start working, you should read a special prayer, the text of which is included in some sets.
Cloth
Bead embroidery is an original addition to wardrobe items. This technique is often used by famous designers, and it never goes out of fashion.
During work you will need:
- beads or beads;
- monofilament;
- needle;
- dress, T-shirt or blouse;
- iron;
- adhesive interlining;
- chalk.
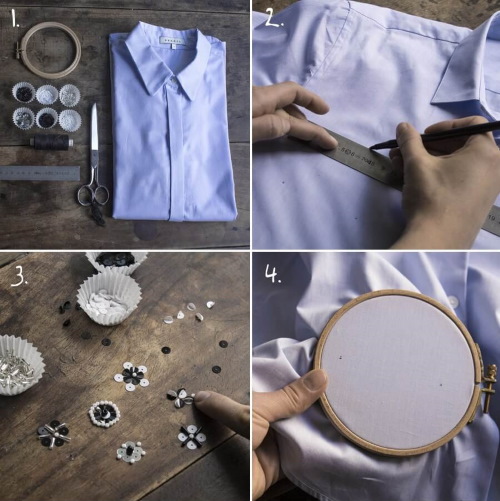
To decorate clothes with beads, you need to follow these steps:
- Using chalk, draw a straight line on the shoulder in a vertical direction, which must necessarily continue the shoulder seam.
- The inside of the garment needs to be glued with interlining to ensure that the embroidery is secure.
- You need to take several pieces of interlining, each of which is attached to the back of the garment with the adhesive side down. The interlining is fixed to the fabric using a heated iron.
- The position of the squares should be marked on the sleeves of the product.
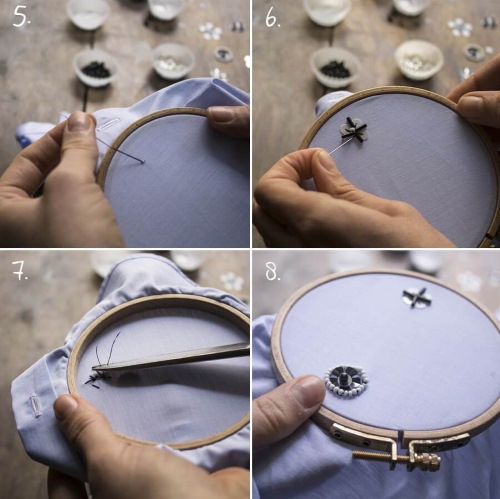
- Prepare 0.5 m of thread, at the end of which a small knot is made. From the wrong side of the upper part of the sleeve, make a stitch, bringing the needle to the outer part of the garment.
- Next, you need to sew on the first bead. After that, sew on other beads according to the existing image. Each of them is secured on the back side of the fabric.
- It is recommended to embroider the second drawing below the first one to give the embroidery a finished look.
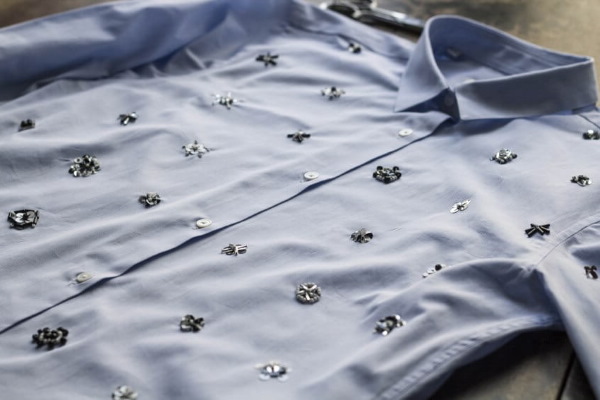
If the beads are sewn onto a long-sleeved dress, you can fill all the free space with designs. Before washing, the garment should be turned inside out and rinsed by hand or in a special bag on a gentle cycle.
Decorations
You can decorate the products with any elements that match the main composition.
Pendant
A cabochon is attached to the center of the felt. After that, it is stitched in a circle using the mosaic technique. Each row should have a specific number of beads. Then, using a simple pencil, a mark is made on the place where the remaining stones will be sewn. They are decorated in a similar way.
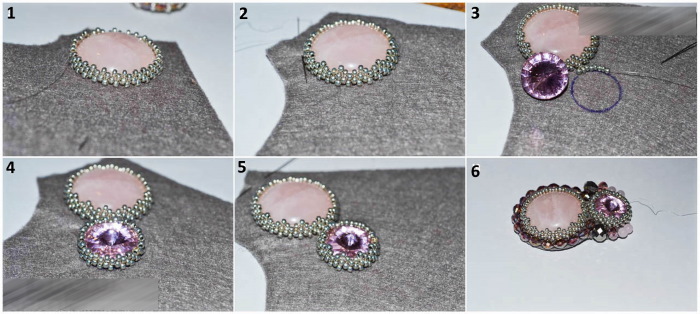
After this, each of the elements is sewn together (say, one bead and a large cabochon). When the work is finished, the pendant is cut out along the outline, placed against the paper and traced. This element is cut out, treated with glue and applied to the inside of the pendant. The paper is again greased with glue, pressed tightly against the piece of leather and cut out.
To make the seam almost invisible, it can be trimmed with large beads of light colors. The finished work will look good with fringe.
The last step is to secure the loop. You can buy a metal one or make one yourself using a thin ribbon. A piece of leather or a regular lace will also work for these purposes.
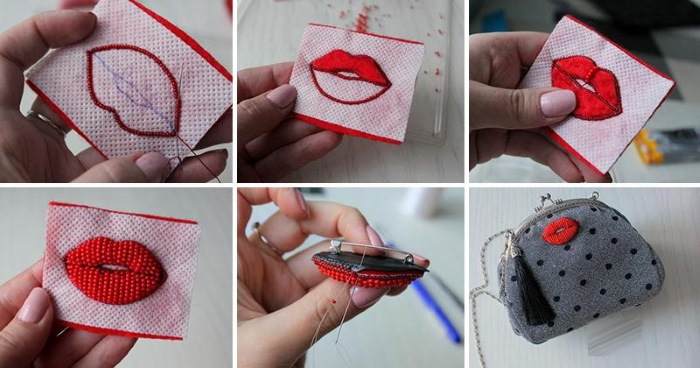
Lips Brooch
To make a brooch you will need:
- red felt;
- a piece of cardboard and leather;
- bead thread;
- red and white threads;
- beads of white and red shades;
- glue;
- scissors;
- interlining.
Step-by-step process of embroidering a brooch:
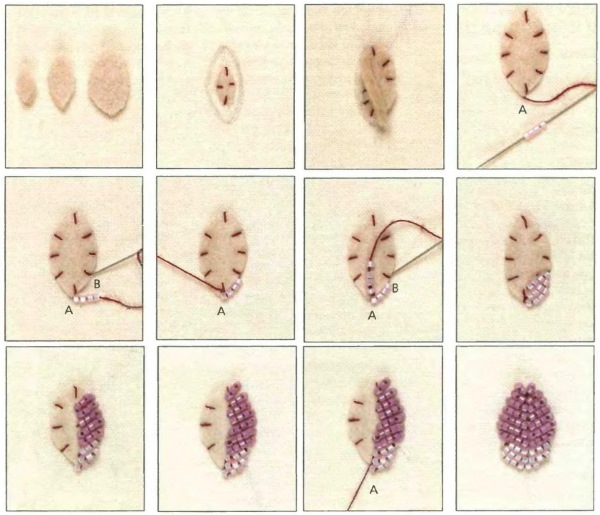
- Draw the outline of the lips on a piece of interlining. You need to try to apply the drawing evenly and clearly.
- Cut out the lips along the edge and glue them to a piece of felt.
- Transfer the lips to the cardboard. Draw their inner lines, stepping back from the edge about 4 mm.
- Use scissors to cut out lips from the cardboard base and attach them to the future decoration.
- The base needs to be stitched through with a bead thread. Each of the knots should be hidden in the hole of the bead.
- The outline of the design is embroidered with red threads and beads, following the 3x2 principle. This means that 3 beads are stitched first. After that, you need to go back 2 beads to go through them again. To avoid gaps in the seam, you need to lay the beads tightly.
- For a quality result, you should stitch the beads with thread a second time after completing the work.
- To achieve the effect of a three-dimensional brooch, cut out the details from red felt. These elements need to be glued to the base.
- Then the lip elements are embroidered with red beads, starting from the center.
- White beads are used when embroidering the teeth area.
When finished, the edges should be carefully trimmed.
Beginners' mistakes
The most common mistakes needlewomen make when they are learning to embroider are:
- purchase of low-quality materials;
- deviation from the proposed scheme;
- beads sewn on at different angles;
- beads that are too tight or too loose;
- using threads that are not intended for bead embroidery, as a result of which it may break;
- beads of different sizes, which spoil the appearance of the painting;
- incorrectly selected needle (very thick or low quality);
- replacing the color scheme of beads with other shades (sometimes this is allowed, but in most cases it negatively affects the final result).
Beginner needlewomen have the opportunity to quickly learn how to work with beads. The step-by-step guide described in this article will help you select materials for creativity and correctly embroider pictures, icons, and even create jewelry without outside help.
Author: Ekaterina Pisarenko
Video about bead embroidery
Bead embroidery for beginners: