Crocheting a tourniquet is a fascinating activity, starting from the moment of choosing beads from a mass of existing offers, and directly working on the decoration pattern.
What you need to knit a rope of beads
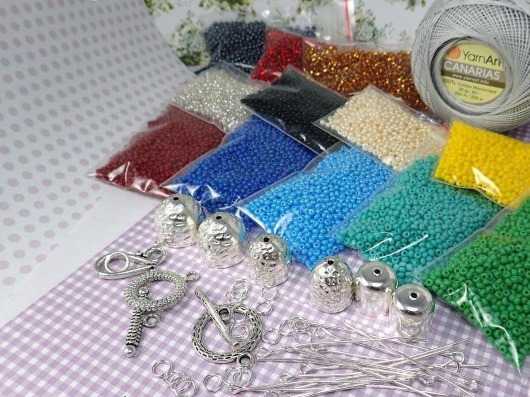
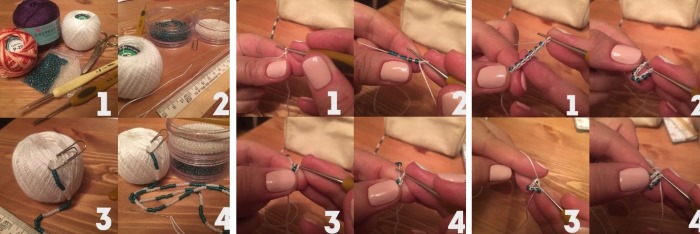
To work you need to prepare:
- beads,
- threads,
- needle,
- hook,
- 1 paper clip,
- fittings and devices for their installation (nippers, round-nose pliers).
Selection of materials and hook
Beads vary by manufacturer, size, shape and color. The best cords look best when made from round beads. In addition, this form is ideal for beginner craftswomen. The beads lie flat, and the product looks neat.
To determine the size of the beads, you need to remember that the smaller the number, the larger it is.
For the first works it is better to stop at the size 8/0. It is not difficult to work with it, and the decoration will look attractive. Experienced needlewomen choose sizes 10/0, 11/0 for harnesses.
Beads from Japan and the Czech Republic are suitable for jewelry. They are smooth and have a large color palette. The best option in terms of price-quality is Czech Preciosa or Gamma beads. Japanese Toho and Miyuki are also suitable for knitting, but this is a more expensive option. Chinese beads are attractive in price, but poorly calibrated, so they are not recommended for work.
When choosing colors, you should take into account that the color of the beads in the package may often not match at all how they will look on the thread. This is especially true for transparent beads or those with a colored center. In the package, they look much darker than they actually are.
At first, it is recommended to use opaque beads with a matte, shiny or pearlescent surface.
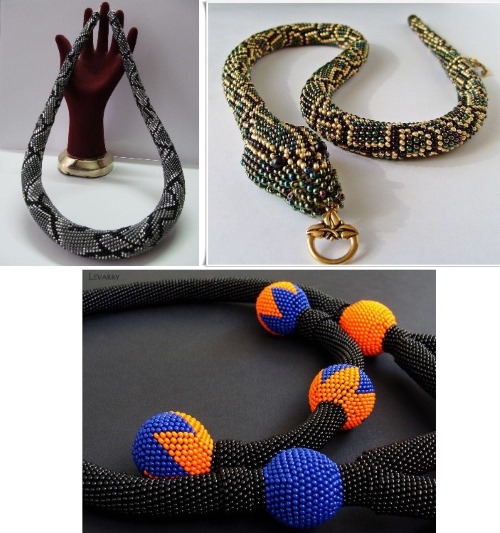
Beaded crochet cords (patterns can be simple or complex) differ in design by cord diameter and are divided into types:
| Types of harness | Number of beads in diameter, pcs. |
| Thick | 15-20 |
| Average | 8-10 |
| Thin | 4-6 |
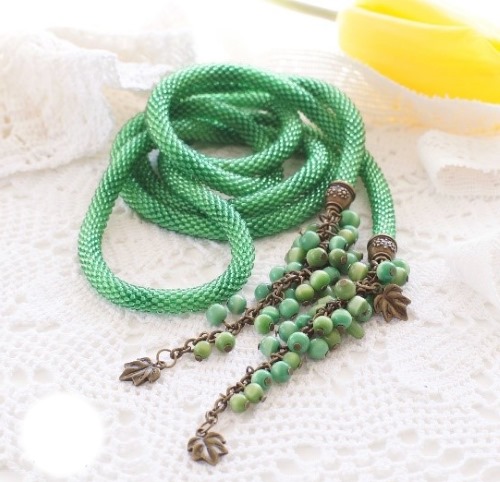
Thin items are usually made long and are made in one color or a scattering of colors. For example, lariats are neck decorations where the cord does not close into a circle. This allows you to fantasize while wearing it, tying it in different ways.
Thick cords are painstaking work that requires professionalism and patience from the master. Such decorations are distinguished by the complexity of the pattern, multi-color and detail of the pattern. The most common type of cord is medium. The average number of colors in them is 2-3.
There are most of these patterns on the Internet and it is advisable for beginner needlewomen to learn from them. Those who have taken up bead knitting for the first time are not recommended to use 1 color of beads in their work, as the rows will merge, which increases the likelihood of error. It is ideal to knit with 2 or 3 colors of contrasting colors.
To make the harnesses, use the following threads:
- Iris.
- Snowflake.
- Canarias.
- Violet.
- Monofilament.
Any sewing thread on a spool will also work. If it is too thin, you can knit in several folds.The ideal option is when the color of the thread matches the main color of the beads.
But many do not adhere to this rule, since translucent contrasting thread can create interesting color effects. Beginners should stop at light threads, for example, white or beige, since loops on them are more visible and easier to knit.
The needle has an important function, since the right needle will greatly reduce the time when stringing beads on a thread. With a long 10-centimeter needle, beads are easily stringed on a thread if the knitting will be one color or a multi-colored scattering, when there is no need to follow the pattern.
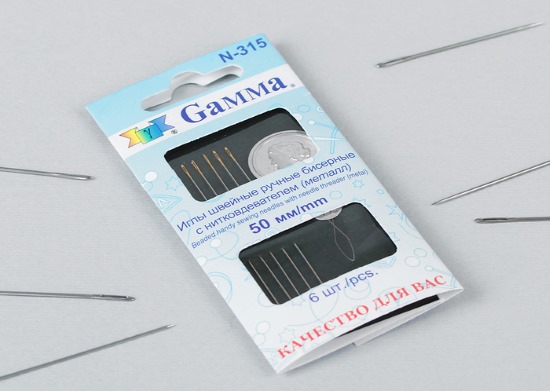
If the beads are strung according to the pattern, which means one piece at a time, then it will be inconvenient to work with a needle longer than 6 cm.The crochet bead cords, the patterns of which are presented in the article, are knitted with No. 0.8 – 1. The size of this tool depends on the preferences of the needlewoman, the density of knitting, the thickness of the thread and the size of the beads.
Often the need to change the hook size is already visible at the beginning of the work, when there are large gaps between the beads, or, conversely, they are pressed too tightly against each other.
Master class on how to crochet a simple beaded cord
For beginner needlewomen, making a tourniquet should be as easy and clear as possible, so you should choose 2 colors of beads that contrast with each other. Size - 8/0.
Other materials needed:
- Iris threads,
- hook,
- scissors,
- needle,
- clip.
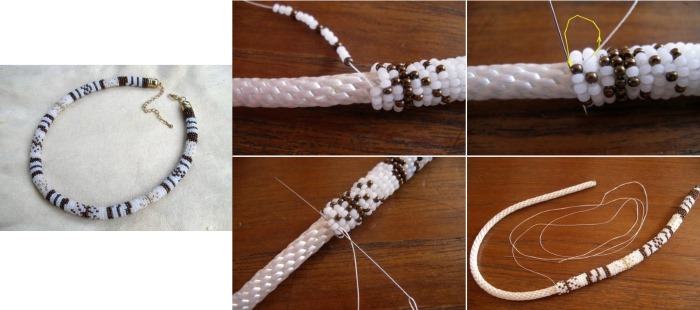
Stages of work:
- First of all, you need to calculate the required number of beads and the length of the thread. To do this, you need to decide on the length of the cord and the number of beads in its diameter.
For the master class, a 7 cm long cord with 7 beads in diameter was selected. This diameter will correspond to 10 mm. Therefore, the final length of the thread:
7 cm * 7 pcs = 49 cm.
- Next, you need to string 49 cm of beads onto the thread. The pattern is as simple as possible - alternating green and white rows. This means that you should string beads alternately 7 green, then 7 white, then green again, then white.
Before casting on, it is advisable to measure 49 cm of thread and secure it to the ball with a paper clip. This will allow you to make a neat bead thread.
After casting on, remove the paper clip, measure out about 0.5 m of thread and secure it with the paper clip again, and move the beads closer to the skein, leaving only 10 or 15 beads at the beginning of the thread for knitting the first rows. As you knit, you will always need to hold about 15 beads in your palm.
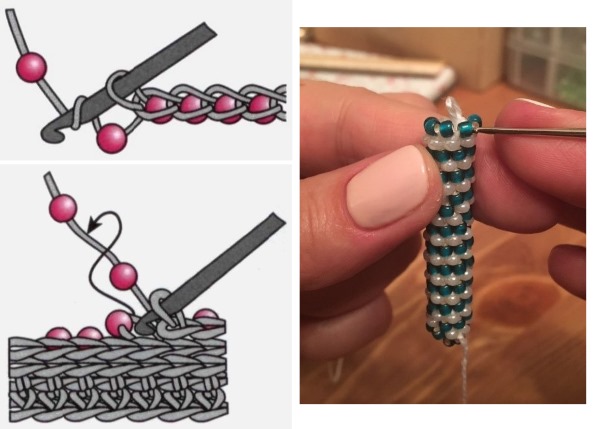
- The harness in this master class is made with half-columns. The row begins with an air loop. When knitting the second loop, you should grab 1 bead and knit it. The remaining green beads are also knitted.
As a result, you should get a chain of 7 beads. After that, the chain needs to be closed into a ring. If everything is done correctly, the beads will be outside the ring, and the thread base will be inside.
- For the second row, 7 white beads should be “prepared” in the palm. They should be knitted with half-columns.
To do this, insert the hook from the back side under the green bead, move one white bead with your finger and, grabbing the thread behind it, pull the thread first under the beads of the first row, and then through the loop on the hook. Thus, 1 loop should remain on the hook.
The remaining loops of the row should be knitted similarly, making sure that the back side consists only of threads, and the front side of beads. It is also important to control the tension of the thread. If the tension is incorrect, the beads will either fall out of the total mass or, on the contrary, fall inside the cord.
- The third and subsequent rows are knitted in accordance with the description of the second row. You need to try to lay the beads evenly one above the other. In this case, in the process of knitting a row, the beads will be located vertically, and in the already knitted rows - horizontally. The quality of the finished work depends on the attention to these details.
- After reaching the required length of the cord (7 cm), you need to knit the last row with half-columns, but without beads. This is done in order to "lay" the beads in the penultimate row horizontally.
Next, the thread is tightened and cut off. And the product, depending on its purpose, is decorated with the necessary accessories. In the process of working on simple patterns, and especially on complex ones, errors can be made related to the counting of beads.
Below are the ways to eliminate them:
- Removing a bead from a chain. This situation may occur if there is a color error during the pattern, or if in the middle of knitting it turns out that the bead is uneven or of poor quality.
- You can remove an unnecessary bead by crushing it with pliers, and in order not to accidentally touch or cut the thread, you should first insert a needle into the bead.
- Add a missing bead. If a bead was missed or removed due to an erroneous set, then the desired bead should simply be sewn onto the finished cord. To do this, in the place where it will be sewn, it is necessary to knit a loop without beads, thus leaving free space.
Single crochet stitch
To make a spotted tourniquet in red you will need:
- beads No. 10 – 4 colors,
- thread,
- hook thickness 0.75 mm,
- needle,
- scheme,
- accessories for the finished product (clasp, rings, caps, pins, large beads).
Harness diagram:
- The diagram shows a rapport (repeating pattern). The number of rapports will depend on the intended length of the cord.
- This spotted cord should be 39 cm long. According to the diagram, this corresponds to 7 rapports. One row - 25 beads.
Stages of work:
- It is necessary to string beads on a thread taking into account the pattern and the number of rapports.
- Knitting should begin with knitting a chain with air loops. Total - 25 loops.
- The first 3 rows should be knitted without beads. Later they will be needed to secure the cord to the fittings. The 2nd and 3rd rows should be knitted with single crochets.
- Next, you need to complete a row, knitting beads with single crochets. To do this, move the beads close to the hook with the loop, grab the thread through the loop of the bottom row with the hook and pull it through. In this case, the bead will already be fixed. The two loops formed on the hook should be knitted.
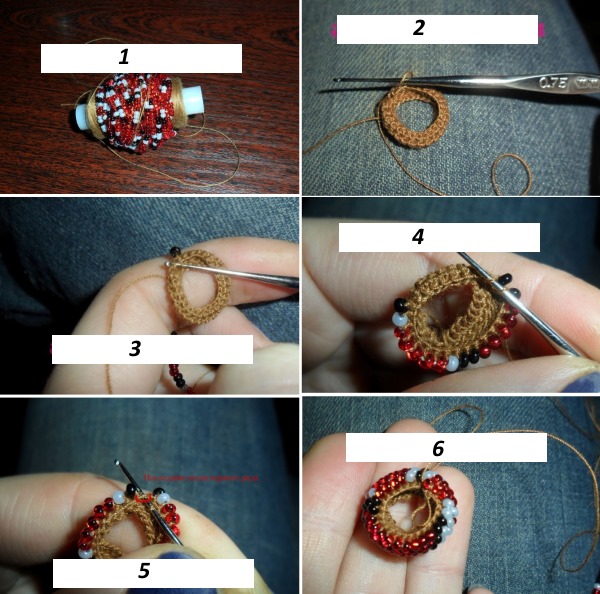
- The remaining loops of the row must be done in the same way. The 25th bead will be the end of the row. However, it should not be above the 1st bead, but next to it.
- Continue working according to the pattern until the length of the tourniquet becomes 39 cm.
- The last 2 rows should be knitted with single crochet stitches without beads and at the end, secure and cut the thread.
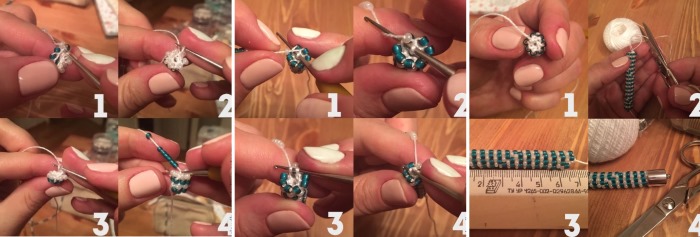
To turn the tourniquet into a stylish decoration, you should attach the necessary fittings to it:
- The edges of the cord need to be processed. To do this, place a pin in the bead and carefully sew the ends.
- Then you need to put the fastening cap on the pin. Part of the wire needs to be removed with wire cutters, leaving a tip long enough to round it into a ring.
- Lastly, you should secure the lock to the harness.
Tourniquet in a column
Crochet bead cords (the patterns are given using crochet stitches and half crochet stitches) differ not only in the execution technique, but also visually.
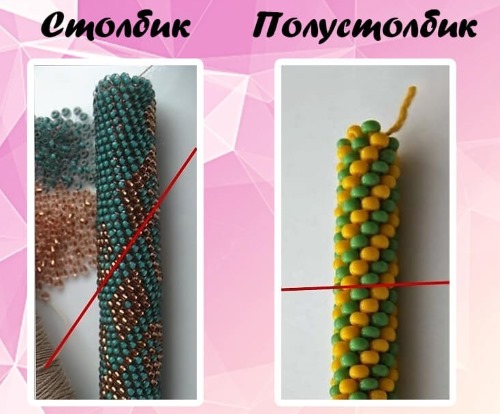
For example, this is expressed in the tilt of the beads on the finished cord.The column is typically arranged diagonally. When knitting with a half column, the beads lie horizontally.
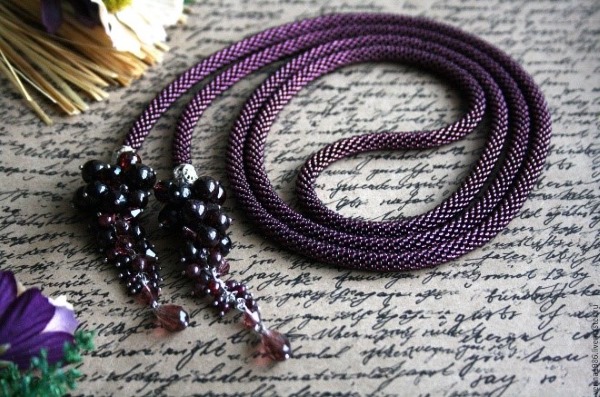
Beaded single-color cord
Crocheted bundles of beads of one color do not require the use of a pattern, so there is less chance of getting confused and making mistakes while working. To make such bundles, you should take a thread that matches the color of the beads. The circumference of the product is usually medium or thin, so the best knitting option is to use half-columns.
Single-color cords can be used to make bracelets, necklaces, but more often they are used to make lariats.
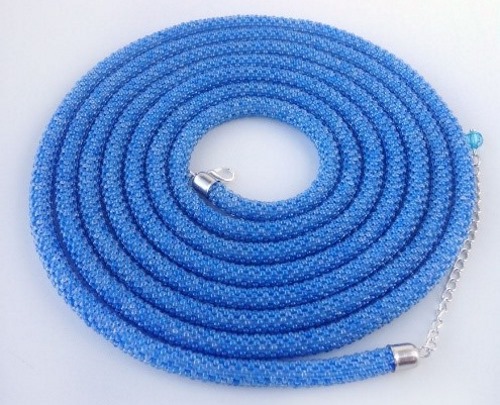
The difficulty in working on a lariat is that it is usually long (up to 1.5 m), so you need to string a large number of beads. It is difficult to move meters of beads along the thread during the work.
Experienced craftswomen recommend placing the beads evenly on the thread and only then twisting it into a ball. In this case, you will not have to move large volumes of beads over long distances. Another problem is that a long knitted rope twists and interferes with further work.
There are two ways out of this situation:
- Tie the tied end into a knot. In this case, after untying, there is a risk of creases appearing.
- Periodically unwind the tourniquet in the opposite direction. This is less convenient, but there is no risk of deforming the product.
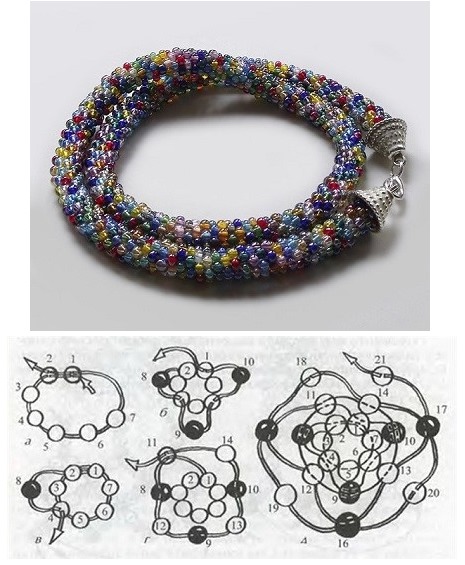
Patterned bead cord
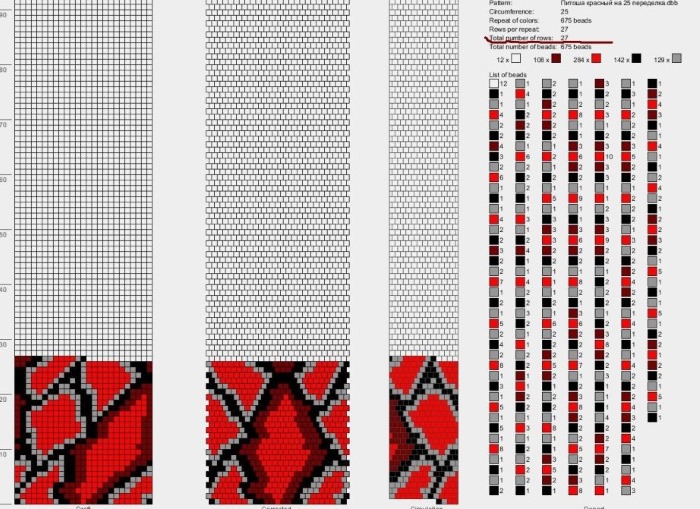
The harnesses can have both simple patterns with alternating 2-3 colors, and complex ones. To make such decorations, you need to be able to read the patterns. There are several programs in which you can make patterns yourself, calculate beads and threads. They all make similar patterns. Therefore, as an example, you can use, for example, the DB-Bead program.
This diagram allows you to see (from left to right):
- The first drawing is the author's design, from which the program generates a diagram.
- Next comes the actual diagram, which you need to focus on when knitting. This is a cable in an unfolded form.
- The following picture shows what the tourniquet will look like when finished.
- The colored squares in all 3 pictures are a pattern. From this diagram, you can see that the pattern needs to be repeated every 20 rows.
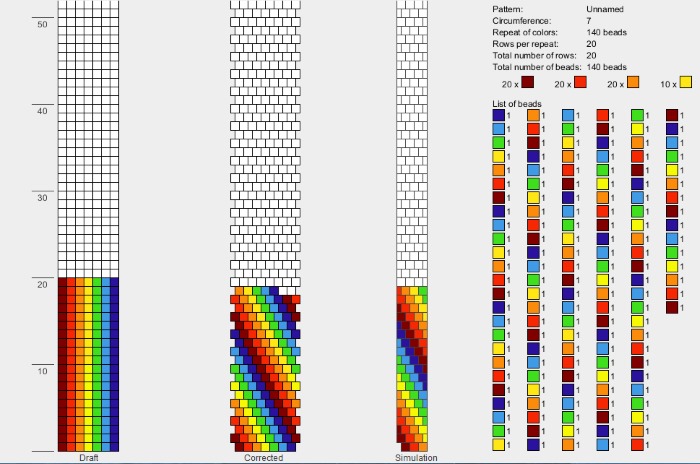
- In the upper right corner the necessary numerical information is indicated: the number of beads in a row (7 pcs.), the number of beads in a pattern (140 pcs.), the number of rows (20).
- The multi-colored columns below are the order of stringing colored beads onto a thread. You should start stringing from the top left square and move down, then move to the column to the right.
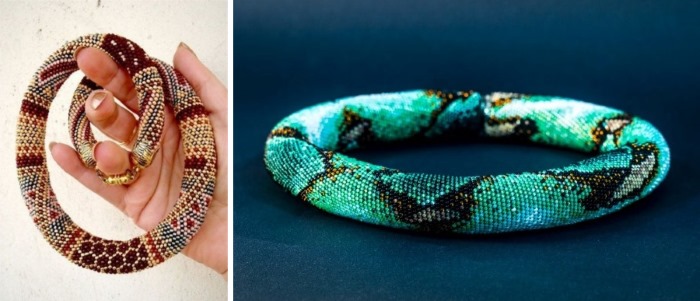
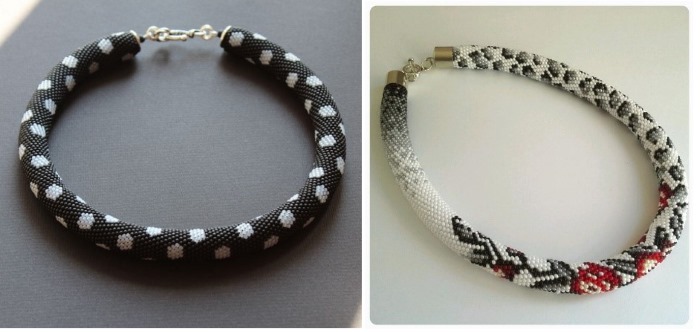
Beaded cord with half-columns and columns
Sometimes the insufficiently neat appearance of the harness is associated with the wrong choice of knitting type (column or half-column). Beginners, in order not to make a mistake, should strictly follow the diagram and description of making the harness.
Experienced craftswomen can already take into account several factors to choose the right type of knitting, such as the diameter of the cord, the size of the beads and thread. Column knitting is used on cords of thick diameter and allows you to make complex patterns.
When choosing a column knitting on small diameters, there will be a large space between the beads, which, of course, should not be allowed. In this example, both cords are knitted with the same threads and beads and have a single diameter consisting of 10 beads. But the upper sample is made with half columns, and the lower one - with columns.
If you have any doubts about how to knit a product, it is recommended to make a small sample up to 5 cm long before starting work.
Beaded cord with half-column
As your skill level in crocheting increases, you will want to master new techniques and original effects to make more interesting products. One of these useful skills is increasing and decreasing the cord diameter.
The increase is made by knitting two loops in one loop of the previous row. In this case, the hook should be passed under two threads of the lower loop. Both half-columns should be made with beads.
When decreasing, two loops of the previous row should be knitted with one half-column with a bead. If the pattern is simple and the expansion is small, then it is enough to ensure that the added and decreased loops are symmetrical.
In other cases, to avoid mistakes, it is recommended to mark the places where there will be a reduction or expansion on the thread with beads. This can be done with small pieces of paper.
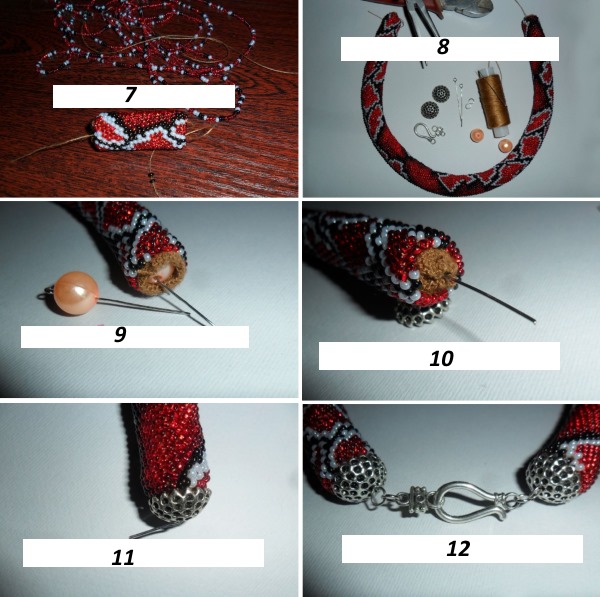
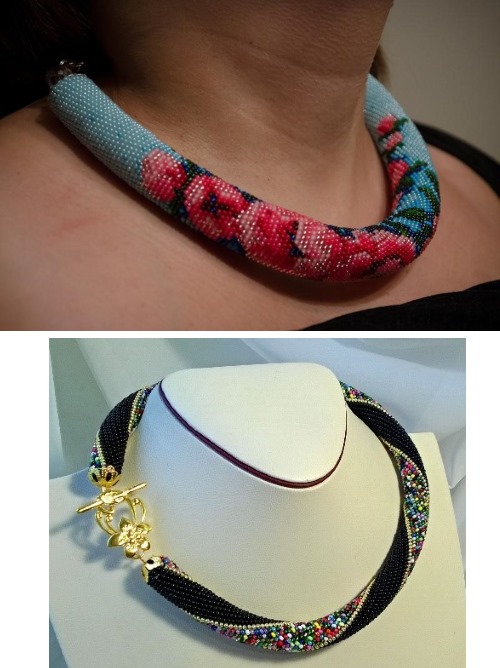
Beaded cord embroidery on a rope - African technique
Crochet beaded cords, the patterns of which can be easily found today in any variations, require craftswomen to know the basics of knitting. The African method of making jewelry is easier to make, while the result is also impressive.
The essence of the technique is in densely sewing beads onto a regular cord or thick rope using a needle.
Unlike previous works, here there is no need to pre-string the beads onto the thread according to the pattern, which means there is less chance of error.
To make a necklace you will need:
- beads,
- rope,
- thread or fishing line,
- needle,
- accessories for jewelry.
An important nuance is the choice of rope. It is preferable that the diameter be from 5 to 8 mm. A smaller diameter will complicate the work and a gap will be visible between the beads. A larger diameter will suit those who like massive jewelry.
In terms of material, it is better to choose a cord with a cotton braid. It is easier to embroider on such a braid - the beads lie more evenly. In addition, at the end of the work there will be no difficulties with securing the ends and fittings.
Stages of work:
- First of all, you should attach a thread to the cord in any convenient way. Then, beads are strung onto the thread. This can be several beads or a chain of beads that will make several turns around the rope. It is important to remember that the fewer beads are sewn on at a time, the better the work will look.
- The bead chain should be tightly wrapped around the rope. To fix the chain, it is necessary to grab it in several places with a thread. To do this, stick the needle into the cord and pull it out through the last few beads. Then you need to make a cross stitch, thus sewing the thread to the braid.
This fastening must be repeated along the entire length of the sewn chain in the direction from the end to the beginning.
- After the entanglement is sewn, you should return to the place where the work stopped, namely, first bring the needle out for a couple of beads to the end. And then pass the needle through these beads, sewing them to the braid.
- Next, you need to continue embroidering on the rope, alternating between adding beads to the thread and securing the resulting chain of beads on the surface of the cord.
- After the tourniquet has reached the required length, the work must be finished. To do this, the core of the rope must be cut 1-2 cm from both ends of the tourniquet. Tuck the braid into the resulting void and tighten the end with a thread. The tourniquet is ready. All that remains is to attach the clasp to it.
Other patterns for weaving beaded cords
Among other popular models of knitted harnesses, one can note the “Fur” one.
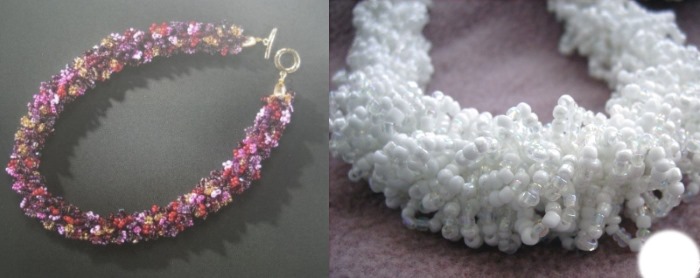
Knitting should be done as for a regular cord, but to get "fur" between the loops you need to knit a long loop. Any number of beads, beads are strung on this loop. Everything is limited only by the imagination of the needlewoman.
A wide variety of patterns among the harnesses braided with a needle:
- "Mosaic".
- "Square".

A harness knitted from beads is a relevant and original decoration created by the skillful hands of a craftswoman, as well as with a hook or a needle. You can create harness patterns in special programs, or work with ready-made patterns that needlewomen share on the Internet.
Author: Vorobyova Nadezhda
Article formatting:Natalie Podolskaya
Video about knitting cords from beads
Crochet bead harnesses - patterns: