Sparrows are common in our area. They can be seen flying overhead or sitting on trees not only in summer but also during cold weather. To draw this bird on paper, for example, for children, will have to face considerable difficulties. Considering that the feathered creature is small in size, it is difficult to draw.
Drawing tools
A drawing of a sparrow for children can be created in black and white or in color using:
- paints;
- felt-tip pens;
- colored pencils;
- pastels.
Today, stores are full of a variety of products for creative people, the main thing is not to make a mistake with the choice. The finished result will largely depend on how high-quality the tools are that were used to make the drawing. Much also depends on the paper, the choice of which must also be approached seriously.
Graphite pencil
Those who start drawing often prefer to use something familiar. Such is a simple pencil. When drawing a sparrow, you can do with just it, because the plumage of a small bird is similar in color to the graphite of a simple pencil. If you plan to create a color drawing, it will also be difficult to do without a simple pencil. Artists use it to create contours.
Strokes made with simple pencils are distinguished by their precision and smoothness. Pencils produced in Russia and Ukraine have markings of hardness and softness, designated by the letters M and T. If there is a designation MT, then the pencil is soft-hard.
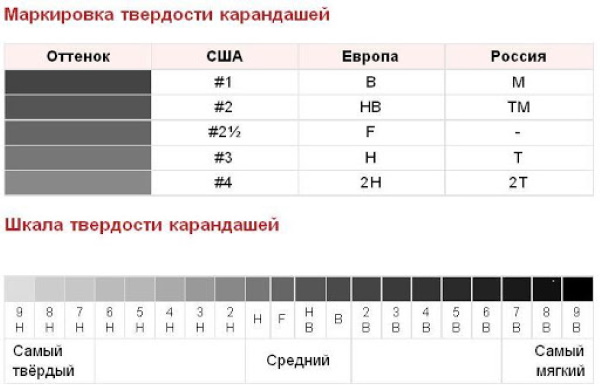
Pencils produced abroad are marked similarly. Only in this case, instead of the letters M and T, B (softness) and H (hardness) are used. The combination HB is also encountered.
A number is also placed before the letter so that the buyer can understand how hard or soft the pencil is.
For example, a pencil marked:
- 3T – harder than a pencil marked 2T;
- 3M – softer than a pencil marked 2M;
- 2B and 2M - soft enough to be used to draw a clear line;
- H2 and T2 – have a hardness that leaves a light grey mark on paper.
A higher hardness, designated by the number 3 and higher, is rarely required for creating drawings. Such tools are used in creating blueprints. A beginner artist is advised to acquire a set of several different pencils. Hard and hard-soft can be used for general work. Pencils, the softness of which is designated by the number 2, are good for applying tonal spots. Softer pencils are suitable for creating intense black tones. They are also convenient for making volumetric sketches and applying thick shadows.
Colored pencils
Colored pencils are pencil leads of various colors, enclosed in a wooden shell. They are traditionally used in drawing lessons at school. The color palette of such pencils has a wide range.
Wax crayons
Wax crayons are the best option for artists under 7 years old.
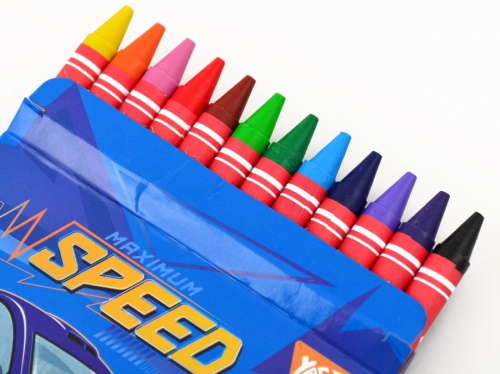
Their main advantages include:
- convenience;
- safety;
- purity;
- easy sharpening.
Wax crayons can be used to draw on:
- paper;
- cardboard;
- tree.
However, they are not suitable for painting on gloss.
Watercolor pencils
This is a type of pencil that is a combination of regular colored pencils and watercolor paint. They are used in the following way: first, a drawing is made, and then a wet brush is drawn over it, which turns it into a watercolor.
Felt-tip pens
Felt-tip pens can be used by children who are already 3 years old. There are 2 main types of these writing instruments.
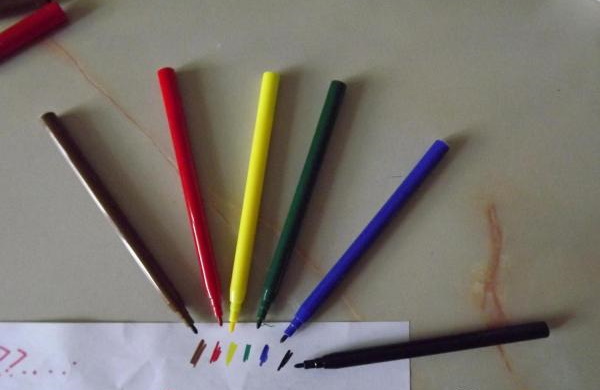
The classification is based on the underlying substance:
| Water based | Alcohol based |
| These markers are practically odorless and pose no danger. Their marks can be washed off the skin and washed out of clothes. | These markers have a strong odor, dry quickly and are not intended for children. |
When choosing felt-tip pens, it is recommended to remove the caps and check their smell. It is better to avoid purchasing those products that have a strong smell. Give preference to products of domestic and European manufacturers.
Paints
The main types of paints are as follows:
- watercolor;
- gouache;
- oily;
- acrylic.
When choosing them, it is necessary to obtain as much information about the product as possible before purchasing:
- who is the manufacturer;
- best before date;
- rules of application.

Preference should be given to paints stored in jars: in this case, they can be used more economically. The colors of the paint should be natural, it should not have sharp unpleasant odors.
Paper
You can draw in children's albums specially designed for this purpose. However, such paper will quickly deteriorate as soon as you draw on it with an eraser. It is better to give preference to hard Whatman paper, which has a smooth surface, devoid of porosity.
Master classes
A drawing of a sparrow for children can be created by first preparing materials and tools.
The bird can be drawn:
- on a branch;
- in the feeder;
- in the clearing.
Also, several sparrows may be present in the picture at the same time.
When depicting a sparrow, you must adhere to the following recommendations:
- if possible, draw from life or from a picture;
- take into account that the bird will be depicted using simple geometric shapes: circles, ovals. They will help to create the correct form;
- When creating a sketch, do not use thick strokes, because they will be more difficult to remove when correcting;
- Before drawing a line, mark the sheet. This will allow you to see the location of the object.
Master class for beginners
To work with a simple version, you will need a pencil and a sheet of paper.
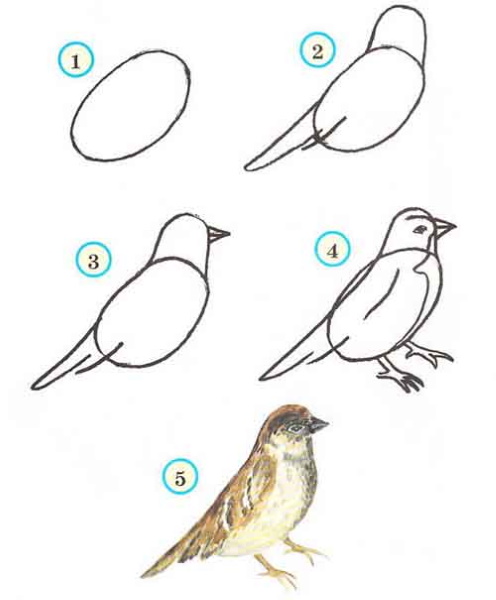
Drawing is carried out in the following stages:
- Draw the outline of the sparrow. In the middle there will be a large oval, which will become the outline of the body. It should have a slight slope.
- Draw a circle above the oval. This will be the head, which should be about 3 times smaller in size than the body.
- Draw a triangle near the bottom of the oval, to the left of it. This shape will become the tail in the drawing.
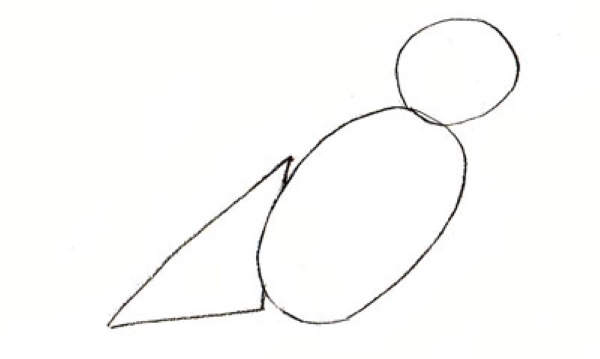
- Draw a line for the tail and outline the legs.
- Trace the circle at the top of the drawing with a pencil so that the resulting shape is the front part of the sparrow.
- Continue outlining the body and tail.
- Draw a dividing line for the wing.
- Work on creating the legs. It is not difficult to draw sparrow feet: the main thing is to understand the lines and not get confused in them. It is important to remember that the sparrow has claws on the tips of its fingers.
- Draw the head. You should start with the organ of vision. Since the sparrow appears to the artist and future viewers in profile, only 1 eye is visible. It can be represented by a small circle.
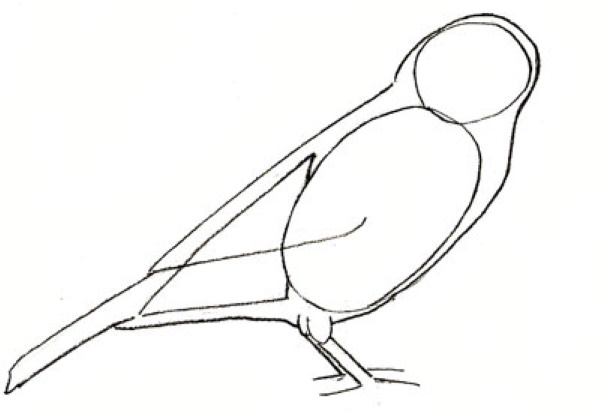
- Draw the beak and draw marking lines for future feather coloring.
- Draw the plumage. The feathers should be represented by numerous smooth lines.
Sparrow on a branch
A drawing of a sparrow for children sitting on a branch can be done as follows:
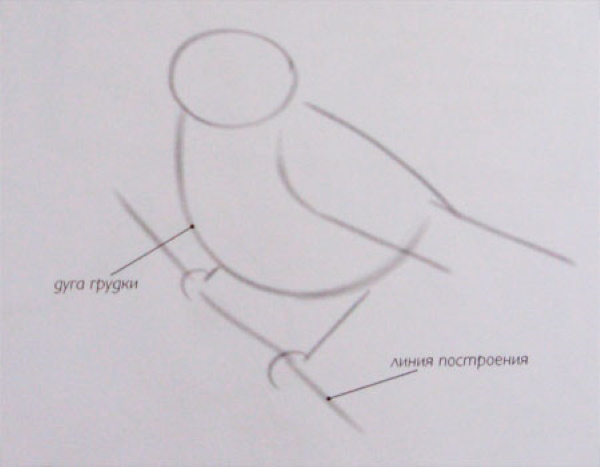
- The first lines, which will act as reference points in the future, are drawn without pressing hard on the pencil. It is more convenient to start with a branch, which can be represented by the 1st thin line, passing from the lower right corner to the upper left.
- Draw an arc above the branch, which will become the sparrow's chest. Finish off the top with a circle, which will be the head.
- Finish drawing the wing, tail and legs. All this is depicted with simple lines. At the same time, the lower parts of the bird's legs should be represented by small arcs. These will be the sparrow's fingers, grasping the branch.
- Outline the outline of the sparrow. Don't forget to mark the sharp tips of the wing and tail.
- Draw a small circle in the head area. This will be the eye.
- When drawing a beak, remember that the line denoting it should run along the contour of the head.
- Outline the outline with more distinct lines.
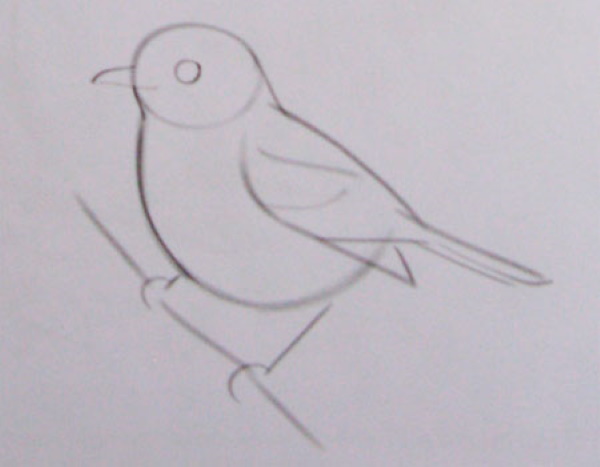
- Draw another line for the beak and add a small number of strokes to the chest.
- Draw the bird's legs, remembering that its toes should be represented by curved lines.
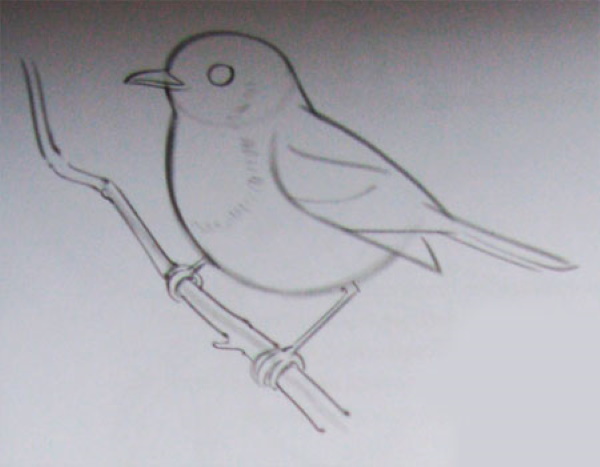
- Give the branch on which the bird sits volume, make it more curved and add knots.
- Work on the plumage. First apply a fan pattern to the wing, and then paint the tail. The texture of the feathers should be conveyed using soft lines.
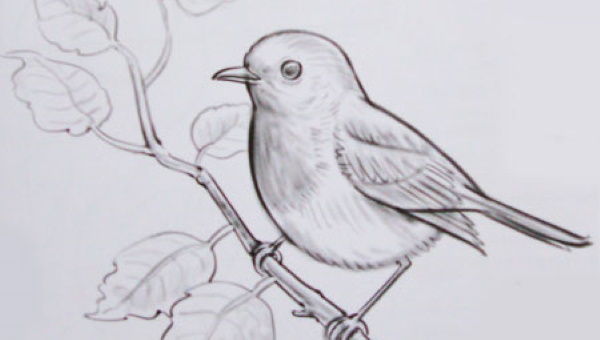
- After applying strokes to the chest, leave some areas of the body unpainted.
Feeder with sparrows
Sparrows in a feeder is a drawing that contains several birds at once. It is especially pleasing to children. At first, working on creating such an image may seem more difficult than drawing one sparrow. In reality, everything is not difficult, because in this case the birds can be represented more schematically. It is not necessary to carefully draw each element.

The process of drawing a bird feeder with sparrows goes through the following stages:
| No. | Stage | Description |
| 1 | Visually divide a sheet of paper into 3 parts | The first part should contain the feeder, the second part should contain the branch on which it is attached, and the third part will contain the soil visible from above. The feeder will be located approximately in the middle and will become the main element of this drawing, therefore the middle part of the sheet, intended for the feeder, should have the largest area. The tree branch on which the feeder hangs will be located at the top. The ground is the bottom of the leaf. |
| 2 | Start creating a drawing | It is necessary to depict a tree branch: you should start from the top. First, you should make a sketch with simple lines, without pressing hard on the pencil. |
| 3 | Draw a bird feeder | Its outline should be represented by a quadrangle and 4 lines coming out of its corners. All these 4 lines rush upwards and converge at 1 point – under a wide branch. |
| 4 | Sketch some bird outlines | The number of birds can be any. Perhaps only 1 sparrow is "dining" in the feeder or another bird is sitting next to it. At the same time, the 3rd sparrow can be sitting on a branch. Some of their relatives can fly nearby. |
| 5 | Determine the location of objects | When the sketches of the branch, the feeder and the birds are done, you should carefully look at what you have got and decide which element of the drawing will be in the foreground and which is better to bring to the background. After that, start drawing the foreground elements. It is best to start with the sparrows themselves.
The main features that should not be forgotten when drawing the middle and main part of this picture are that the feeder should have ropes, and the wings, head and tail of the birds should be drawn with special care. |
| 6 | Draw a branch and a bird feeder | It is important not to forget to add grains to the upper surface of the feeder. They can be represented by numerous dots.
The ground at the bottom of the drawing can be represented by several wavy lines. |
| 8 | Color the picture | You can start right away with the birds. Their plumage can be given different colors: gray, black, white. The most suitable color for a wooden feeder is brown. The branch on which it hangs should be approximately the same.
The snow at the bottom of the drawing can be left white or lightly colored blue. |
Painting a sparrow in a forest clearing with gouache
A drawing of a sparrow for children among lilies of the valley in the forest can be done using a simple pencil and gouache paints.
The steps to create an image are as follows:
- Draw a sparrow in the middle of the cardboard sheet.
- To the left of the bird, draw a lily of the valley. The lower part of this plant has large pointed leaves, and the upper part is represented by one stem with several small flowers arranged in a row. Each flower should be shaped like a bell.
- At the bottom of the sheet, under the sparrow's feet or near them, draw several strawberry leaves. If there is space left on the paper, draw another lily of the valley to the right of the bird. Several strawberry leaves can also be located here.

- When all the necessary contours are completed, put the pencil aside, take gouache and start coloring the drawing.
- Using a #5 brush and white paint, paint the lily of the valley flowers. If there is a branch on the right, its flowers should also be painted. With the same paint and brush, paint the bird's chest, and draw a few thin wavy lines on its wing.
- Take brown paint and apply it to the back and top of the head.
- Turn brown paint into light brown. Use the resulting color to paint the wing and tail. To get light brown paint, you can add a little yellow or lemon to regular brown gouache.
- Using ochre, draw a circle near the eye.
- Take red gouache and apply it to the inside of the beak, if the beak of the drawn sparrow is open.
- Create a light fluff on the sparrow's neck. Light gray paint is used for this. To obtain it, you need to mix white and black paints on the palette. In this case, you need to take more white and add a little black to it. The sparrow's beak and paws should also be painted with gray paint.
- Proceed to coloring the elements of the drawing that should be green. We are talking about the leaves of the plants. To color the large pointed leaves of the lily of the valley, prepare not just green, but bright green paint. You can create it on the palette as follows: add emerald green to lemon. You need to add gradually to form a bright green saturated color.
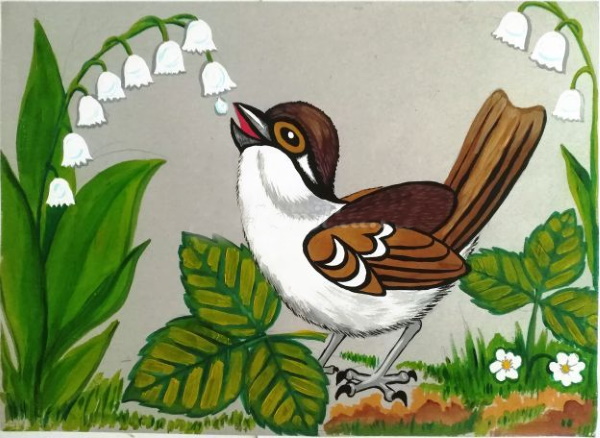
- Don't forget to shade the leaves so that the drawing is as realistic as possible. To do this, use emerald green paint. First, emerald veins should be applied to the strawberry leaves. Then, between them, make several strokes of yellow lemon paint.
- To shade the lily of the valley flowers, use a light gray tone. It is applied on one side, and there should be several blue strokes on the bells themselves. They will help to give volume to the white flowers.
- Apply a few strokes of ochre to the clearing and paint the grass with green grass paint.
You don't have to graduate from art school and be a professional to create beautiful drawings and enjoy it. If you use the right tools with materials and follow detailed instructions, you can create a beautiful drawing. In order for the drawn sparrow to look like a real one and surprise adults and children, you need to accurately draw the initial contours, and then proceed step by step.
Video on how to draw a sparrow
How to draw a sparrow correctly: