Hand-made products are popular because of their uniqueness. Making toys with your own hands from fabric is not a difficult task if you study the appropriate literature and practice. Patterns for beginners will help you cope with easy examples of work and move on to more complex examples.
What you need for sewing
Toys made of fabric with your own hands using a pattern for beginner craftsmen can be made using information from a handicraft magazine. It is best to make a pattern from thick cardboard, although some needlewomen prefer to work with polyethylene.
Its advantages are that it is transparent, it is easy to apply the outline of the part, and also to transfer the image to the fabric. It does not require much space.
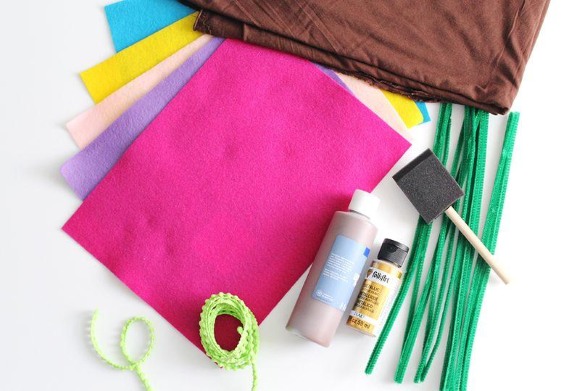
For work you will need the following materials:
- fabric that will serve as the base, as well as additional fabric (leather, fur, felt, lace);
- ribbons of different widths and colors;
- assorted threads;
- wire;
- filler material;
- applique, interlining for fastening to fabric;
- decorative elements.
The wire frame gives the product volume.
The threads should be made of polyester and intended for machine application. This will provide the necessary strength, since the object will be filled. For embroidery of small objects (for example, a mouth or a nose), floss threads are used. The best way to apply the applique to the product is to use glue on a non-woven base.
The image is ironed with a hot iron and thus fixed on the fabric. Natural and synthetic materials are used as filler: cotton wool, holofiber, synthetic padding, foam rubber, synthetic fluff.
Synthetic materials are often preferred, since they are hypoallergenic, hygroscopic, can be washed without losing shape and easily dried. All of the listed fillers meet this requirement, except cotton wool. It forms lumps, cakes, and therefore will serve less, the toy will lose its shape faster.
Giving the product an attractive appearance is done with the help of decorative elements: ribbons, beads, buttons. They are necessary for decorating the models' clothes or the product's face/muzzle. DIY fabric toys created using the algorithm allow you not only to create new patterns for beginners, but also to update old samples of your favorite animals and dolls.
Tools
Toys made from fabric with your own hands according to patterns for beginners must be precise, for which it is necessary to choose the right tools.
In the process of making a gift you will need the following items:
- awl;
- scissors;
- set of needles;
- thimbles;
- ruler, measuring tape;
- roller knife;
- fabric marker;
- pins;
- tool for filling the product;
- skewer for turning.
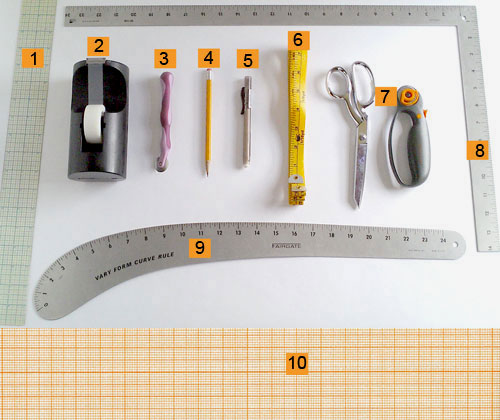
An iron and a sewing machine are also useful as equipment. The sewing kit contains needles of various thicknesses, from 1 to 12. Special very long needles are used to attach the limbs. Fabric marking is done with tailor's chalk or a disappearing marker. They provide precise, fine lines and are quickly removed from the finished product.
When making a pattern, a box with lighting makes the work easierIf there is none, then window glass can handle a similar task.
Choice of fabric
The final result of the work and the appearance of the product largely depend on how correctly the fabric was selected. The same fabric can have different characteristics: density, degree of fiber processing, elasticity, width. The elasticity of the fabric is achieved due to the stretch fiber, it is affected by the direction of its location.
Toys made of fabric with your own hands can be made using various materials. Patterns for beginners are recommended to be made from elastic, durable materials with a rich color range, not subject to rapid thinning and easy damage. It is important that the fabric either does not wrinkle or is well ironed. Otherwise, it will not have a marketable appearance.
The following people successfully cope with this task:
- faux fur,
- knitwear,
- wool,
- cotton fabric,
- cotton,
- velvet,
- felt,
- flax.
For home toys, blanks from pieces of fabric obtained from old things are suitable. Manufacturing for sale requires higher quality materials, so it is necessary to use fabric from the store. In the haberdashery department of the store, a novice needlewoman can inquire about what fabrics are used for toys.
The name of some of them may contain information about their purpose (for example, faux fur for toys). It is most suitable for making animal products due to the dense and heavy texture of the material. Fur with short and long pile is suitable. Knitted fabric has bright colors, it is elastic, stretches easily, the edges do not crumble.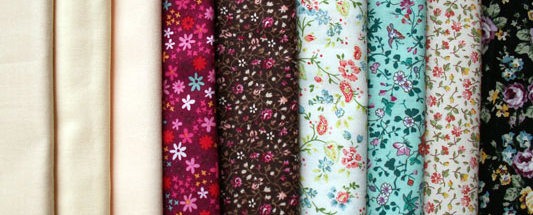
This type is considered universal, as it is used to make dolls, animals, panels, appliques. But knitwear is capricious in work, there are some peculiarities in making a pattern. Due to its stretchability, much more filler is required. Beginners are not recommended to do their first work with knitted texture.
Cotton fabrics are more often used for products that will be in contact with children.The texture is characterized by hypoallergenicity, environmental friendliness, and hygiene.
Cotton fabrics include:
- chintz,
- satin,
- fleece,
- terry texture.
The first 2 options are traditionally used to make dolls' bodies. Fleece is pleasant to the touch and can be used as any elements of the product. The fabric does not stretch, is suitable for small products, a little filler is required, the price is low. Domestic cotton available for sale is often thin, translucent, the filler from the product will protrude from the side, so it is not suitable.
Imported options are expensive. The basis for toys can be furniture cotton. The disadvantage of this option is that it is only available in milky color. Before use, the fabric must be dyed. A big plus of furniture cotton is its low price.
Felt is a felted fabric that can be made from natural or synthetic fibers. For sewing toys, it is recommended to use material with a high wool content. It has a bright color, does not crumble if cut, and holds its shape well. Wool is used for sewing soft toys. Its positive characteristics are density, pile, and smooth texture.
Velvet and velour will make a wonderful hare, fox or bear. Such fabric is pleasant to the touch, does not crumble and is elastic.
Linen has the best characteristics for working with handicrafts: the fabric is durable, stiff, and the edges do not crumble. But not every type is suitable for toys. The canvas can have different properties: tablecloth and interior linen are not suitable. The first type is difficult to iron, and the second is sold in a wide roll, so it is inconvenient during work.
The main requirements for linen are good ironability, frequent arrangement of threads, and medium density. Rare interweaving of fibers can lead to the filling coming out, or the threads of the seam on the border of the product parts will be visible. Dense fabric can look rough, then it is not suitable for small dolls.
If the linen contains elastic thread, it may not be suitable for use. To check suitability, stretch a piece between your fingers, and if it takes on the appearance of a net, then such a material is not suitable. Experienced craftsmen can work with more complex materials, such as silk.
It slips in your hands, but due to the flowing texture, products made from this material look expensive and presentable. Silk is used to make a dress, apply appliques or decorate the edges of a toy's clothing. The fabric dyeing must be natural, since it will be in contact with the owner's skin, and durable, so as not to lose color during use.
For work, it is recommended to choose a bright palette so that the toy pleases the eye, but the choice of color depends on the user's preference.
Making a pattern
DIY toys from fabric at the pattern stage for beginners involves using a ready-made or self-made template. If the pattern is made from a single piece of fabric, the material is folded, placed on the left half of the pattern and cut out after the contours are outlined with a marker.
If the toy consists of pieces, then the pattern is placed on a new piece each time.
Each type of fabric requires its own template, since the product may be of different sizes. It is necessary to adapt the pattern to a specific texture. The pattern may deform, and this depends on the type of fabric and the method of placing the pattern on it.
Here are some possible changes:
- when the pattern is placed along the grain of the fabric, which does not stretch, there is practically no deformation;
- if you place the image of the part across the grain line, then during the filling process the toy will become taller;
- elastic fabric in which the stretch fibers are located across the fabric will have a larger width, that is, the deformation will occur horizontally;
- transferring the image onto knitted fabric will cause deformation in both directions, so the pattern must be made smaller, or take into account that the finished product will be larger;
- the pattern is practically not deformed if thick fleece is used in the work.
To obtain a pattern, the template is printed on a sheet of paper or drawn independently. The template shows the dimensions of the parts vertically and horizontally. If the pattern is taken from a magazine, then the elements indicate how many parts are needed for the work.
The template is cut out and transferred to the fabric. If there are several parts, you can fold the piece in half, and then the work will be done faster. When the image is transferred to the fabric, the pattern is fixed to prevent it from shifting relative to the fabric. The contours of the parts on a dark-colored piece are outlined with a white or yellow pencil; if the fabric is light, with a black pencil.
The fabric should be left with 0.5 cm seam allowances. Natural fur and non-flowing fabrics (felt, leatherette) are cut exactly along the line, without any deviation.
Technology of sewing toys
Each product goes through the same stages of work:
- selection of material;
- fabric smoothing;
- transferring the template of the parts onto the patch;
- cutting;
- basting;
- sewing;
- stuffing;
- design.
When the pattern is transferred to the fabric and cut out with an allowance, it is necessary to baste the parts manually and stitch them by machine or by hand. The sewn part of the body is turned inside out, it is most convenient to do this with a metal blunt-ended stick. The next step is to fill the part with a special stick. This must be done carefully so that there are no wrinkles on the surface of the fabric.
After filling each part of the body, they must be sewn together. Where it can be seen, the operation is carried out as carefully as possible. For the filler, the place where the head will be sewn on or in the middle part of the body is left unsewn.
Attaching the limbs to the toy is done with or without a button. For this, a special needle is used that can pass through the entire width of the toy. The craftsman takes a long thread, ties a knot, and cuts it as short as possible. The needle is inserted from one side, passing through the entire body of the product, and is removed at the same level, stringing the limb and passing through one hole in the button.
Next, you need to return to the back of the product. There, you also string the second limb and buttons. The steps need to be repeated several times until the parts are firmly sewn on.
If the owner of the toy is a small child, then the limbs are sewn on without buttons.
To decorate the face or muzzle, you need to sew on the eyes, nose, and decorate the mouth. It is more convenient to do this before the front and back of the head are connected together. At the design stage, the craftsman decorates the body and clothing of the toy with decorative ribbons, beads, seed beads, and fur.
Puppy
DIY toys made of fabric in the form of a puppy can be flat or voluminous. Patterns for beginners are made of felt, fleece, wool, cotton, knitwear. A flat puppy is cut out, filled with filler in a minimal volume. The product is stitched along the edge with an overlock stitch on the front side, that is, it is not turned inside out.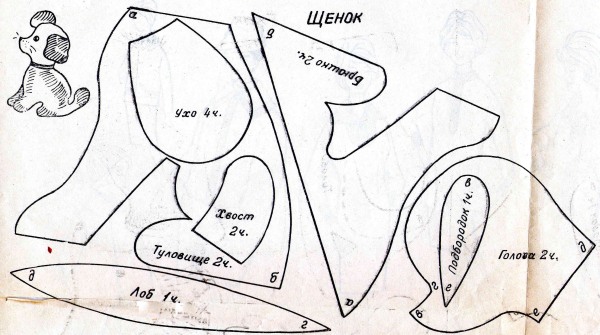
A volumetric toy requires a little more time, but the technology is no different from the standard. Difficulties may arise at the stage of designing the muzzle: you need to create natural folds, and also think of what the nose and eyes will consist of. The patterns applied to the fabric are cut out, sewn on the reverse side. Then the product is turned inside out, filled with filler, the limbs and body are connected.
When making a dog's muzzle, the eyes can be made from a fabric of a different color or sewn onto the fabric in the right place with floss. The nose is stuffed separately with filler and sewn onto the tip of the muzzle or a flat piece of fabric is glued on with glue.
To obtain natural folds on the muzzle, the fabric is pulled together with a thread (for example, between the eye and eyebrow, nose and mouth). To obtain folds, foam rubber is sewn to the back of the fabric and stitched in one direction and then in the opposite direction.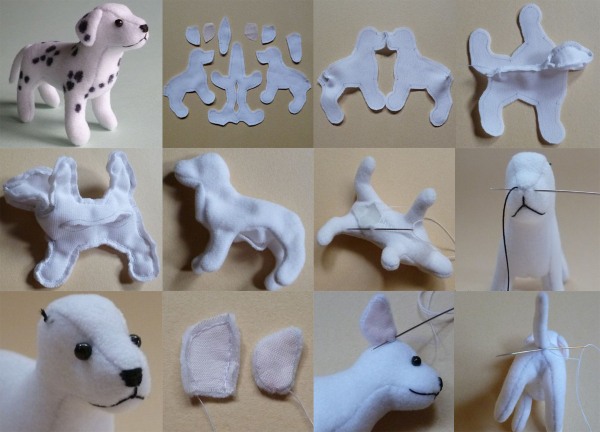
The animal's ears are not stuffed and are made of two types of fur: fluffy on the outside and short-haired on the inside. When the head is ready, it is attached to the body with a blind stitch.
Cat
DIY fabric toys in the form of a cat are made using different techniques. If it is a tilde, then patterns for beginners imply the absence of clear lines. Only the outlines of the animal are drawn on the template, there are no separate details on the limbs or tail.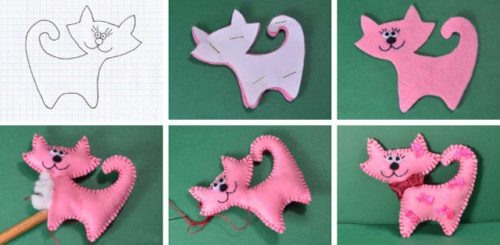
The cat's body, paws, tail and head in this technique are a pattern made from one piece of fabric. It is stitched, cut out, stuffed, turned inside out. Tilda cats are characterized by the presence of cute details: blush on the muzzle, a miniature nose, embroidered or glued on, whiskers.
When making a volumetric cat, you need to remember that before sewing the parts together, you need to cut out the spaces between the fingers.
The contour of the eyes, nose, moustache and mouth are best embroidered with floss. You can also often see stitched areas between the fingers. The tail is sewn on with a blind stitch.
Hare
The process of creating a bunny is not complicated: the toy goes through all the standard stages. The animal is distinguished by its powerful hind limbs and large ears, which is often emphasized. The details are cut out according to the pattern, stitched, filled with filler, and turned inside out.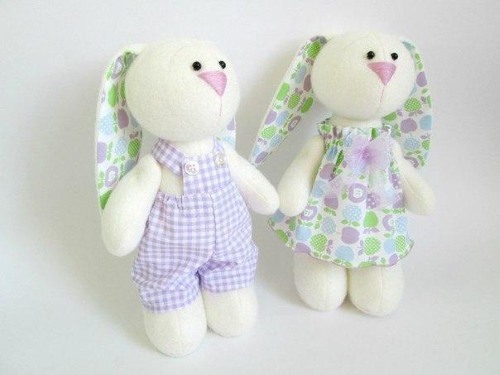
The animal's muzzle can be embroidered entirely with threads or made of other materials: the eyes are made of fabric or using buttons. The ears are stuffed with filler or used without it, depending on the desired result. The standing ears have a wire frame. After designing, they are sewn to the head.
Particular attention should be paid to the process of filling the animal's hind legs, since they have a bend and may not be tightly filled. This will affect the appearance of the finished toy. A flat toy hare after cutting is stitched with thick threads on the front side, can be filled with filler or not contain it.
Turtle
The product is often used as a pillow, so a large-diameter circle is used as a base. Additionally, you will need 4 limbs, a head and a tail. After the parts are cut and stitched, all the parts are filled with foam rubber or synthetic padding, except for the tail. The body parts are sewn to the shell. The turtle's eyes are embroidered with floss.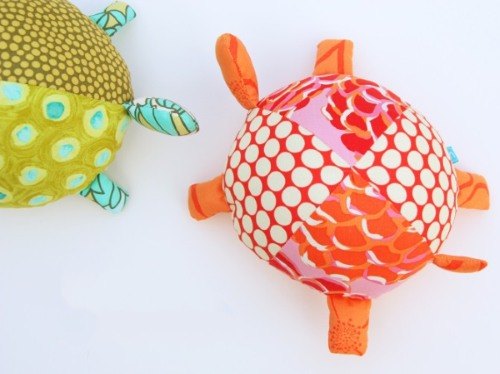
A more complex version has a separate body, shell, limbs, head. To complicate the work, the shell is stitched on top with circles or polygons, imitating the natural texture and color.
Teddy bear
It is one of the most popular heroes among folk art. There are many options for making and performing the animal. Most often, plush or other fabric with a soft short pile is used. To make the image realistic, wax or nail polish is used to create the nose.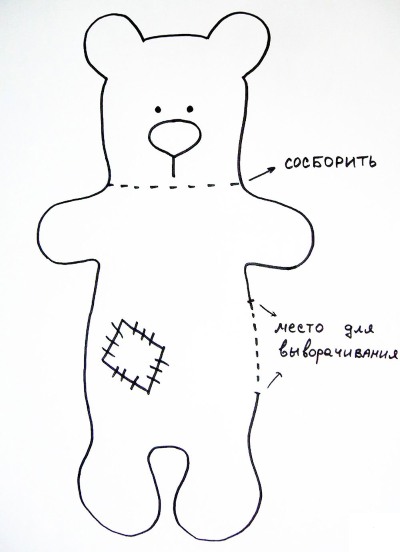
A piece of felt of the appropriate size is glued to the desired area. The nose is sewn along the edges, and then hot wax is applied to the fabric using a hair dryer. A similar effect is achieved if, instead of wax, several layers of transparent varnish are applied, each layer of which is sanded until smooth.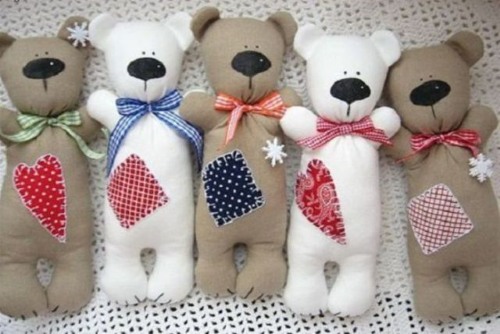
This technique makes the nose shiny and lifelike, “wet”.
Polymer clay can be used as a nose. The product is modeled, then baked and glued with special fabric glue.
Hedgehog
Making a hedgehog has its own nuances: you need to come up with something that imitates needles. To do this, you can first make many small pompoms from knitting threads of the selected color and then attach them to the back of the workpiece. A simpler version uses artificial or natural fur with long fluffy pile.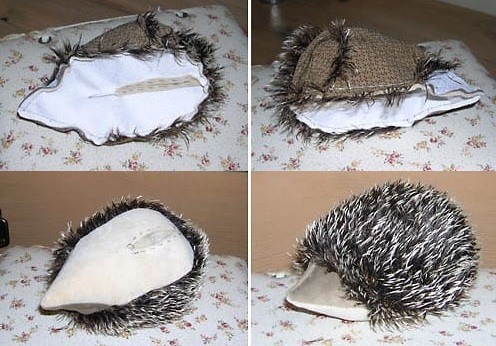
The color of the product can be any, but if you want it to look natural, then for the muzzle, belly and ears it is recommended to use flesh-colored, beige or golden fabric. For the eyes, large black beads or round buttons are most often used.
Owl
The bird's distinctive feature is its large, expressive beak and a unique expression on its face. To make the beak, you can use thin suede, which is sewn together on both sides and filled with padding polyester, after which it is sewn to the face.
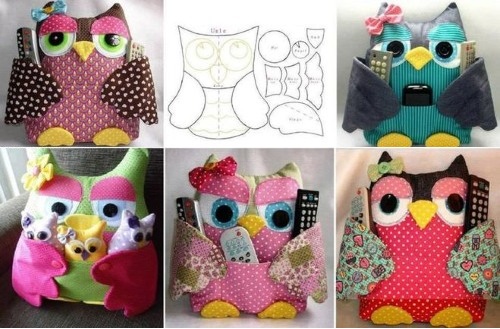
The second option is to form a beak of the desired shape from polymer clay. Such a nose looks realistic, imitating anatomical holes and curves. For simpler versions of the owl, the beak is a triangular piece of fabric sewn or glued to the face.
To get the bird's eyes, you need to take 2 ovals for each, larger and smaller diameters. They are successively glued to the eye area, and then the pupil is glued on. Usually this is a small button or piece of fabric.
Frog
A detailed diagram of the toy is shown on the pattern. The product is drawn on the fabric, the details are cut out, and sewn together. The amphibian's eyes are usually emphasized, which are depicted as large round apples. There can be several options for implementing the organs of vision: from a simple round one, glued to the face, to elements sewn separately to the head.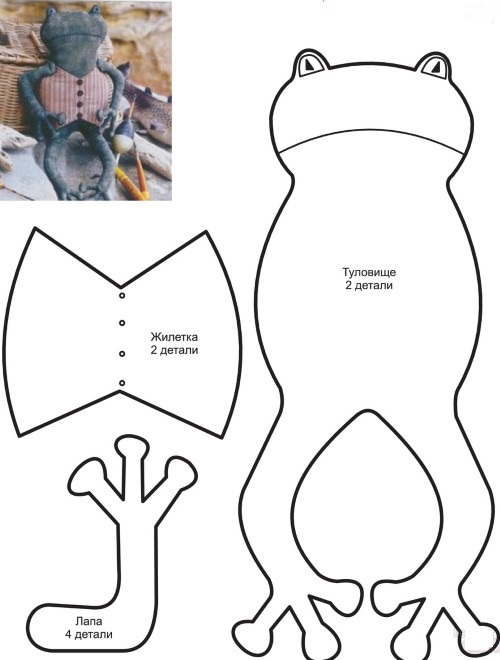
These can be 2 semicircle elements that are filled with filler, or round elements. They are stitched along the edge and then pulled together into balls. Pupils are glued onto the finished eyes with special glue.
Deer
The reindeer toy can often be found in a more primitive design, in the form of flat elements. They are given as a souvenir for the Christmas tree. The flat toy is cut out, stitched along the front side with coarse threads using an overlock stitch without turning over. The amount of filler in such a toy is minimal.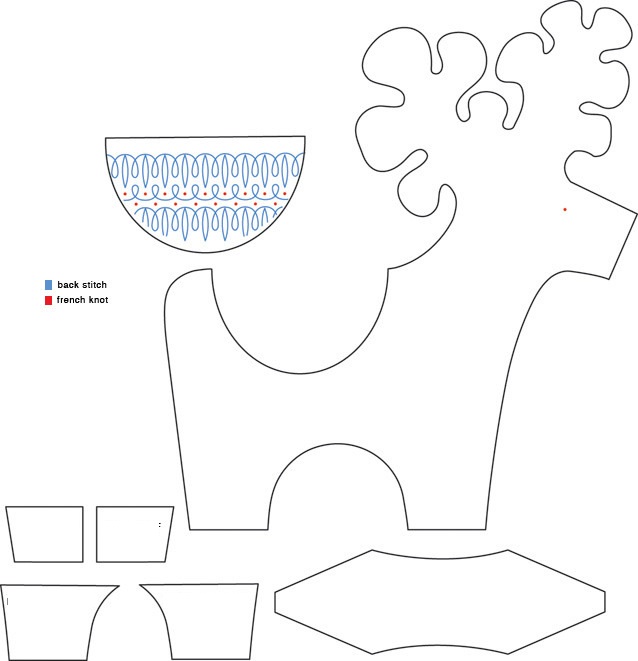
The animal's horns can be made from brown fabric., a piece of leather or even using tree branches.
Doll
When making a doll, you need to remember that the fabric for the body should have the appropriate color. The technology for making a doll is somewhat more complicated, since in addition to the body and limbs, you need to take care of making her hair, clothes, and shoes.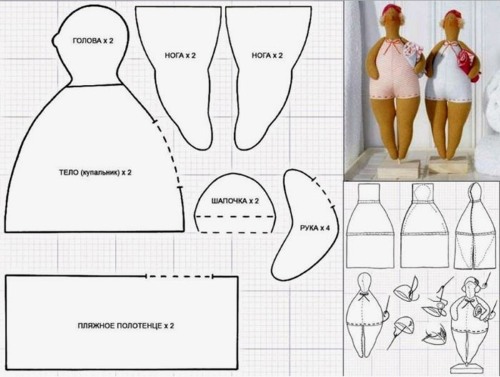
Dolls with lush hair or even a hairdo have a special charm. To obtain it, it is recommended to use knitting yarn of the required thickness and color, which are sewn with small stitches to the head pattern. Pieces of felt or fabric cut into long rectangles sewn to the head can be used as hair.
Another technique for obtaining hair is hair obtained by felting special yarn. Curls are obtained by winding the yarn on sticks of the required diameter. The sequence of making a doll is as follows: the body, head, and limbs are cut out. Then the product is turned inside out, the body parts are filled, and sewn to the body.
Since the head is time consuming and contains many details, it is completely shaped and then sewn on.
Dog
The Tilda dog is made of natural materials: linen, cotton. The color of the product is natural, beige or brown. The pattern consists of 2 parts: the first is the body and limbs, the second is the ears. A dog in another technique implies clear individual parts: limbs, a contoured muzzle with realistic details.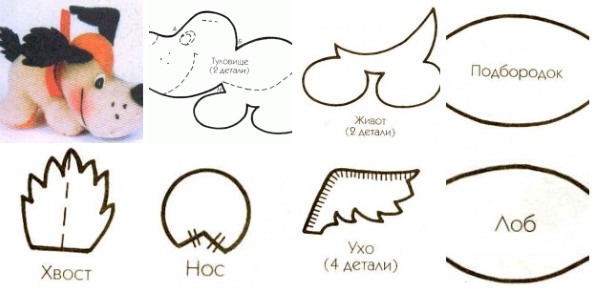
When making an animal, you can use the method of making a nose, as described for a teddy bear, since this is the part of the body that is often emphasized in a human friend. Ears are most often depicted as long and hanging. The dog's head consists of patterns for the front and back of the head. The ears are sewn on at the junction of these parts.
Little fox
The animal's muzzle is distinguished by its triangular shape. The pattern may imply its execution by cutting out a part that, when sewn, is a cone. Such a mouth is sewn onto flat or volumetric products. At its end there is a nose in the form of a button, a stuffed fabric ball or a part made of polymer clay.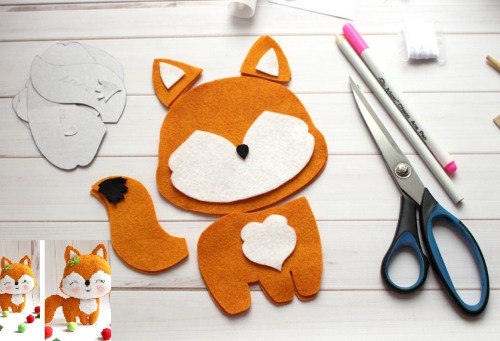
The color of the toy can be a combination of red and white, or be in a single color. The order of combining colors and details is indicated on the pattern. The ears are small in size, triangular in shape, they are sewn on the border of the front and back of the head. Usually the pattern does not provide for filling this part.
Horse
The peculiarity of making a horse is the need to make a mane. After marking and cutting out the parts on the border between the 2 parts of the body, it is placed on top. For the mane, it is necessary to wind yarn on 2 rectangular pieces of thick cardboard of the selected width (along the length of the mane). A piece of masking tape is glued on top of this winding, after which the entire resulting spiral is removed.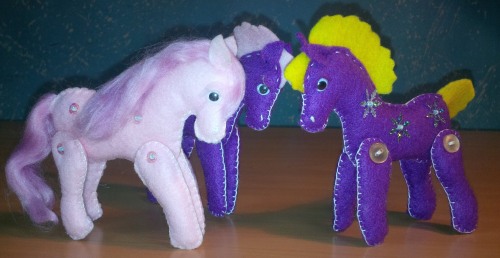
Without removing the adhesive tape, the mane is applied to the place where it should be. Then it is stitched in the middle along the entire length of each part of the pattern. Then the tape is carefully removed. When both parts are sewn together, you get a lush mane. The tail is a skein of yarn of the selected length, which is stitched by machine in the right place.
Useful tips
Scroll:
- To making the toy did not become financially expensive, you can find many materials at home. For example, you can use the inside of an old blanket made of natural or synthetic fiber as filler. Even scraps obtained by cutting things will help.
- Selecting a color scheme lies entirely with the master, but it is necessary to take into account the compatibility of colors and materials with each other. If the fabrics are colorful, then several shades should intersect.
- You can use the most bold contrasting combinations. This applies not only to color, but also to images. For example, checkered fabric can be combined with polka dots or colorful fabric, geometric shapes. For the experiment to be successful, you first need to try the fabrics on each other.
- When making a toy with your own hands from fabric, even using a pattern for beginners, difficulties may arise with choice of filler. At this stage, it is necessary to choose those options that do not roll. To check its suitability, it is necessary to take a small amount of material and try to roll it into a ball in the palm of your hand. If you can do this, the filler will gather in lumps and protrude on the sides of the product, it is not suitable.
You should not choose the most expensive fabric for a toy, especially for beginners. Compliance with each stage of work and accuracy will be of decisive importance, so you can choose fabrics in the middle price category.
Video: DIY Toys from Fabric. Patterns for Beginners
How to sew a kitty and a kitten with your own hands, find out in the video:
How to sew a soft toy, watch the video: