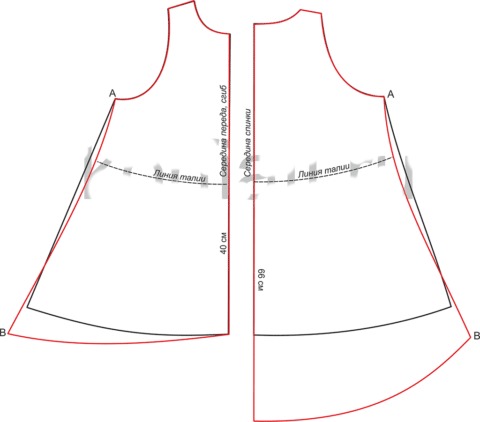
A-line dress is a suitable model for training a novice dressmaker. A ready-made individual pattern-base will make sewing successful. The main condition for successful sewing is a good fit, in this case it is guaranteed.
What is a trapeze dress, silhouette
The A-line silhouette first appeared on the fashion catwalk in 1957. Young Yves Saint Laurent, after taking over as chief fashion designer of the legendary house of Christian Dior, released his first collection based on the abstract artist Mondian.
The silhouette of the dress stood out from the works of other designers, was immediately liked by contemporaries and soon became popular all over the world. Today, with the revival of interest in vintage items, the A-line dress is coming back into fashion.
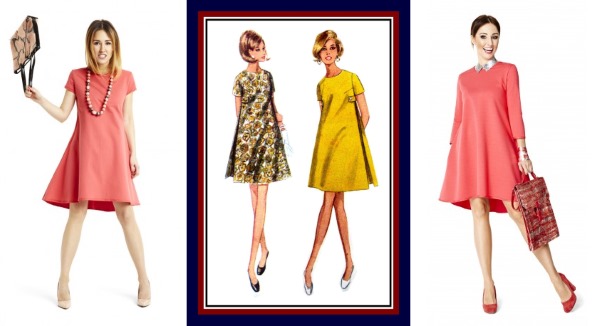
In its first version in the 60s, the famous garment had a round neckline. The dress was sleeveless, and the short skirt flared above the waist to allow freedom of movement.
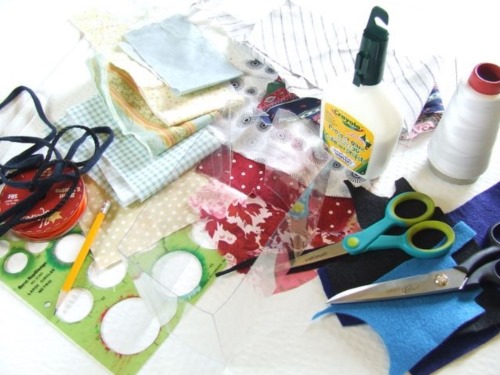
Necessary tools for constructing a pattern
A-line dress (pattern for beginners is based on an individual base) will not take much time to sew.
Tools needed to construct the pattern:
- a simple pencil of hardness B or HB;
- paper for drawing patterns and making templates;
- rulers 90 cm and 50 cm long;
- triangle with an angle of 90°.
Accessories for cutting and modeling patterns on fabric:
- measuring tape;
- tailor's chalk or soap;
- tailor's pins;
- tailor's scissors.
At the first stage, the shape of the figure is assessed. Depending on this, a standard design is used or an individual pattern is built for its further modeling into a trapeze dress. With pronounced features of the original figure, it will be easier to make and model an individual basis than to adjust a ready-made one.
How to take measurements for a dress correctly
Based on the measurements, an individual basis is built and changes are made to the finished pattern. All measurements are taken on the body, with a minimum of things worn. It is optimal for the body to be wearing only underwear.
At the stage of taking measurements, the woman wears the bra with which she plans to wear the future dress, and the fittings will also be done with it. Shoes with the right heel height will give the figure the correct pelvic position and help choose the appropriate length of the product. A thin belt should be tied around the waist, this technique allows you to accurately measure the torso.
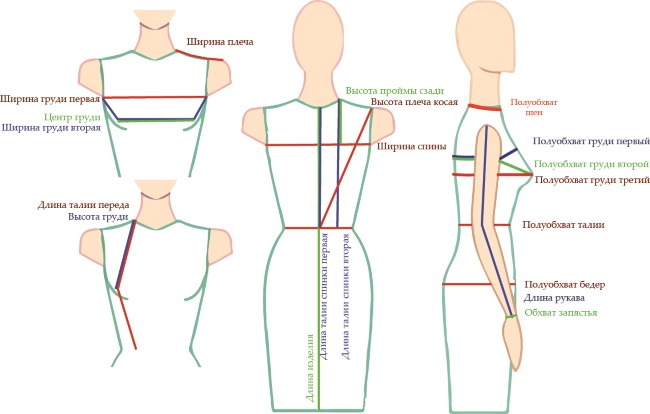
To construct and model a trapeze dress, you will need the following measurements:
| Name | Sequence of measurements |
| Half-girth of the torso at chest level | The measuring tape goes around the highest points of the chest. On the back, the tape is placed horizontally. |
| Half waist circumference | The tape is on the narrow part of the torso, parallel to the floor. |
| Half hip circumference | The measuring tape runs strictly horizontally across the highest points of the buttocks. |
| Position of the highest point of the chest | The distance is measured from the protruding point of the chest to the intersection of the base of the neck and the shoulder seam. |
| Front length to waist | Measured from the intersection of the base of the neck and shoulder seam to the waist. The tape passes through the highest point of the chest. |
| Dress length to waist behind | The distance from the intersection of the base of the neck and the shoulder seam to the waist is measured. The tape passes through the protruding point of the shoulder blade. |
| The width of the chest at its narrowest part | The measurement is taken in a straight line between the front corners of the armpit folds. |
| Width of the wide part of the back | The measuring tape connects the back corners of the armpit folds |
| Shoulder width | between the extreme points, from the right shoulder to the left. |
| Shoulder girth | The tape is placed along the widest part of the arm. |
| Sleeve length (if any) | Distance from the protruding point of the shoulder to the wrist or desired. |
| Dress length | The tape is placed from the highest point of the shoulder seam to the desired length of the garment. The tailor's tape passes through the highest point of the chest. |
Some measurements are used only for the selected style of the product:
- pocket entrance height;
- yoke level on the shelf;
- yoke level on the back;
- underbust line;
- wrist circumference (for long sleeves);
- elbow circumference (for long fitted sleeves).
Having a similar model in your wardrobe will simplify the task of determining the length of the dress and the location of the style lines. Measurements are taken on the finished product and transferred to the pattern drawing.
Essential elements of a trapeze dress
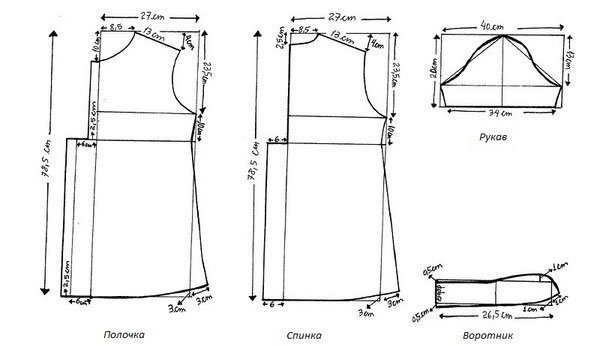
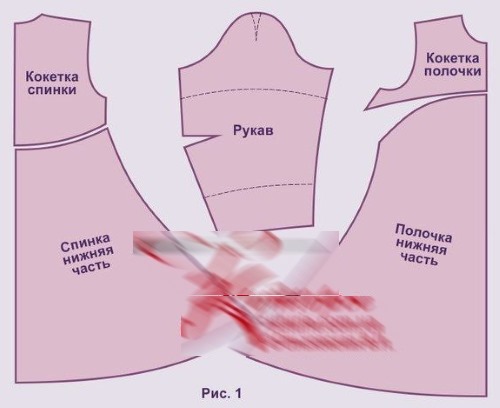
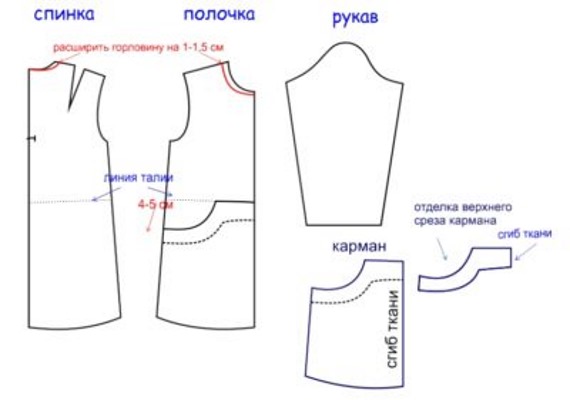
The trapeze dress consists of the following parts:
- shelf – 1 piece;
- the back can consist of 2 parts with a seam in the middle, into which a zipper is sewn;
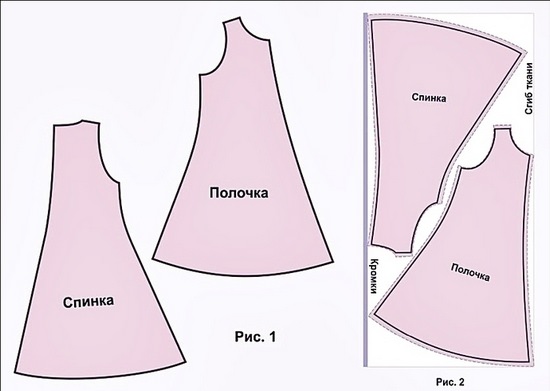
- sleeves - 2 pieces, depending on the model they can be long, 3/4, short or absent altogether. When the dress is sleeveless, the armhole is finished with an armhole facing;
- collar – 1 piece. Its presence depends on the selected model; if it is absent, the neck is finished with a neck facing.
A fashionable item will become irreplaceable if there are pockets at the hip level. To make them, a pattern is prepared for the valve, facings, valance, pocket sacks, and the patch pocket itself (according to the model).
Step-by-step construction of the pattern
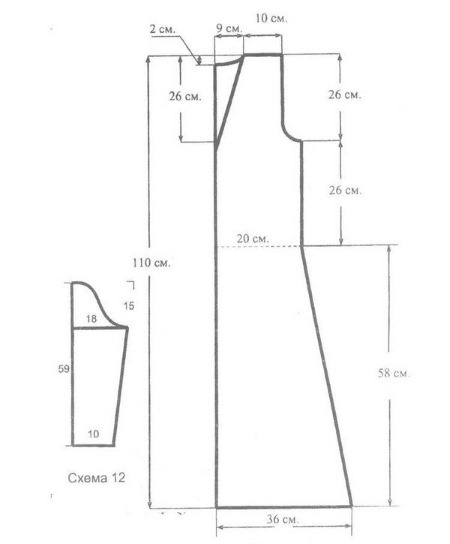
A-line dress (pattern for beginners is presented further in the article) is constructed on the basis of an individual dress base with a set-in sleeve. For a figure close to standard, a ready-made pattern is used. Correctly taken measurements will help determine the size and place of changes.
Construction based on a ready-made pattern is carried out in several stages:
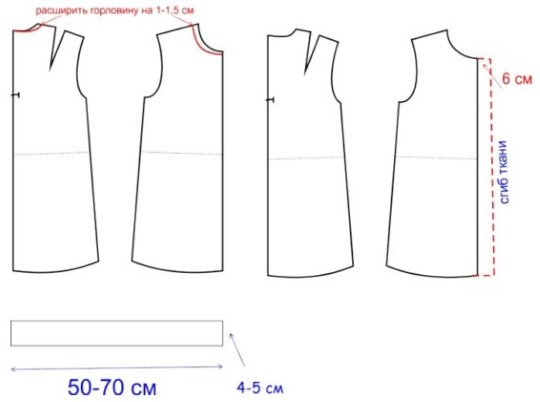
- The main lines of the base pattern are transferred to the prepared paper. Darts on the waist line are not used from the base in the new pattern, they do not need to be transferred to the new drawing.
- The bust dart is transferred to the armhole.
- The expansion of the shelf and back is marked along the bottom line. The expansion is laid according to the model from 7 to 15 cm.
- A new side seam line is drawn. At the top point of intersection with the armhole, it coincides with the base, then gradually widens - slightly to the waist line and strongly to the bottom line.
- The construction of a set-in sleeve for an A-line dress has no special features; the basic pattern is used without changes.
- The position of the pockets is marked on the shelf, the details of the pockets (flap, patch pocket) are drawn on the shelf, then transferred to a separate sheet.
Large symmetrical details of the back and front are cut in half, a fold line is marked in the center. Small details are cut out entirely. A-line dress looks good with raglan sleeves. The armhole line directed to the neckline emphasizes the silhouette of the model, which is widened downwards.
The easiest way to model a raglan is on a proven basis with a set-in sleeve:
- On the pattern of a one-seam sleeve, a line is drawn connecting the point of the height of the sleeve cap and the middle of the sleeve bottom line.
- The sleeve is aligned with the armhole at the front roll point (in the narrow part of the armhole shelf and the corresponding point on the sleeve).
- The front roll point is connected to the neckline, the line is drawn at a similar angle to the side line.
- To construct the back half of the sleeve, the steps are repeated.
Raglan is the easiest to process. To sew it in, you do not need to form the fit of the armhole relative to the armhole. First, all the details of the dress are collected, the neck and fastener are processed, then the side cuts are sewn and the bottom of the product is folded.
How to sew a trapeze dress yourself: step-by-step instructions
A-line dress (the pattern for beginners is constructed with a fold in the middle of the front and a seam in the center of the back) is cut out on fabric folded in half with the right side facing inward. The middle line of the front coincides with the fold of the fabric, and the cut of the middle of the back is parallel to the edge.
With sleeves
The production of sewing products is carried out in a certain sequence, the observance of which saves time and helps to obtain a neatly and correctly sewn product.
Step-by-step production of a trapeze dress with sleeves:
- On the shelf, pockets are processed (if any according to the model). Bust darts are stitched.
- The middle seam is where the fastener (droplet or zipper) is processed.
- The back and front are stitched and overcast along the shoulder seams.
- The neck is finished with facing.
- The side seams of the dress and sleeves are stitched and overcast.
- The sleeves are sewn in and the armholes and caps are overcast.
- The bottom of the dress and sleeves are overcast.
- The bottoms of the dress and sleeves are hemmed by hand or machine.
Depending on the model, the sequence may vary, for example, instead of facings on the neckline, the neckline may be decorated with a turn-down collar. On the shelf up to the pockets, reliefs, yokes, and undercuts are stitched and overcast.
For overweight women
The A-line silhouette hides the features of a full figure well and highlights its best sides.
The model is selected according to body type:
- For a girl with a large bust, a style with an expansion from the highest point of the chest is suitable. Half of the bust dart opens towards the bottom line, the remaining part is directed to the side cut.
- Broad shoulders, belly and narrow hips - A-line dress slightly flared at the bottom, sleeveless, with an American armhole.
In the A-silhouette, much attention should be paid to the decor. Embroidery or applique should be placed near the face.
A sundress for a full figure is sewn in the following order:
- Decorating a shelf.
- The bust dart is stitched on the front and ironed downwards.
- Pockets are processed (slit or in the side seam).
- On the back, the central seam is stitched and the zipper is processed.
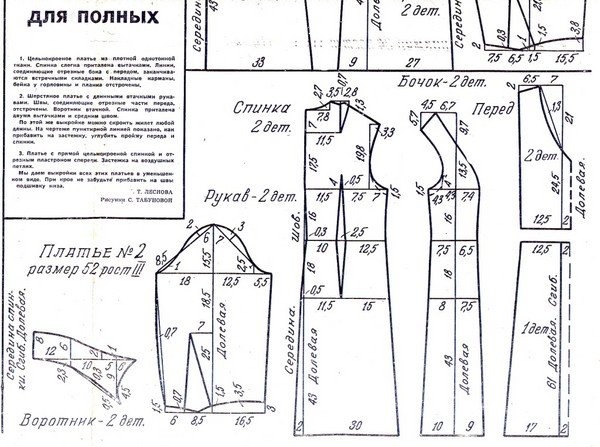
- The shoulder seams are sewn together and the neckline is finished with facing.
- The side seams are joined.
- The bottom of the garment and sleeves (if any) are hemmed.
Clothes for plus size women should envelop the figure. Decorative seams should be vertical.
60's A-Line Dress
Retro 60s styles suit different body types:
- A girl with a flawless figure will choose a shortened model, sleeveless, with a fitted top and a slight flare that starts just above the waistline. The standard of that time is the famous model Twiggy in such outfits.
- A figure without a bust finds harmony in an A-line dress with chest pockets or with a gather from the yoke located above the bust line.
The 60's style of sewing uses decorative stitching and piping.
Sequence of sewing a model with patch pockets:
- The valves and collar are processed.
- A finishing stitch is placed along the edge of the parts.
- On the shelf, stitched pockets with flaps are processed.
- The shoulder seams are stitched.
- On the shelf, a fastener with strips is processed.
- The collar is sewn in.
- The armholes are finished with facings cut on the bias.
- The side seams are sewn together.
- The bottom of the product is folded over using a machine.
The threads for the finishing stitching were selected to match the fabric, twisted, and thicker than those for the connecting seams.
A-line dress with yoke
The line of the cut-off yoke can be either straight or shaped, smoothly transitioning at the side seam into the seam of the cut-off yoke of the back.
To get the yoke pattern, you need to match the front with the back along the side seam. Mark the position of the cut-off piece on the center line of the back and the front. From these points, draw lines into the pattern at a right angle and connect them with a smooth line. When cutting off the yoke pieces, add a 1 cm seam allowance on both sides.
Sewing sequence:
- The first operation of sewing such a model will be sewing the yoke to the main part.
- The stitching seam is overcast and finished with a finishing stitch.
- The order of further assembly of the product is the same as for the previous model.
The figured yoke is stitched by 0.5 cm with thicker threads dyed to match the fabric.
How to Make a Trapeze Dress for a Girl
To sew a sleeveless A-line dress for a child, a novice dressmaker only needs to copy the pattern from the girl’s ready-made clothes.
Particular attention should be paid to the armhole line, neckline and position of the shoulder seam.
The position of the lower armhole point can be checked using the following calculations:
- horizontally – ¼ of the child’s chest circumference + 3 cm;
- vertically – 1/8 chest circumference + 7 cm.
After the neckline and armhole lines are copied onto the back and front drawing, the length of the garment is measured from the highest point of the shoulder. An extension is laid along the side cuts and a rounded hem line is drawn. The wider the dress at the bottom, the more rounded the hem line will be.
Sewing a children's dress:
- Do embroidery or applique on the shelf.
- Sew shoulder and side seams.
- Trim the neckline and armholes with bias binding.
- Trim the bottom of the dress with piping.

The satin trim is matched to the trim of the children's sundress.
A-line loose dress
A-line dress (a pattern for beginners can be with sleeves, but for the first experience it is better to choose a model of clothing without them) can have an extension towards the bottom not only along the side seams.
The construction of a free silhouette is carried out in the following order:
- On the basic base of the shelf and back, three vertical lines are drawn. Two of them are directed to the neck, one to the highest point of the shoulder seam.
- The shelf and back are cut vertically and moved apart at the bottom at equal intervals.
- The new cut of the front and back is drawn on paper or directly on the fabric.
- At the place of the cuts in the product, folds are formed, and the product turns out to be evenly fluffy at the bottom.
A very popular model is one with different bottom levels on the front and back. To draw the bottom line correctly, the front and back are aligned along the side cut.
Near the middle seam, the bottom line is drawn at a right angle, and then it is formed into a smooth curve. A loose trapeze dress made of chiffon is made from two identical layers of fabric.
The sewing of two layers of the dress is carried out simultaneously:
- The shoulder seams are stitched.
- The middle seam of the back is not connected completely by 20 cm.
- The back neckline is fastened with a droplet fastener.
- The side seams are sewn together.
- The neckline and armholes of both layers are aligned and simultaneously finished with bias binding.
- The bottom is folded over using a Moscow stitch on a sewing machine.
If the chiffon is very translucent, a denser fabric is selected for the underdress.
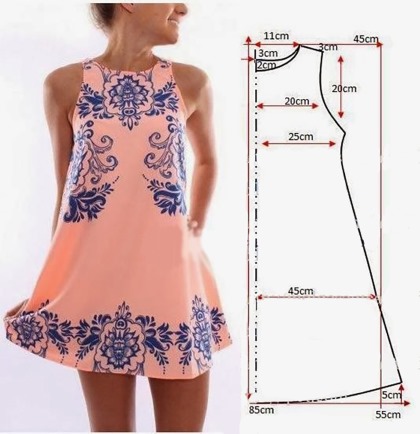
A-line sundress
For the pattern, the lower part of the armhole is moved up 2 cm. On the front of the A-line dress, the neckline is drawn perpendicular to the middle fold. It connects with the bottom line of the armhole with a smooth curve and goes to the back perpendicular to the middle of the piece.
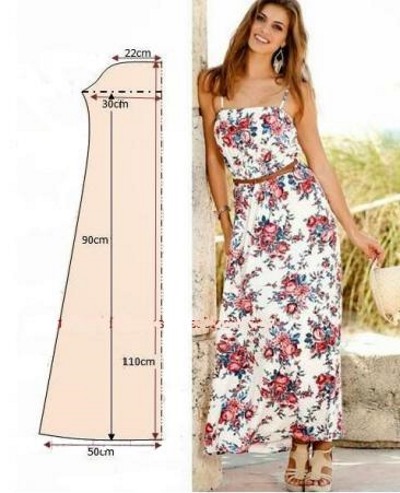
A-line sundresses have their own sewing features:
- The main load during use falls on the top of the product, especially in the area where it connects to the straps. Before sewing on the top facing, it should be reinforced with adhesive fabric.
- To make the product easy to put on, a 30-40 cm long zipper is sewn into the left side or central back seam.
Sewing procedure for a trapeze dress:
- Process the straps of the sundress: sew the vertical sides of the pieces face to face, iron the seam, turn inside out and iron again.
- Glue the upper edge of the back and front, stitch the darts on the front.
- Stitch the top of the sundress with a facing, while simultaneously inserting the straps into the seam.
- Process the zipper in the side seam.
- Process the bottom of the product.
The straps of the sarafan can be of different widths, depending on this their processing changes. Narrow straps can be sewn without turning inside out, the seam width is 0.1 cm from the edge of the fold of the part.
The sequence of sewing a dress, regardless of the model features, has much in common. Having mastered the trapeze dress, a novice dressmaker can move on to constructing more complex patterns, special knowledge for this already exists.
Article formatting:Natalie Podolskaya
Video about sewing a trapeze dress
A-line dress - no pattern needed: