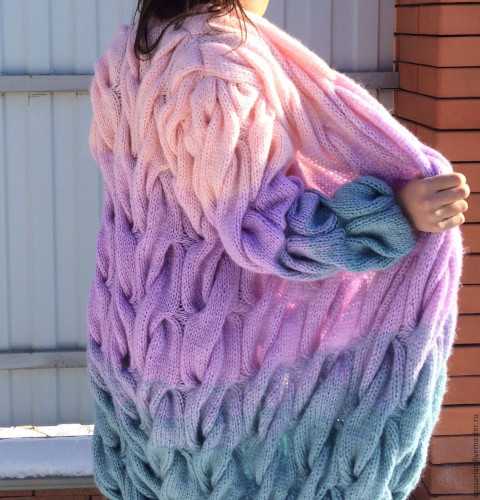
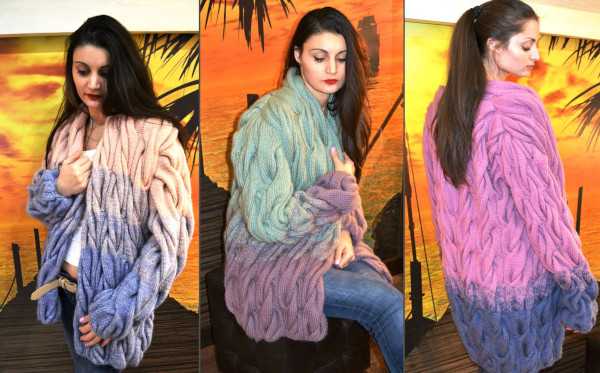
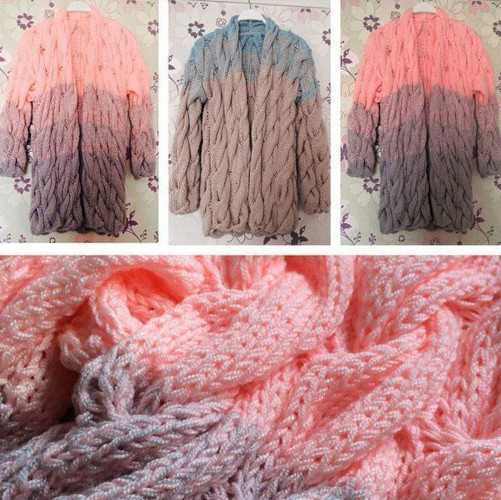
Lalo Cardigan is a practical and fashionable wardrobe item, which can be worn in the off-season or with the onset of windy cool weather.
Thanks to the detailed diagrams, you can create various braided patterns with knitting needles, because this pattern is considered the main distinguishing feature that outerwear belongs to this style.
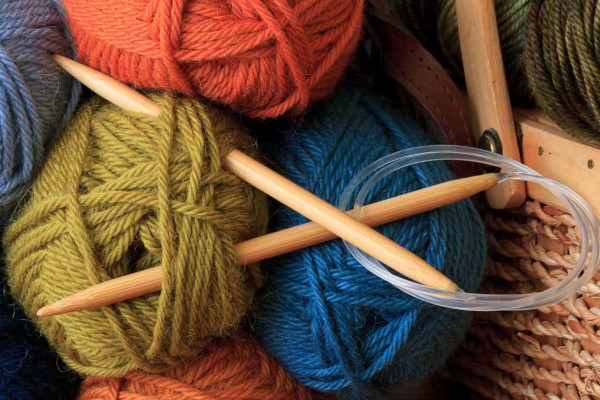
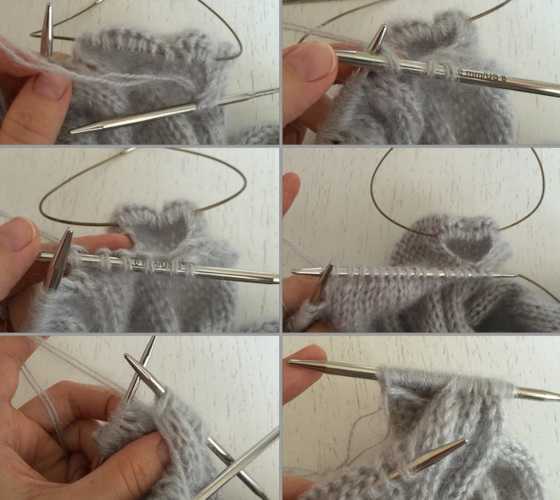
Necessary tools and materials
Lalo cardigan with knitting needles (the patterns explain in detail how to knit beautiful outerwear) for women should be knitted from woolen material.
It is also necessary to prepare:
- tool for closing stitches;
- 3mm circular knitting needles, 40cm long, for braiding;
- markers with knitting needle and loop holders;
- 2 circular knitting needles 5 mm, 60 and 80 cm long.
For the design of the children's cardigan model, it is best to use semi-woolen threads in 2 additions. The knitting needles should be circular No. 5.
Additionally, you need to take:
- a large pin with markers;
- a needle with a large eye;
- circular knitting needle No. 4.
Schemes with description of works for beginners
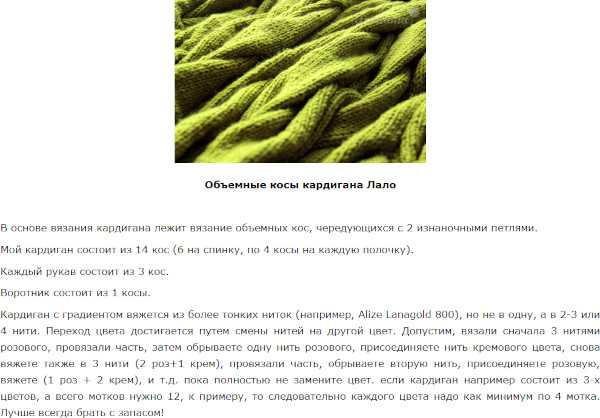
Knitting patterns for pullovers, sweaters, and cardigans use braids as one of the elements, combining it with other patterns. However, to design a Lalo cardigan with knitting needles, braids should be the only type of pattern to make all parts of the clothing, including the sleeves. This pattern can include 2 or several dozen stitches.
Knitting mainly involves lush and large weaves.
Features of the style:
- voluminous braids;
- optimal length;
- wide sleeves that are caught at the wrists and have low armholes.
It is permissible to knit outerwear as a single piece or from several separate elements.
There are also 2 options for how to start work:
| Way | Features of knitting |
| 1 | It is necessary to make a set of only half of the stitches in the braids. After that, in a new row, you should knit the required number of elements so as not to perform the binding of the lower part of the garment. |
| 2 | In this case, you need to knit the full number of stitches, and then in the 3rd row make the first overlap. |
Voluminous outerwear is great for slim and tall women to emphasize the delicacy and fragility of the figure. If a woman has curvy shapes, you should not wear this type of cardigan. In this case, it is recommended to create a not very voluminous, another model of warm clothing.
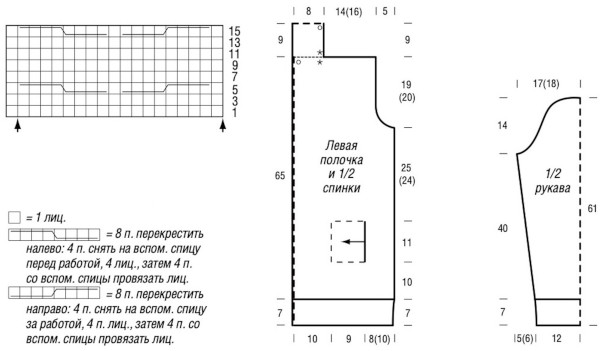
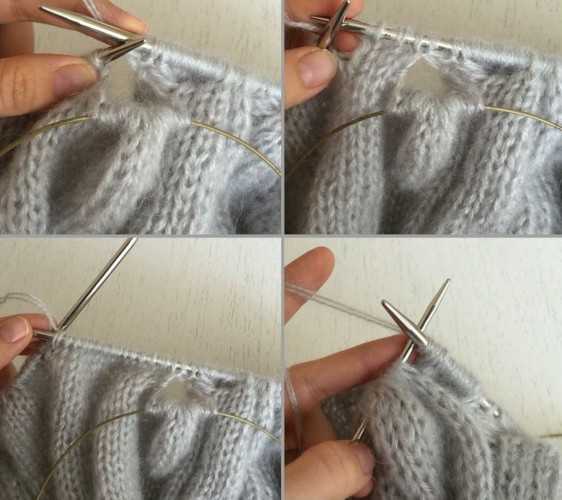
The diagrams contain abbreviations to indicate loops and other elements:
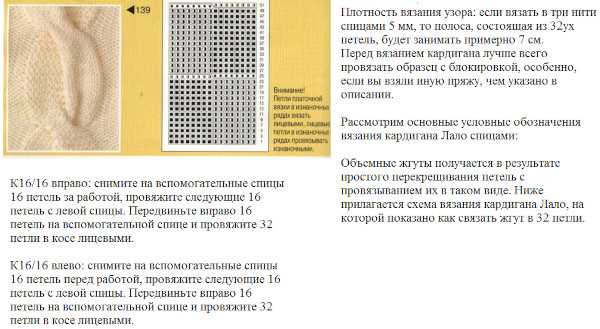
- Braid 16/16 to the right side. In this case, you need to transfer 16 stitches to the additional tool and leave them behind the fabric, and knit the next 16 elements from the left knitting needle. Then, you need to move 16 stitches to the right side on the additional tool, forming 32 front loops in the braid.
- Braid 16/16 to the left. You need to remove 16 elements on an additional knitting needle, leaving them in front of the fabric. From the left tool, you need to knit the next 16 stitches. Next, you need to move 16 elements to the right on the additional tool, and create 32 front stitches in the braid.
- Braid 13/13 to the right side. On an additional tool behind the canvas you need to throw 13 stitches, then make 13 front elements, and then knit 13 stitches with the front ones from the auxiliary needle.
- Braid 13/13 to the left. In front of the fabric, 13 stitches must be transferred to an additional knitting needle. Next, 13 front elements must be made, and then, by analogy, 13 loops must be knitted on an additional tool.
- *…*. Indicates that these elements need to be knitted to the end of the row with alternation several times.
- Front loop. Indicated as k.p.
- Purl stitch. Designated as ip.
- Edge loop. Indicated as edge.
Model for women
Cardigan Lalo knitting needles (patterns require attention so as not to miss stitches, otherwise you will have to unravel the work) for women, you need to start from the bottom. In this case, the front part must be designed together with the back.
Algorithm for performing work:
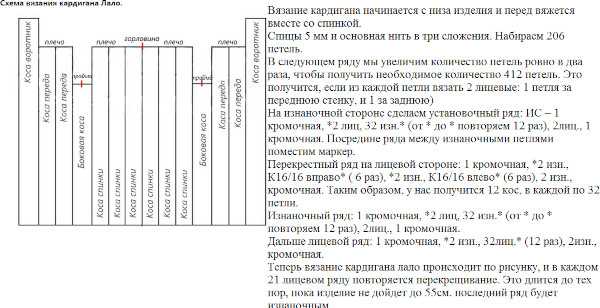
- The main yarn should be in 3 folds, while initially take knitting tools 5 mm. Make a set of 206 stitches.
- In a new row, increase the number of stitches by 2 times to obtain the required number of elements. There should be 412 stitches in total. To do this, make 2 l. p. from each element (1 stitch should be for the front wall, and the other for the back wall).
- On the wrong side, make a setting row. To do this, knit the edge, *2 knit stitches and 32 s. p.* (12 times), 2 knit stitches and the edge. It is recommended to place a marker between the purl stitches in the center of the row.
- On the front side, make a cross row. To do this, make an edge, *2 i. p., a 16/16 braid to the right side* (6 times), *2 i. p. and a 16/16 braid to the left side* (6 times), and also 2 i. p. and an edge. As a result, 12 braids should be created, each consisting of 32 stitches.
- Work from the wrong side a row of edge, *2 l. p. and 32 i. p.* (12 times), 2 l. p. and edge.
- Then knit a front row on the edge base, *2 sl sts, 32 sl sts* (12 times), 2 sl sts and edge st.
- Next, design the work according to the ornament. In this case, make a crossing in every 21 front row. Knit the fabric until it reaches 55 cm. The last row should be purl.
Step-by-step description of creating an armhole:
- In the front row, make an edge, *2 sl, 32 sl* (3 times), 2 sl and 8 sl. In the middle of the armhole, close 16 stitches. Then knit 8 sl, *2 sl, 32 sl* (4 times), 2 sl, 8 sl and close 16 stitches in the middle of the row to form the center of the new armhole.
- Then make 8 l. p., 2 i. p., *32 l. p., 2 i. p.* (3 times) and edge. As a result, 380 stitches should be created.
- Turn the fabric, continuing knitting only on 113 stitches from the left side of the front. For this, it is permissible to use needles that are 60 cm long. The other stitches should be on the same tools.
- In the purl row make an edge, *2 l. p., 32 i. p.* (3 times), and also 2 l. p. and 8 i. p.
- At the beginning of the front row, close 2 elements for the armhole 2 times.
- Next, at the beginning of each front row, decrease 1 stitch 4 times. Knit according to the pattern, not forgetting to make a crossing, because this is the main element of the ornament.
- When the armhole height reaches 20 cm, finish shaping the left front on the wrong side.
Instructions for knitting the shoulder with collar, back and back neck:
- In the front row make 68 stitches. However, in the braids, the elements are designed 2 together with the front ones. As a result, 36 elements should be created. To transfer these stitches, prepare a special holder. The 37 elements that remain are required for the collar.
- Next, work on shaping only the collar so that its height reaches 10 cm. Finish knitting with a purl stitch.
- When the outer front side is formed, knit the stitches in the braids 2 together with the front ones. As a result, 21 elements should be created. Transfer these stitches to the holder.
- From the wrong side to the back, fix the yarn. On each side, close 2 stitches 2 times for the armhole. At the same time, on each side, decrease 4 times by 1 element.
- On the front side make 36 stitches and close in the middle of 68 elements. Then knit 36 stitches in the remainder.
- For each shoulder of the back, transfer 36 elements to the holder.
To begin shaping the right side of the front, the material on the back side must be joined to the stitches on the right side. This part of the garment should be shaped like the left side of the front.
Step-by-step design of sleeves:
- For the right sleeve, make 16/16 braids to the right side, and for the left sleeve, to the left side.
- To design the first sleeve, cast on 53 stitches with 60 cm long circular tools. And make two l.p. from each element (1 stitch should be for the front wall, and the second - for the back wall). As a result, 106 elements should be created.
- The installation purl row consists of edge, *2 l. p., 32 i. p.* (3 times), 2 l. p. and edge.
- In 1 front row make edge, *2 i. p., braid 16/16* (3 times), 2 i. p. and edge.
- Then knit according to the pattern, making crossings in the braids.
- On each side, add 1 stitch in every 6th row (repeat 10 times). As a result, 126 stitches should be formed. Continue working in the same way so that the sleeve length is 45 cm.
- In the back row, finish the work, and also at the beginning of 2 rows, close 4 elements. Then close 3 and 2 stitches at the beginning of each 2 rows, respectively. Only 108 elements should remain on the knitting needles.
- To make the front row, make the edge, k2tog, continuing to the 3 outer stitches. Slip 1 piece, then pull 1 k through the slipped stitch and make the edge. There should be 106 pieces left after decreasing 2 stitches.
- To create a back row, perform similar decreases in each front row 9 times to get 88 stitches. At the beginning of the next 4 rows, close 3 elements. Then in the next 4 rows, close 4 stitches at the beginning. There should be 60 elements left on the tools.
- In the next front row, make an edge and 2 knit stitches together (5 times). Then make 38 stitches according to the pattern. After 5 times, knit 2 knit stitches and make an edge. There should be 50 elements left for knitting the back row.
- The new front row consists of edge, 2 knit stitches together (3 times). Then knit according to the pattern so that 7 stitches remain. Next, make 3 times 2 knit stitches together and edge stitch. There should be 38 stitches left.
- The next row of knits includes the edge, 2 ip together and *2 ip together* (16 times), as well as 2 ip together and the edge. The result should be 20 stitches.
- The other sleeve is designed in the same way as the first.
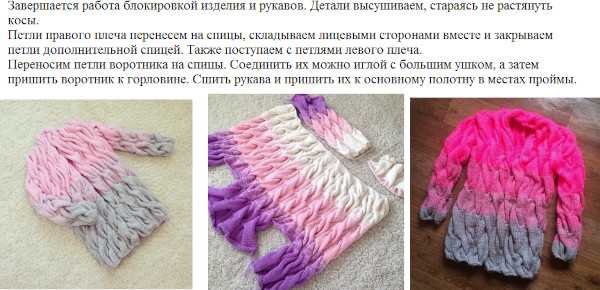
To finish knitting, you need to block the fabric with sleeves. Parts of the product need to be dried, but you can not stretch the braids. To close the loops of the right shoulder, you need an auxiliary tool.
To do this, the stitches need to be transferred to knitting needles and folded face-to-face. Do the same with the left shoulder elements.
The collar loops also need to be transferred to the tool. To connect them, you can use a needle with a large eye. After that, the collar can be sewn to the neck. Finally, you should sew the sleeves and join them to the main product at the armholes.
For girls
The Lalo cardigan knitted with knitting needles (the patterns will tell you how to create a children's clothing model) for girls should consist of 3 or 4 shades of threads, which should be thin and in the same color range.

Step-by-step knitting instructions:
- Cast on 198 stitches with yarn of one shade in 2 additions. In the 1st row, increase this number by 2 times, while making 2 l. p. from each element (1 stitch should be for the front wall, 1 - for the back wall). There should be 396 elements.
- The 2nd row consists of edge, *2 l. p., 26 i. p.* (14 times), 2 l. p. and edge. Mark the middle of the row with a marker.
- In the 3rd row make an edge, *2 i. p., braid 13/13 to the right* (7 times), *2 i. p., braid 13/13 to the left* (7 times), 2 i. p. and an edge.
- Starting from the 4th row, design all other even rows according to the pattern.
- Line 5 includes edge, *2 i. p., 26 l. p.* (14 times), 2 i. p. and edge.
- Continue knitting in the same way, crossing in every 21 rows. As a result, the height of the fabric should reach 48 cm.
- To divide the product into shelves and a back, in 1 row make an edge, *2 i. p., 26 l. p.* (3 times), 2 i. p., 6 l. p., close 13 stitches, 7 l. p., *2 i. p., 26 l. p.* (6 times), 2 i. p., 7 l. p., close 16 elements, 6 l. p., 2 i. p., *26 l. p., 2 i. p.* (3 times) and an edge.
- After that, each back and shelf are made using a separate skein of yarn.
- To make the armhole, perform a decrease. On the shelves, decrease 2 stitches 1 time and 1 element 4 times. As a result, the height of the armhole of these parts should be 18 cm.
- To make the collar, cast on 29 stitches. When the height reaches 9 cm, transfer the stitches to a large pin.
- To form the shoulder, use the following 56 elements. Having knitted 2 l. p., form 26 braid stitches with 2 elements in 1 l. p. Then repeat these steps again. As a result, 30 stitches should be created.
- Then proceed to the design of the back to a height of 66 cm. It is necessary to perform a decrease to make an armhole. To do this, decrease 2 stitches once, and then 1 element 4 times. The decrease should be done on each side. As a result, the height of the armhole on the back should reach 18 cm, as well as the height of the armhole on the shelves.
- To make the back shoulder, take 2 braids and make 2 stitches together. As a result, each shoulder should consist of 30 elements. Transfer the stitches to a pin. Knit the central elements that remain with a decrease. To do this, make 1 stitch for every 2 stitches.
- Decorate the second half of the back in the same way.
- To knit the sleeve, cast on 44 stitches. In a new row, make 2 stitches from each element (1 should be for the front wall, 1 for the back wall), so that you get 88 elements.
- In the next row make an edge, *2 l. p., 26 i. p. (3 times), 2 l. p. and an edge.
- Then make the edge, *2 sl st, 26 sl st (3 times), 2 sl st and edge. Continue working according to the pattern, making a crossing in every 21 rows.
- In every 6th row add 1 stitch to get 108 elements.
- Having reached 37 cm in height, start to design the sleeve cap. To do this, close 2 times 4, 3 and 2 stitches on each side. There should be 90 elements left.
- After knit the edge and 2 l p in 1 l p to the end of the row. Then make 2 l p in 1 l p and edge.
- The purl rows are designed according to the pattern.
- In new front rows, repeat the decrease 9 times. There should be 70 stitches on the tools.
- In the new front rows, close 3 and 4 stitches 4 times to obtain 42 elements.
- Continue decreasing on the front row, making an edge, 2 stitches together (5 times), 20 elements according to the pattern, again 2 stitches together (5 times) and an edge. There should be 20 stitches left that need to be closed.
- Design the second sleeve in the same way as the first.
To assemble the product, all parts must be steamed and dried in a horizontal position, fixed to the required dimensions.
Then you need to make shoulder seams. After that, you need to connect the collar elements with a knitted seam and sew it to the main product. Next, you need to make seams on the sleeves and connect them to the armhole.
Secrets for Beginners
The Lalo cardigan can be knitted with knitting needles (the patterns are simple, so they are suitable for beginners) by those with little experience.
To do this, it is recommended to use useful tips:
- When designing warm clothes from several shades, you need to select tones that will be combined with each other. In this case, the gradient must be calculated based on their number. The main thing is that the length of the line of all shades and transitional tones is the same.
- For children's clothing, it is advisable to take hypoallergenic material made of natural fibers. Bamboo with cotton and merino wool are suitable for this.
- The design on children's clothes must be dense so that it retains its shape over a long period of time.
Knitting needles are a unique tool that allows you to knit braids with complex interceptions. To work, you must use patterns, be attentive, and also be patient. As a result, you can make a fashionable and exclusive Lalo cardigan.
Video about cardigan Lalo
Master class on knitting a Lalo cardigan: