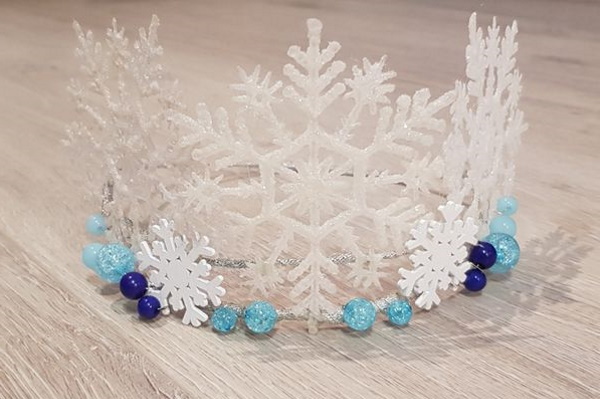
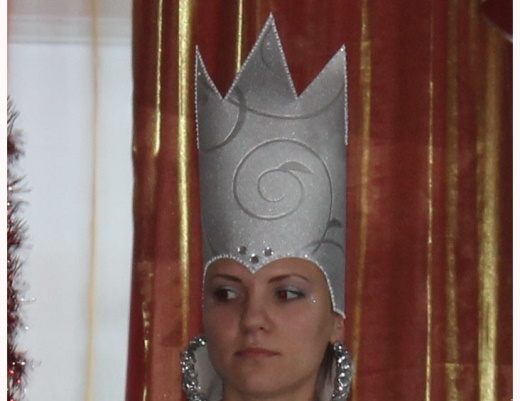
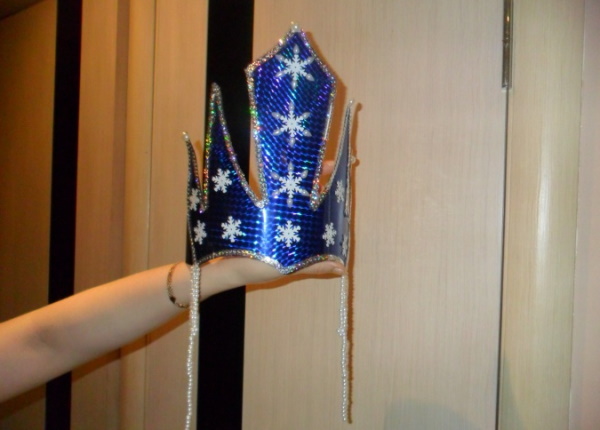
The Snow Queen is a famous magical character from children's fairy tales. Her costume may be needed for a theme party or children's holidays. The main part of the outfit is the crown. To make it yourself, you need to find out what materials and tools you can use, and also read several detailed descriptions on making the accessory yourself.
What you need to make the Snow Queen's crown with your own hands
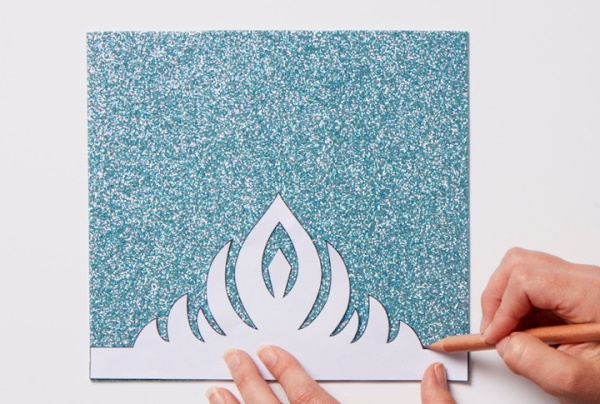
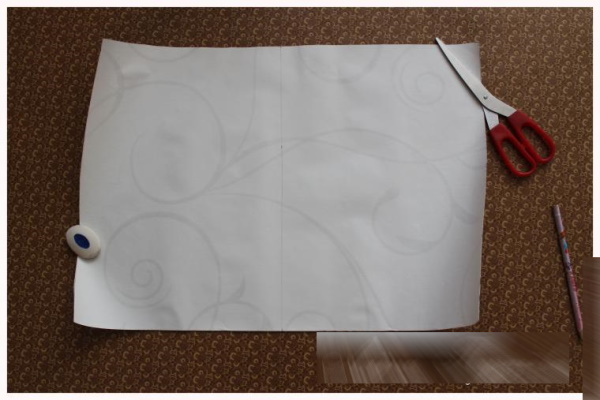
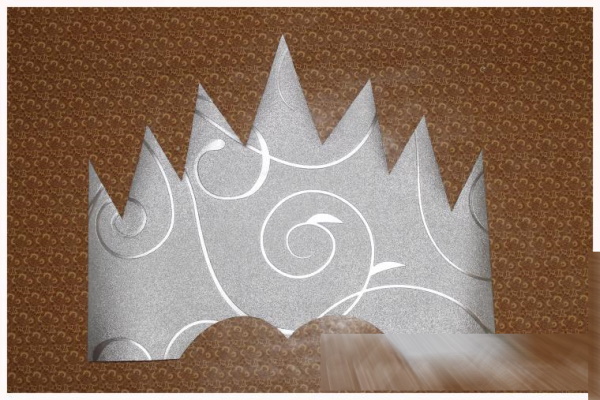
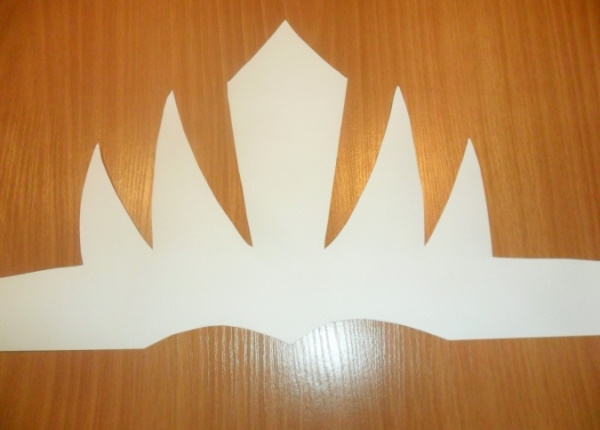
First, you need to prepare a template from thin cardboard. The Snow Queen has an unusual crown. It has several sharp and large teeth. The highest teeth are located in the center, and the smaller ones are on the edges.
The crown can be made for the entire head, or just the front part can be created, and the rest can be replaced with an elastic band. Before creating a template for option 1, you need to measure the circumference of the head and add 2 cm to the result. These will be allowances for fastening.
To make an accessory with an elastic band, you need to subtract the length of the product from the head circumference, and then cut off a piece of tape, subtracting another 1.5 cm. This is necessary so that the accessory does not fly off during movement.
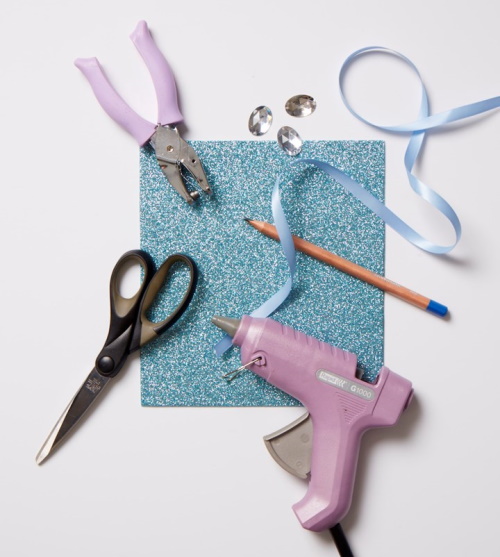
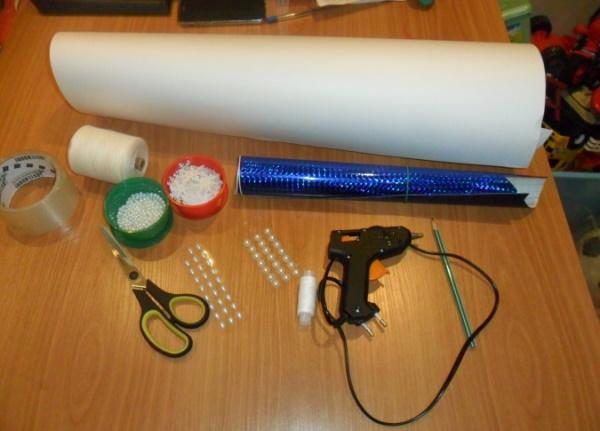
What can you make this decoration from, and what materials might you need:
| Main material | Necessary tools and additional materials | What can be used for decoration |
| Foamiran | Hot glue | Shiny braid, beads, rhinestones |
| Paper | PVA glue | Paints with glitter, sequins |
| Cardboard | PVA, chancery knife | Rhinestones, sequins, lace, thin fabric |
| Wire | Nippers, hot glue | Plastic snowflakes, large beads |
| Beads | Monofilament, wire, beading needles | Shiny beads, large rhinestones |
Sequins in the form of snowflakes, for decorating the crown, can be purchased at craft stores, or cut out of shiny paper using a figured hole punch.
Tools that should always be at hand:
- scissors;
- simple pencil;
- Moment glue;
- measuring tape.
The article below provides instructions on how to create a beautiful accessory from various materials. All necessary tools and materials will be listed additionally.
Master class on creating a crown from foamiran
Snow Queen's crown (you can make a crown with your own hands in 15 minutes) made of shiny foamiran will turn out beautiful and festive. Silver or white material is ideal. You need to choose decor of the corresponding colors for it. You can add a few blue or light blue rhinestones.
Preparation of materials
What you need for work:
- 2 sheets of foamiran;
- scissors;
- felt-tip pen;
- hot glue;
- translucent tape (1 cm wide);
- metal hook and loop fastening;
- threads;
- sewing needle.
For decoration you will need: small round silver sequins, 3 large blue rhinestones (1 larger than the others), small sticky ribbon rhinestones.
Creating the foundation
Using a simple pencil, you need to transfer the paper template onto foamiran. Often sheets of this material are sold in a small format. If 1 sheet is not enough, then you can cut out 1 piece from 2 parts, dividing the crown into 2 parts in the center.
Further procedure:
- To connect 2 crown pieces into 1, you will need tape and hot glue.
- The ends of the ribbon need to be burned with a lighter so that they do not unravel.
- Glue the tape so that it covers the joints of the foamiran on the front and back sides.
- Bend the ends of the ribbon and glue them on the back side.
Glue the remaining tape onto the sides of the crown.
Decor
How to decorate a crown:
- Using thread and a sewing needle, sew round sequins around the edges of the crown.
- Glue the largest rhinestone in the center of the crown.
- Glue smaller stones on the sides. The distance between them and the central rhinestone should be the same.
- Glue small glitter on a sticky base around the large rhinestones along the contour.
- Glue on several sequins in the shape of snowflakes, in a random order.
The clasp needs to be sewn to the edges of the crown.
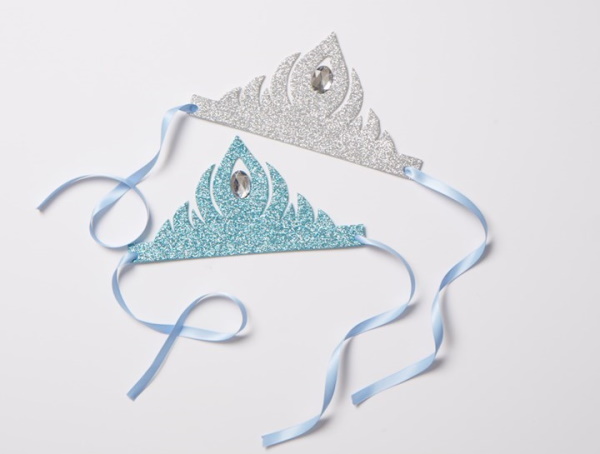
How to make a paper crown
The Snow Queen's crown (making a paper crown with your own hands is very simple, so you can entrust this work to children from 10 years old), made of thick paper, will be light and very convenient. Paper is a material that quickly loses its shape. A paper crown can be worn only for 1 evening.
Preparation of materials
The crown can be cut out of old wallpaper scraps. Vinyl wallpaper with a textured floral pattern is ideal.
What else is needed for work:
- scissors;
- pencil;
- office tape;
- stapler;
- silver spray paint.
For decoration, you can use shiny paper, snowflake sequins and holographic tape with a silver sheen.
Creating the foundation
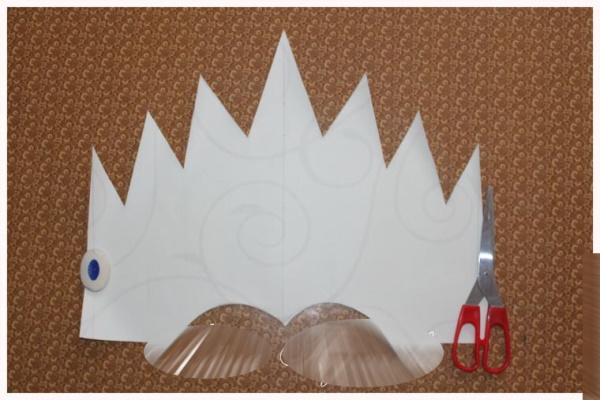
The template needs to be transferred to the wrong side of the wallpaper and cut out the shape of a crown:
- Paint the crown with spray paint on both sides. You can protect the floor from staining with cling film or a garbage bag.
- After the paint has dried, make sure there are no unpainted spots left on the crown. If necessary, you can apply a 2nd coat of paint.
- Dry the product.
To make the paint dry faster, you can use a hair dryer.
Decor
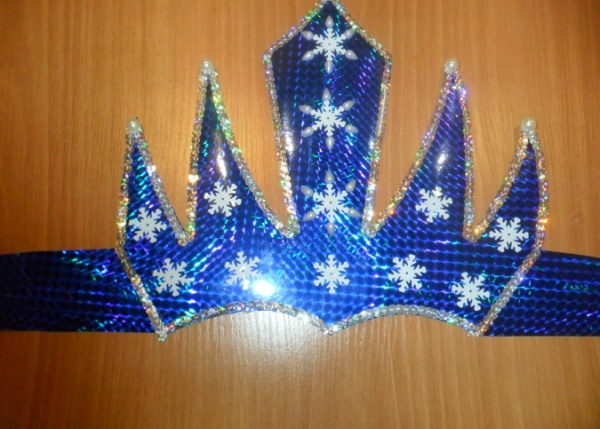
How to decorate a paper crown:
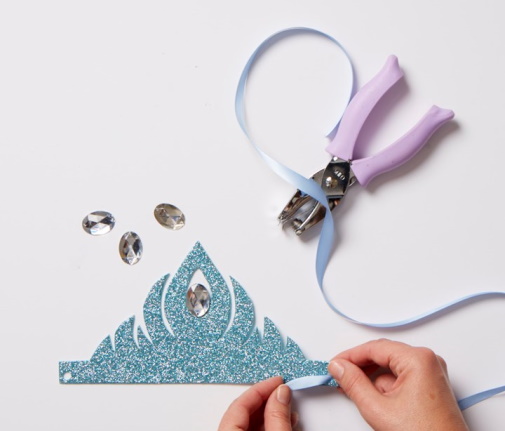
- Cover the edges of the product with holographic tape.
- Cut out 3 large diamonds from shiny paper.
- Glue the diamonds in a row, placing them in the center.
- Glue snowflakes onto the crown in a random order.
Wrap the product around your head, secure the ends with a stapler. For reliability, insert 3-5 staples.
How to make a crown out of cardboard
You can make the Snow Queen's crown yourself from cardboard. This decoration option will be stronger than a paper product. For work, you can use cardboard from a box of household appliances, or white cardboard for children's creativity.
Preparation of materials
What you will need for work:
- cardboard;
- stationery knife;
- thin translucent fabric with lurex;
- scissors;
- grey felt-tip pen;
- hole punch;
- narrow elastic band (black or gray);
- silver braid;
- glossy silver paper (2 sheets);
- sewing threads;
- needle;
- PVA glue and transparent "Moment".
Small pearl beads and large snowflake-shaped sequins are suitable for decoration.
Creating the foundation
This will be a crown with an elastic band. The template needs to be transferred to cardboard, and also traced on 2 sheets of silver paper and cut out.
Further procedure:
- Place the template on the straightened fabric. Trace it along the contour with a felt-tip pen, and then add 1 cm on each side, drawing a line parallel to the contour. These will be the hem allowances.
- The cardboard needs to be carefully pasted over with silver paper on the back and front sides, using PVA.
- When the glue dries, place the fabric blank on the front side of the product.
- Fold the edges of the fabric and glue them to the back of the cardboard using Moment glue.

Wait until the glue is completely dry.
Decor
How to decorate a crown:
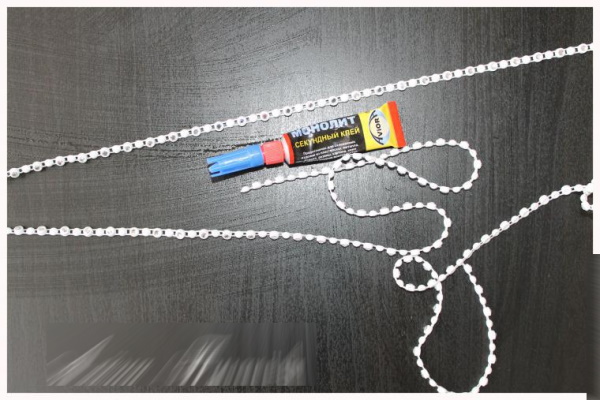
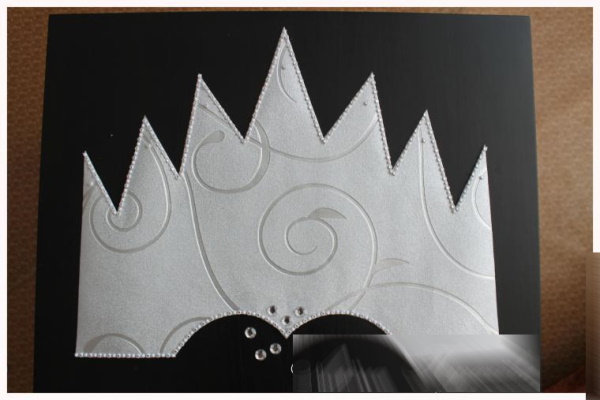
- Sew silver braid along the contour of the product.
- Sew beads to the fabric layer in a random order, and also glue sequins using Moment.
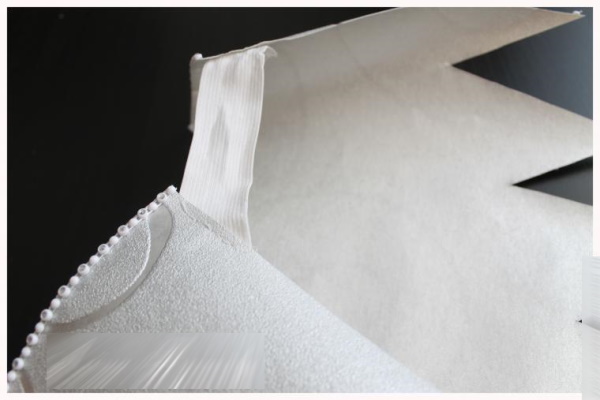
- Use a hole punch to make 2 holes on the sides of the crown.
- Measure out a piece of elastic tape of the required size. Cut the tape and thread it through the holes.
Tie the ends of the elastic in knots on the back side of the crown.
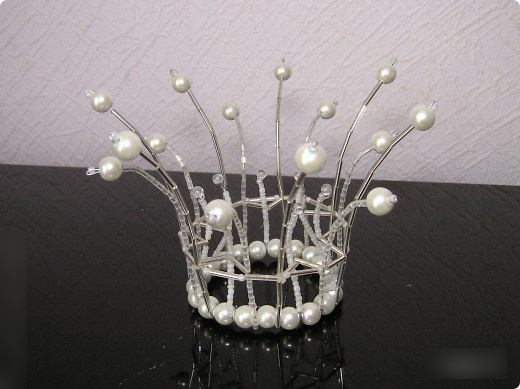
Wire Crown
The Snow Queen's crown (you can make a crown from wire with your own hands in 30 minutes) can be made from blue or white chenille wire.
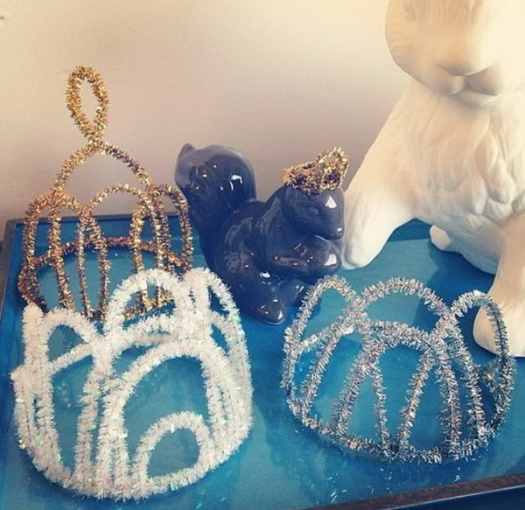
This decoration option will be light and convenient.
Preparation of materials
What materials are needed:
- narrow rim (7-10 mm);
- shiny blue chenille wire;
- blue satin ribbon;
- blue marker;
- small nippers;
- hot glue.
Large plastic snowflakes are suitable for decoration.
Creating the foundation
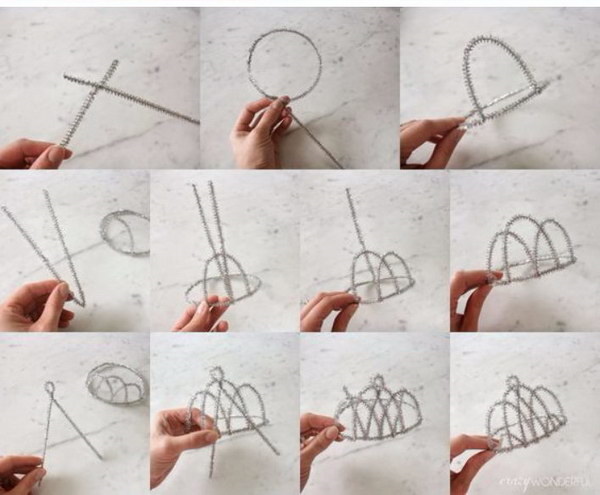
How to make a snow queen crown from chenille wire:
- Wrap the headband with satin ribbon. Secure the ends of the ribbon with hot glue.
- You need to make markings with a blue marker. The crown will consist of 6 loops, as well as 4 large triangles. You need to put marks at the same distance from each other so that all the elements are identical.
- Twist the chenille wire in pairs.
- Make 6 loops of the same size. In places where marks were made, the wire should be twisted around the rim in 1 turn. When the length of the wire ends, new double strands should be carefully attached to it.
- Using the same technology, make 4 triangular teeth.
- To ensure that the entire structure holds firmly, you need to cut 1 wire into 2 cm pieces and use them to fasten the arcs and triangles together.
- Wrap the remaining wire tightly around the base of the crown, braiding the rim.
- Carefully trim off excess ends with nippers and bend.
To prevent the sharp ends from scratching your head, you can drop some hot glue on them.
Decor
Plastic snowflakes can be glued to the crown in a random pattern using hot glue. The glue stick may leave thin threads. These should be removed.
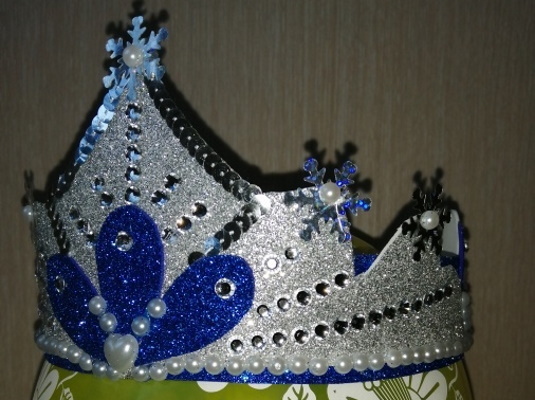
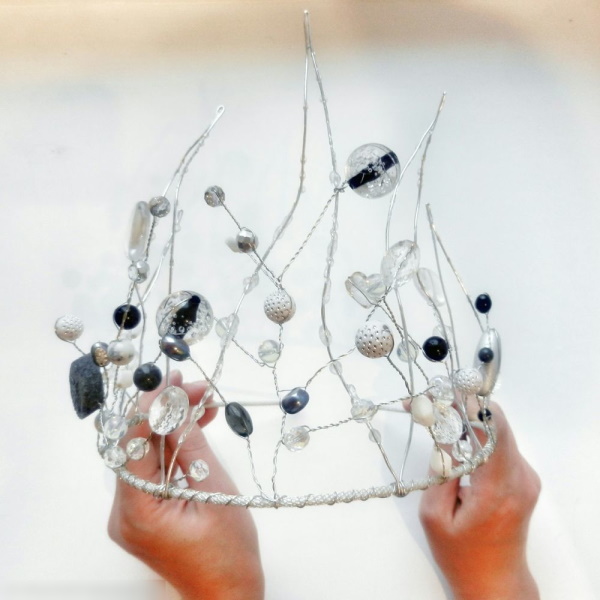
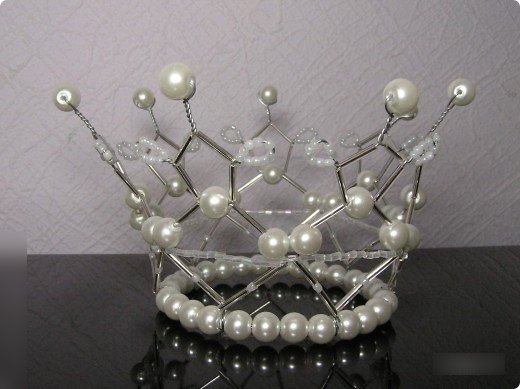
Crown of beads
The Snow Queen's crown (anyone who is already familiar with the basics of beading can make this type of decoration with their own hands) made of beads is a complex and labor-intensive job.
The result will be very beautiful and will attract the attention of other carnival participants.
Preparation of materials
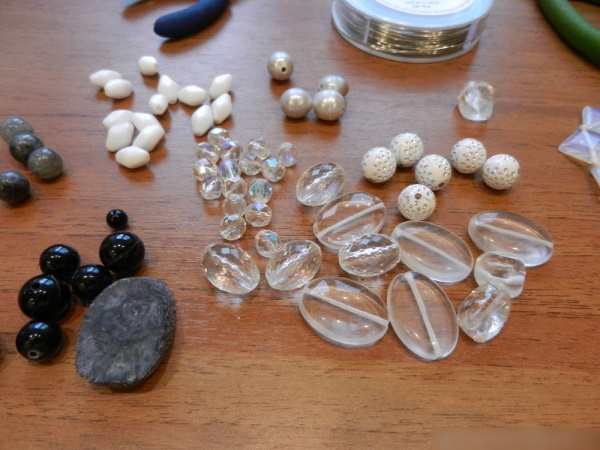
What you will need for work:
- metal headband base;
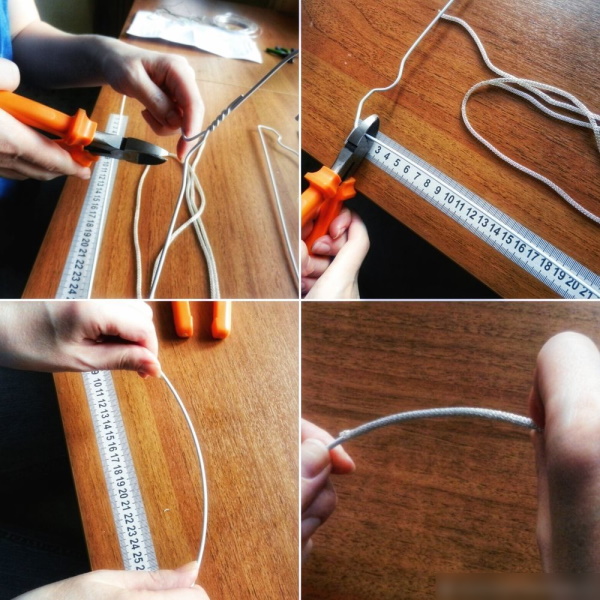
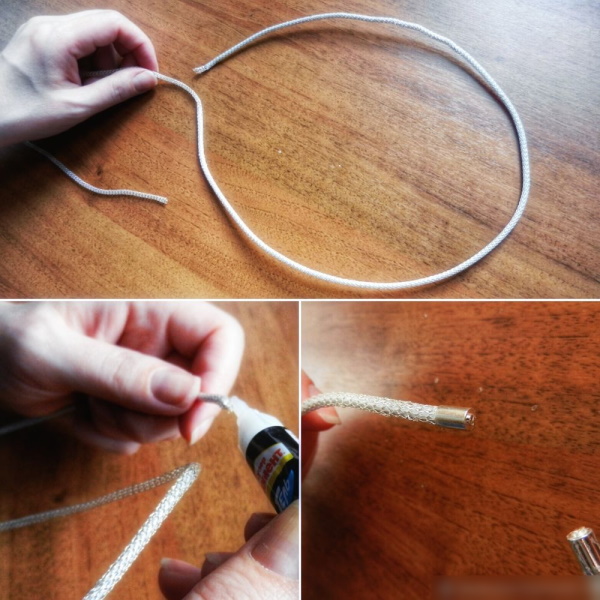
- gray satin ribbon (1.5 m);
- 65 cm of silver wire, 1 mm thick;
- 1 rectangular rhinestone (2.5 x 1.8 cm);
- 2 rectangular rhinestones (1.8 x 1.3 cm);
- 1 teardrop rhinestone (2.5 x 1.8 cm);
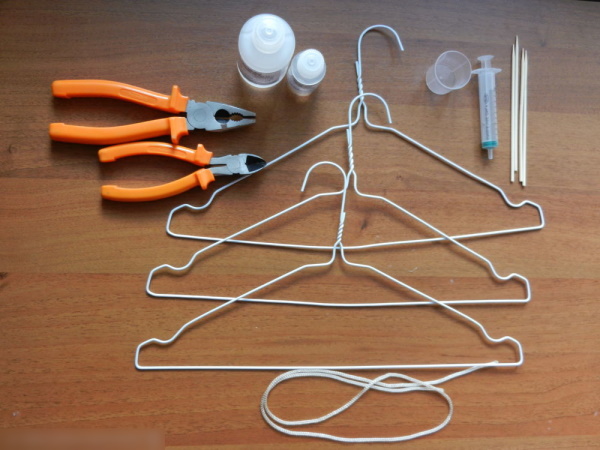
- 2 round rhinestones (1.2 cm in diameter);
- transparent beads with a colored sheen (No. 10, 13, 6);
- white nylon thread;
- monofilament;
- paper and pencil;
- beading needles.
For work, beads in 50 g bags of each type will be enough.
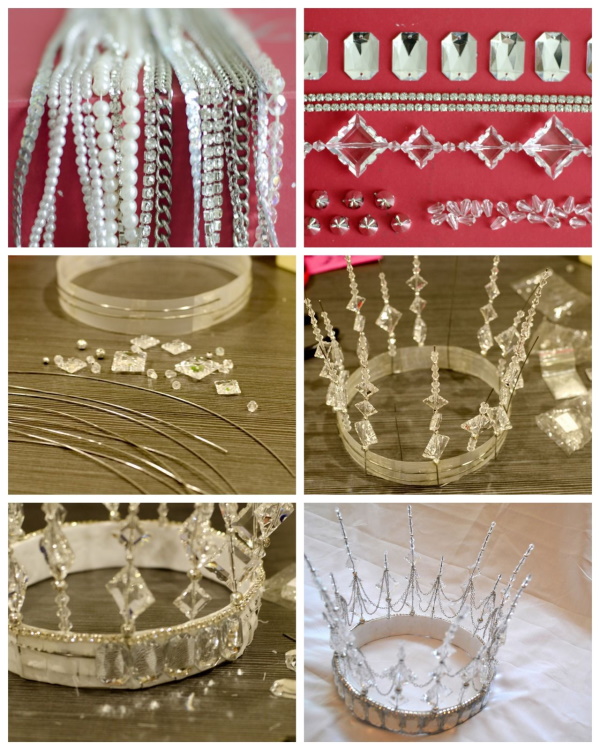
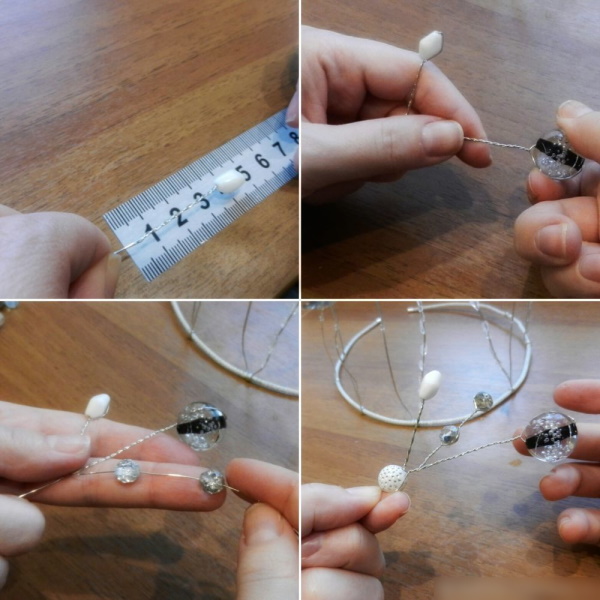
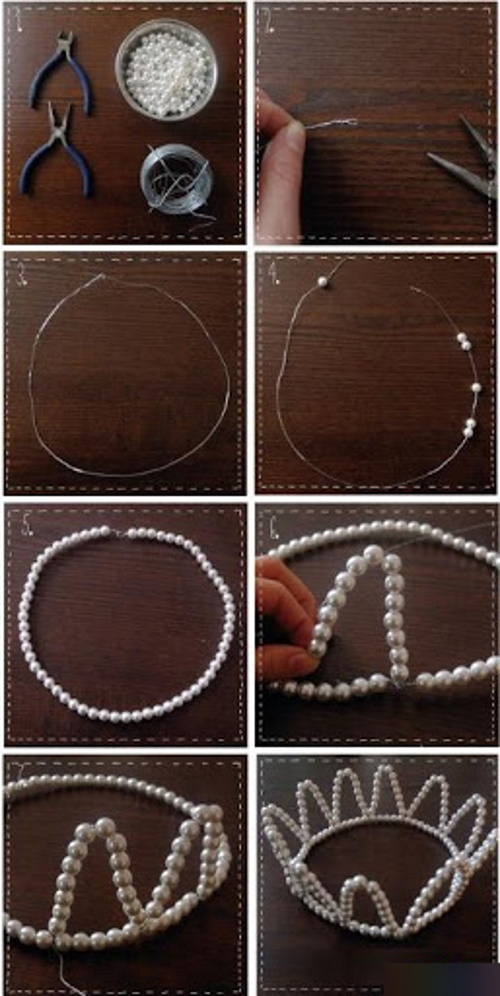
Creating the foundation
The base of the crown consists of large rhinestones braided with beads. Then they will need to be connected with beaded lace and attached to the headband.
How to braid round rhinestones:
- Fold the monofilament in half and thread it through the needle to form a loop.
- String 24 beads #10 onto the thread. Insert the needle into the loop and tighten the ring.
- Take another bead and pass the needle through it.
- Weave 2 rows using the mosaic technique.
- Weave a new row with “teeth” using beads No. 13.
- Bring the monofilament to the other side.
- Pick up 5 beads #13, take them out through 1 bead from the bottom row.
- Bring the needle out to the next row. You should get a petal-shaped pattern.
- To keep the petals in shape, you need to pass the thread through them 3 more times. Tie a knot and cut off the excess. Further weaving will be done on a nylon thread.
- Bring 1 bead from the very bottom row out.
- Pick up 3 beads #13, pass the needle through the next bead in the row. Weave in the same way around the entire circumference, and then weave 2 more new rows.
- Fasten the thread.
By analogy, you need to braid another round rhinestone.
How to braid a teardrop rhinestone:
- Thread the monofilament into the needle in the same way as when weaving a round rhinestone. Pick up 40 beads #10. Tighten the ring.
- The next 2 rows need to be woven in a "mosaic" pattern. Pull the thread tightly.
- Weave a new row with “teeth”. Tighten the thread.
- Bring the needle out to the other side. Weave another row of "mosaic".
- Weave a new row in the form of petals.
- Between the middle beads of each petal add 2 new beads. Pull the thread tight, secure it and cut off the excess.
- Attach a nylon thread. Bring it out through the bead from the very bottom row.
- Weave 1 row with beads No. 13.
- A new row and the next (final) one, weave from beads No. 10.
- Now you need to make a sharp end for the rhinestone. The thread should be brought out not through the 3rd bead, but through the 2nd.
- Pick up 3 new beads, pass the thread through the outermost bead of the “petal”.
The teardrop-shaped rhinestone is braided.
How to braid small rectangular rhinestones:
- Thread only one end of the monofilament thread through the needle. String 4 beads #10. Bring the needle out through the very first bead.
- String beads again, 33 pcs.
- Thread the other end of the thread through the 2nd needle. Put 1 bead on it and insert the needle with the opposite end of the thread inside. Tighten the thread.
- Continue weaving in the same way until only 1 bead remains.
- Bring the thread to the next row. Weave a new row from beads #13, making 1 skip at the corners. Tighten the thread.
- Turn the resulting frame over and insert the rhinestone inside.
- Pick up 2 new beads, pass through the next 1.
- Bring the thread to the other side.
- By analogy (each time picking up 2 new beads) continue weaving up to row 15.
- Bring the needle out to the other side.
- Weave a new row, similar to points #7 and #8. Only instead of 2 beads, you will need to take 1.
- Pull the thread tight and secure it. Cut off the excess.
- The new row needs to be woven with “teeth”.
- The monofilament should be threaded into the needle with 2 ends. Thread the needle into 1 bead from the edge and align the threads so that the ends are the same length.
- String a #10 bead onto both threads.
- One end should be threaded through the outer bead from below. The other end should be threaded through the same bead, but in the other direction. Tighten the thread, secure and trim off the excess.
- Take a nylon thread and insert it through 1 “tooth”.
- Pick up 3 new beads #13. Pass the needle through the next “tooth”.
- Weave in the same manner until the end of the row.
- Weave 2 new rows in the same way, using beads No. 10.
In the same way, weave another rhinestone of the same shape and size.
How to braid a large square rhinestone:
- Weave a cross from beads No. 10, just like at the beginning of the braiding of the small rhinestone.
- On one of the threads, string 45 beads and weave the remaining “crosses” until only 1 bead remains.
- On another thread, string 1 bead, connect the weaving into a ring. Tighten the thread.
- The new row should be woven in a certain sequence: 3 times 1 bead, 1 skip. 9 times 1 bead, 1 skip. 3 times 1 bead, 1 skip. 9 times 1 bead, 1 skip. Tighten the thread.
- The reverse side needs to be closed with 5 rows of crosses.
- Add the “teeth”.
- The next row should be woven with beads No. 13, and after it 2 rows of beads No. 10.
All the rhinestones are braided. Now you can assemble the crown into a single product.
 Procedure:
- Draw a horizontal line on a sheet of paper. Arrange the rhinestones as they should be in the crown: a large square in the center, small square and round rhinestones on the sides, a drop above the central stone.
- The places where the rhinestones touch each other need to be sewn with monofilament.
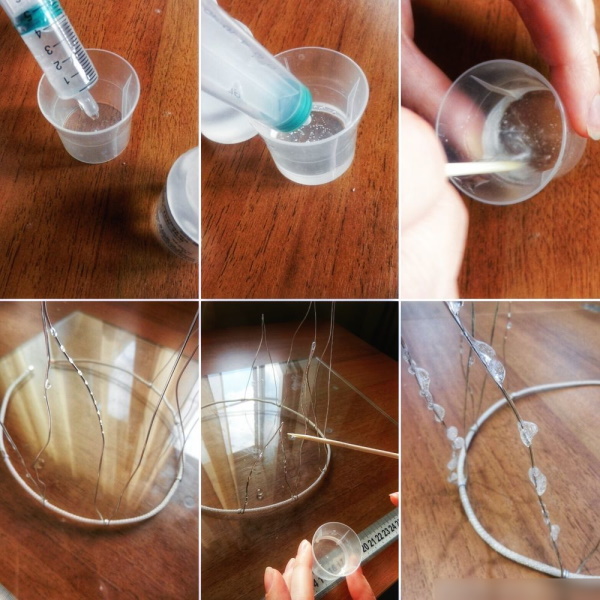
- Attach the elements to the frame using thin wire.
- Cover the wire on the frame with satin ribbon, wrapping it around the workpiece.
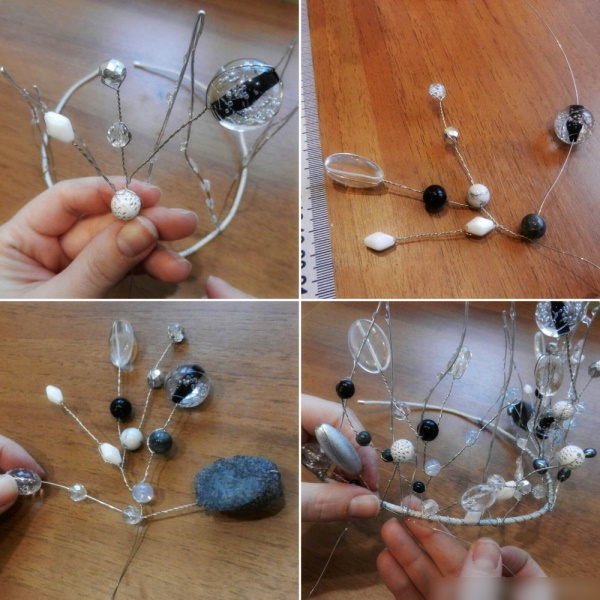
The gaps between the elements are covered with beaded lace. It can be done arbitrarily, without an exact pattern.
Decor
How to decorate a crown:
- Thread 2 ends of the monofilament through the eye of the needle. Pass the needle with the thread under the wire, leaving a small loop. Tighten the thread.
- Pick up 1 bead #10. Pull the needle out of the wire, pin the needle on the other side. In the same way, you need to stitch 2 rows, picking up 1 new bead.
- Next, you need to make "lace". To do this, you need to secure the monofilament at the bottom of the crown, at the edge.
- Pick up 5 beads #13, then pass the needle under the wire, turn it over and stick it into the same bead again.
- Repeat the previous step.
- Braid the entire lower part of the crown.
Large beads can be used to cover the holes in places where lace was made without a pattern.
You can make a snow queen crown with your own hands from any materials. The main thing is to consider its size, as well as choose a base color that matches the entire outfit as a whole. If the carnival dress is white, then the crown should be white. A light blue or blue accessory will suit a blue outfit.
Video about the craft
How to make the Snow Queen crown: