The patterns developed by tambour stitch embroiderers in the medieval era, with the spread of the use of the hook, entered into everyday use by knitters all over the world. The patterns and descriptions of the knitting process are improved and progressed. As a result of this process, the technique of crochet ribbon lace, beloved by many needlewomen, appeared.
Crochet technique for lace ribbon fabrics
Crochet ribbon lace, patterns and descriptions of its knitting have a long history. Even ancient Egyptian slaves wove long ribbons of their aprons from straw with sticks, which did not have heads like modern hooks. The knitting tool gradually acquired a convenient form, which allowed combining simple loops and columns into their complex combinations.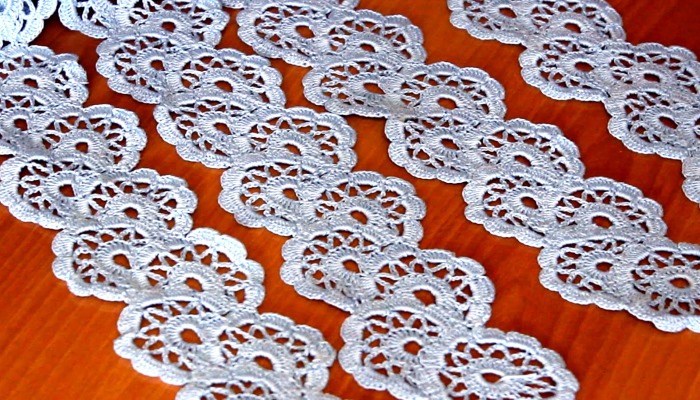
Even the invention of knitting machines did not force needlewomen to abandon weaving with a hook. Over time, the developments and standards of masters, made in one style, received their specific names.
Rectangular connections of openwork motifs and patterns of a certain length, forming lace ribbons with relief edges and collected in flat geometric figures, began to be called ribbon lace. The technique of knitting ribbons absorbed the techniques characteristic of patterns made by Bruges, Irish, Brussels and other crochet methods.
A distinctive feature is that the ribbons have a clearly visible central stripe, around which identical patterns are knitted on both sides.
Most often, oval half-motifs of Irish lace are used for side patterns.
Rules for crocheting products from lace ribbon fabrics
Crochet ribbon lace, patterns and descriptions of the processes of making products from it are subject to certain rules that help novice knitters not to make typical mistakes, as a result of which the product is over-knitted.
The main rule is not to start knitting a product without making several control samples of a small length of ribbon. Knitting samples not only makes further work easier and helps to master the technique of making a pattern, but also allows you to make sure that the thickness of the threads and their color will be in harmony with the chosen pattern.
It is necessary to moisten the samples and determine the size of their shrinkage after drying and the deformations that have occurred. After that, fasten the samples together in order to understand that the chosen method of adhesion of the edges of the tapes will not lead to swelling of the web.
It is best to start knitting the lower part of the strip with a whole motif, which will allow the bottom of the product to look neat. If inserts are planned between the ribbons, for example, from fillet mesh or elements of Irish lace, then you cannot do without an accurate pattern or the use of a mannequin.
Symbols used for ribbon lace patterns
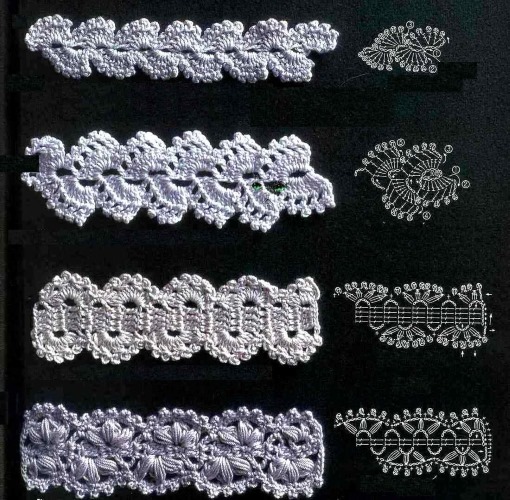
Needlewomen use symbols grouped into specific patterns to indicate knitting techniques and methods.
In the modern world, so many different patterns and descriptions have been developed for crocheted ribbon lace that it has not yet been possible to come to the point where they all use the same type of symbols, so next to each pattern there is usually a decoding of the symbols.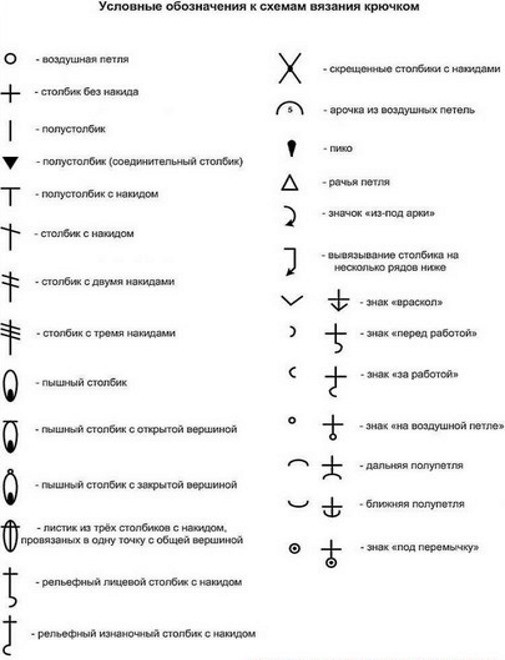
You should look carefully not only at the images, but also read the text next to them, because the same terms can be designated by different symbols by different scheme compilers. Using the example of the simplest trim tape, we will consider in detail the scheme and techniques for crocheting ribbon lace. Let's start by examining the knitting scheme.
Formation of the first row
The beginning of knitting is a chain of 10 air loops twisted at the top. In short form it is designated as 10 VP, on the diagrams it looks like circles or ovals connected to each other.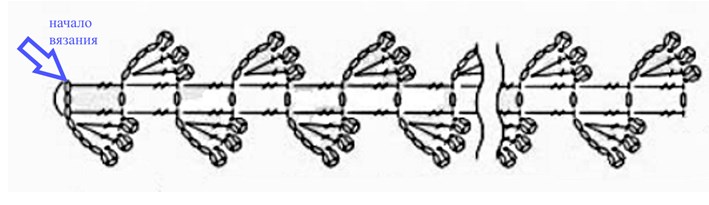
The first 3 ch, underlined by an arc, are the basis of the center of the ribbon, to which the columns with two yarns (dc2n) will then be attached. The chain ends with three curved ch. This is one of the designations of the knitting technique called "picot", sometimes it is indicated in the diagrams by a black droplet.
There are several ways to knit the first air loop, which is also called the initial or working loop. The simplest of them is to put a hand-twisted loop on the hook.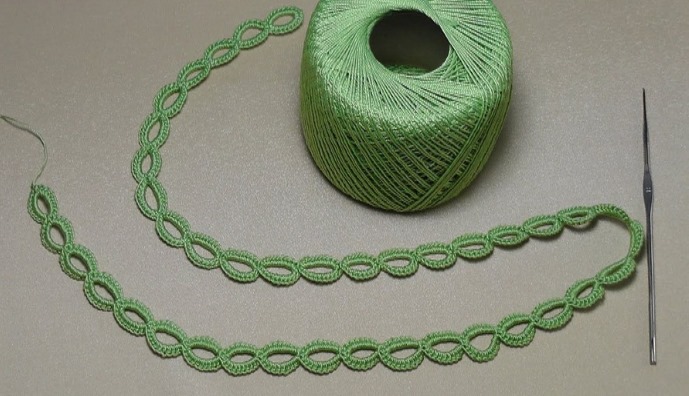
To form a chain of VP, we pick up a thread and pull it through the initial loop hanging on the hook. The pulled thread will form the next working loop. It remains hanging on the hook, it is not taken into account when counting the loops in the chain. The loop removed from the hook is the second VP. We repeat the technique as many times as there are ovals in the pattern.
Knitting a picot
We skip 2 loops of the chain, we do not count the one hanging on the hook, we insert the hook under the upper arc of the third loop and pull the working thread through it.
We form a column with one yarn over (sc1n), on top of which there will also be a picot. We throw a thread on the hook, stick it into the 4th from the beginning of knitting ch. Between the just knitted picot and the point of sticking there are 3 ch. We insert the hook under the upper arc (half-loop) of ch, grab the thread and pull it through the loop.
There are three loops hanging from the hook. We pass the thread through the two far loops, leaving 2 loops on the hook. We pick up the thread and pull it through the loops of the remaining two loops. The loop from one loop hangs on the hook, and between the lower chain and this loop there is a column.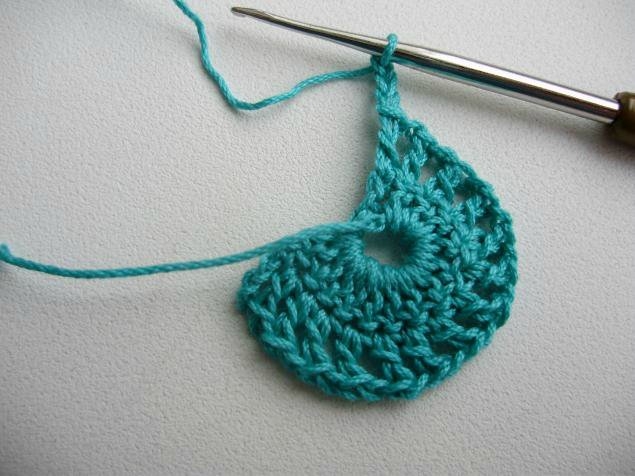
Over the st1dc we knit the picot technique: we knit 3 ch, we insert the hook into the space between the ch, over which the picot has already been knitted, and the first st1dc, we pass it under the column, we grab the thread and pull it to the front side - there are two loops on the hook, we grab the thread again and pull it through these two loops, there is one loop on the hook.
When knitting the second st1n, we take into account that it will be located above the same loop over which the first st1n was formed, that is, after the yarn over, you need to insert the hook into the same loop and form the second st1n. A slingshot of 2 st1n emanating from one point is formed. We knit the picot above it in the same way as the previous one.
Above the next ch, we knit a column with two yarns. For reference: an additional stroke on the column icon indicates another yarn. We knit yarns alternately, pulling the thread through every two loops until one loop remains on the hook. Then the diagram indicates that you need to knit 1 ch, and above the initial ch, form another 1 st2n and move on to the next row.
Second row
Start: chain of 7 ch. Turn the knitting over after knitting 7 ch and continue to act on the wrong side according to the pattern of the first row.
Crochet ribbon lace. The patterns and descriptions for them do not decipher how to connect the stripes together. Therefore, before starting to knit the product, knit short samples and test several connection options.
How to join ribbon lace
We connect two strips of the considered sample at two points: a picot above the air loops and a picot above the first dc. For the first attachment point (Fig. 1-3), after knitting 5 ch, we pull the working thread through the picot of the light strip, turn the knitting over and knit two ch - we finish the first picot.

For the second connection (Fig. 4-6), after st1n, knit 1 ch, make a yarn over on the hook and knit st1n through the second picot, then 1 ch and finish the picot according to the second knitting option.
Crochet ribbon lace, the patterns and description of which we have considered above, is formed into any fabric, because it is not difficult to connect individual ribbons when knitting picot. In this case, the first ribbon is knitted completely, and the second is connected to it when gradually knitting its length.
The coupling is carried out either with the help of posts or without them. Since the columns can be knitted with any number of yarns, that is, they can be lengthened, then at the stage of making control samples, it is necessary to calculate what height, meaning with how many yarns, the columns involved in the process of adhesion of the ribbons will be required.
To adjust the width of the garment, first fasten the front tapes, then the back tapes.
After applying to the pattern, determine the height of the posts to fasten the parts of the product together, or use mesh knitting. If each ribbon is knitted without simultaneously connecting to the next one, then the coupling can be done only after pinning all the ribbons to the pattern. The length, number of ribbons, distances between them and the order of knitting are checked against the pattern.
Pattern and description of crocheting simple ribbon lace
Many ribbon laces are knitted with two columns in the center, as in the variant discussed above. Here is a diagram of a slightly more complex pattern. It has added lush columns (spsh) with a common top. From the diagram it is clear that they are knitted without sticking the hook into the air loops or into the knitting fabric, but by inserting it under a chain of VP.
Technique of knitting a lush column
Knitting is performed according to the following pattern:
- We insert the hook under the chain, hook and pull the thread, the first untied st1n is formed, in other sources it can be called a draw-through, a tension, a blank for a column. In our case, it is necessary to knit three more of the same untied ones. There are 4+1 loop loops hanging on the hook.
- In order for all the column blanks to be equal in height, each time you make a yarn over, you have to hold it firmly with your finger.
- Yarn over again and pull the thread through 4 loops
- There are 2 loops hanging on the hook, we pull the thread through them. The column is complete.
Knitting according to the pattern
In the first row of st1n and chains of ch we form the central part of the pattern. Then we move on to the second row, knitting from the top of st1n 3 ch. We insert the hook under the arc of ch and knit 2 spsh, between them 4 ch.
We connect to the lower arc with two ch and a single crochet (sc). To move on to the next spsh, we knit 2 ch and under the next arc we form three lush columns at intervals of 4 ch.
To make a turn after 2 ch under the last arc of 4 ch of the previous row, and if instead of it there are a pair of columns of the first row, then under the first column, we knit 1 spsh + 4 ch + 1 spsh + 4 ch, do not forget to hide the initial end of the thread in the knitting fabric.
Then insert the hook between the outer two s1n and again 1spsh + 4vp + 1spsh + 4vp, knit in the same way on the opposite side from the center of knitting 1spsh + 4vp + 1spsh.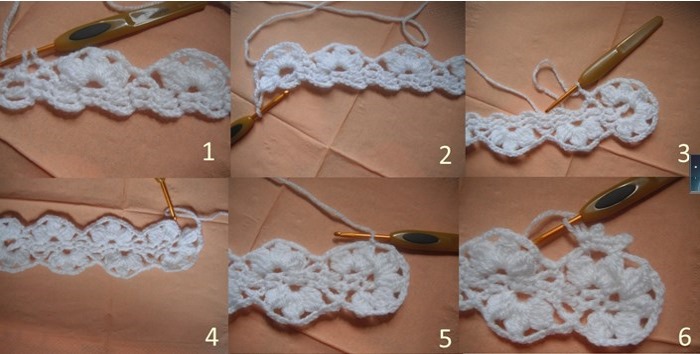
We connect to the lower arc from the first row: 2 ch + 1 sc under the chain + 2 ch. In total, 6 spsh are formed over three arcs on the turn (Fig. 1-3). We continue to form the 2nd row, knitting combinations of 3 spsh and 4 ch over the chains.
We knit the final turn as in the previous one, we connect to the top of the very first spsh with 4 ch. We proceed to tying the arcs of the second row with single crochets while simultaneously forming a picot. In this case, 3 ch for the picot will start from sc and connect to its upper half loops (Fig. 4-6).
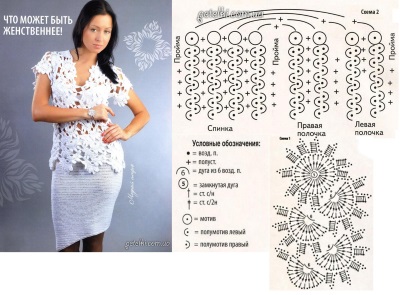
Knitting pattern for a white blouse
Crochet ribbon lace, diagrams and description of the pattern for a blouse provide for the adhesion of ribbons during knitting of a whole cloth, because the edges of the ribbons are formed by chains of air loops. They form convex arcs. When forming chains, the edges of the ribbons are tied to each other.
Central Motif
Round or oval motifs and half-motifs form patterns for ribbon lace. Petals are located along the edges of the motif. To maintain the symmetry of the patterns and ease of knitting, central motifs are knitted with an even number of petals, halves of motifs with an odd number.
The patterns and descriptions are mainly intended for needlewomen with knitting experience. Therefore, the first air loops of the lift are not shown when lifting one row higher. Instead, columns with a certain number of yarns are depicted. The same inaccuracies are allowed in this pattern. In addition, the rows after which the knitting fabric must be turned over are not indicated.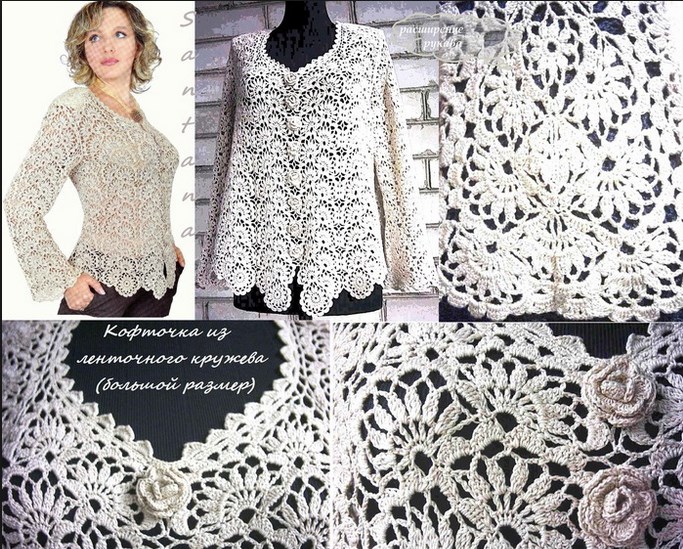
The first row is considered to be a circle with the number “5” in the center. This means that you need to knit 5 ch and close them into a ring. To close the circle at the end of the chain, a thread is pulled through the first loop, forming a connecting loop (sp).
The second one starts with a chain, knitted from sp of 5 ch, replacing the first column with two yarns (1 dc2n). Insert the hook inside the ring and begin to knit 23 more dc2n one by one. The top of the last column in this row is connected with sp to the upper air loop of the first column.
To put it briefly, the second row entry will look like this:
- • 24 dc. In the third row, 4 ch are raised from sp - the first three replace dc, the last one is a space between the columns. On the tops of the lower dc, we knit 23 dc, alternating them with 1 ch. We finish the row with sp.
- • (1с1н+1вп) x 24.
Knitting petals
The fourth row begins with a chain of 6 ch and 1 dc. Insert the hook under the chain stitch of the third row and knit 1 dc. From its top, knit 3 ch, and around the leg of the column, knit another 5 dc, gradually descending to the chain stitch located behind the bottom column.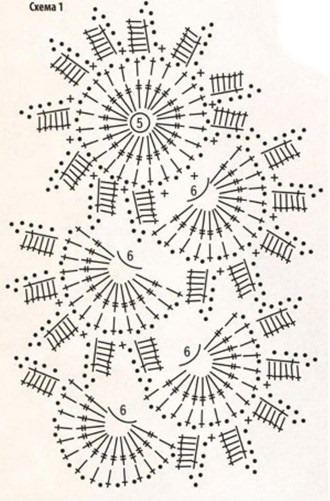
This group of columns, forming the first petal, ends with 1 sc: (6 ch + 1 st1n + 3 ch + 5 st1n + sc) x10.
Each petal is thus knitted over the two lower columns, separated by one ch.
Transition to a semi-motive
From the last single crochet, we knit 9 ch and connect with a single crochet to the ch that goes before the first petal.
Then, instead of the first column of the half-motive, 5 ch to raise the knitting to a row higher.
We insert the hook with the knitted loop into the upper ch of the chain, which is in front of the hook, and attach it with a connecting loop to the lower part of the top of the first petal in the fourth row. We turn the knitting over.
Knitting the first half-motive
In front of us is the back side of the knitting. The peculiarity of all ribbon lace is that it is impossible to knit it completely from the front side. Complex transitions with turnings of the knitting fabric are made in order not to constantly break the thread. We knit over an arc of 9 VP 13 st2n. The fabric must be turned over, this technique is called knitting with turning rows.
Further according to the scheme:
- (1с1н +1вп) x13
- (6ch + 1sc + 3ch + 5sc + sc) x5
We fix the arc for the transition to the opposite petal between the top of the last petal of the first half-motive and the top of the penultimate petal of the central motif. Further work will consist of knitting the half-motives to the length required for the ribbon while simultaneously connecting the adjacent ribbons. Sew the shoulder seams.
Application of ribbon lace
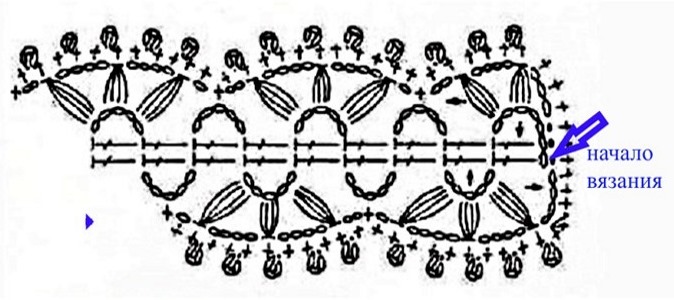
Craftswomen find new areas of application for patterned fabrics and ways of joining ribbons. Based on this pattern, a hat with an invisible connection of ribbon lace was knitted. This method of joining is used when laying ribbons transversely in the process of knitting outerwear.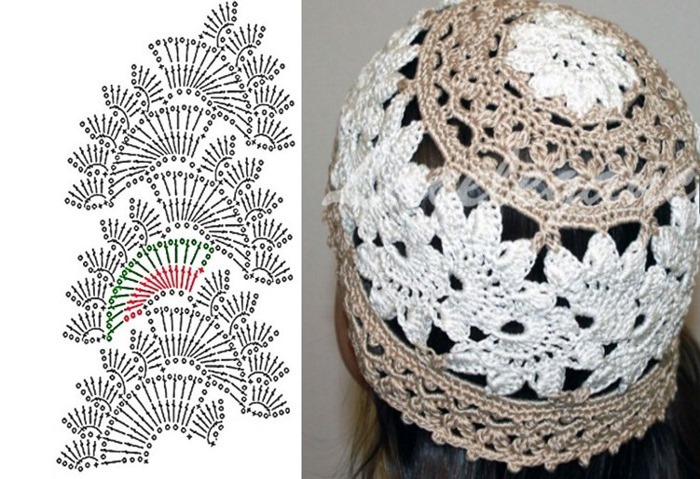
The craftswoman marked the beginning of knitting in green and the final row in red. The basis for the columns of the first row was a separately knitted chain of VP of arbitrary length.
Article formatting: Oksana Grivina
Video on how to knit ribbon lace
Crochet Lace Lesson:
What beauty. I want to learn how to knit like this, but I don't think I have the patience...