Clothes can be given a second life by slightly changing their appearance. A dress can be refreshed by sewing new sleeves to it - lace, leather, long or short. For the experiment to be successful, you need to understand how the pattern should be constructed correctly.
Classic version
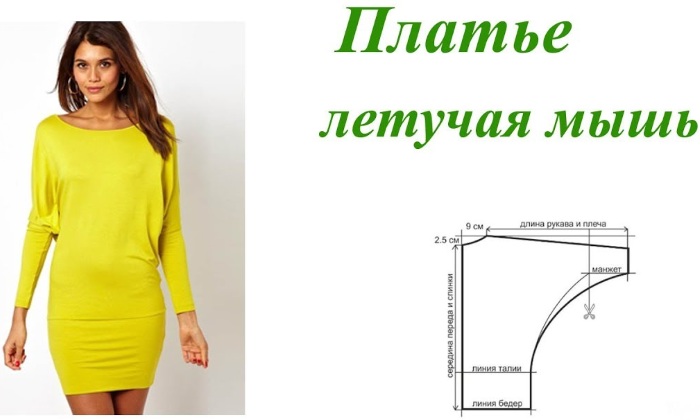
Dress Sleeve Pattern The classic bat is created based on the back pattern. The basic pattern can be made independently according to the measurements. The neck notch on the back side goes to a depth of 2-2.5 cm. The notch on the back is made according to the following formula.
The radius of the notch = 1/6 of the neck circumference +1. According to the data obtained from this formula, the notch of the neck is built along the back, but the shape itself is made individually each time, depending on the style of the dress.
Find the corner point of the shoulder and make an indent from it upwards by 1 cm. Draw a line along the pattern through this mark, which is equal to the length of the shoulder. Mark the length of the shoulder and the length of the sleeve on the pattern.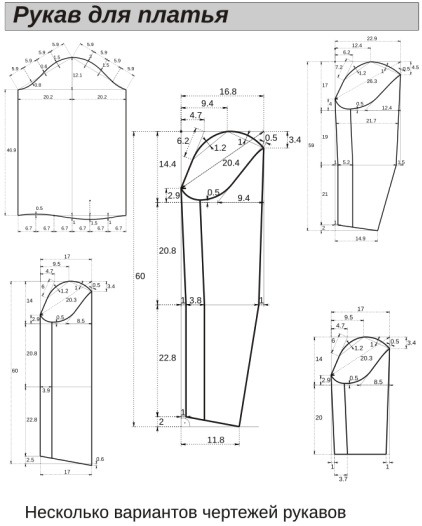
Extend the line from the edge of the sleeve in length, using the formula ½ the wrist circumference by measurement + add for the fold. From the fold line, draw a rounded line to the side, connecting the side line of the dress and the sleeve. In this place, the seam will pass, creating the effect of a batwing sleeve.
Batwing sleeves
The pattern for the sleeve of a batwing dress is quite simple and does not require the creation of additional darts, with the exception of creating a detail for clothing for a girl with a large bust. This option is suitable for women with any type of figure.
The size of a dress with batwing sleeves is chosen based on the volume of the hips. When constructing a pattern, be sure to pay attention to its compliance with the overall length of the product.
To ensure that the sleeve pattern matches the length of the dress, follow these instructions:
- The skirt is measured from the waist along the side line. A similar measurement is taken on the sleeve pattern. If necessary, you can extend the seam in the center or side, or shorten the pattern so that the lengths match.
- Measure the sleeve length according to your figure. You can use the length from the side mark on the neck to the desired length mark, taking into account the bent elbow.
- The resulting number, corresponding to the sleeve length, is transferred to the pattern. If it is necessary to make a sleeve ¾ long or any other mark of incomplete sleeve length, make a fold along the pattern parallel to the bottom.
Loose fit
Some seamstresses use their own palm to construct a sleeve pattern. First, draw a horizontal line on a pre-prepared sheet of paper. From this line, set off a right angle. The width of the sleeve base is calculated based on the data on the shelf and back. The sleeve is connected to the armholes of the shelf and back. The intersection of the lines on the paper will indicate the middle point of the sleeve.
The spread palm is placed on the paper so that the base of the palm is at the intersection of the lines and the middle finger passes through. The end of each finger is marked on the paper. Using a template or by hand, connect the marks into one curved wavy line. This line will mark the boundaries of the sleeve. The left hand helps to construct a pattern for the right-hand sleeve.
On the pattern, mark the parts that belong to the shelf or the back. A line of a distinctive color marks the line on the pattern where the seam will be, and cut the pattern in this place.
The parts are glued together, swapping them. Such a pattern is used as a blank for sewing a sleeve according to personal measurements. This method is especially popular among those seamstresses who do not like the cutting process.
Another option for constructing a pattern for a free-cut sleeve is to model a sleeve without a seat. The peculiarity of such a sleeve is that when sewing the sleeve into the armhole, the cap is not adjusted to the sleeve.
This type of sleeve is often modeled using knitted fabrics, since this material lies better than other fabrics when modeling a sleeve. Most often, a non-slip sleeve is found on sports T-shirts and polo shirts.
Dress with short sleeves
The pattern of a dress with a shortened sleeve is made up of 2 blanks: the base of the dress and the sleeve pattern with 1 seam. The dress is made to fit tightly and about 1.5 cm is left for an increase.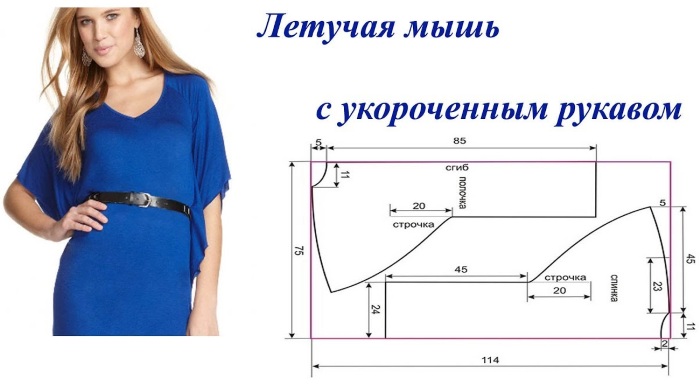
| Stage | Work progress |
| Making up the front of the dress | 1. Cut out the base of the dress at the waist. 2. The dart of the skirt from the front side is moved to the side. 3. Determine the hip line and measure 8 cm down from this point. From this point, narrow the front part of the skirt by 1.5 cm. 4. Measure the length of the skirt from the waist. It is approximately 70 cm. 5. The depth of the neckline is increased by 1-2 cm. 6. From the side of the armhole, measure 5 cm down. From here, draw a connecting line with the center of the chest. 7. Close the dart from the chest area, move it to the side and reduce it by 1.5 cm. 8. Make an additional facing along the neck, 3 cm wide. |
| Making up the back of the dress and sleeves | 1. The neckline at the back of the dress is increased by 1 cm.
2. Make a narrowing at the back of the skirt similar to the front (step #3). 3. Make a cut along the back at a height of 23 cm. 4. The neckline facing is done separately on paper. 5. To make the sleeve, take the pattern for the seam with 1 seam and shorten it. From the extreme point of the shoulder, the sleeve length will be 33 cm. |
| Cut of the product | 1. Cut out 1 piece of the bodice from the front, the front part of the skirt. 2 pieces of the back and sleeves. 2 pieces of the neckline from the back and 1 piece of the neckline from the front are made minus the facing.
2. The pieces are laid out on the material along the grain line. The pieces are cut out taking into account an allowance of 1.5 cm for the seams. The lower parts of the sleeves and hem are cut out with an allowance of 4 cm. |
Long one-piece sleeve
The appearance of a finished dress with a one-piece sleeve is influenced by the shape of the upper cut. When choosing a horizontal cut, the dress bodice is soft and voluminous. A beveled cut gives the dress a strict look. Similar dress models are made with a cut-off side or with the addition of a gusset so that movements are not constrained.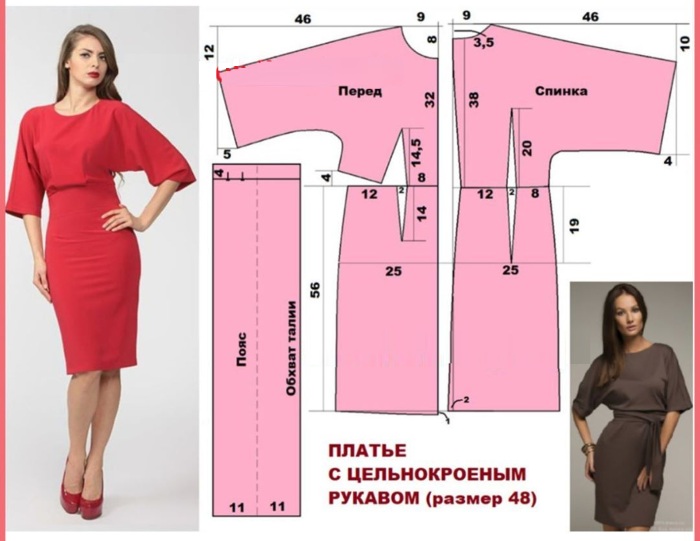
| Building a base for a pattern | Use the basic dress pattern. First check the pattern to see if it matches your own measurements. The classic silhouette of a dress with a tight fit can be changed to a roomier shape. To do this, increase the area of free fit. All increases in size are evenly distributed between the back section, the front, and the armhole. |
| Building the Shoulder | From the extreme point of the shoulder, draw a straight line to the desired sleeve length. The average length is 55-56 cm, many are guided by this indicator. If the dress is made with shoulder pads, the shoulder height is raised to the level of the lining. The average sleeve width is considered to be 36 cm, calculated using the formula ½ wrist circumference + 2 cm increase. The increase can be changed at your own discretion. Determine the middle of the segment and make a 5-7 mm indent to the side from this point. Connect the edges of the sleeve through this point with a pattern. From the lower edge of the sleeve draw a line parallel to the upper line of the sleeve. Connect this line with the side seam of the product. |
Raglan sleeve
One of the ways to cut a sleeve is a raglan. With this method, the sleeve is cut out together with the back and the shelf. The peculiarity of this method is that the armhole for the sleeve starts at the neck, like a set-in sleeve. But unlike the set-in sleeve, here the armhole is made deep. The shoulder areas of the back and the shelf are filled with a sleeve, and in the place of the shoulder seam there is a connecting seam.
Such sleeves are modeled when creating products from a material with a high content of elastane, since the pattern does not have darts on the chest and auxiliary seams. The elasticity of the material compensates for the lack of darts and therefore the resulting product fits the figure.
Stages of sleeve modeling:
- The pattern of a sleeve with 1 seam is taken as a basis. It is transferred to paper - the line of the middle of the sleeve, the elbow line and the control points of the sleeve cap. From the side of the front cut, the sleeve line is increased by 0.6 cm.
- The line of the middle of the sleeve changes – it is again drawn through point 0.6.
- The height of the sleeve cap is increased by 2-4 cm. To do this, the required values are set aside down from the cap level. The new marks are connected to the cap line with smooth lines. A pattern is used for this.
- The elbow dart is reduced by 0.6 cm. The lower level of the sleeve on the elbow side is raised by the same amount.
- The level of the middle of the sleeve is raised by 0.6 cm from the top. A horizontal line is drawn at this point.
- The pre-prepared upper parts of the sleeve are applied to the parts of the armhole so that they are connected at the new point of the top (raised by 0.6 cm).
- The sleeve is cut along the middle line of the sleeve. This creates the front and back lines.
- Transfer the new patterns onto paper and you will get the raglan sleeve blanks.
For large breasts
The dress sleeve pattern may change if there is a big difference in the measurements of the lengths from the back to the waist and from the chest to the waist. In this case, the pattern needs to be adjusted to the shelf, taking measurements at the chest height and determining its center.
- On the pattern, find the extreme point of the shoulder and step back 3 cm from this place.
- Draw a straight line down, which forms the sleeve line. The length of this line is determined by the formula: chest height minus 1 cm.
- Determine the central point of the shelf and from this point make an indent to the right by ½ of the center of the chest, where the center is the highest point of the chest. From this point, draw a dotted line down the pattern towards the lower seam of the sleeve.
- The pattern is cut out along the specified lines and transferred to the individual measurement of the length of the front body to the waist level.
- The place where the dart is formed in the shelf area is marked on the pattern or immediately transferred to the assembly area on the fabric in the form of a fold or a pinched pleat.
With a rounded shoulder line
The pattern with a rounded shoulder line is obtained with a sharper angle of inclination. Unlike the classic shoulder version, this one is narrower and looks like a raglan, but is made without a seam.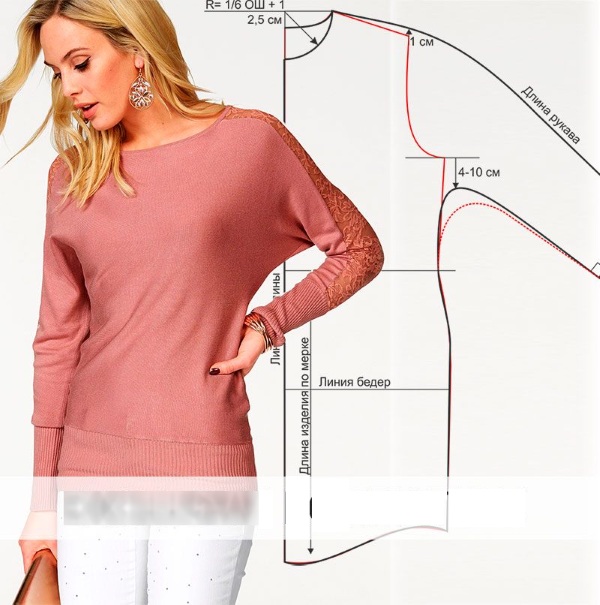
To create a pattern with a batwing sleeve with a rounded shoulder, use the pattern for the back as a basis:
- Make an indentation from the edge of the shoulder to the right by 1 cm.
- A line is drawn down through this mark and extended a little in length. An indentation of the measurement is made along the line, according to the formula shoulder length + sleeve length, indicated at an angle.
- The lower part of the sleeve is drawn at a right angle. The length of the sleeve in this part is equal to ½ the wrist circumference with an addition. How much will need to be added is determined based on the style of the product and the material.
- Find the point of the lower armhole mark from the back and make an indent of 4-10 cm. From this place the lower seam of the sleeve will come out and go to the side of the dress.
Without shoulder seam
The pattern of the batwing dress sleeve can be made without a seam along the shoulder. To do this, the sleeve line is drawn from the extreme shoulder point not downwards, but extended horizontally. The sleeve width is measured using the formula ½ of the wrist circumference with an increase.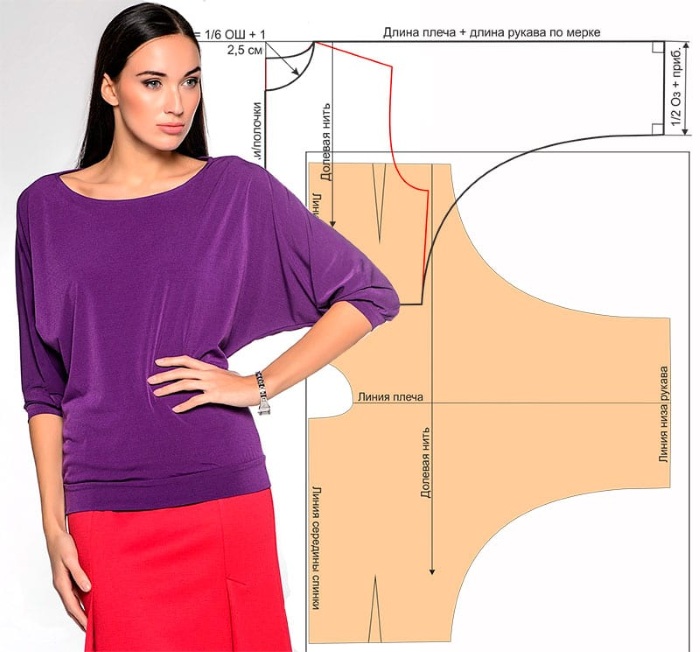
To cut the front and back of the dress, the fabric is folded in half and turned around. To make the dress look more fitted, several additional darts are made in the waist part from the back and in the front part. Using such a pattern, the waist area can be modeled with or without a seam.
No side seam
To create a pattern for a dress with batwing sleeves, but without adding a seam on the side, calculate in advance so that there is enough material in the armhole. This sewing pattern is designed for the fact that there is no side seam on the sleeve, but there is one in the waist area.
Begin cutting out the sleeve in the same way as indicated in the instructions for the classic sleeve. Find a mark on the waist and from there draw the sleeve line upwards at an angle of 45°. Taking this line into account, measure the lengths of the shoulder and sleeve.
Find the extreme mark of the shoulder, make an indent of 1 cm upwards and from here draw a curved line, parallel to the lower part of the sleeve. The lower part remains straight, stretched upwards, the upper part is curved. The width of the sleeve in the lower part is calculated using the formula ½ of the wrist circumference with an increase.
Prepare patterns for the back of the dress and for the front, but without a seam on the side. Both parts are laid out so that they join in one part. The dress can be fitted if you make several darts on the back, at the waist and on the front. When cutting, do not forget to leave space for allowance on all sides (about 1.5 cm).
Flashlight
To make a “flashlight” sleeve for a dress, first draw a pattern where all the elements are depicted parallel to each other, this is how the gathering and volume in the sleeve are formed.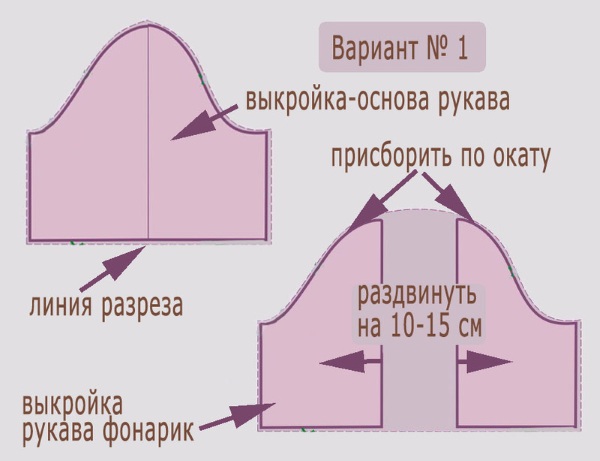
To ensure that each part is neatly gathered, they are connected evenly. To make the sleeve appear voluminous only in the outer part, the gathering is spread in the central part. In the upper part, the sleeve is not always compressed in the gathering area, sometimes only folds are left.
Raised top
The pattern of the dress sleeve is constructed in such a way that the rise of the required size is drawn on it. To model this rise on the sleeve, the rise is cut out and divided in half.
Its outer parts remain attached to the shoulder line, the parts are raised by 1-3 cm and connected by the corners of the central parts. The line of the new rise is marked on the pattern and blanks are made from the material, focusing on the new mark.
Another option for constructing a pattern for a raised shoulder is to model a sleeve with a gather along the armhole. To make such a sleeve, use the classic version of modeling a sleeve with 1 seam. The finished part is cut in half and moved apart to the sides by a width of 6 cm. For the cuff, a width of 6 cm is provided and therefore the sleeve length is reduced by half the width of the cuff.
Tulip
Use a ready-made classic sleeve blank in volume. Draw a curved ascending line from the bottom of the sleeve up diagonally. Cut out the resulting part and make the same part in a reflected form.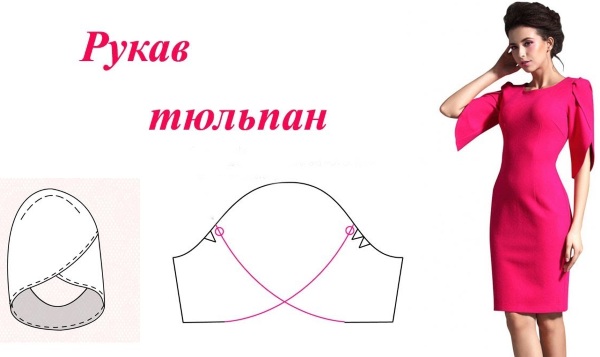
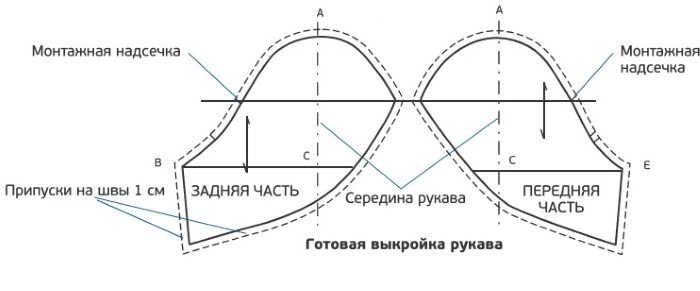
Both parts are connected (it is better to glue the parts) at the place where the bottom of the sleeve begins. All cut places are processed and overcasting is done at the top. The parts are folded so that one part does not completely cover the other.
Shuttlecock
The basis is a classic sleeve blank. If you are making a frill sleeve above the elbow, then make a horizontal mark of the desired length along the bottom of the sleeve. If you plan to cut a sleeve below the elbow, then draw an arbitrary curved line.
The sleeve part is divided into several parts (the quantity is determined at your discretion, the number of folds depends on their number). The pattern is cut along the designated lines, not completely, leaving a distance of 0.3 cm. All parts are moved apart so that the distance between them is from 3 to 6 cm.
Deflated
To construct a pattern for a dropped sleeve, take a raglan construction template and a top blank. Additionally, take a simple sheet of office paper.
- In the shelf section, the dart on the chest is converted into a waist dart.
- Draw a connecting line that extends from the top of the sleeve through the armhole to the front.
- Mark the point where the sleeve level drops on the upper cut in the front section of the sleeve. Usually, the sleeve is lowered by 4-6 cm from the extreme point of the shoulder. This section is connected with a curve to the armhole line to get a right angle at the upper cut on the sleeve.
- The point of the shoulder drop is marked on the back. Here, this point is 1-1.5 cm lower than on the shelf. When the parts are sewn together, the difference in length disappears due to the shoulder cut being seated on the back.
- Cut the parts from the front and back along the obtained lines.
- Model the sleeve and cut out its parts. Connect its front and back parts. During the process, make sure that the elbow bend line, the sleeve cap cut and its lower section are aligned.
The process of creating a pattern for a dress sleeve of any style is a single scheme. The process of modeling a sleeve differs only in nuances, such as raising or shifting the extreme points, calculating the width of the sleeve or the angle of the sleeve. Following simple instructions, beginners and practicing seamstresses can independently create a pattern for any sleeve of the product.
Article formatting: Vladimir the Great
Video about sleeve pattern
The simplest sleeve pattern diagram: