Drawing characters is one of the important competencies that develops creative thinking and motor skills in children.
A master class on drawing robots using pencils can be a great opportunity to introduce a child to the basic techniques of this art, because mechanical machines and androids are a topic that attracts the attention of preschoolers and younger schoolchildren.
What you need for drawing
| Name of the tool or material | Brief description |
| Paper | Special drawing paper should be used. It should be smooth and thick enough to provide comfort when working and prevent the charcoal pencil from spreading. Paper with a partially rough coating can also be used to create texture effects. |
| Graphite pencils | Graphite pencils are the main tool. They are available in different thicknesses, allowing you to adjust the tone and intensity of the lines. Pencils with a hard lead are used to create fine and detailed elements, while those with a soft lead are suitable for creating richer and darker tones, allowing you to achieve darker shades and depth. However, they are more prone to smudging. |
| Charcoal pencils | Charcoal pencils are widely used to create shadow and depth effects. They have a soft and gentle lead, which makes it easy to apply dark shades and smooth transitions. However, charcoal should be used with caution, as it can dust and leave marks on other elements of the drawing. |
| Erasers | An eraser is needed to correct mistakes and erase unnecessary lines. It helps to make adjustments to the drawing, removing unsuccessful marks and creating a cleaner image. It is important to choose a soft eraser to avoid damaging the paper. |
| Sharpeners | Not only do they help maintain the sharpness of the pencil lead, but they also allow you to control its thickness. Their different types can have different hole sizes, which allows you to get different line thicknesses and ease of application. |
| Shading products | Allows you to create smooth transitions and create volume in the drawing. The use of such tools includes special brushes or sponges, which can be of different sizes and shapes. |
It is also necessary to choose a comfortable workplace with good lighting.
Master classes
In order to draw a robot with pencils, you need to familiarize yourself with several recommendations and take into account important data:
- The initial stage involves learning the basic principles of drawing and analyzing the technical details of the robot. To do this, it is worth taking the time to study various images of robots. This will help you understand the basic details and proportions that will need to be reproduced on paper.
- You need to place the robot so that it is in the center, and try to add small details of the surroundings to create a more complete image. It is advisable to choose an interesting angle or perspective to add dynamics and depth.
- Before you begin the actual drawing process, it is important to study the basic proportions of the robot. They are the basis of a good image, so do not rush and immediately proceed to the details.
- When creating a drawing of a robot, it is necessary to take into account its geometric structure. They are usually complex combinations of straight and curved lines. When drawing, the geometry and accuracy of each line should be observed to ensure the realism of the image.
- Moving on to the actual drawing process, you should pay attention to detail: from the smallest details to larger design elements. Particular attention should be paid to the mechanical parts of the robot, such as gears, wires, panels, and other elements. The smallest elements, such as bolts and nuts, can give the robot a unique look. The more details you add to the drawing, the more interesting it will look.
- You should also pay attention to the light and shadows of the composition. Using different gradations of tones, you can create a three-dimensional image of the robot. You need to imagine that the light source is in a certain place, and the shadows fall accordingly. This will add realism and depth to the drawing. You need to try to convey the texture of metal or plastic using lines and thin strokes. Displaying perspective plays an important role in creating a three-dimensional image.
- When working with pencils, you can use various techniques: toning, shading, creating strokes, and so on.
One of the most common methods of shading is the use of paper pieces. They need to be moved softly and gently over the surface of the drawing, creating the effect of a smooth transition from light to dark tone.
Another method of blending is to use rags or thin gauze cloths. These materials allow for more precise control over the blending process and allow for the creation of different textures and effects.
Soft pencils with a graphite base have a special structure that allows their surface to be shaded using special brushes. Such tools provide a more precise and smooth result and allow you to achieve more complex effects.
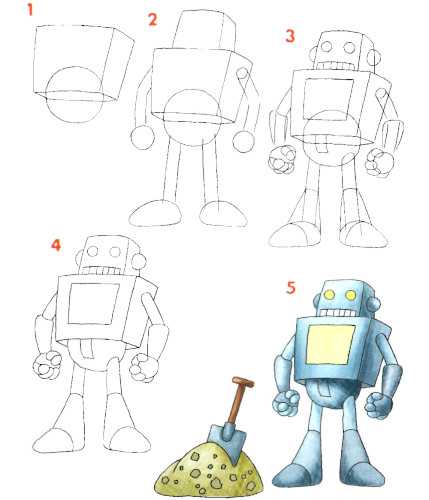
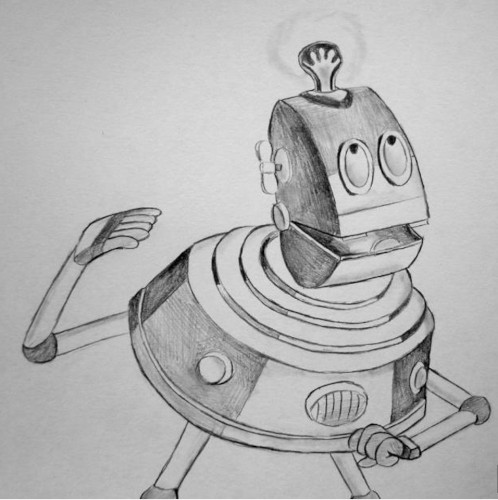
Good robot
Step by step drawing process:
- Take an A4 sheet of paper and a pencil. Start drawing by creating the main shape of the robot. Draw a large oval head in the center of the sheet. Think about how big the robot will be to properly distribute the space on the sheet.
- Start drawing straight lines down from the robot's head - these will be the boundaries of its body. Gradually add the frame of the arms and legs, using straight and curved lines for this. Do not forget about proportions: the arms and legs should correspond to the size of the body.
- Proceed to detailing the robot. Add a face: eyes, nose and mouth. You can draw kind eyes with large pupils and a smile on the robot's face - this will create a friendly image. Think about the details: buttons, antennas and so on. Place them all over the robot's body symmetrically and harmoniously.
- Add light and shadow elements to the drawing to give it volume. You can leave a white stripe on the head and draw light and shadow on the rest of the body. This will give the drawing depth and realism.
- After finishing all the details and adding shadows, go over the drawing with a pencil again to emphasize the contours and enhance its expressiveness. Get rid of unnecessary lines, if any. The final touch will be coloring the drawing with a pencil to give it depth and color saturation.
Funny robot
A fun robot making workshop can be a great way to not only explore your child's creativity, but also teach him to work with various techniques:
- Determine the composition of the future drawing. On the paper, you should draw 2 vertical lines dividing the sheet into 3 parts. This will help create balance and correctly distribute the elements of the robot.
- Draw the basic shape of the robot's body and head. You can use a soft pencil and light but confident movements for this. You also need to give these elements a slightly rounded shape so that the robot looks cute and friendly.
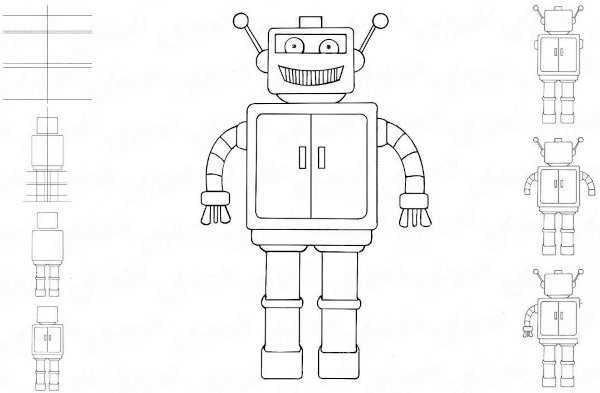
- Step-by-step addition of various parts of the robot. Starting with the eyes, draw round shapes, add an antenna above them. Move on to drawing the mouth - create a rectangular shape. Decorate the ears with screws to emphasize that this is a mechanism.
- The lines drawn in the first step will help determine the location of the arm and leg. It should not be forgotten that the robot will consist of many straight lines and geometric shapes, so it is necessary to draw them carefully so as not to spoil the overall composition of the drawing.
- Draw the details on the robot's body. You will need buttons on the chest, mechanisms on the arms and legs. It is important to create a clear distinction between the robot's parts so that they look realistic and recognizable.

- Using light pencil strokes, add shadows and volume to the robot, making it more realistic and alive. You can also use a light pencil to highlight certain parts of the body and add shine.
- Edit the drawn picture with an eraser to get rid of any residual lines and highlight the main points.
Bender
Robot Bender from the animated series Futurama is a negative character, the source of countless comic situations. His height is 180 cm. Unlike most robots, Bender often breaks the rules, gets into trouble because of his scandalous behavior and carefree lifestyle.
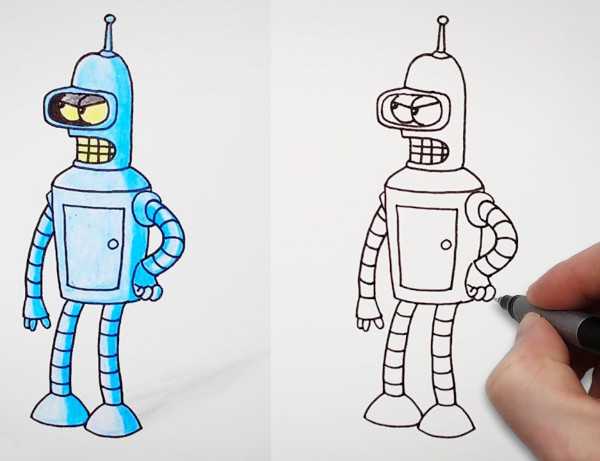
For children who are interested in drawing and fans of Futurama, a master class on Drawing Bender the Robot can be an interesting and creative activity:
- Apply light guidelines to the paper for the future drawing. Draw the boundaries of Bender's body using simple lines, indicating the main proportions and shapes. This step will help maintain the correct proportions and avoid mistakes in the future.
- Start with the head. Bender the robot has a distinctive head shape with 2 large eyes and elongated ears. Draw these elements, carefully working out the details - the shape of the eyes, the distinctive pupils and the metallic markings.
- Proceed to drawing the body. It is made in the form of 2 horizontal cylinders - the body and legs. Draw the body, paying attention to the proportions and shape. Work on the buttons, characteristic metal marks and other details.
- Proceed to drawing the hands. Bender the robot has 2 powerful mechanical hands with fingers. Draw these elements, paying attention to the appropriate details and proportions.
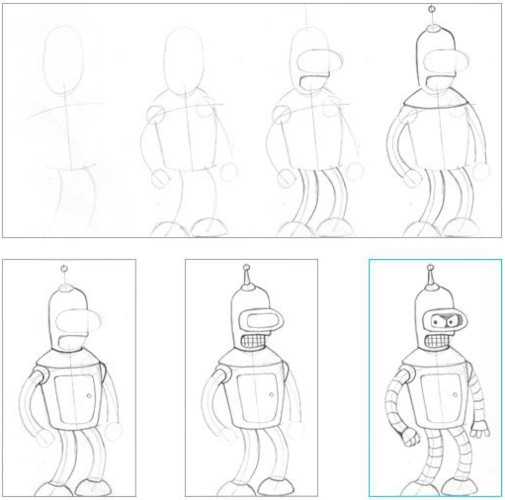
- Draw the legs. The robot has 2 curved legs. Sketch the shape of each leg on paper, keeping the proportions correct and paying attention to details such as hinges and platforms.
- Add finishing touches and details. Enhance the contrast and dynamism of the drawing by working on shadows and transitions. Reflect the characteristic features of the Bender robot - his mechanical smile, metallic texture and other characteristics.
- Review the drawing and, if necessary, make additional corrections and improvements.
Blacktop
Blacktop is a robot superhero dressed in thin but strong armor. At the very heart of his armor is a weak reactor that rattles and overheats after every blow. Blacktop's appearance is completed by a gray helmet and bright red glowing eyes.
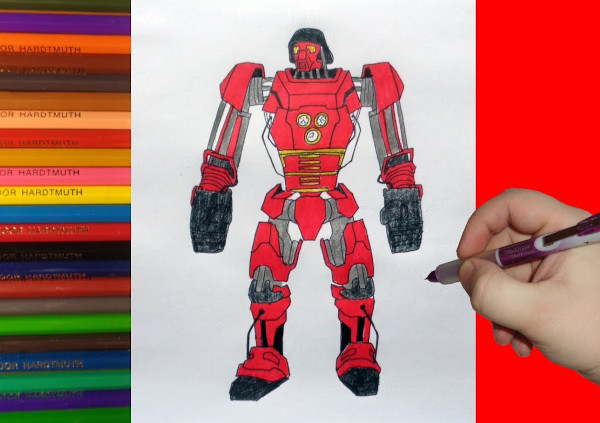
Step by step process of drawing Blacktop full body using pencils:
- Determine the basic proportions and shape of the robot's body. Start by drawing vertical and horizontal lines to help you position the parts correctly. Blacktop is a powerful machine, so his figure should appear powerful and muscular.
- Move on to more detailed elaboration of the drawing. Start by adding the main features of Blacktop's face and head. His eyes and mouth should be expressive, for this you can use different line thicknesses to give the drawing volume and depth.
- Proceed to work on the robot's body and limbs. Use different shades of gray to give the image volume and texture. Draw armor and other mechanical parts.
- Add shadows to give the drawing depth and realism. Determine the direction of lighting and the shadow that the object will cast. Use thin lines and different shades of gray to create volumetric and realistic shadows on the robot.
- Refine the details of the robot, correct any flaws, and give the drawing a finished look.
- You can color the robot with pencils using shades of gray.
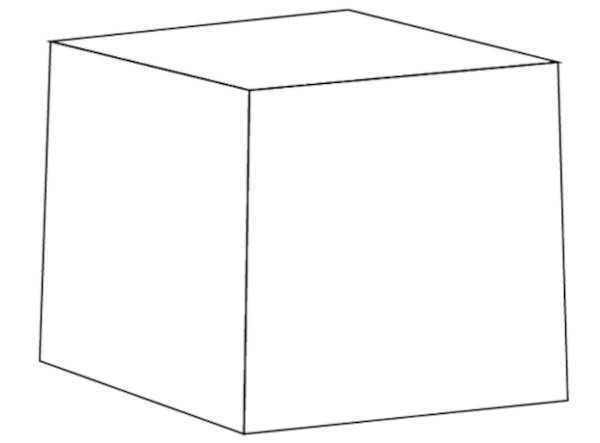
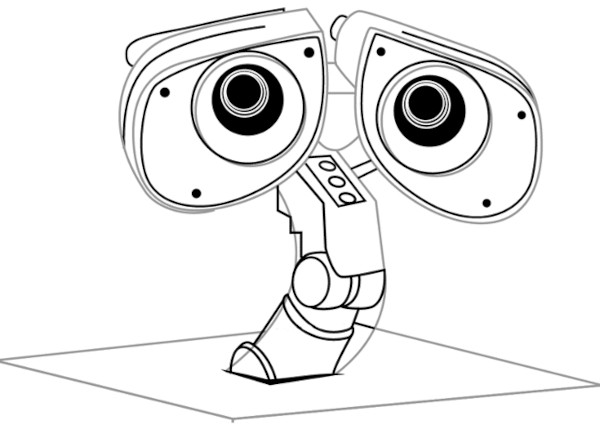
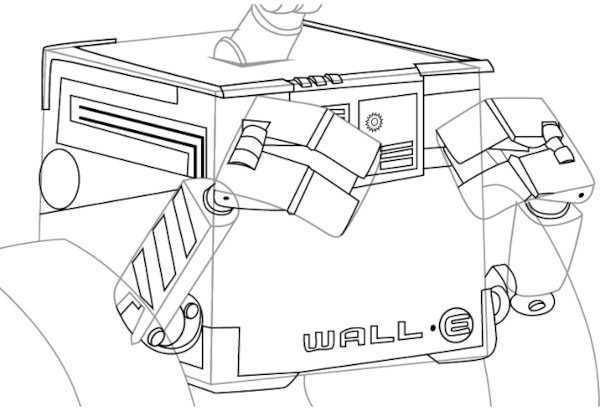
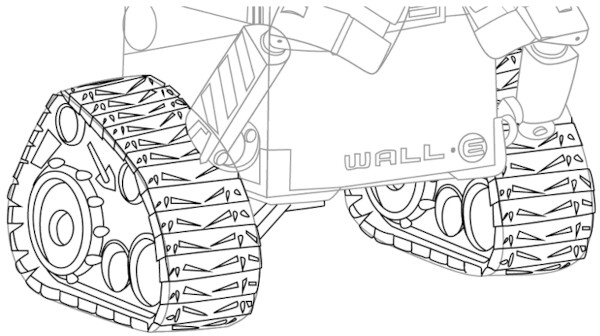
Wall-E
Wall-E from the cartoon of the same name is a cleaning robot. Its coloring was once rich, but years of work have led to the metal becoming faded and rusty. On the top of the robot is a stand in which are located 2 eyes.
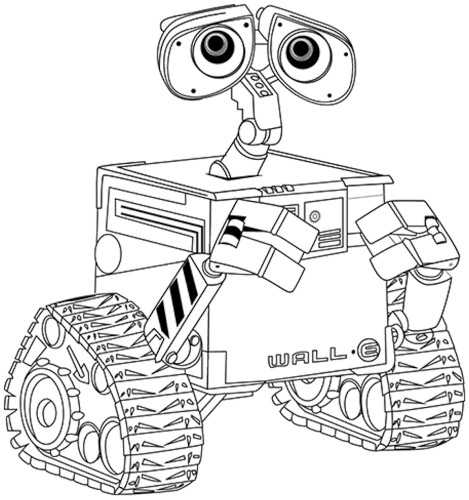
Wall-E is inquisitive, kind, and very attached to the objects he finds while cleaning. He is one of the most popular characters.
Step by step process of drawing a robot:
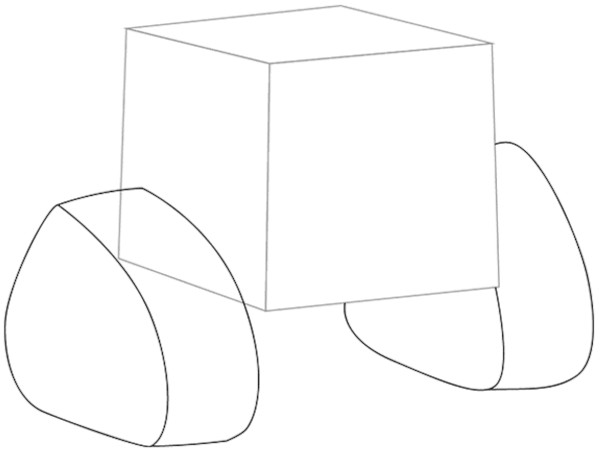
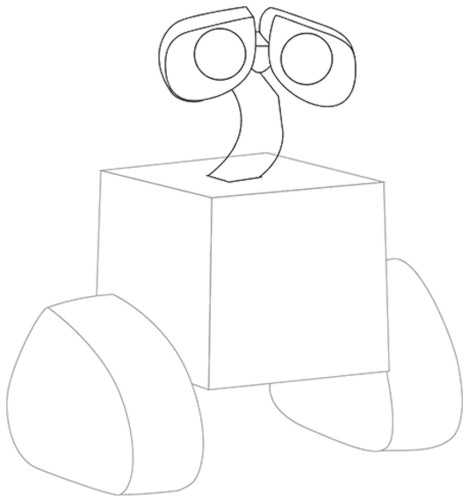
- The outline of his figure. Use a thin pencil to create clear and neat lines. Wall-E is a rectangular body with rounded corners, so it is important to pay attention to the correct proportions.
- Draw geometrically shaped legs.
- Add details to the robot. Start with Wall-E's eyes, which are shaped like a large round lens.
- Then pay special attention to his hands, which have a geometric shape. Use straight lines to create the connecting parts of the robot.
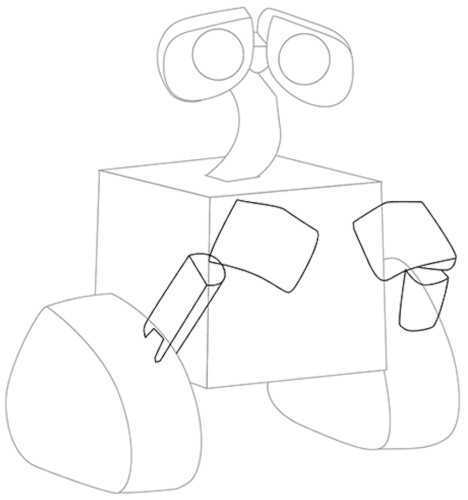
- Wall-E has a metallic surface, so it is important to create the effect of metallic shine. For this, it is recommended to use a soft pencil and create smooth transitions between light and dark areas. Pay special attention to the depth and volume of the robot, adding shadows on the darker areas of its surface.
- Focus on the small details of the robot, such as bolts and buttons. You can also add small scratches and scuffs to the surface of Wall-E to create a sense of reality and emphasize his character.
- Work out the details of the robot's legs.
- Analyze the resulting picture, make adjustments if necessary, and give the work the final touches.
Baymax
Baymax is an inflatable medical robot from the popular cartoon Big Hero 6, created by the genius Tadashi. He is a good-natured and sympathetic character. His medical skills allow him to treat almost any ailment.

Baymax proves to be an invaluable friend and protector to his owners. His kindness and selfless attitude towards tasks make him one of the most beloved characters among children.
How to draw robot Baymax with step by step tutorial:
- Start by forming his head. The rounded shape and elongated top edge will help create the recognizable features of the hero. Draw the body, represented by 2 ovals.
- To draw the arms and legs, use simple geometric shapes such as ovals and rectangles to create the outlines of the limbs. This will help to achieve the correct proportions and shapes. At the ends of the arms and legs, draw round shapes that will represent the corresponding parts of the robot.
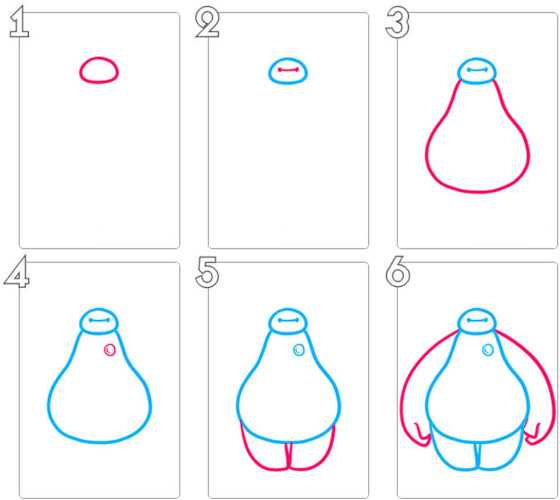
- Draw his eyes and the line connecting them. Baymax's eyes are slightly oval shaped and tilted downwards.
- Use different shades of gray and black to tone surfaces and add shadows. Consider gradients and transitions between tones.
- Add additional lines and textures to give Baymax more depth. Feel free to experiment and add your own creative interpretations to the drawing to make it unique.
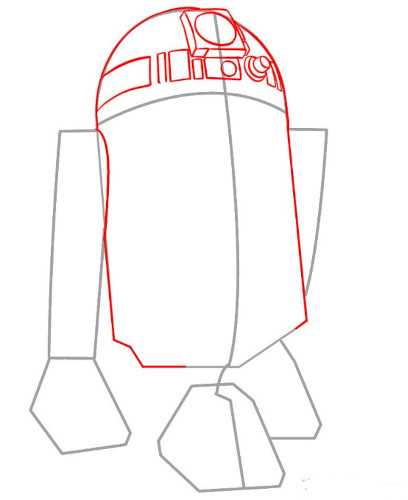
R2-D2
R2-D2 is one of the most recognizable characters in the Star Wars franchise. This little robot has a unique design: his barrel-shaped body and dome-shaped head with one eye immediately attract attention. R2-D2's head has indicators that flash in different colors.
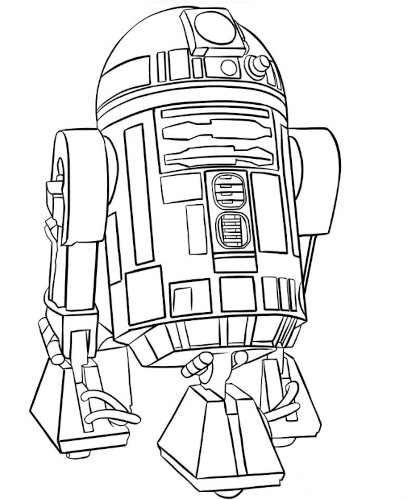
With a step-by-step approach, kids can learn how to create this popular character:
- Start by drawing the basic outline of the robot's body. It is a cylindrical shape with some details on the top and bottom.

- R2-D2 has a round head shape with lots of small details. Pay attention to shape and proportions so that the head is properly attached to the body.
- Add round and rectangular elements to the robot's head and different panels.
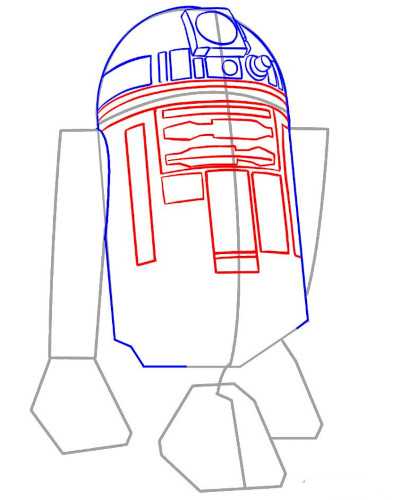
- Add extra detail to the robot's body. R2-D2 has many protruding parts and panels that give him his recognizable look.
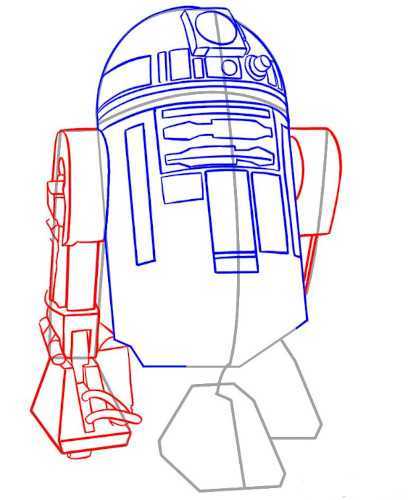
- Add small details such as buttons and gauges on the robot's body. They will help create realism and complement the overall look of R2-D2.
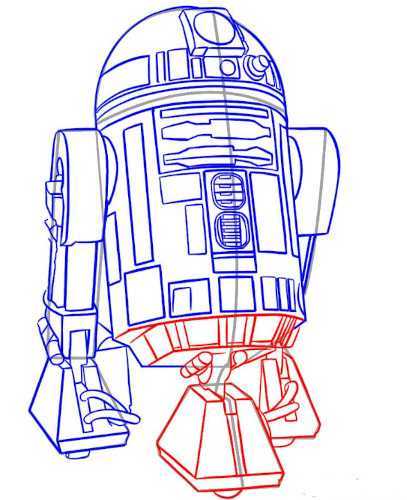
- Create smooth transitions between light and dark areas of the drawing.
Robot from the planet Shelezyaka
The inhabitants of the planet Shelezyaka from the popular cartoon "The Mystery of the Third Planet" are robots whose height is slightly smaller than a human. They are distinguished by a heavy, strong and durable design.
They are capricious and touchy, requiring special attention and care. On the forehead of each robot there is an indicator light that displays their emotional state.
Step by step drawing process:
- Draw the head. Go to its detailing. Mark the places for the eyes and mouth with short and light lines. The robot from the planet Shelezyaka has an unusual head shape and futuristic details.
- Sketch the general shape of the robot with light lines so that you can easily adjust the drawing. Determine the basic proportions of the body, head, arms and legs. Move on to the body of the robot. Continue drawing the arms and legs of the robot.
- Display the technical elements and mechanisms that decorate it. Use different line thicknesses to create volume and texture. They should also be detailed and have characteristic elements.
- Using different shades of pencils, create volume and depth of the robot. Consider the direction of light and add shadows where necessary.
A robot drawing master class not only gives children the opportunity to express their creativity, but also to learn how to observe and convey different shapes and proportions. Careful study of details and application of technical tips will help to create a realistic drawing of a robot using pencils.
Video about drawing a robot
How to draw a cute robot: