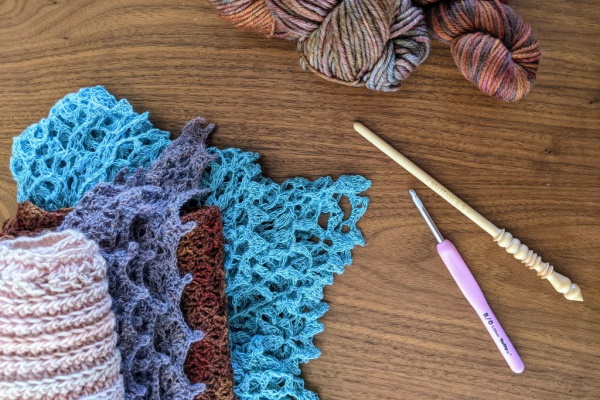
Crochet edge binding is often used to give things a more elegant and sophisticated look. The edges of the product can be bound with either a simple set of loops or a complex original pattern.
Crocheting the edge of the product
There are many different types of crochet edge trims. Most often, edging is needed for sleeves, collars, and the bottom of the garment.
Decorative types of bindings are used for edging tablecloths, towels, curtains and scarves. Sometimes the use of binding is used to hide some defects of products located on their edges. Correctly executed binding can significantly improve the appearance of the item.
The edges of the product are bound with threads, the thickness of which depends on the type and thickness of the yarn from which the product is knitted.
To ensure that the crocheted pattern is neat and not stretched at the edges, it is necessary to select a tool that matches the selected yarn. The hook sizes used for different yarns are given in the following table.
| Hook diameter (mm) | Recommended yarn type | Products that can be connected |
| from 0.5 to 1 | Cotton threads of the finest diameter (mouline) | Decorative scarves, collars, lace products and trims for their edges |
| from 1 to 2 | Cotton threads (iris) or synthetic, thin diameter | Children's outerwear, summer clothing and decorative items, as well as trims for sleeves, collars and other clothing elements |
| from 2 to 3 | Medium diameter cotton, acrylic or wool yarn | Winter sweaters, scarves, hats |
| from 3 to 5 | Double twisted wool yarn | Warm sweaters, cardigans, mittens |
When selecting a hook for the thread you are using, you need to turn the tool upside down and pull a loop of yarn onto it. If the thread completely fills the area of the recess in the hook and does not extend beyond its edges, then this tool corresponds to the required dimensions and is suitable for knitting with the selected thread.
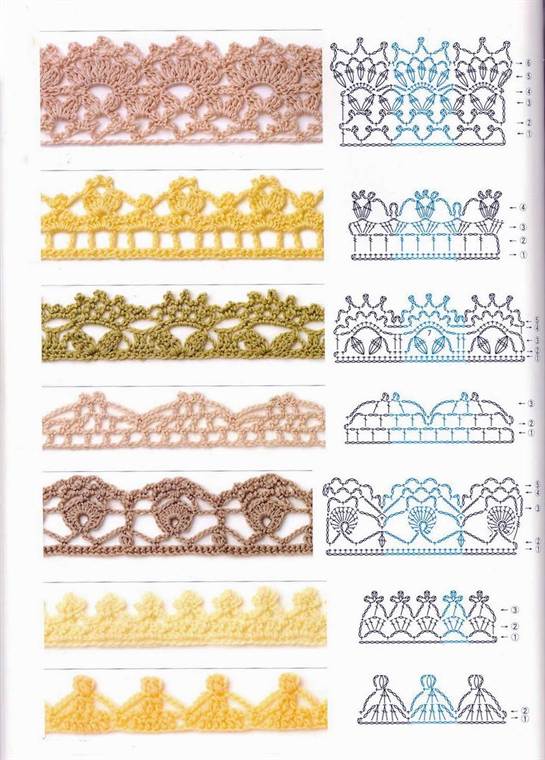
The following types of edging are used to trim the edges of products:
- Longitudinal (consists of several decorative rows, connected sequentially along the width of the product element).
- Transverse (consists of one row of openwork elements, connected one after another along the edge of the product).
- Combined (When knitting, longitudinal and transverse types of binding are used).
The border can be knitted separately and then sewn to the edge of the product. For knitted products, it is advisable to knit the border directly into the loops along the edges.
Crayfish step
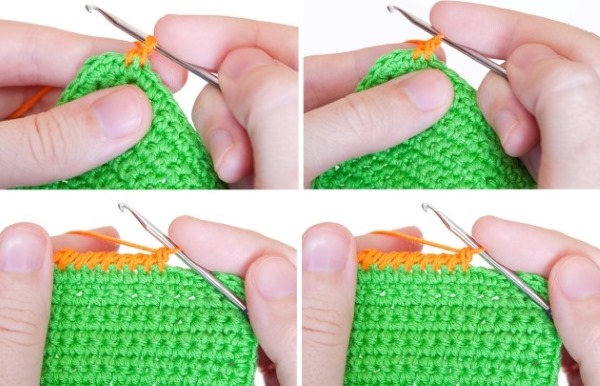
Crocheting the edge can significantly improve the appearance of the product. The simplest option for edging the product is the crab step. The technique for doing it is based on the use of single crochets and is done from left to right.
To perform the edge binding with a crab step, you need to:
- Insert the tool into the leftmost loop of the edge of the product.
- Make 1 chain stitch.
- Insert the tool into the next loop of the base row, grab the main fiber and pull it up from this loop (2 loops will form on the hook).
- Grab the main yarn with the hook and pull it through the 2 loops on the hook.
- Cast on 2 chain stitches.
- Insert the tool into the loop of the main row, skipping 1 loop relative to the previous knitted loop, grab the main fiber and pull it up from this loop.
- Grab the main yarn with the hook and pull it through the 2 loops on the hook.
- Cast on 2 chain stitches.
- Repeat steps 6 through 8 as many times as necessary to knit the entire row to the end of the edge of the product.
This binding pattern emphasizes the edge of the product and protects it from stretching. The crab step is often used for binding sleeves and cuffs.
Pico
Crochet edging makes the item look neater and more concise. Pico edging is a peak-shaped pattern that is often used for edging hats and cuffs.
The process of performing such a harness consists of the following steps:
- Insert the tool into the rightmost loop of the product.
- Perform 1 chain stitch.
- Insert the tool into the next loop of the row, grab the main fiber and pull it up. Then hook the main strand again and pull it through the 2 loops on the hook.
- Knit 3 chain stitches.
| Classic pico | 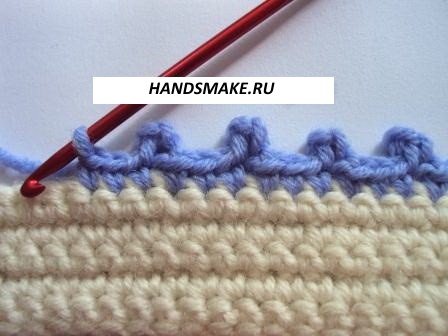 |
| Expanded pico | 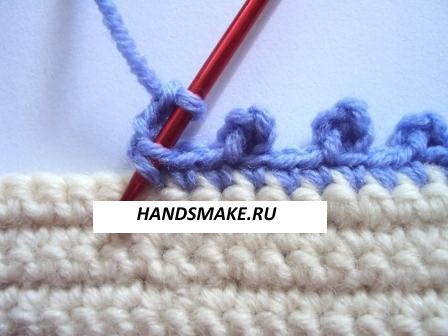 |
| Big pico | 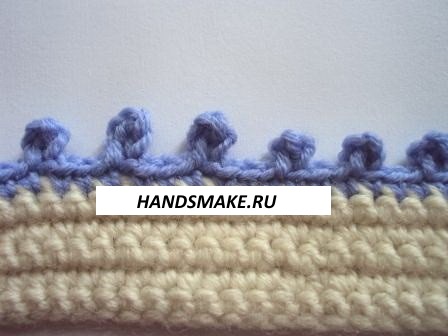 |
| Triple picot | 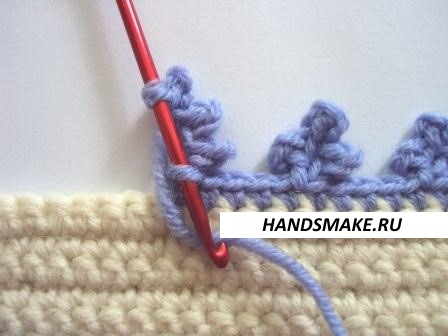 |
| Volumetric pico | 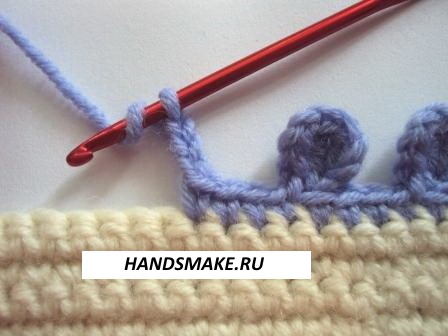 |
- Insert the tool into the 1st chain stitch from the bottom up, grab the main fiber and pull it out of the loop up. Then hook the main strand again and pull it through the 2 loops located on the hook. As a result, you will get 1 "Pico" element.
- Insert the tool into the loop of the main row, skipping 1 loop relative to the previous knitted loop, grab the main fiber and pull it up from this loop.
- Hook the main fiber and pull it through the 2 loops on the hook. This will leave the picot element attached to the edge of the main row.
- Repeat steps 4 through 7 as many times as necessary to knit the entire row to the end of the edge of the product.
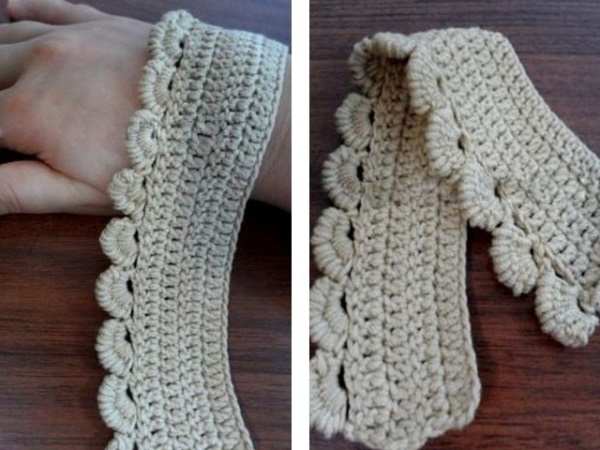
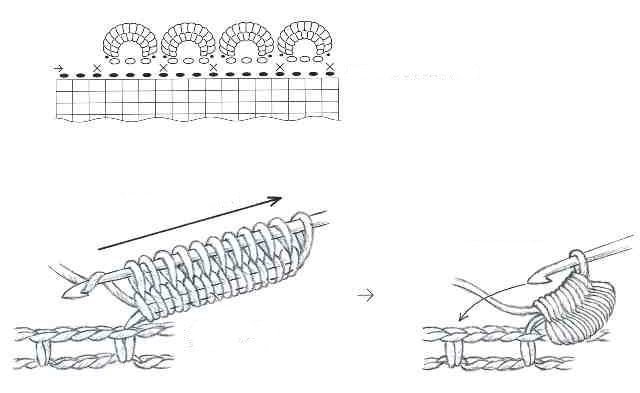
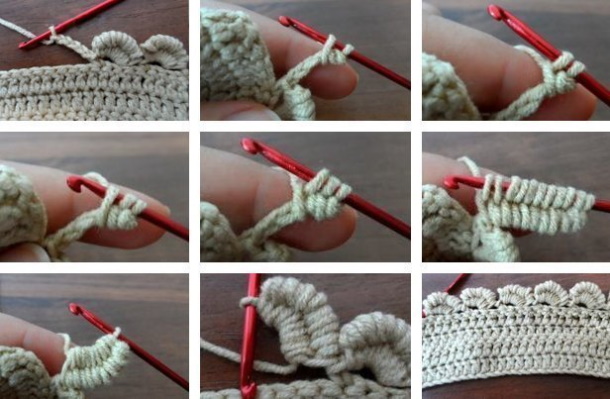
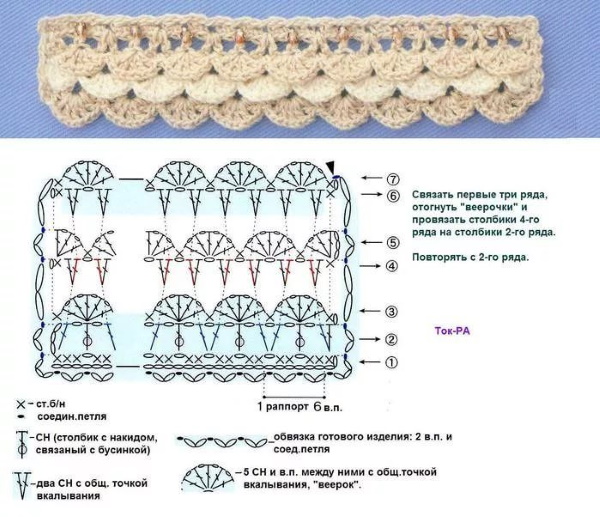
Arched frame (shell)
The crochet edge binding "shell" is a wave-like pattern, each element of which looks like a shell.
The process of performing such a harness consists of the following steps:
- Insert the tool into the rightmost loop of the product.
- Grab the main fiber with the hook and pull it out of the loop to the top.
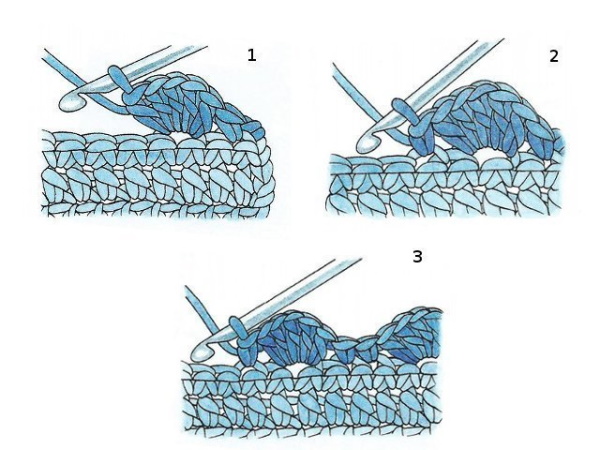
- Place the main fiber over the tool, then insert the tool into the loop of the main row, skipping 2 loops. Then hook the main fiber and pull it up.

- Hook the main fiber and pull it through 2 loops on the hook, then grab the main fiber again and pull it through the other 2 loops on the hook. This will create a double crochet.
- Make 4 additional double crochet stitches by inserting the tool into the same stitch as the previous double crochet stitch.
- Insert the tool into the loop of the main row, skipping 2 loops, and then hook the main fiber and pull it up through the loop. The result will be an element consisting of 5 double crochets, and externally resembling the shape of a shell.
- Repeat steps 3 through 6 as many times as necessary to knit the entire row to the end of the edge of the product.
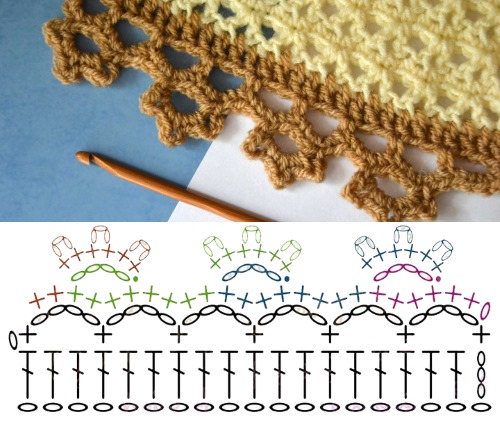
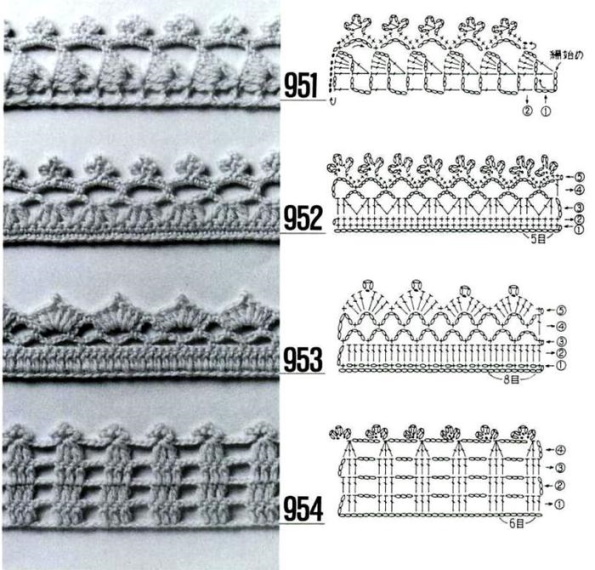
Lace trim
Crochet edge binding with openwork patterns is used to decorate tablecloths, scarves, napkins and various decorative items. The lace pattern crocheted along the edges gives the product a unique and elegant look.
If you plan to use decorative edging for non-knitted items, such as cotton napkins and tablecloths, then before you start edging the edges of the item with a pattern, you must first tie the edges of the item with single crochet stitches. Then, on the formed knitted base, the edging of the pattern itself is performed.
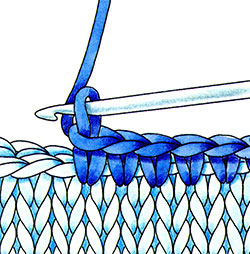
Preliminary binding with single crochets is done as follows:
- Insert the tool into the far right loop of the product.
- Perform 1 chain stitch.
- Insert the tool into the next loop of the base row, grab the main fiber and pull it up. Then hook the main strand again and pull it through the 2 loops on the hook.
- Repeat steps 2 through 3 as many times as necessary to knit the entire row to the end of the edge of the product.
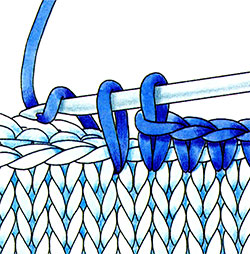 |  |
In order to decorate the edges of the product with an openwork pattern, you need to do the following steps:
- Insert the tool into the far right loop of the edge of the product.
- Make 7 air loops.
- Insert the tool into the 5th loop of the main row relative to the previous loop, grab the main fiber and pull it out of this loop up. Then hook the main strand again and pull it through 2 loops up. As a result, you will get an arch of air loops.
- Repeat step 3 as many times as necessary to knit the entire row to the end of the edge of the product. The result will be a sequence of thin arches along the entire perimeter of the edge of the product.
- Make 3 chain stitches from the base of the previous arch.
- Yarn over the main fiber 1 time, then insert the tool into the middle of the next arch on the left. Then hook the main fiber and pull it up.
- Hook the main strand and pull it through the 2 loops on the hook. Then pick up the main strand again and pull it up through the remaining loops.
- Make 1 chain stitch, then 1 yarn over.
- Insert the tool into the middle of the current arch. Then hook the main fiber and pull it up.
- Hook the warp and pull it through the 2 loops on the hook. Then pick up the warp again and pull it up through the remaining loops.
- Make 1 chain stitch, then 1 yarn over.
- Insert the tool into the middle of the current arch. Then hook the main fiber and pull it up.
- Hook the warp and pull it through the 2 loops on the hook. Then grab the warp again and pull it up through the remaining loops.
- Repeat steps 5 to 13 as many times for all previously knitted arches. The result will be the 2nd openwork row.
- Insert the tool into the middle of the 1st arch of the 2nd openwork row and make 7 air loops.
- Insert the tool into the middle of the next arch of the 2nd openwork row, grab the main fiber and pull it out of this loop up. Then grab the main fiber again and pull it through 2 loops up. As a result, you will get a thin arch of air loops.
- Repeat step 16 as many times as necessary to knit the entire row to the end of the edge of the product. The result will be the 3rd openwork row, consisting of simple thin arches along the entire perimeter of the edge of the product.
- Place the tool under the previous arch of the 3rd openwork row, hook the main fiber and bring it up, then grab the main strand again and pull it through the 2 loops on the hook.
- Repeat the previous step 2 times.
- Make 3 chain stitches.
- Place the tool under the current arch, hook the main fiber and bring it up, then hook the main strand again and pull it through the 2 loops on the hook.
- Repeat the previous step 2 times.
- The result will be an arch frame with a convex openwork element in the center.
- Repeat steps 18 to 22 as many times as necessary to knit the entire row to the end of the edge of the product. As a result, you will get the 4th openwork row, which is a special binding of the arches of the 3rd openwork row.
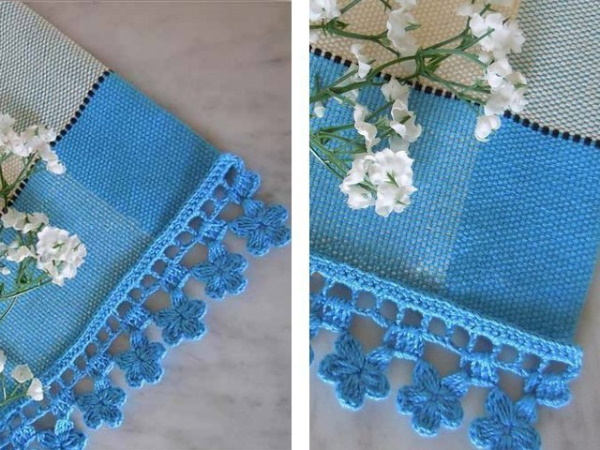
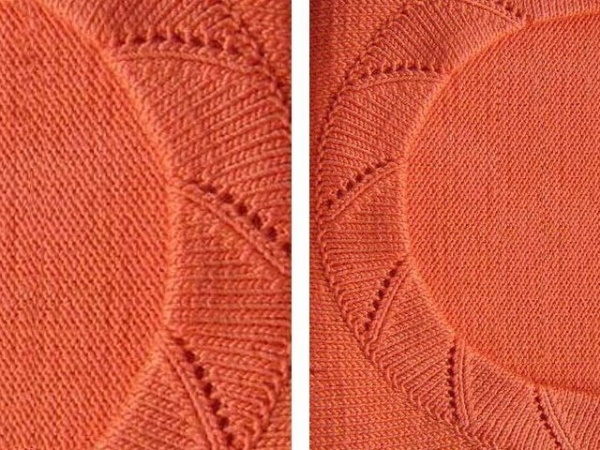
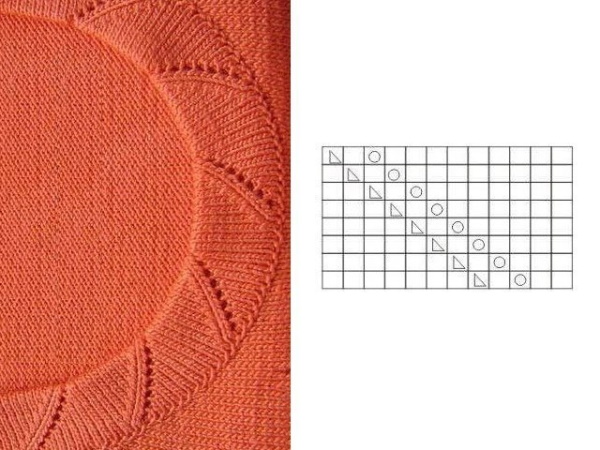
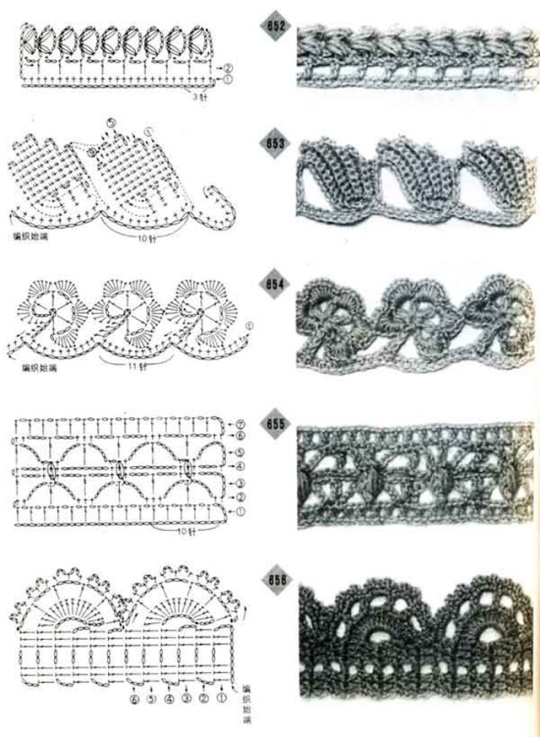
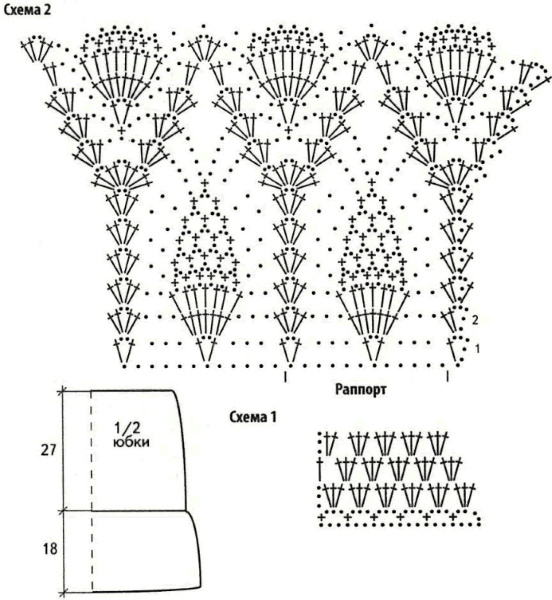
For items knitted from thick yarn, you can use a more voluminous lace trim. The pattern can consist of wide arches connected to each other by small decorative elements.
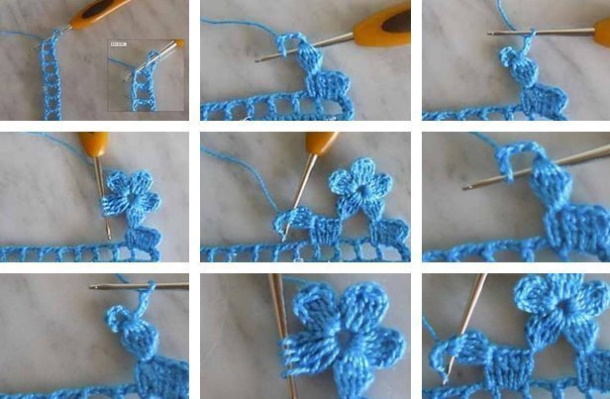
The process of knitting such a pattern consists of the following steps:
- Insert the tool into the outer loop of the product and make 1 chain stitch.
- Insert the tool into the next loop of the base row, hook the main fiber and pull it up through this loop. Then hook the main strand again and pull it through the 2 loops on the hook.
- Make 5 air loops.
- Insert the tool into the loop of the main row, skipping 3 loops relative to the previous knitted loop.
- Hook the main fiber and pull it up through this loop, then grab the main strand again and pull it through the 2 loops on the hook. You will get a small arch.
- Repeat steps 3 through 4 as many times as necessary to knit the entire row to the end of the edge of the product.
- Turn the work over.
- Make 5 chain stitches.
- Insert the tool under the central loop of the arch, grab the main thread and bring it out from under the loop to the top. Then grab the main strand again and pull it through 2 loops on the hook.
- Yarn over the tool once, then insert the tool under the center loop of the next arch. Then grab the main thread and bring it out from under the loop to the top.
- Grab the main strand and pull it through the 2 loops on the hook, then grab the strand again and pull it through the 2 remaining loops on the hook to the top.
- Make 1 yarn over on the tool and insert the tool under the same arch. Then grab the main thread and bring it out from under the loop to the top.
- Grab the main strand and pull it through the 2 loops on the hook, then grab the strand again and pull it up through the 2 remaining loops on the hook.
- Repeat steps 11 through 12 7 times. As a result, you will get a fan-shaped pattern along the contour of the arch.
- Place the tool under the center loop of the next arch, hook the main fiber and pull it up. Then hook the main fiber again and pull it up through the 2 loops on the hook.
- Make 5 chain stitches.
- Insert the tool under the central loop of the next arch, grab the main thread and bring it out from under the loop to the top. Then hook the main strand again and pull it through 2 loops on the hook.
- Make 5 chain stitches.
- Insert the tool under the central loop of the next arch, grab the main thread and bring it out from under the loop to the top. Then again grab the main strand and pull it through 2 loops on the hook.
- Yarn over the tool once, then insert the tool under the center loop of the next arch. Then grab the main thread and bring it out from under the loop to the top.
- Grab the main strand and pull it through the 2 loops on the hook, then grab the strand again and pull it up through the 2 remaining loops on the hook.
- Make 1 yarn over on the tool and insert the tool under the same arch. Then grab the main thread and bring it out from under the loop to the top.
- Grab the main strand and pull it through the 2 loops on the hook, then grab the strand again and pull it up through the 2 remaining loops on the hook.
- Repeat steps 21 through 22 7 times. The result will be the following fan-shaped pattern.
- Place the tool under the center loop of the next arch, hook the main fiber and pull it up. Then hook the main strand again and pull it up through the 2 loops on the hook.
- Make 5 chain stitches.
- Insert the tool under the central loop of the next arch, grab the main thread and bring it out from under the loop to the top. Then hook the main strand again and pull it through 2 loops on the hook.
- Make 5 chain stitches.
- Insert the tool under the central loop of the next arch, grab the main thread and bring it out from under the loop to the top. Then hook the main strand again and pull it through 2 loops on the hook.
- Repeat steps 15 to 29 as many times as necessary to knit the entire row to the end. As a result, the 2nd lace row will be knitted, which will include fan-shaped elements and a group of small arches connecting them.
- Turn the work over.
- Make 2 air loops for lifting.
- Yarn over 1 and insert the tool into the outer loop of the adjacent fan-shaped element. Grab the main fiber and pull it out of the loop. Then grab the main fiber and pull it through the 2 loops on the hook, then grab the fiber again and pull it through the 2 remaining loops on the hook to the top.
- Repeat steps 32 through 33 for each fan stitch.
- Place the tool under the center loop of the next arch, hook the main fiber and pull it up. Then hook the main fiber again and pull it up through the 2 loops on the hook.
- Make 5 chain stitches.
- Place the tool under the center loop of the next arch, hook the main fiber and pull it up. Then hook the main fiber again and pull it up through the 2 loops on the hook.
- Repeat steps 32 through 37 as many times as necessary to knit the entire row to the end of the edge of the garment.
- Turn the work over.
- Make 1 chain stitch.
- Insert the tool into the next loop of the row, grab the main thread and bring it out from under the loop to the top. Then hook the main strand again and pull it through 2 loops on the hook.
- Repeat the previous step 3 times.
- Make 4 chain stitches.
- Insert the tool into the next loop of the row, grab the main thread and bring it out from under the loop to the top. Then hook the main strand again and pull it through 2 loops on the hook.
- Repeat steps 43 to 44 as many times as necessary to knit the entire row to the end of the edge of the product.
Crocheting the edge of a garment is a great way to update the look of a garment. Trim patterns can also be crocheted separately and then attached to the garment using a hook and thread.
Video about knitting
Crochet edge binding: