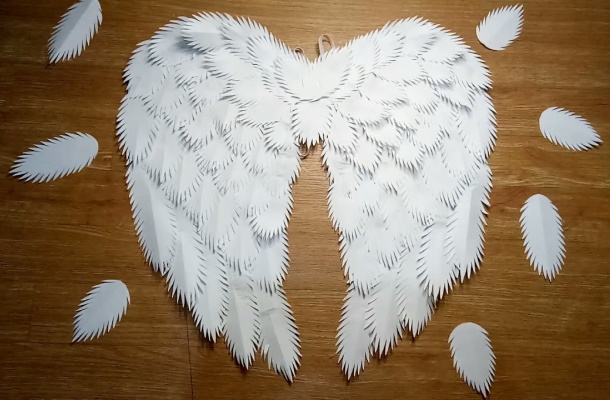
Angel wings for a photo shoot can be made with your own hands. To get a beautiful prop, you need to learn how to correctly determine its size and volume, as well as consider several instructions for making wings from various materials.
How to choose the right size and shape of wings
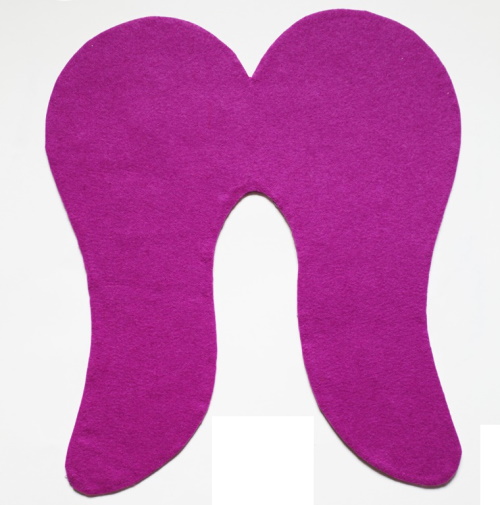
The size and shape of the wings should be selected based on the height and body type of the person who will wear them. For photo sessions with children, it is better to make small rounded wings. They will not restrict the child's movements.
This is important because if the baby is uncomfortable, it will look constrained in the photo.Large, voluminous wings with rounded corners will look good on a tall person with a thin build. Light and fluffy materials from which the feathers will be made will help to add volume.
People with a strong and full build should give preference to narrow wings with sharp ends and long feathers. This shape will visually stretch the figure and the photos will be the most successful. The size should be medium. It is desirable that the lower feathers do not touch the lower part of the buttocks.
For those who are short, the shape of wings with massive tops, which can be decorated with fur or fluff, will suit. The ends of the wings should be sharp. The optimal length of the product is to the knees, or slightly below the buttocks. Such wings will look harmonious in photographs without overloading the image.
Necessary materials
You can make angel wings with your own hands using simple and inexpensive materials.
What you may need for work:
| Material | Description |
| Thick paper, cardboard, foam ceiling tiles | Suitable for making a template onto which feathers will later be glued |
| Thin paper, fabric, isolon, tulle | To imitate a feather |
| Wire | To create a frame |
| Hot glue gun, Moment glue, sewing threads and needles | For attaching wings and decorative elements |
| White gouache, spray paint | For painting the finished product |
| Elastic tape, velcro | For attaching wings to the back or clothing |
A cardboard or foam tile template can be covered with natural white goose feathers. This will make the wings look more realistic. You will also need sharp scissors, pencils, felt-tip pens, and a stationery knife. Beads, glitter, fluff, and lace fabric are suitable for decorating the props.
Making paper wings
Beautiful and strong wings for multiple use can be made from cardboard and drawing paper. Whatman paper will do. This paper is quite thick, so it holds its shape well and is difficult to wrinkle.
What else is needed for work:
- a sheet of cardboard (the ends of boxes from household appliances will do);
- simple pencil;
- scissors;
- stationery knife;
- 2 Whatman papers;
- hot glue;
- PVA glue;
- Moment glue;
- awl;
- lighter;
- wide elastic band of white color.

Procedure:
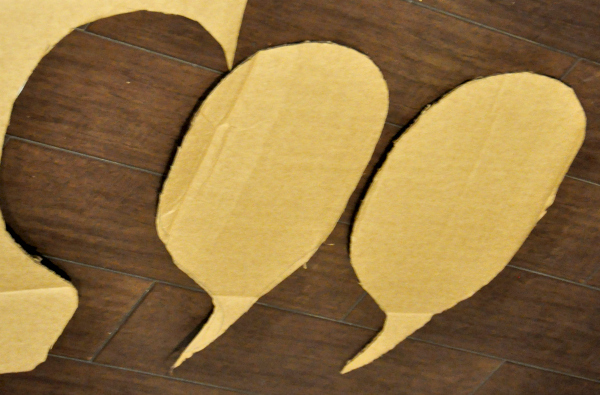
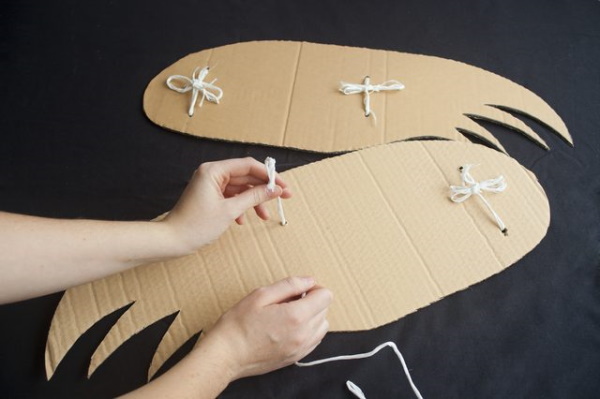
- Draw 2 identical wings on a piece of cardboard. The cardboard should be smooth, without any creases. If the wings are small, you can draw them as a single outline.
- Using a stationery knife, cut out the blanks. Remove burrs and any unevenness along the edges.
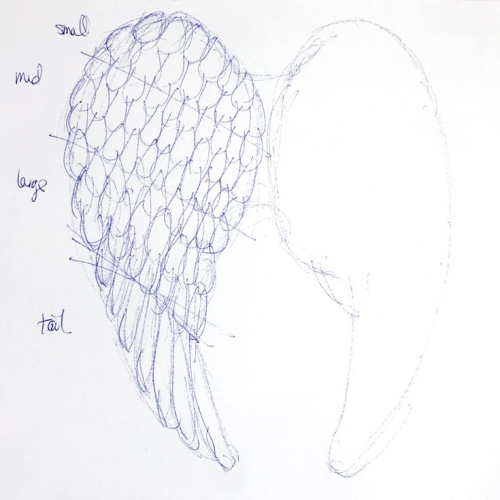
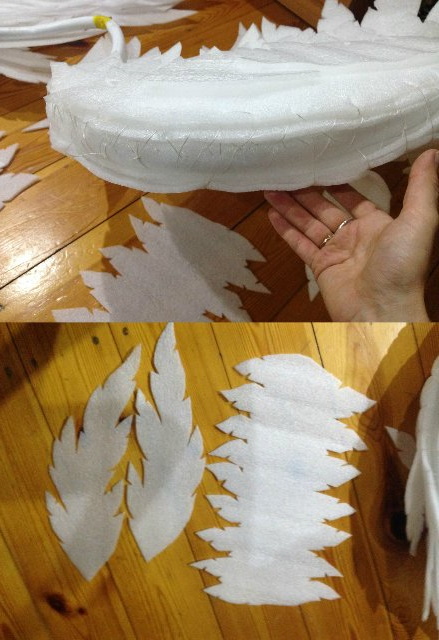
- On the Whatman paper, draw feathers of 3 sizes: large and long, medium and wide, small, with rounded ends.
- Cut out all the feathers with scissors.
- Make small cuts along the edges of each feather. This will make the feathers look more natural.
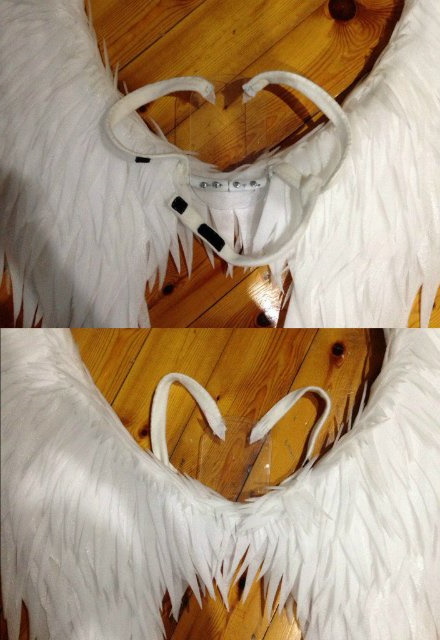
- Mark the location of the straps on the cardboard blank.
- Make holes with an awl.
- Measure the width of the elastic band, make slits of the same width on the cardboard blank. The holes will make the work easier.
- Cut 2 pieces of elastic tape to the desired length.
- Singe the edges of the ribbons with a lighter to prevent them from unraveling.
- Thread the ends of the ribbons through the holes and secure them on the front side with Moment glue. These will be the straps where the person should put their hands so that the wings stay on their back.
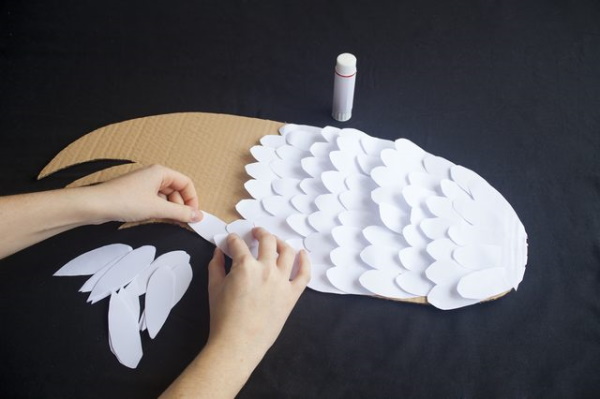
- Bend all the feathers slightly in half to make them look more voluminous.
- Glue the bottom rows of feathers. For this, you should use the largest blanks.
- The next 2 rows on each wing should consist of medium-sized feathers. They should be glued in a checkerboard pattern. Each feather should cover the empty spaces between the feathers from the previous row.
- Glue on small feathers in the same way.
- Also glue feathers onto the wings from the inside.
- If 2 blanks were cut out, they need to be connected with hot glue, and then glued with the remains of paper using PVA glue. Cover the joints with small feathers.
Paper wings are ready to use.
From tissue paper
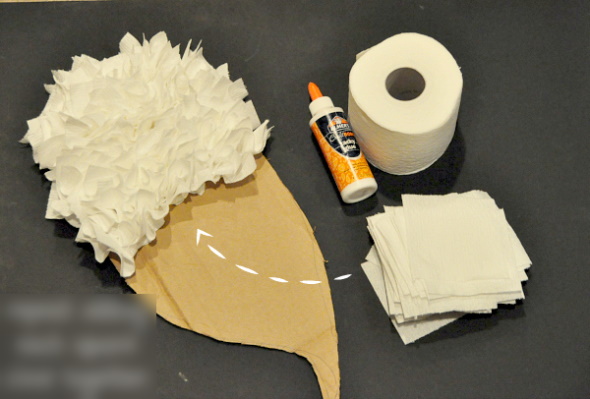
You can make angel wings with your own hands from multi-layered napkins that are used when setting tables.
What to prepare for work:
- 3 packs of white paper napkins (can be replaced with white two-ply toilet paper);
- a sheet of thick cardboard of A3 format;
- PVA glue;
- hot glue;
- chancery knife;
- simple pencil;
- sewing thread and needle;
- Velcro for fastening (can be purchased at craft stores, as well as where sewing materials are sold).
Procedure:
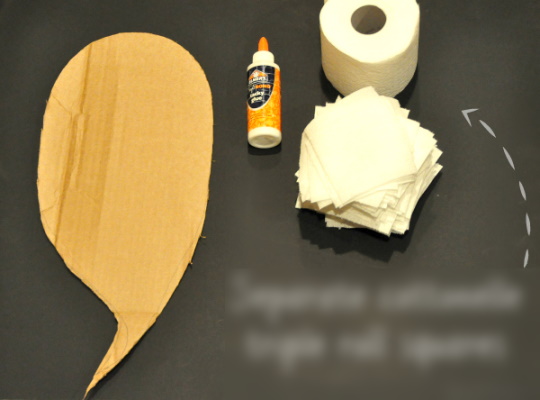
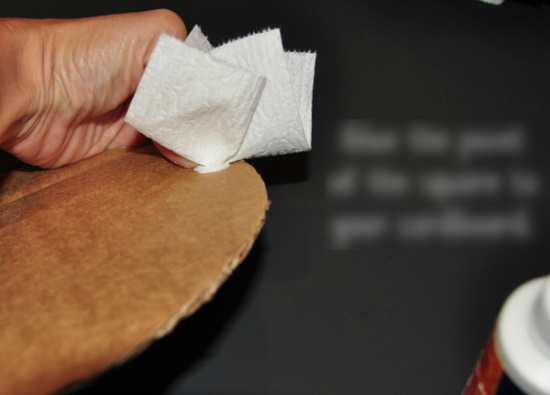
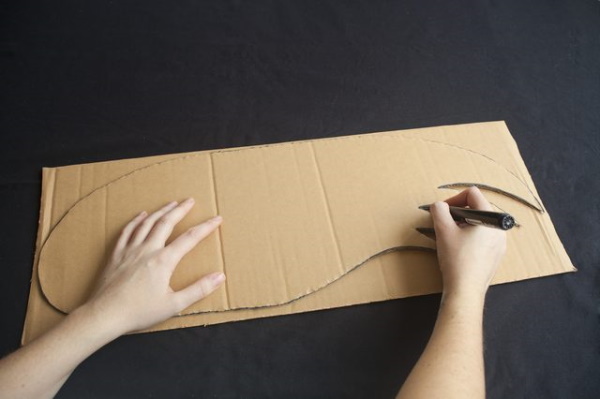
- On cardboard, draw 2 wings with oval tops and sharp lower ends.
- Cut out the blanks using a stationery knife.
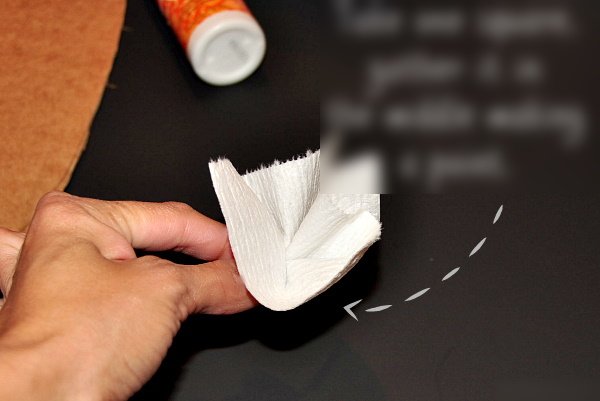
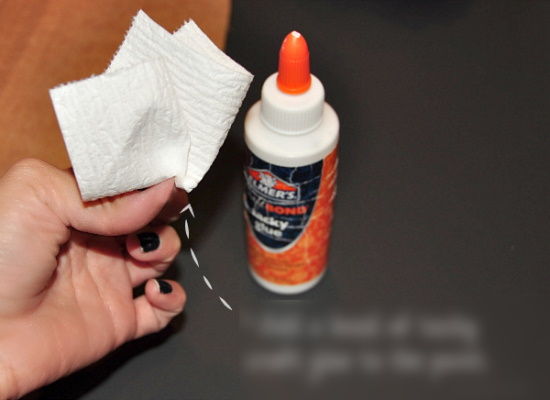
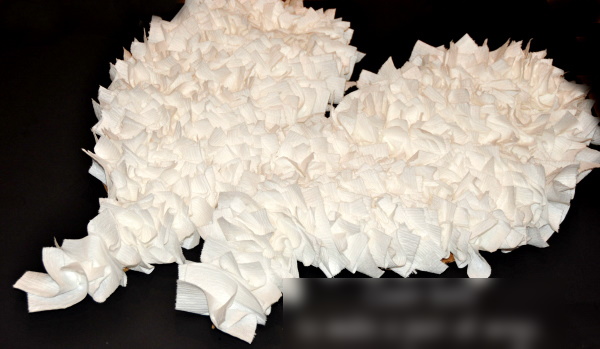
- Fold cones from napkins, then glue them so that the peeling ends of the paper are directed downwards. Glue the "feathers" in rows, starting from the bottom. You need to grease the cardboard with PVA glue, not thin paper.
- Glue the other wing in the same way.
- Glue the straightened napkins onto the back sides of the wings.
- When the glue dries, check whether the cardboard shows through the thin paper. If necessary, glue another layer of napkins.
- Using hot glue, attach the hard parts of the Velcro, placing them closer to the tops of the wings.
- Sew the soft parts of the Velcro onto the back of the suit. They need to be positioned at 1 level, and also make sure that the distance between the Velcro on the wings and on the clothes is the same.
- Cover the front side of the wings with napkin cones, without covering the Velcro.
- Dry the product.
To make the glue dry faster, you can use a hair dryer.
From corrugated paper
Beautiful and light wings can be made from white corrugated paper.
What to prepare for work:
- 2 packs of white corrugated paper;
- 2 white sheets of A3 cardboard (sold in stationery stores);
- felt-tip pen;
- stationery glue stick;
- narrow elastic band of white color;
- lighter;
- scissors;
- stationery knife.

Procedure:
- Use a felt-tip pen to draw 2 identical wings on cardboard.
- Cut out the templates along the outline using a utility knife.
- Mark the places for attaching the straps on the blanks.
- Use a utility knife to make slits.
- Cut 2 identical pieces from the elastic band.
- Use a lighter to singe the ends of the ribbons.
- Thread the rubber bands through the slits and secure their ends with hot glue.
- Without unrolling the paper rolls, cut them into large and medium-sized semi-oval wings.
- Unfold the paper.
- Grease the cardboard with glue and glue paper feathers to the wings. You need to glue from the bottom up. The upper rows of feathers should overlap the places where the paper is glued in the previous rows.
- Glue the feathers to the back of the wings in the same way.
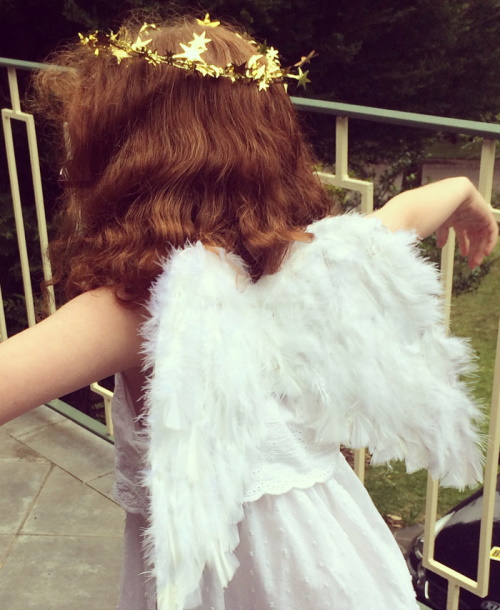
Such wings are light and voluminous. They can be used for children's photo shoots, as well as for decorating a carnival costume. Due to the small weight, active human movements will not be hindered.
From office paper
You can make angel wings with your own hands from office paper intended for printing on a printer.
What to prepare for work:
- 30 sheets of A4 paper;
- stationery knife;
- scissors;
- Velcro for fixing the wings to the suit;
- sewing thread and needle;
- white cardboard A3 format;
- hot glue.
Procedure:
- Draw the outline of the wings on cardboard.
- Cut out the template with a utility knife.
- Fold 15 sheets of paper in half lengthwise. Fold the remaining sheets lengthwise, and then again, crosswise.
- Cut large feathers from long paper blanks. 1 sheet will make 2 feathers.
- Cut out smaller feathers from the small blanks. From 1 sheet of paper you should get 4 small feathers.
- Glue the large feathers on the bottom. Glue the remaining feathers in rows, overlapping the previous ones.
- Using hot glue, attach the hard parts of the Velcro to the wings.
- Sew soft Velcro to the suit.
If desired, you can glue feathers to the back sides of the wings.
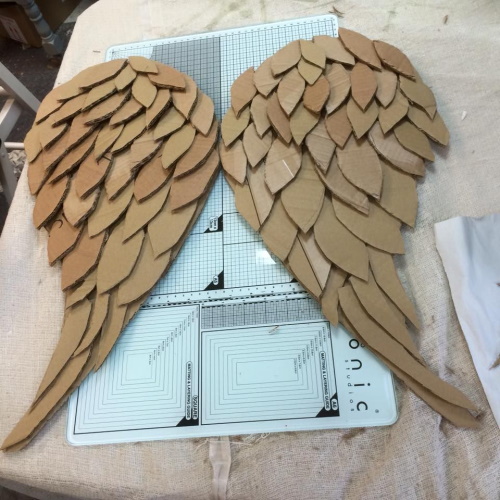
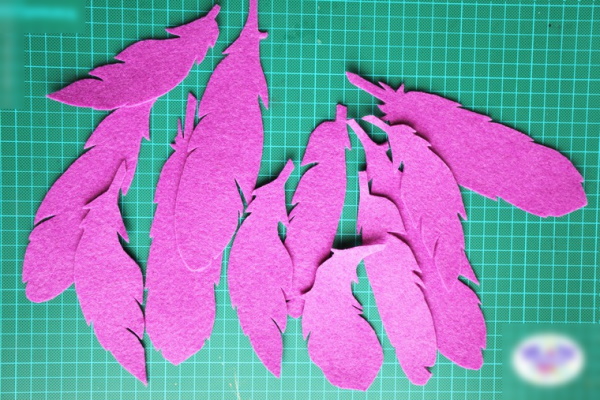
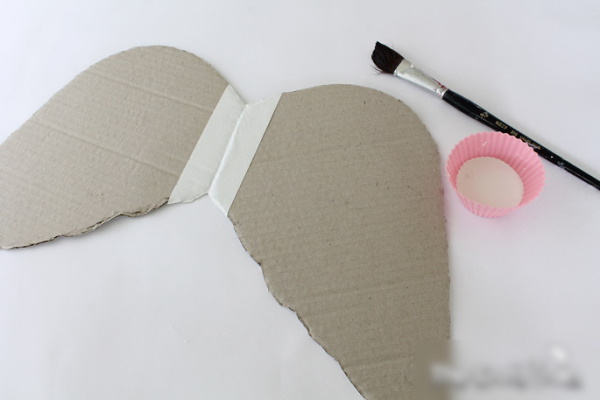
From cardboard
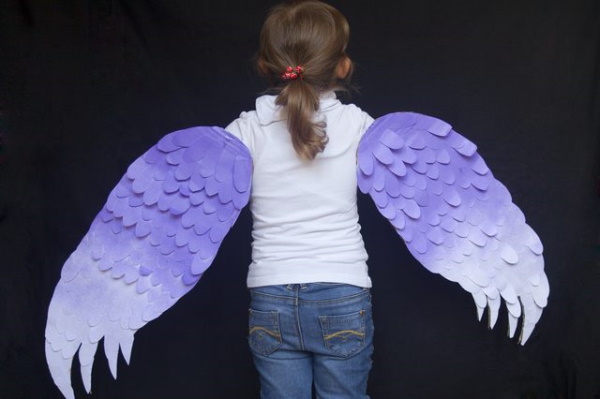
Cardboard wings will be a little heavier than paper ones, but they are much stronger. They can be used for photo shoots and costume parties several times.
What you will need for work:
- 4 sheets of thick cardboard, A3 format;
- white spray paint;
- hot glue;
- 40 cm of Velcro tape;
- sewing thread and needle;
- stationery knife;
- scissors.
Procedure:
- Draw 2 wings of any shape on cardboard.
- Cut out the blanks with a stationery knife.
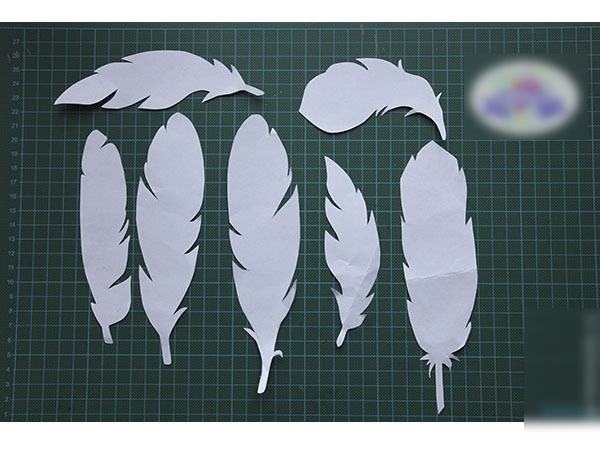
- On one of the scraps draw the shape of a medium-sized feather with a sharp tip.
- Cut out the template.
- Trace the feather onto the remaining sheets of cardboard.
- Use a craft knife to cut out all the feathers.
- Carefully cut off burrs and correct irregularities.
- Glue the feathers to the wings using hot glue. Start gluing from the bottom row. All feathers should be placed overlapping, in a checkerboard pattern.
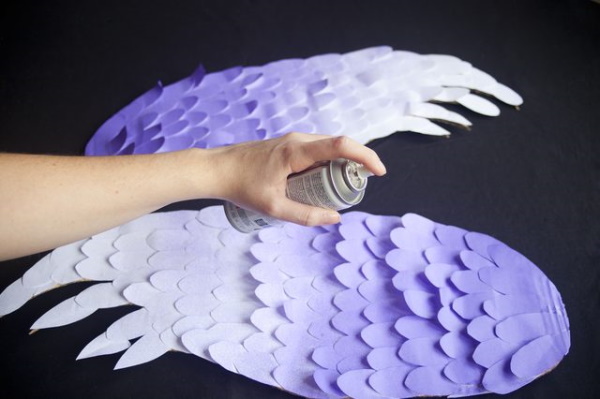
- Paint the feathers and the underside of the wings white using spray paint.
- After the paint has dried, you need to glue the Velcro. The tape should be cut into 4 pieces of 10 cm each.
- Glue 4 hard parts onto the wings, placing 2 strips on top and 2 on the bottom.
- Sew the soft parts of the tape to the suit, placing them in a similar manner.
The wings will hold securely and will not come off while moving.
Made of fabric
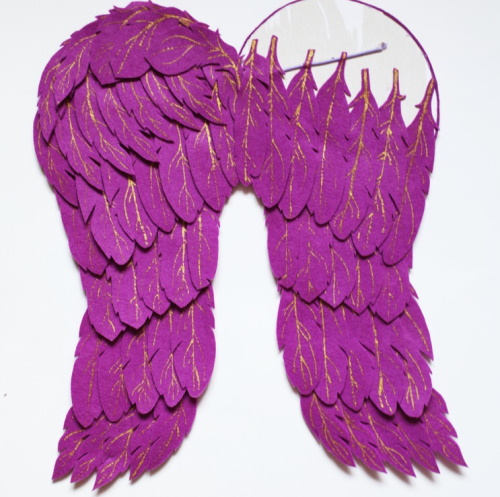
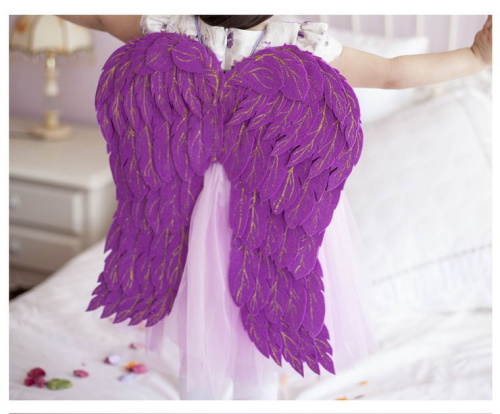
Both thin and thick fabrics are suitable for creating angel wings. The article below presents 2 master classes on creating wings from lace and felt.
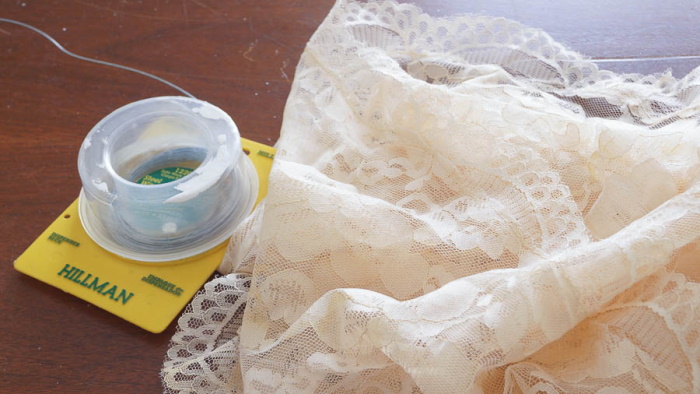
What materials will you need to create lace wings:
- white lace fabric;
- 2.2 m wide white satin ribbon;
- thin white satin ribbon;
- thin wire;
- scissors;
- hot glue.
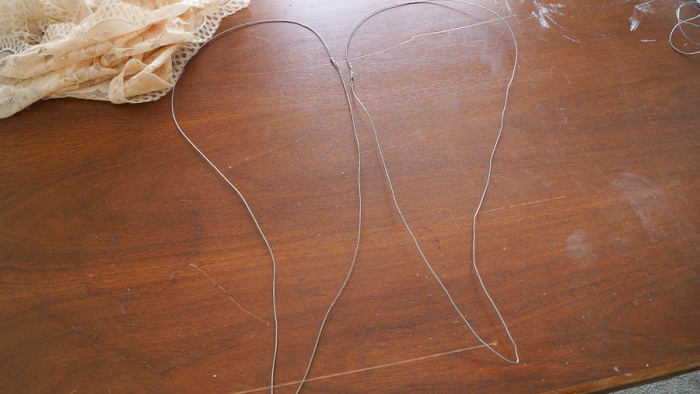
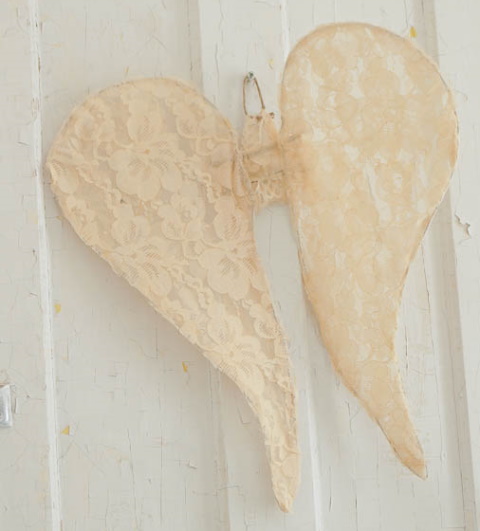
Procedure:
- Cut 10 feathers from the fabric (5 for each wing) in 4 sizes: 39 cm, 25 cm, 19 cm, 12 cm.
- To keep the feathers in shape and prevent them from hanging down, you need to glue a thin wire to them using hot glue. The wire should run along the feather, in the center, like a natural vein.
- Glue the feathers in a random order onto the satin ribbon.
- Tie the ends of the ribbon to your wrists.
- Tie the wings with a thin satin ribbon so that they fit more tightly to the arms.
The result is a light and romantic image of an angel.
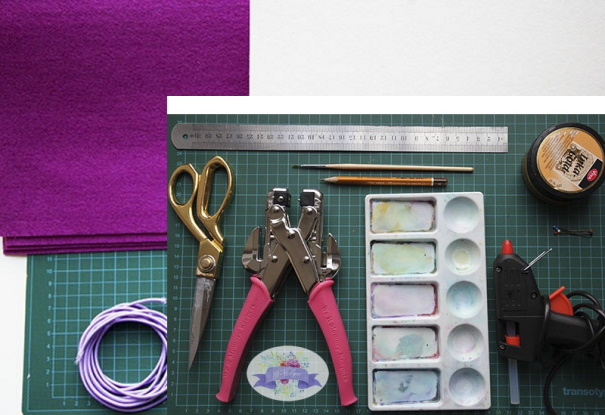
What materials are needed to make angel wings from felt:
- 20 white sheets of A4 felt;
- A2 sheet of cardboard;
- lighter;
- thin elastic band;
- scissors;
- stationery knife;
- hot glue;
- silver fabric paint;
- thin brush.

Procedure:
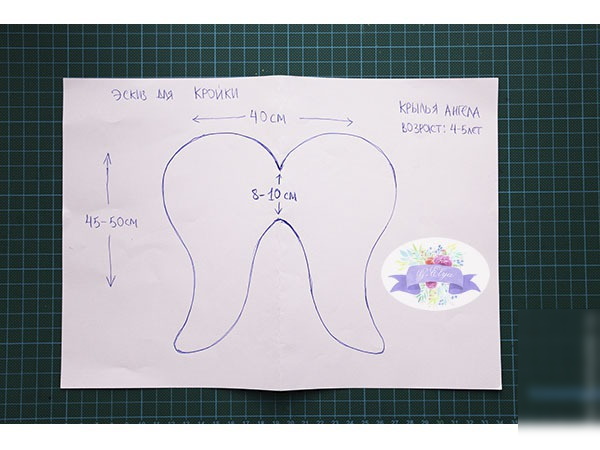
- Draw the shape of the wings on cardboard.
- Cut out the blank with a stationery knife.
- Make slits for the straps.
- Cut 2 identical pieces (about 25 cm) from the elastic band.
- Burn the edges of the ribbons with a lighter and fix them in the holes using hot glue.
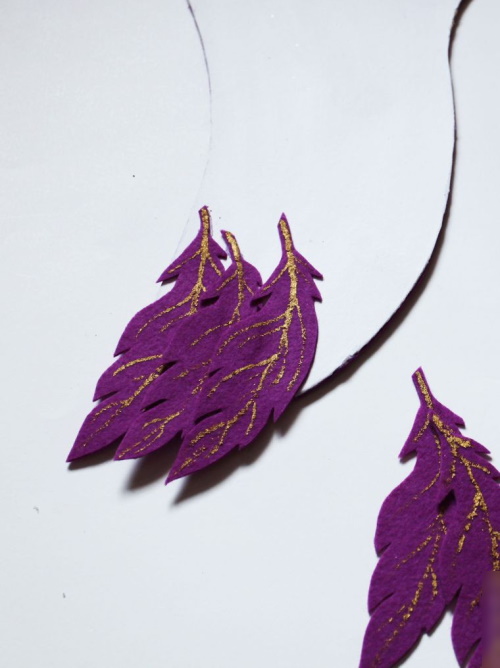
- Cut feathers of the same size from felt. The tips of the feathers should be sharp.
- Use fabric paint to draw veins on each feather.
- Glue the feathers onto the wings, starting from the bottom.
- Glue the back sides of the wings in the same way.
These wings hold their shape well and don’t wrinkle, so they are suitable for photo shoots with children.
From isolon
Izolon is a lightweight material that is used as insulation, laying it between the floor and linoleum. It has a soft, pleasant to the touch texture, so needlewomen often use this material for creativity.
What you will need to create wings from isolon:
- strong but easily bendable wire;
- isolon;
- fabric scissors;
- hot glue;
- PVA glue;
- gold glitter;
- white elastic band;
- white sewing thread and needle;
- white electrical tape.

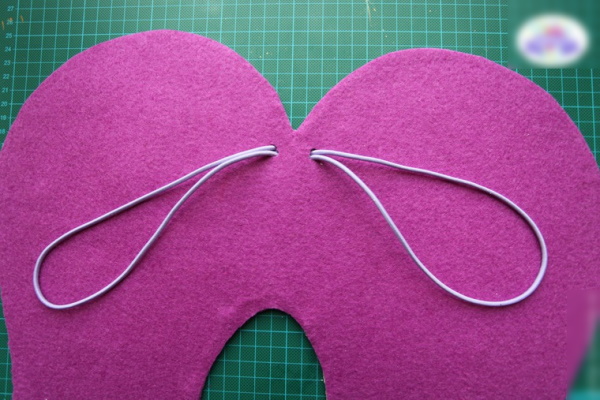
Procedure:
- Make a frame out of wire in the shape of the wings. It should be made as a single outline.
- Wrap the wire with electrical tape. The tape should be stretched well so that there are no large gaps or folds. It should also be used to secure the ends of the wire.
- Cover the frame with isolon. Carefully stitch the edges of the material with white threads.
- 2 pieces of elastic tape, 45 cm long, sew into 2 separate rings.
- Throw the resulting rings over the center of the wings. Secure the ribbon to the wire and isolon using hot glue.
- Cut feathers of different sizes from the remains of isolon.
- Glue the large feathers on the bottom, then glue the rest, overlapping.
- Generously coat the tops of the wings with PVA glue.
- While the glue is still wet, sprinkle the wings with gold glitter.
To prevent the glitter from falling off, after the glue has dried, you can spray it with clear hairspray with a strong hold.
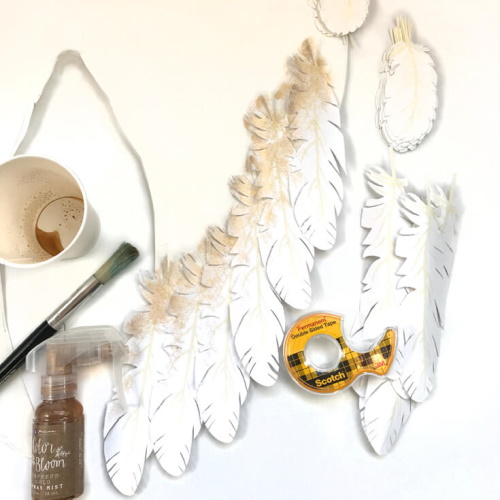
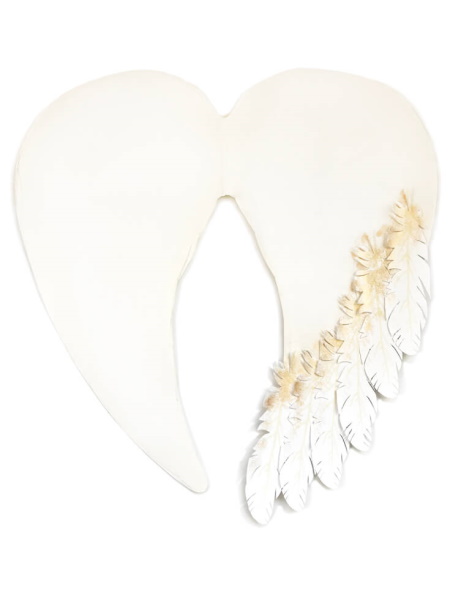
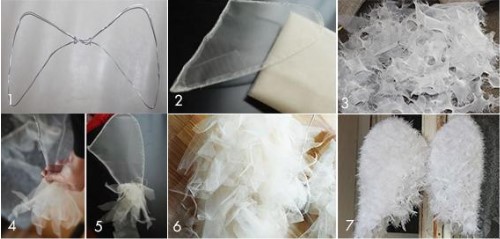
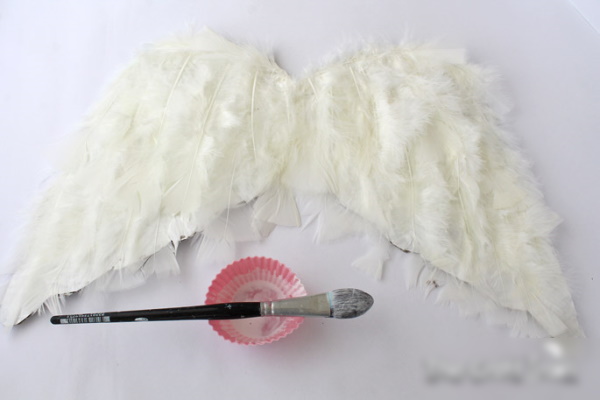
From feathers and down
Angel wings made of natural feathers will look realistic. To make such a prop with your own hands, you will need patience and extreme accuracy, however, the result will be worth such work.
Necessary materials and tools:
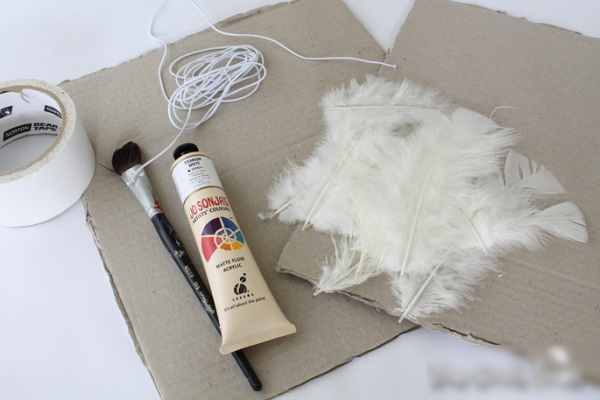
- white goose feathers;
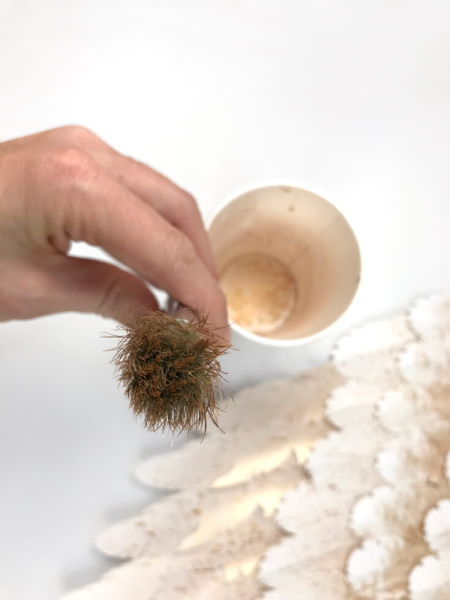
- natural white fluff (can be replaced with synthetic);
- white cardboard (A3 format);
- white paper napkins;
- scissors;
- PVA glue;
- stationery knife;
- thin elastic band;
- hot glue.
Procedure:
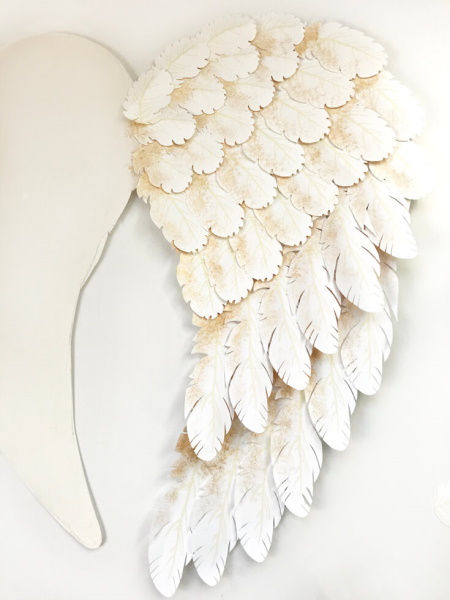
- Draw wings on cardboard as a single outline.
- When trying on the cardboard blank, you need to determine where the straps will be located.
- Use a utility knife to make slits for the rubber bands, thread the ribbons through the holes, and secure the ends with hot glue.
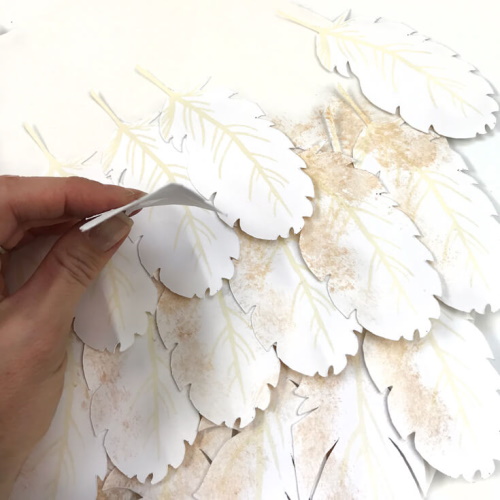
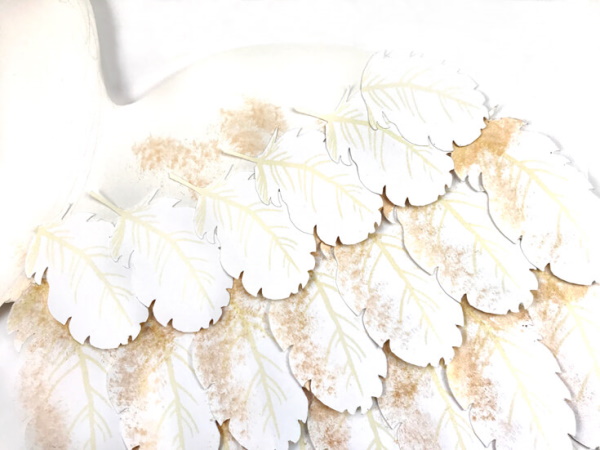
- Using hot glue, attach the largest feathers to the bottom of the piece.
- Glue the smaller feathers in rows, overlapping them.
- Using PVA glue, glue the back side of the wings with white napkins.
- Apply PVA to the tops of the wings from the back side. Sprinkle these areas with natural fluff.
- Wait for the glue to dry.
These wings can be sprayed with glitter hairspray.
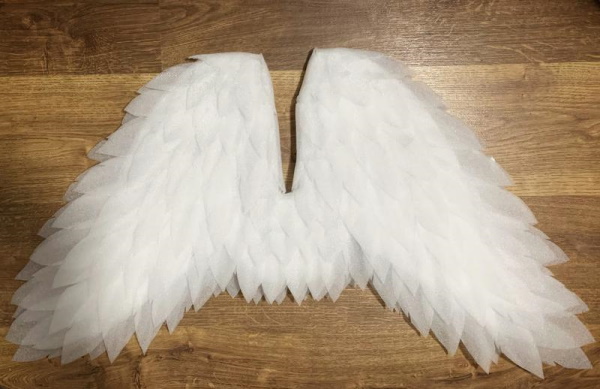
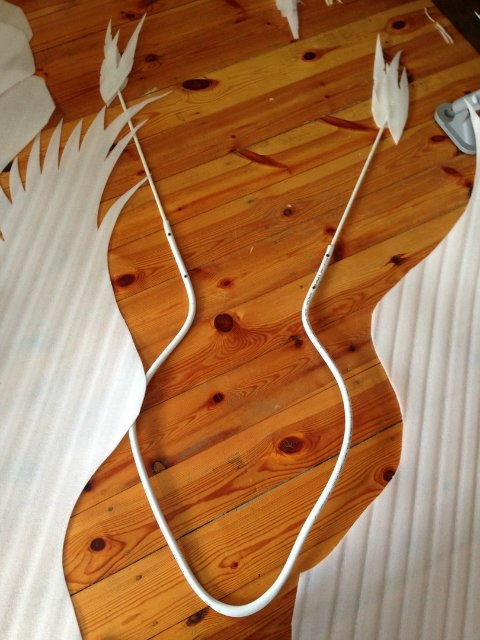
Made of tulle
Tulle is a translucent, mesh material that is used as a lining for full skirts. Angel wings made from this material will be light and airy.

What you will need for work:
- white tulle;
- 2 aluminum hangers;
- white electrical tape;
- pliers and wire cutters;
- thin wire;
- wide satin ribbon about 3 m long;
- sewing needle and white thread;
- scissors.
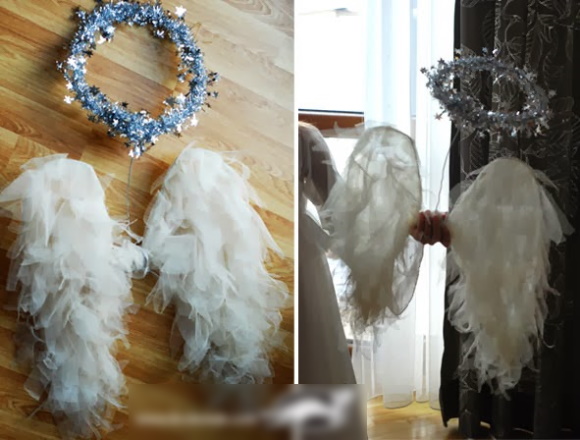
Procedure:
- Use nippers to cut off the hooks from the hangers.
- Use pliers to straighten the hangers and give them the desired shape.
- Connect both frames by wrapping the central crossbar with thin wire.
- Wrap the wing frame with white electrical tape.
- Cover the workpiece with tulle.
- Carefully stitch the edges of the material.
- Cut the tulle into long strips 10 cm wide.
- Fold each strip like an accordion, cut off the bottom corners of the resulting rectangles.
- Straighten out all the ribbons.
- Gather the upper parts of the ribbons with a thread.
- Sew the resulting bunches of fabric to the frame covering. You need to start decorating the wings from the bottom.
These wings are attached to a satin ribbon. It needs to be cut in half, and then the pieces are crossed on the central crossbar of the wings. The ends of the ribbon are tied around the chest and secured with a bow.
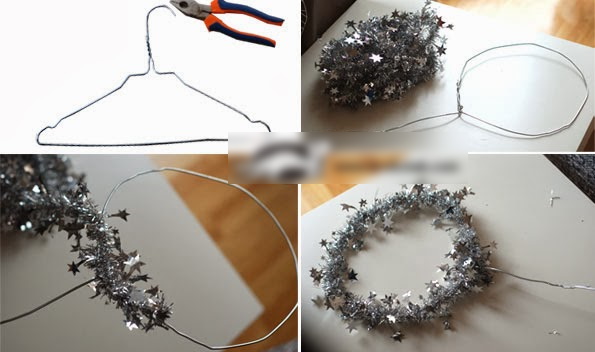
How to make big wings
Large wings can be made using any of the master classes presented earlier in the article as a basis. The main condition is that the design must be lightweight, otherwise it will be difficult to carry. The base can be made from thin foam or cardboard.
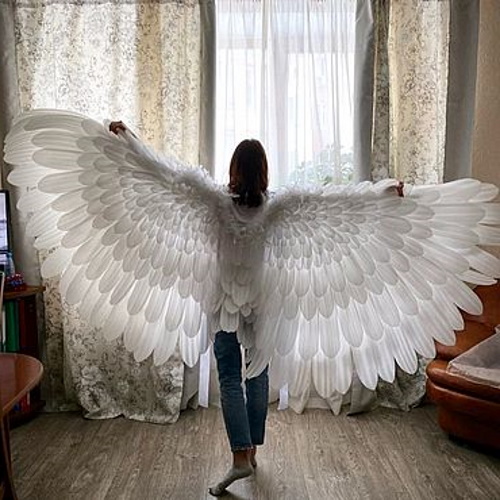
It is not recommended to use a wire frame., as it may bend under the weight of the feathers, and it may also lean backwards, which will spoil the appearance of the prop.
To decorate the tops of the large wings, it is not necessary to cut small feathers or glue real small feathers. This is too long a process. You can decorate these parts of the wings with natural down or sew on a boa that matches the color.
Tips and tricks
Tips to help make your photoshoot props beautiful:
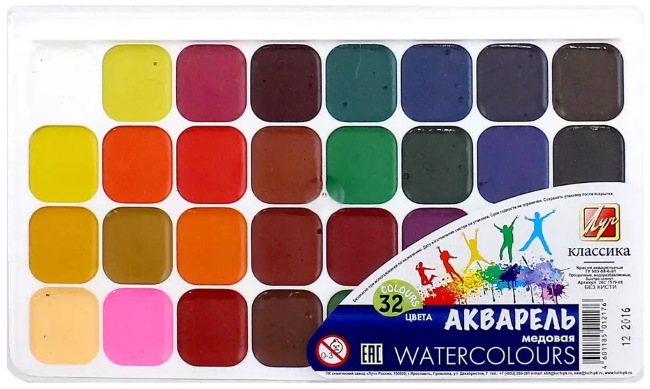
- Natural white feathers can be dyed. First, you need to pour boiling water with dishwashing liquid to dissolve the fat that will prevent the dyeing. Then the feathers need to be dried on a towel. You can use a hair dryer.
To get pastel shades, you can paint the feathers with watercolors, using a thick brush with soft bristles. To get bright and saturated colors, it is better to use tinting hair balms.
- When using hot glue, thin threads often form that stretch from the drop of glue to the gun's tip. They should be cut off immediately or torn off by hand so that these "webs" do not spoil the appearance of the finished product.
- To draw 2 identical wings, you should cut out 1 piece from cardboard, turn it over to the other side, and trace it on another sheet, that is, use one wing as a stencil for the second.
- A printer will help you make feathers from office paper of the same size. In the print settings, you need to reduce the brightness of the contours so that the lines along which the blanks will be cut remain barely noticeable.
You can make beautiful angel wings with your own hands from various materials. The main thing is to think about the size and shape in advance, and also choose a reliable method of fastening. Heavy wings are best attached to elastic straps, and light ones - to Velcro.
Video about the craft
How to make angel wings: