Knowing how to knit a sweater with knitting needles for beginners, you can create a unique product. Patterns with descriptions help needlewomen get their first successful experience. Getting the hang of it, the craftswoman complicates the technique and more easily masters new horizons.
Women's hooded sweatshirt
The product is used as outerwear, so thick yarn is used for it. It is recommended to use threads with the addition of wool or synthetic fiber (viscose, polyester). It is necessary that the finished product is minimally deformed during wear. The knitted sweater with a hood consists of several parts, which are connected at the final stage.
This is the back, shelves, sleeves and hood. It can be knitted separately and then sewn on, picked up along the edge of the neck or be a continuation of the back. To begin, knit a 10x10 cm piece of fabric, calculating how many loops fit into 1 unit, then multiply this number by the desired parameters (chest, waist and hips).
A knitting pattern can initially indicate what the density of the finished product should be.
It is necessary to correspond exactly to this value. Beginners first use the front surface or elastic, gradually complicating the technique. How to knit a sweater with knitting needles for beginners for women of size 50 (XL), you can understand from the diagram with the description. For a simple product, you will need knitting needles 4.5, 5.5 mm, 1000 g of yarn, a zipper 55 cm long. In 10 cm of knitted fabric there should be 15 sts × 20 rows.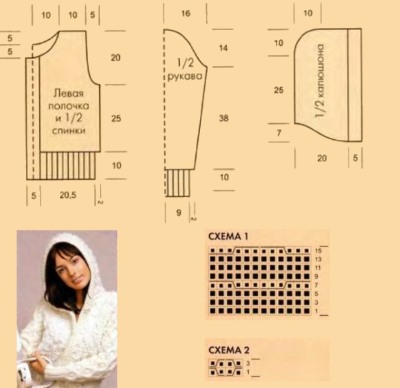
Mating:
- For the back, cast on 92 sts, starting with a 6 cm elastic band using a smaller diameter tool, then moving to a larger size, continuing knitting on the front surface.
- When 37 cm have passed from the beginning of the product, loops are reduced to obtain the armhole of the sleeve. To do this, 3 loops are closed at the beginning and end of the sequence through a column, twice 2 and 5×1, there should be 68 of them left.
- Then, after 22 cm from the beginning of the armhole, every 2nd sequence closes 5 loops once and 6 twice, this results in a shoulder slope. There are 30 elements left, they are closed in the next row.
- To make the pocket burlap, cast on 22 sts on size 5.5 needles and knit 6 cm in stockinette stitch, then set aside the open knitting.
- For the left shelf, cast on 46 loops on a 4.5 mm tool, starting with a 6 cm elastic band. Then switch to a larger diameter of knitting needles, continue working with front and back rows.
- Having knitted 12 cm like this, 21 loops are set aside on the right (for the pocket), the others remain in work.
- To get a bevel, on the right every 3rd element is closed 10 times every 2nd sequence. When the decreases are finished, knit all the loops completely, put aside knitting from 15 elements.
- All open parts, 22 sts for the pocket lining and 21 free sts on the right, removed earlier, are cast on with knitting needles of diameter 5.5. Knit 11 cm in the front row with front loops, in the back with the same ones.
- Next, 31 loops out of 43 are knitted with a straight fabric, placing the previously removed 15 pocket sts in front of the main part.
- Next, knit the elements together with the front one in turn from each knitting needle, finishing with 3 single ones.
- There are 46 loops left, the armhole starts at the same level of the back. Having knitted 18 cm, on the left side, every 2nd row, close 9 loops 1 time, and then another 3, 2 and 1 elements for the neckline. The shoulder bevel is done as on the back. The right and left shelves are symmetrical.
- For the sleeve, create a set row of 44 loops on smaller knitting needles, start with a rib, the length is the same as on other parts. Then move to a larger diameter tool, continue working with the front surface.
- The sleeve bevel is formed by adding 1 loop 6 times in every 8th row and 1 loop 2 times in every 6th sequence. The resulting 62 sts are knitted 44 cm. Then 2×3 loops are closed through a column, 2 times 2, 8 times 1, 3×2 and 2×3 for the sleeve cap. When its total length is 59 cm, the knitting is closed.
- For the hood, cast on 116 stitches, knit 3 rows with the front surface, the next purl row is knit. Switch to large knitting needles, continue knitting with the same pattern.
- On both sides, every 4th row is closed 4 times with 1 loop, and every 2nd row 2×1 and 2×2. The resulting 96 elements begin to close after 24.5 cm, on both sides, every 2nd row is closed with 6x3 sts.
- At the same time, close 2 central loops, continuing to knit the halves separately. From the central elements, it is necessary to close 3x2 sts and 2x3 in every 2 rows. When the length of the hood reaches 30.5 cm, knitting is finished.
- When assembling, the hood must be folded from the inside by 1.5 cm, creating a drawstring. The detail is sewn along the edge of the neckline, the sleeves are sewn in. The pocket linings are sewn on from the inside, the shelves are connected, and a zipper is sewn in the front.
Women's button-down blouse
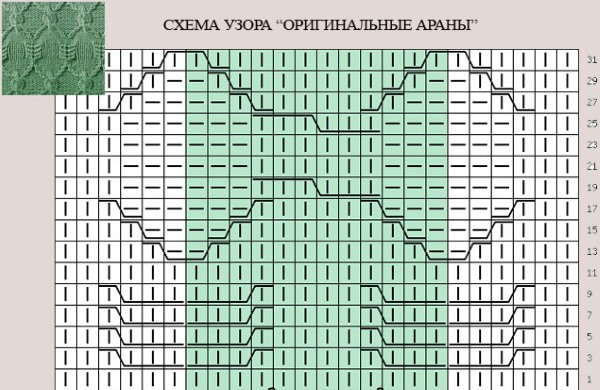
How to knit a sweater with knitting needles for beginners with more complex patterns can be understood from the diagrams with descriptions. For example, arans and braids are suitable for a product with buttons.
For a sweater of European size 40 you will need:
- about 400 g of yarn;
- straight knitting needles size 3, 3.5 and 4;
- circular tool 3.5;
- buttons with a diameter of 15-20 mm.
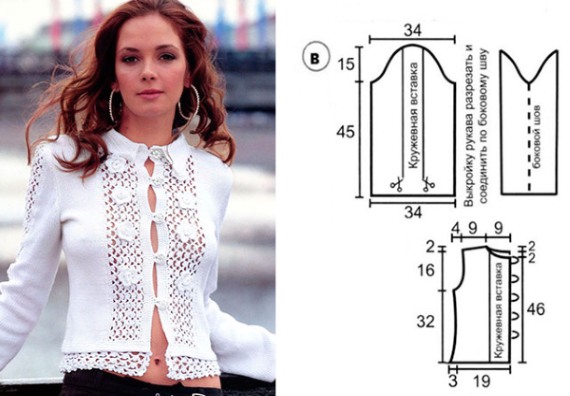
Step by step instructions:
- The back is started with a cast-on row of 103 elements of the smallest size of 1 row with purl stitch, then continue with jacquard 28 rows with 3.5 mm knitting needles. The pattern is made according to the diagram.
- On the front side, the next row is knitted with knit stitch, then 3 more with purl stitch. Then move on to a 4 mm tool, continuing to work on the volumetric pattern in accordance with the diagram.
- After 20 cm from the end of the jacquard, begin to make the armholes of the sleeve. To do this, 4 loops are closed on both sides, and then 2 sts are closed every other row, 2×1.
- After 19 cm from the beginning of the sleeve, you need to start making the shoulder bevel, closing 6 loops on both sides, then in an even row 2 more times 10 elements.
- At the same time, it is necessary to form the neck. To do this, close 23 elements in the center and knit the halves separately. Having knitted the loops of the neck from the inside, finish the back piece.
- For the left shelf, cast on 47 sts on smaller knitting needles, starting as on the back, with purl stitch and jacquard. Then there is 1 row of knit stitches and 3 rows of purl stitches, in the last one, 1 element is decreased. Next comes the pattern with arans according to the scheme. The armhole and shoulder bevel are made similarly to the back.
- To get the neck, after 35 cm from the jacquard pattern on the left, close 5 elements, and then each even row 1 time 2, 3 and 1 loop. The fabric is finished. The right shelf is made in a similar way with a mirror-image pattern.
- For the sleeve, you will need to cast on 51 stitches, starting with the patterns as in the previous parts. To get a bevel, add every 8th row 1 st and after 6 sequences 3×1 st, then comes the braid pattern.
- The sleeve cap is obtained by decreasing the knitting by 3 elements 6 times in each even sequence. You need to start 32 cm from the end of the jacquard.
- For the neck and collar, knitting is transferred to circular needles and 3 purl rows and 5 cm with a rib pattern are knitted. To obtain a strip, the loops of the shelf are picked up, starting with purl elements and continuing with 4 rows with a rib pattern. On the right part, holes for buttons need to be added.
- At the final stage, the sleeves are sewn in, the fronts are connected, and the fittings are sewn on.
Openwork blouse
This pattern is suitable for knitting lightweight items. If you use cotton threads, you get a sweater for a cool summer evening. Wool yarn allows you to get a warm sweater. The pattern will be clear if you use a thin thread without lint.
The sweater usually consists of a combination of several patterns, they are indicated in the knitting description. Such a product is more difficult to make, it requires attention, precise measurements and skills.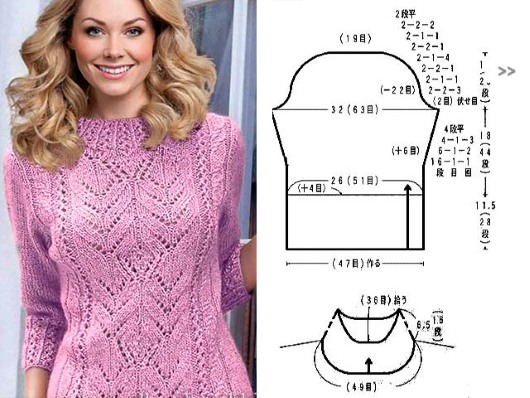
Mating:
- To obtain one of the straight cut models with a back fastening and a raglan sleeve, 1 ornament is used. All loops are proportionally divided into the back (30%), shelves (40%), sleeves (30%). The boundaries of the product parts are marked with markers.
- To form the raglan line, you need to add 8 stitches to the initial set of stitches, calculated taking into account the knitting density, in odd rows, before and after the marker.
- According to the sample, size 48 product has a length of 55 cm, neck width of 17, total sleeve length of 65 (from the neck to the armpit 16 and 49 from this point to the end of the sleeve), neck opening 5 cm, volume at the bottom of the product - 52.
- The pattern is knitted simultaneously with the increases according to the pattern. The product has an openwork knitting on the front and back, the sleeves are a solid fabric of stocking knitting.
- The placket, the bottom of the garment and the sleeves are made with garter stitch.
Short sleeve jacket
How to knit a sweater with knitting needles for beginners - diagrams with descriptions will help you quickly cope with the task. A short-sleeved jacket will complement your wardrobe in winter or summer.
To work you will need:
- knitting needles 3.5 and 4 mm;
- buttons;
- cotton yarn or yarn with bamboo fiber.
Knitting density 16 sts x 29 rows = 7 x 10 cm.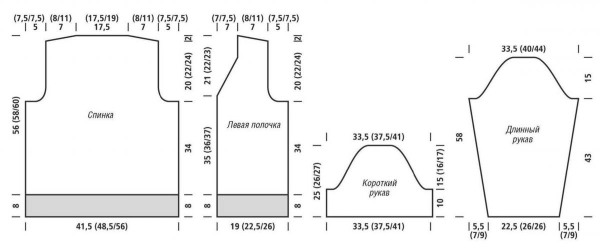
To obtain Russian size 48-50 you need:
- For the back of the product, cast on 121 sts and knit, alternating pattern 1 and 2: 16 rows (3 cm), then 22, 26 rows and another 3 cm.
- In the next row, you need to start closing the loops for the raglan: close 6 sts on each side, then after the 3rd row, close every 4th row by 1 st and every 2nd row 2 times by 1 element.
- While making the shoulder bevel, continue knitting with pattern 2, from the first 6 closed loops another 38 rows. The remaining 26 rows are knitted with pattern 1, then closed.
- For the front shelf, cast on 60 stitches, alternating rows as on the back. After 26 sequences have been completed with pattern 1, together with the transition to pattern 2 from the inside, you need to make the neckline: close each 4th sequence by 1 st. 15 times and through a row 5×1 st.
- For the sleeve, you need a set row of 95 elements. After 5 cm, you need to start making the raglan (close 6 loops on both sides, then from the 3rd row in an odd set 23 times 1 st, then 11×1 st in each row). The total length of the sleeve is 25 cm.
Spacious jacket
One of the techniques for knitting a spacious jacket is to create a product in a circle. For this you will need circular knitting needles with a long line (diameter 5.5), a stocking tool, 600 g of yarn.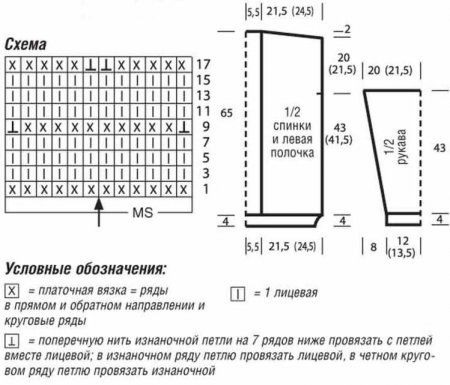
Mating:
- 15 loops and 26.5 rows of stocking stitch should make up a product of 10×10 cm. The second pattern is elastic, a similar trial piece should be 20 sts.×26.5 rows.
- It is recommended to knit in the forward and reverse direction. The cast-on row is 200 sts, starting with the front surface and knitting a 110 cm product (260 rows), closing.
- To obtain a sleeve, cast on 48 stitches (12 on each) using double-pointed needles, knit with a 28 cm elastic band (74 rows), and close.
- At the assembly stage, the ends of the product are connected, sewn, but taking into account the armholes. Sleeves are sewn into them.
Short jacket with braids
This pattern is suitable for beginners, as it looks impressive and is easy to perform. For such a product you will need 700 g of yarn 166 m/100 g, knitting needles No. 6 and 7.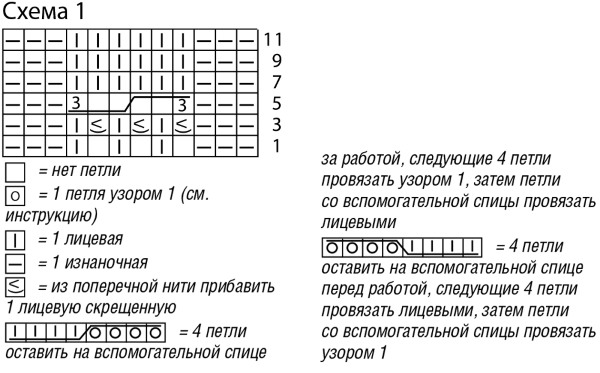
Mating:
- For the back and front, loops are cast on at once, then at a height of 40 cm they are divided into 2 parts.
- The initial row is 199 elements, then 47 remain for the shelves, 6 on both sides are closed for the armhole, 93 remain for the back. The details are knitted separately.
- Next, at the back stage, in every 2nd row on both sides, 1 loop is closed 45 times and then 3 more times. The product is closed after 60 cm.
- When knitting the right shelf, the armhole is formed as on the back. When the total height reaches 51 cm, on the right side, every 2nd row is closed with 1×8, 2 by 2 and 2 by 1 loops.
- For the sleeve, cast on 55 sts on 7 mm needles, adding 1 element on each side 6 times in every 12th row. The armhole is formed by closing 14 rows of 2 sts at a height of 40 cm. The piece is finished at a total length of 56.
- For the collar, cast on 92 sts around the neckline and knit with a 15 cm rib pattern.
Short sleeve jacket
One of these jackets is special in that knitting is done in the transverse direction from one shelf to another. For work you will need thick yarn 800 g, knitting needles size 6. Fabric 10 cm2 should be 13p. x 18r.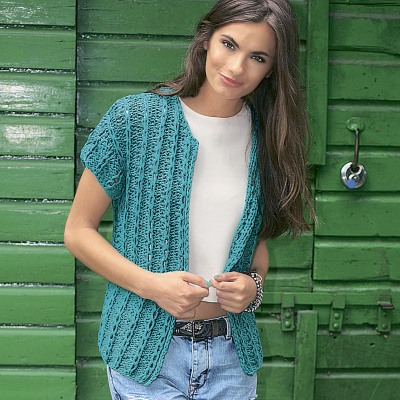
Mating:
- For the back and front, cast on 56 sts, alternating 10 garter stitch elements and 13 cable stitch elements. When the total height reaches the required hip volume, close the garment.
- For the yoke, cast on 13 sts and knit in the transverse direction with the pattern until the total length of the product reaches 164 cm.
- The sleeves consist of 11 loops, worked in garter stitch to a height of 32 cm.
- During the assembly process, the yoke is sewn to the upper part of the lower part, leaving 32 cm for the armhole. Along its upper edge, 213 loops are cast on and continue knitting with a rib pattern, decreasing 3 times every 3 cm by 40 loops. To do this, the elements are knitted 3 elements together. When the knitting is 12 cm, it is closed.
- Along the edge of the shelves, you need to knit 4 rows of garter stitch on raised loops. On the right side, make holes for buttons, on the opposite side, sew on fittings.
Jacket with arans
How to knit a sweater with knitting needles for beginners with Aran, diagrams with descriptions will tell you.
To obtain such a jacket size 48-50 you need:
- 550-600 g yarn 146m/50g;
- knitting needles size 3.5, 4;
- additional tool for braids;
- buttons.
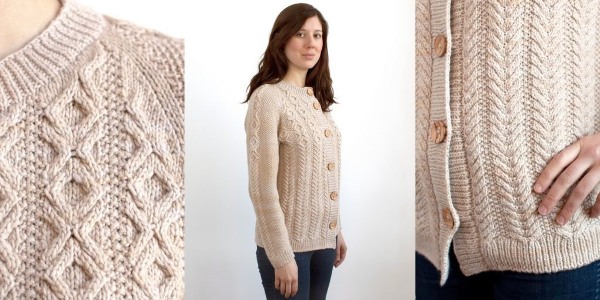
Knitting density on 4 mm knitting needles, purl stitch 17×28, fantasy pattern 32 columns, 48 loops according to the pattern – 21 cm.
Mating:
- Initial set - 90 elements, with a tool of a smaller diameter work with a 3 cm elastic band, starting and ending with the front st. In the last purl row add 7 elements, move to large knitting needles and purl. surface.
- After 34 cm, begin to form the armhole, closing 4 loops in sequence, twice 3, 2 and 1 st.
- After 54 cm from the armhole, close 4 elements at the beginning and end of the row and then another 3x5 for the shoulder bevel.
- The neck is obtained by closing 11 loops in the center, finishing the halves separately. To round the part, every 2nd column is closed with 2x4 sts.
- For the right shelf, the cast-on row is 43 sts, 3 cm, starting with a 2x2 elastic band.
- Then in the extreme purl row add 16 sts, switch to a combination of purl stitch and fantasy pattern. This is 2 sts purl row, 48 pattern according to the scheme, 9 purl stitch.
- At a height of 34 cm, start the armhole by closing 4, 2×3, 3×2 and 3×1 sts in each 2 rows. When the product is 48 cm high, form the neckline, and 54 – the shoulder slope.
- The left shelf is made symmetrically in mirror image. The shoulder is obtained by dialing 42 sts, starting with the elastic band, adding 5 sts in the last row.
- After this, add 3 times 1 element in each 8th row, and every 10th row 7×1 st. The sleeve cap is formed by closing the elements when the knitting reaches 37 cm.
- The neck placket is made by casting on 84 sts on 3.5 mm needles using a 3 cm rib pattern and continuing with a front row. The placket is formed by casting on 96 sts along the edge of the front and knitting using a 3 cm rib pattern.
- The assembly is done with invisible seams.
Jacket with shawl collar
Such a product can be made with any pattern.
For one such jacket you will need:
- 400-450 g of yarn;
- double pointed, straight and circular knitting needles, size 4;
- hook 3.5 mm.
The back and sleeve are knitted in one piece, then the left shelf is knitted across, turning into the right shelf. The knitting direction is indicated in the diagram. To get the collar, all the loops of the parts will be transferred to 1 knitting needle.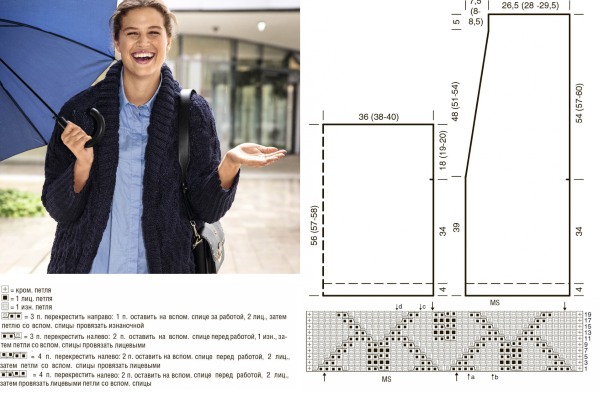
Mating:
- The initial set of elements for the back and sleeves is 191 elements, openwork pattern according to the scheme.
- After 24 cm of knitting, you need to cast on 32 sts on both sides to get one-piece sleeves.
- The row begins with 11 loops according to the pattern, perform the rapport, then repeat the initial actions. Having worked 19 cm in this way, 32 sts of the sleeve are closed. 191 elements remain, which are put aside.
- For the sleeve, cast on 86 loops in front, knit 32 columns with openwork weaving using braids, then set them aside open. Continue the work by stringing the previously set aside loops on the knitting needles on the fishing line. On both sides, you need to add elements, 5 loops each, 4×5 and 20×4.
- The shawl collar is knitted with an openwork pattern with a rib, starting from 13.5 cm from the last increase, with an increase of 1 loop. Having knitted 4.5 cm in this way, shortened rows are started. To do this, the row is knitted to the last 18 loops, turn the knitting, make a double loop, knit to the last 18 sts, turn the product, make a double st. Thus, at the end of the row, the outer 18 loops of each sequence remain unknitted. There should be 4 such open loops on each side.
- Then, from the front row, continue knitting with shortened rows so that on each side there are 7 rows x 27 open sts. When ready, the row is knitted completely, after 12.5 cm all loops are closed.
- Cast on 144 sts along the edges of the sleeves using double-pointed needles, 36 on each, make a “rib” pattern, knit 2 sts together at the beginning and end of every 3rd circular row 12 times, then every other row 10. Having knitted 15.5 cm, close the sts.
Jacket with cones
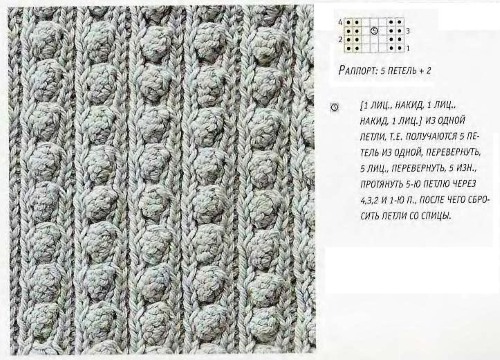
How to knit a sweater with knitting needles for beginners with a pattern with bobbles, will help to understand the schemes with a description. The volumetric pattern looks advantageous, usually combined with others, complementing them. The attention of the masters is offered a jacket with a medium sleeve length, where the bobbles are evenly distributed throughout the product.
To get a blouse for size 48-50 you need:
- thin wool yarn - about 400 g;
- straight knitting needles 2.5 and 3.5 mm;
- circular needles 2.5;
- mother-of-pearl buttons.
Instructions:
- For the back, cast on 137 stitches on 2.5 knitting needles, knit 4 rows with a 1×1 elastic band, then start the front surface, moving to a larger tool, adding 10 stitches in 1 sequence. So knit 39 cm (148 rows), then begin to form the bar. To do this, close 6 sts at once and through a column 1 time 3, 2 and 1 st.
- After 18 cm in the central part, close 43 elements and knit separately, forming a neck. For rounding from the inside, close 3x3 sts through a row, for the shoulder bevel, close 3x8, 7 loops in parallel. The right side ends symmetrically.
- The shelves are made symmetrically, in the description - the method for making the left shelf. It begins with 72 sts on 2.5 mm knitting needles, first a strip of 4 rows of elastic, then 2 rows of stocking stitch on 3.5 knitting needles.
- In the first row of the 2nd pattern, you need to add 5 loops. Continue knitting with the "bumps" pattern.
- After 39 cm from the strip, make the armhole similar to the back. Decreasing the loops for the armhole, after 6 cm, start closing the elements for the neck on the left side.
- Then every 2nd row should be completed with 5, 2×3, 2 and 1 st. When the knitting from the beginning of the neck reaches 12 cm, you need to start making shoulder bevels.
- For the sleeve, 72 loops are cast on with 2.5 mm knitting needles, after 4 sequences of the strip, move to a larger diameter tool, and begin the front surface with the addition of the 5th element.
- Continue with the “bumps” pattern, after 7 columns add 1 st at the beginning and end of the sequence, every 6th row 8×1 st. The added loops fall into the main pattern.
- After 19 cm, you need to start forming the sleeve cap by closing 6 sts in 1 sequence, then every other row 4, 3, 4×1 sts, until the knitting reaches 13.5 cm.
- Then from the beginning of the row, remove 1 st as an edge st, continue with 4 front sts.
- Next comes a rapport that repeats 16 times: slipped stitch, 2 knit stitches knitted together, then threaded through the slipped stitch. Then come 4 knit stitches, edge stitch.
This completes the task of how to knit a sweater with knitting needles for beginners using the "bumps" pattern. It is easier to work with a detailed description and visual drawings, you can see how the element will look in practice. There are many knitting patterns for jackets. Having studied the basic patterns, you can learn to combine them with each other, replenish your wardrobe with basic items of different styles.
Video: How to knit a sweater with knitting needles for beginners. Patterns with descriptions
How to knit a sweater without a pattern, find out in the video:
https://www.youtube.com/watch?v=JeIoOXMd1cM
Knitting cardigan, master class:
I usually use knitting patterns and descriptions with diamonds when knitting winter sweaters and cardigans for myself and my husband. I use certain types, such as fancy diamonds, in inserts or decorative elements, such as openwork stripes.
Finished diamonds can vary in size and require a large number of rows and different types of loops - from simple front loops to yarn overs. Some diamonds, such as "Leaves", are medium-sized, which allows the pattern to be used for knitting children's items.