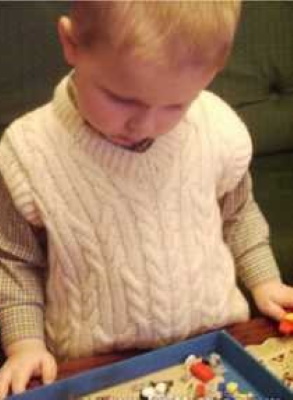
Warm knitted vests will be useful for boys in the cold season. Sleeveless jacket is a fashionable and beautiful garment that does not restrict movement. There are many options for products - knitted with a simple face jersey or a nice pattern.
Necessary tools
Even a beginner needlewoman can knit a beautiful vest for a boy. The item can be created in a couple of evenings.
For different versions of the sleeveless jacket you will need the following tools:
- knitting needles of different diameters (circular on a line, straight or hosiery);
- the hook is useful both for weaving and for lifting links along the edge of the product or for processing edges;
- a measuring tape for taking measurements and then calculating the parameters of an item based on a sample;
- scissors;
- a needle with a blunt end and a wide eye for joining knitted parts and threading in excess thread;
- markers for marking a specific place;
- special pins for throwing loops when creating bundles;
- loop collector;
- ruler;
- sewing pins;

- row counter.
Which model to choose depending on age
Knitted vests for boys come in different styles. For little ones, models with a zipper along the entire length of the product or with a hood are suitable. For older children, you can prefer a version with buttons or completely without fasteners. For children aged 5-10, an original vest knitted with cords or a fantasy pattern will suit.
The main criteria for choosing a style:
- practicality, for small active children the item should not restrict movement;
- It is better when the product is slightly larger than the actual size, this feature will give a feeling of comfort;
- the younger the child, the less unnecessary elements you need to use.
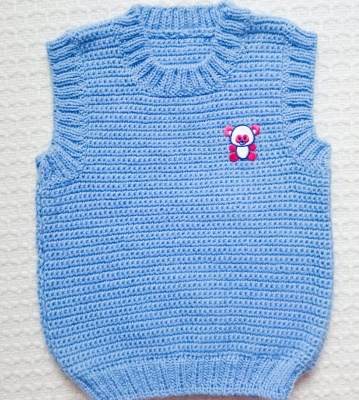
Knitting a crochet vest for a baby 1-2 years old
To make a sleeveless jacket for a 1-2 year old baby, you will need thin acrylic yarn - 80 g of a bluish shade and 60 g of a sand shade (in 100 g - 380 m), knitting rods No. 3, hook No. 2.5 and 4 beige buttons.
Conventional values of loops:
- air loop – ch;
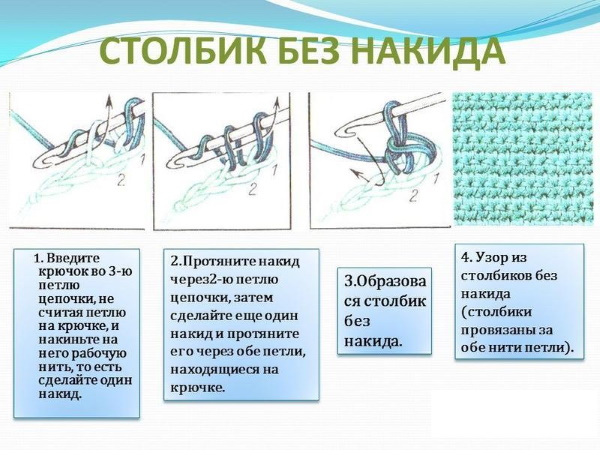
- single crochet – sc
On knitting needles, make a 1x1 elastic (alternating 1 front st, 1 back st).
Weaving density: 10 cm contains 23 sts of elastic and 19 sts of fantasy motif.
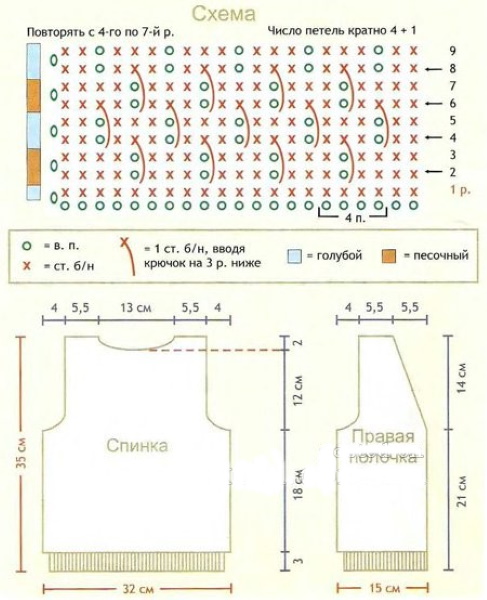
Bystep by step description of the process:
- For the back, thread 75 sts onto knitting needles with blue thread and knit 3 cm with a rib pattern.
- Continue crocheting according to the pattern, evenly closing 14 sts in the 1st tier. You will get 61 sts.
- Having passed 21 cm from the initial tier, reduce for the armhole on both sides in each line 3 sts. - 2x2 sts., then 1 st. There will be 45 sts left.
- Having knitted 12 cm from the beginning of the armhole, finish the middle 21 sts for the neck, then decrease 2x1 sts on both sides. There are 10 sts left on each shoulder. Finish the work at a height of 35 cm from the bottom edge.
- For the right front half, cast on 35 sts using knitting needles and knit 3 cm with an elastic band.
- Continue weaving with a crochet hook, making uniform decreases in the 1st row – 6 sts. There will be 29 sts left, which are then knitted according to the pattern.
- After 21 cm, make an armhole from the side edge, using the same principle as on the back panel. At the same time, on the other side for the neck, reduce in every 2nd row 11x1 st. You will get 10 st. Finish the work at a distance of 35 cm from the bottom.
- Weave the left front panel symmetrically.
- The assembly consists of sewing the shoulder sections together, then using a blue thread, lift all the armhole cells onto knitting needles, knit 2 cm with an elastic band and finish the loops with the front method. Use the same method to tie the neckline piping and the fastener line.
- Sew the side seams.
- On the left strip, make 4 openings for the fittings (overcast 1 st). Place the 1st opening at a height of 1 cm from the bottom, and the last one at the point where the neckline is formed. Place the remaining loops evenly. Attach the buttons.
- Lightly wet the product and dry it.
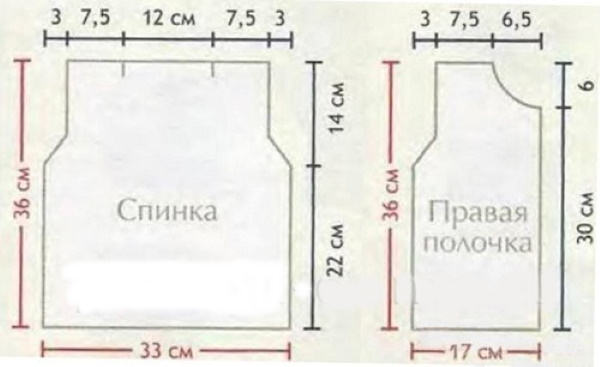
Crochet vest for a boy 3-4 years old
Knitted vests for boys aged 3-4 years are made from natural yarn, for example Pekhorka. For the product you will need 200 g of blue threads, hook No. 2.5, and knitting needles No. 3.
First, you should take the baby's measurements:
- shoulder width;
- length of the product (from the neck to the selected point);
- length from the bottom line to the armhole level.
To determine the density of the weave, you should make a small sample. Then find out how many centimeters are obtained in the number of cells collected and calculate how many loops need to be collected.
Step by step execution of the thing:
- For the back, dial the calculated number of links and weave with a straight panel of sc st. up to the armhole level. Simultaneously, reduce 6 columns. The resulting angle will be smoothed out after tying.
- Continue working to the desired height, 2 cm before completion, you need to reduce the central columns to shape the neck. First, close ¼ of the volume, then decrease 2 sts in each tier. Knit in this way to the desired height.
- The front panel is made in the same way as the back, only the cutout is made deeper. It is created in the same way, but 6 cm earlier.
- Lightly moisten the finished pieces, dry them, and then sew the shoulder and side cuts.
- Next, cast on stitches along the neckline, armhole and bottom of the garment. Work with an elastic band (alternate 2 front sts, 2 out sts) 10 rows and finish the work with a special elastic technique.
- If desired, decorate the vest with a cute applique.
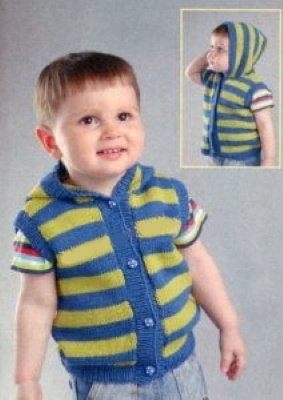
With a hood
For a universal hooded vest for every day, you will need yarn containing 40% acrylic and 60% cotton, knitting rods No. 4 and 4 buttons. The pattern is presented for children 2-4-6-8-10 years old. In a 10x10 sample, you get 17 sts and 24 rows when knitting with the front surface.
Registration procedure:
- For the back, make a set of 57-61-67-69-75 sts and knit 3 cm with a 1x1 elastic band.
- Continue working with the front jersey until the armhole is formed – 18-20-23-24-27 cm. If desired, the product can be varied with stripes. In this case, alternate 6 rows of one shade and 6 rows of strands of another color.
- The armhole is designed as follows: in every 2nd row, decrease according to the size: 1x3 sts, 2x1 sts/the next 3 parameters are reduced identically – 1x3 sts, 2x2 sts, 3x1 sts/and the last option – 1x3 sts, 3x2 sts, 2x1 sts.
- Next, for the shoulder, close 2x6 sts after 2 rows from both edges and shape the neckline.
- For the front half, cast on 27-29-32-33-35 sts and knit 3 cm with a rib pattern.
- Then continue knitting in the same way as the back, but it is recommended to ensure that the stripes on the parts match.
- The armhole on the front panels is created in the same way as on the back half. For the neck, knit 32-36-41-43-47 cm from the bottom and decrease the links in every 2nd row according to the sizes - 2x5 sts / 1x5 sts, 1x6 sts / 2x6 sts / 1x6 sts, 1x7 sts / 2x7 sts.
- For the hood, cast on 83-87-93-97-101 sts and knit 2 cm with an elastic band.
- The next 2 tiers are knitted with threads of a different shade.
- Having knitted a 16-17-18-20-20 cm piece of fabric, divide it into 2 equal segments and mark the center, start decreasing: 1x1 st., after going through another 1 row, make 4x1 st.
- Finish the work at a distance of 22-23-24-26-26 cm from the bottom edge.
- On the shelves, use an elastic band to create a 3 cm wide fastening strip.
- Sew in the hood, sew the shoulder and side seams. Cast on stitches along the armhole edge and knit 3 cm with an elastic band.
- On one part of the strip, make loops evenly, and sew fittings to the other part.
With lightning
Knitted vests for boys will create a stylish look and keep you warm in cool weather. A warm sleeveless jacket with a zipper is knitted from woolen or semi-woolen children's yarn.
For a 2 year old child you will need:
- 200 g of medium thickness thread;
- knitting needles No. 4.5;
- 35 cm separable zipper.
The item is made with 2 patterns: "fancy" and "rice". The 1st motif is knitted in the form of diamonds according to the pattern. The 2nd option is woven by alternating 1 front st and 1 back st, and in even tiers of front sts, back sts are knitted and vice versa.
Knitting density: in a 10x10 sample there are 16 sts and 20 rows. The sleeveless jacket consists of a back and 2 symmetrical fronts.
Step-by-step design:
- For the back panel, cast on 53 sts and knit the first 4 tiers with a “rice” pattern, this will prevent the item from stretching.
- Then move on to a fantasy pattern and weave 22 cm in an even cloth.
- Having reached the specified length, form the armhole. From both sides, decrease 1x3 sts, 2x1 sts. As a result, 43 sts will remain.
- Continue working straight with figured weaving. When the depth of the sleeve neckline reaches 14 cm, transfer all the links to an additional knitting needle and leave them in this position for a while.
- For the right shelf, string 27 sts. The part is made together with the bar, its cells are already included in the calculation. Weave the initial 4 levels with a "rice" pattern, then continue to knit the first 3 sts without taking into account the edge, and knit the remaining snares with a figured motif.
- Make the armhole in the same way as on the back. Close the links from the left edge, then continue knitting to 30 cm. At this stage, shape the neck. On the right side, decrease 1x5 sts, 2x2 sts, 1x1 st. There will be 12 sts left on the knitting tool.
- After passing 36 cm from the bottom, put the workpiece aside. Next, the left shelf is made in mirror image.
- The assembly consists of joining the open shoulder loops (12 sts on each piece) with a stitch called “loop to loop”. The 18 sts of the back panel are again transferred to the working knitting needle.
- Cast on 24 sts on each shelf. The result will be 66 sts.
- Connect the resulting cells with a “rice” motif at a distance of 8 cm, then complete the work in one go.
- Along the edge of the armhole, string loops and weave with a “rice” pattern 2 rows, then close them.
- Sew the side seams and attach the zipper to the strips.
- Turn the outer section of the collar over and attach it to the neckline.
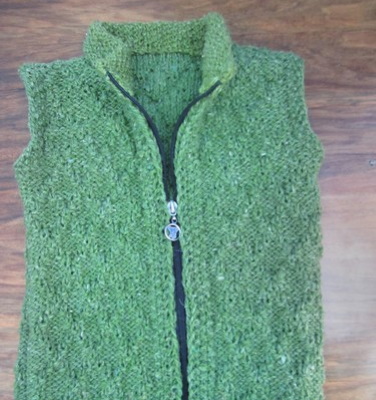
- Wash the product and lay it out on a towel to dry.
On buttons
Knitted vests for boys can be made even by beginner needlewomen. For example, a simple version with buttons, which combines bright stripes. The model is presented for sizes 68/80/92.
To work, you need yarn consisting of equal parts of cotton and acrylic (in 50 g - 140 m) - 50 (100) 100 g of red, blue and dark blue, as well as knitting needles No. 3.5 and 4. For the fastener, you need 3 blue buttons (diameter 1.8 cm).
Patterns used:
- 1x1 elastic (alternating 1 front st, 1 back st) on tool #3.5;
- garter stitch (all tiers are knitted with the front stitch);
- face jersey (alternating front and back rows);
- The stripes are woven as follows: * 2 red, 6 rows light blue, 4 rows dark blue*, from * to * constantly repeat. When changing the shade, the thread is pulled freely up along the edge.
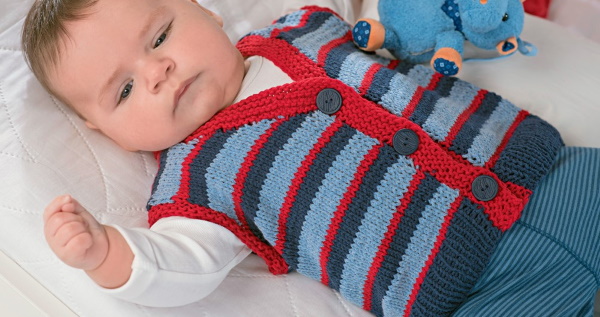
The knitting density is: a 10x10 piece is knitted from 20 sts and 26 rows.
Step-by-step registration:
- For the back, string 64/72/80 sts of dark blue yarn onto rods #3.5 and weave with a 4 cm elastic band.
- Having knitted the specified distance, transfer the work to thicker knitting needles and continue knitting with the front surface, simultaneously alternating the stripes according to the instructions.
- Having passed 18/22.5/27 cm from the bottom, reduce 2 sts on both sides, then in each subsequent 2nd tier, close 4x1 sts on both edges. 52/60/68 sts will remain.
- Finish the work at a height of 30/35/40 cm from the bottom row. The central 26/30/34 sts belong to the neck, and the outer 13/15/17 sts form the shoulders.
- For the left shelf, use rods No. 3.5 and dark blue yarn to cast on 30/34/38 sts and weave with an elastic band.
- At a distance of 4 cm from the bottom, transfer the product onto rods No. 4 and knit with the front fabric, alternating stripes.
- For the armhole, at a height of 18/22.5/27 sts from the bottom edge on the right working side, reduce 2 sts and close 4x1 sts every 2 rows.
- At the same time as shaping the armhole, for the neckline on the left side in each subsequent 2nd row decrease 11/13/15x1 st. Knit the remaining rows straight.
- After passing 30/35/72 cm from the bottom, close the remaining loops (13/15/17) for the shoulders.
- Knit the right side in mirror image.
- Lightly moisten the pieces, stretch them according to the pattern, then dry them. Decorate the shoulder sections with a mattress stitch. Sew the sides and seams of the strips using the same method.
- For the sides along the edge of the neck and shelves, evenly string 139/163/187 sts on knitting needles No. 3.5 with red thread and knit with garter stitch, while making 3 openings for a button on the fastener of the right shelf. They are designed as follows: knit 6 sts in the front tier, then decrease 1 st. Knit the remaining cells in the row. On the next purl tier, pick up new links in the places of decrease. Having knitted 7 rows of the strip, complete the work.
With jacquard pattern
To knit a jacquard vest for boys aged 3 months/6 months/1 g/2 g, you will need 2 skeins of light beige and 1 skein of gray, purple and white yarn. Its composition is 40% wool, 30% polyamide and acrylic (in 50 g - 125 m). Work with knitting needles No. 3/3.5. For the fastener, select 5 medium-sized buttons.
Patterns used:
- 1x1 elastic on knitting needles No. 3;
- face jersey (alternating face and back);
- jacquard pattern on rods No. 3.5, knit with face fabric according to the counting instructions for a specific size.
Sample density for jacquard: 10x10 cm – 25 sts and 26 rows on knitting needles No. 3.5.
Registration procedure:
- For the back, cast on 59/65/69/77 sts with light beige yarn on knitting needles #3 and knit 2 cm with a rib. Then transfer the work to #3.5 rods and continue working with a jacquard pattern. Design the armholes and neckline using the counting chart.
- For the left shelf, string 27/31/33/37 sts on knitting needles #3 with light beige thread and knit 2 cm with a rib pattern, adding 1 st in the last tier (only for the smallest size). You will get 28/31/33/37 sts. Then switch to knitting tool #3.5 and knit jacquard according to the counting instructions, and make the neck and armhole according to them.
- The right side is knitted symmetrically.
- For 2 strips of the front panel, cast on 63/71/77/89 sts in the main color, knit 2 cm with a rib pattern and leave cells.
- The neck piping consists of 102/105/109/113 sts of light beige yarn, decorate it with a 2 cm rubberized pattern and also set aside the links.
- For 2 cuffs, cast on 85/89/95/101 sts with the main color thread, knit 1 cm with an elastic band and leave loops.
- To assemble, sew the shoulder sections. Then connect the shelves and strips with a serrated stitch, and attach the cuffs and neck in the same way.
- On the left fastener, 1 cm from the edge, make 5 holes for buttons. Place the lower and upper openings at a distance of 1 cm from the edges, and distribute the rest evenly. Loops are formed by pulling out horizontal threads.
- Finally, sew on the buttons.
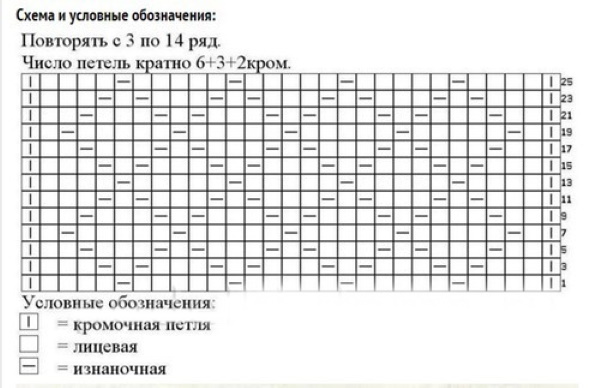
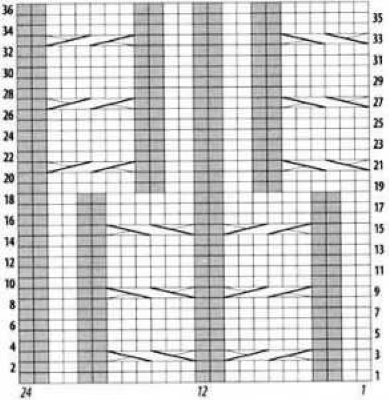
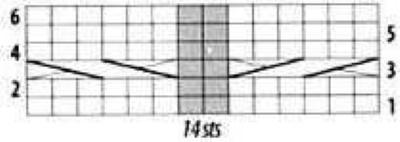
With braids
For size 104-110, you need to have 220 g of thin wool yarn, as well as knitting needles No. 2.5 and 4. Experts advise inexperienced needlewomen to initially create a pattern. It will help determine whether the work is going in the right direction. It is advisable to periodically apply the weaving tightly to the template.
Patterns used:
The bottom of the sleeveless jacket, the neck and armholes are knitted with a 2x2 elastic band (alternating 2 front sts and 2 back sts). The main part of the product consists of 2 motifs (diagrams are presented below). On the front side, a “braid” pattern is made, and the back side is knitted according to the pattern.
Step-by-step description of the model:
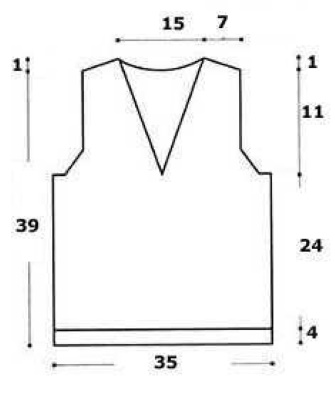
- For the back, cast on 112 sts using thin knitting needles and knit 4 cm with an elastic band.
- Next, transfer the cells to thick knitting needles and continue working with a patterned design.
- Fold both motifs. Then weave in this order:
| Knitting method | Repeat, quantity |
| edge | 1 |
| Pattern #1 | 2 |
| Motive No. 2 | 1 |
| Scheme No. 2 | 2, in mirror image |
| Edge | 1 |
Next:
- Having passed 24 cm from the bottom line, design the armholes. First, reduce 1x10 sts on both sides, then 2x6 sts, 68 sts will remain. Continue knitting.
- Having knitted another 11 cm, make shoulder cuts. To do this, close 1x6 sts. Finish the work after 40 cm from the bottom.
- The front half is made in the same way as the back, only you need to make a cutout.
- Having knitted 28 cm of the main fabric, close the central 2 links, then knit both fragments separately.
- From the inner edge of the neck, reduce 16x1p. The shoulder bevels are designed as on the back panel.
- Lightly moisten the finished parts with water and dry or iron.
- Sew the shoulders and side seams.
- Finally, tie the neckline and armholes with an elastic band.
Beautiful vests for boys are quite easy to design. Knitted items are original and unique. The main condition is to choose the appropriate pattern and yarn. The best option is natural fibers of different colors.
Video about making knitted vests for boys
Knitted vest with knitting needles for a boy: