The Moon is the Earth's satellite, a huge space object that revolves around the planet Earth. It can be seen in the sky at night, shining brightly thanks to the Sun.
The moon changes its appearance. It can be seen in the form of a crescent or a full circle. The mysterious light and soft outlines of the moon create a mood suitable for different genres of drawing.
Necessary materials and tools
Drawing tools and materials are important components of the artistic creation process. They provide the opportunity to express individuality and convey ideas and emotions.
| Tools and materials | Peculiarities |
| Paper | Artists can use thin, translucent papers to create subtle watercolor effects, while heavier papers can handle bold strokes and heavy effects better. Smooth papers allow for easy rendering of fine lines and fine details, while textured surfaces help create unique visual effects such as shadows and highlights. |
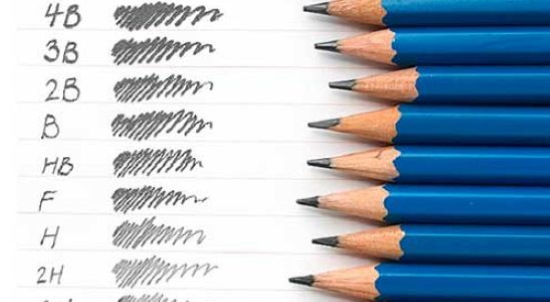
| Graphite pencils | They are hard and allow you to get clear and thin lines. They are used to work out details and create contours. Professional graphic pencils have a wide range of hardness, which allows the artist to control the pressure and intensity of the lines. |
| Charcoal pencils | They differ from graphite pencils in their softness. Artists use them to create smooth and expressive strokes. Charcoal pencils can have different shapes and sizes, which makes it easier to work on details or fill in large areas of a drawing. |
| Sanguine, sepia, sauce | · Sanguine, made from finely ground iron oxide powder, has a warm brown hue and is used to create soft shadows and highlights. · Sepia is a pigment obtained from the secretion of mollusks. Its use allows you to create soft, warm shades that imitate the color of sun-dried skin. · Sauce, like sanguine, is made from metal oxide powders, but has a darker shade. With this material, you can emphasize the shape and volume of figures, creating deep shadows and smooth transitions. |
| Colored pencils | To obtain particularly light shades, it is necessary to use pencils with a soft lead. To create dark and dense lines, you should choose pencils with a hard lead (from 9B and above). To create thinner lines, use pencils of type B or H, and for wide strokes - pencils of types B and M. HB pencils are considered universal, suitable for both basic lines and for coloring large spaces. |
| Erasers | To correct mistakes or add texture to a drawing, erasers of different hardness and size are used. Erasers with a soft surface are suitable for removing small details, and hard erasers are used for erasing broad strokes. There are special colored erasers that leave a trace of the desired color on the paper. |
| Klyachki | These are drawing correction tools made of natural rubber and eraser. They are capable of removing traces of graphite pencils and various art materials. The eraser can be used to blur strokes and generalize shapes. |
| Stencils | They are tools that are used to facilitate the drawing process. The surface of the stencils can have different patterns or letters, which facilitates the process of creating identical images or texts. |
| Rulers, compasses | A ruler is a tool that performs a measuring function. A compass is used to draw circles of different radii. Both tools are important for the precise construction and transmission of forms. |
| Sharpeners | They help maintain pencils in the required condition, ensuring the sharpness of the leads. This is important for obtaining clear and neat lines without losing the brightness of the color. |
| Brushes | They are made from various materials: natural fur, synthetic fibers, bristles. You can find brushes of different shapes (round, flat, conical) and sizes.
Round brushes are used for working out details. Those with a sharp tip are suitable for adding volume to a drawing, and flat ones are used for tinting large surfaces. They can differ in the stiffness of the bristles: soft ones (squirrel, pony) allow you to create delicate transitions and smooth lines, hard brushes (bristle) are suitable for large strokes and rough texture of the drawing. |
| Gouache | This is the name of a water-soluble paint that has the ability to give a dense opaque layer. Despite its opacity, gouache maintains smooth transitions, which allows artists to convey shadows. This material is suitable for both beginners and experienced artists. |
| Watercolor | A paint that is good for beginning artists. Watercolor is notable for its many delicate shades, allowing for smooth color transitions. It is easily washed off, allowing for corrections. |
| Acrylic | A synthetic paint that uses a polymer as a binder. Paints in this group dry quickly, forming a durable coating suitable for many techniques. |
Master classes
The moon, as an object for images, can become an accent in a drawing of an urban landscape, an element of a fantasy composition, or simply an independent subject of artistic interest.
While working on the drawing, you can refer to ready-made instructions or try to depict the night light in your own style.
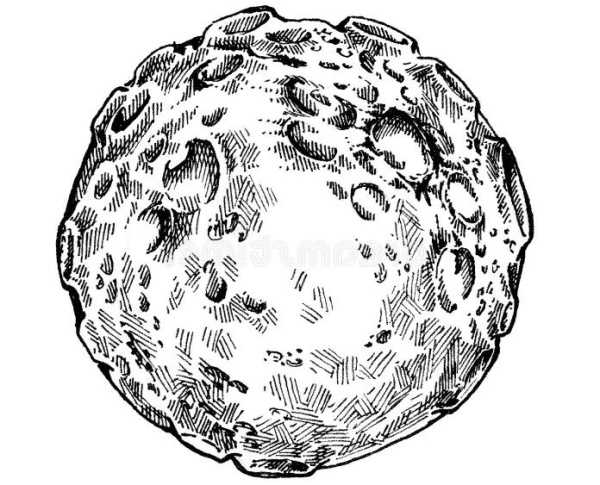
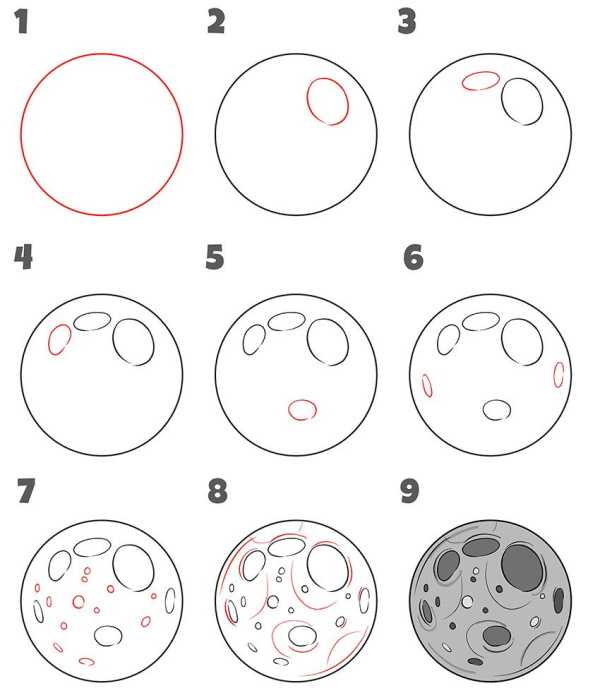
Volumetric with craters
The drawing process may seem complicated, but if you follow the instructions, the result will be impressive:
- Determine where the Moon will be located on the sheet. This can be the center, top or bottom of the sheet. Choose a point from which you will draw the lines of the circle. Draw a small circle indicating the contours of the Moon.
- Draw the outline of the moon using a compass. Start with the main circle, then add half-shadows using a darker shade of pencil, and shadows, blending them with an eraser.
- To create volume and realism, use several circles of different sizes that will flow into each other. Draw several circles, gradually decreasing their diameter. The result will be a three-dimensional object.
- Add details that will make the drawing even more realistic. Consider the relief of the surface, craters, mountains and plains. Use different pencil pressure to create shadows and gradients.
When drawing lunar craters, pay attention to the shadows they cast. Craters can be of different sizes and shapes. Emphasize the shadows from the craters to give them volume.
Adviсe:
- It is important to remember about perspective and proportions. The moon should not look distorted.
- You can use different textures and shades of pencil to create a sense of depth and volume. Don't forget about light and shadow. They will help make the drawing more realistic and interesting.
Full in the sky against a tree with charcoal pencil
The moon in the picture can be represented with the help of a master class.
Before starting work, it is recommended to study the features of the materials used and master the basic techniques of shading with a charcoal pencil:
- Creating a preliminary sketch will help determine the basic proportions and shapes of objects, which will make the work more accurate and precise. Outline the general contours of the image using light lines of a simple pencil.
- Paint the bottom of the sheet black to create the feeling of the ground or a dark space. Distribute the color evenly, creating an even coating.
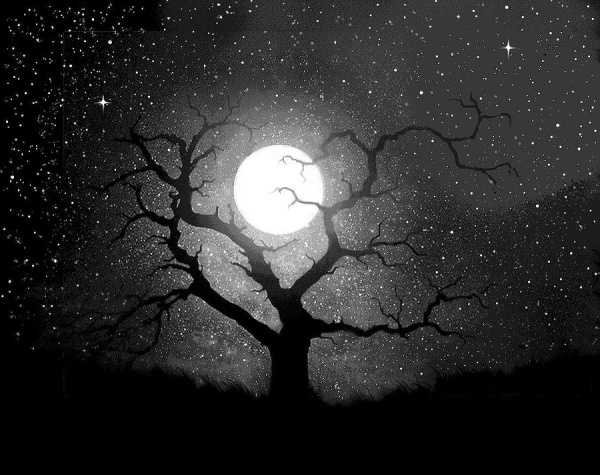
- Draw the outline of a tree without leaves. To do this, draw several straight lines of different lengths, which will create the base of the trunk and branches. Mark the location of large branches with thin lines.
- Using a pencil, draw a circle that will represent the moon. Make sure the line is straight and clear, and that it matches the size of your drawing. Use an eraser to adjust the shape of the circle.
- Proceed to creating the starry sky. Using various shades of dark gray and black, paint the area around the Moon, leaving dots - stars. Pay attention to the fact that the light from the Moon illuminates the sky and creates a contrast between the sky and the earth.
- Go over the entire image, paying attention to details. You can add shadows or reflections on the surface of the Moon. This will give the work volume and realism. Use an eraser to remove unnecessary lines or add strokes where necessary.
The wolf howls at the moon
This master class is the basis for creativity and each detail can be changed depending on preferences and style:
- On the sketch, determine the location of the main elements of the drawing: the wolf will be in the middle of the sheet of paper, and the moon will be in its background. The proportions of the animal's body should be harmonious, and the head should be turned upwards. It is important to remember about perspective so that the wolf does not look flat.
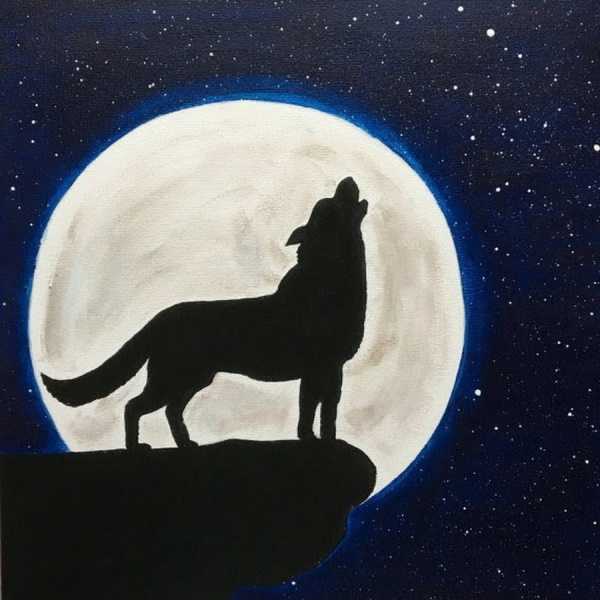
- Draw a cliff on which the wolf stands. Mark the horizon - this is an imaginary line that divides the sheet in half. Place the base of the cliff on this line. Create three-dimensional forms of the cliff, gradually raising its height from the base to the top. The foreground should be more detailed and darker compared to the background.
- To create the outline of the wolf with black paint, start with the head and paws, move to the body and tail. Draw the ears, nose and open mouth.
- Draw the Moon with light gray paint against the background of the wolf. Its shape should be round, it can be increased in size. Create a volumetric effect by adding shadows and highlights.
- Paint the sky with dark blue paint. The stars are represented as white or light blue dots.
To make a drawing appear three-dimensional, you need to carefully apply paint with a brush, adding layers to create depth and shadows. You can use different painting techniques, such as dry brushing or glazing, to achieve the desired effect.
Moon in cartoon style
The moon in the drawing can be depicted as a crescent moon using a cartoon style.
To do this, you need to complete several steps, and at each stage you should take into account the rules and principles of drawing:
- Create a sketch of the future drawing. This will help determine the basic proportions and arrangement of elements on a sheet of paper. The sketch should be simple and concise, without unnecessary details.
- Draw the outline of the waxing moon. It should be smooth and rounded to create the impression of softness. Do not draw too sharp corners, as this can make the drawing awkward.
You should not make the moon too big or too small, as this will disrupt the harmony of the image.
- Draw a cloud under the moon on which it will be located. The cloud should be fluffy and light to emphasize the airiness and weightlessness of the moon. It can be made in the form of a spiral or an arc.

- Draw an eye with a pupil. It should be round and expressive, with wide open eyelids. The pupil is small and dark to give the eye depth and liveliness.
- Draw an eyebrow above the eye. It should be curved and slightly raised to express joy and surprise. The eyebrow can be made in the form of an arch or a crescent.
- Draw an upturned nose below the eye and eyebrow. It should be short and slightly curved to convey the character's distinctiveness and individuality. The nose can be made in the form of a triangle.
- Below the nose, you need to draw the mouth. It should be smiling and open to show the joy and kindness of the moon. The corners of the mouth should be raised up, and the lips slightly parted.
- The cheek of the moon should be slightly raised to reflect its smile. It can be made in the form of an oval or a circle.
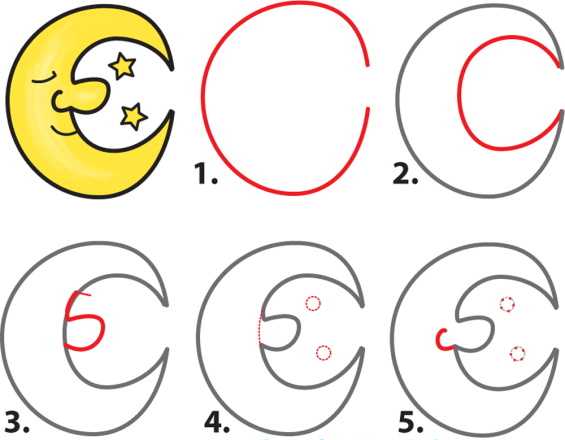
- Around the moon you need to draw 5-pointed stars, which will become an additional decoration.
- Paint the sky blue, the moon and stars yellow, and the cloud white with a bluish tint. It is recommended to use bright colors, and also experiment with shapes and details.
Astronaut on the Moon
The moon in the picture can be depicted with the help of a master class, which is a general guide:
- Make a sketch.
- Place an image of the Moon's surface with craters on the bottom of the sheet. This will create the effect of cosmic depth and will allow you to more accurately convey the atmosphere of outer space.
When drawing the moon, you can use smooth transitions of light and shadow to create a realistic image of the lunar surface. Pay attention to details such as shadows from craters and surface relief to make the drawing as believable as possible.
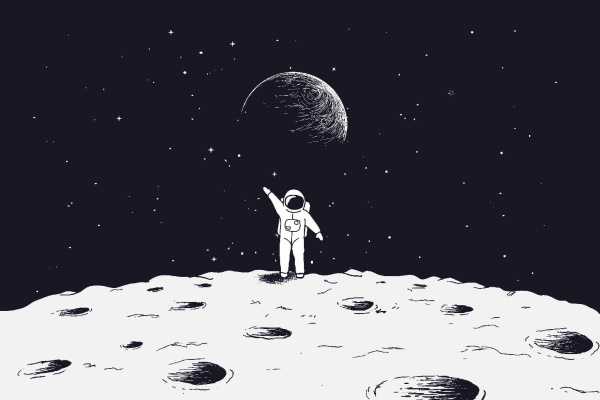
- Add a figure of an astronaut in a spacesuit standing on the surface of the Moon. The astronaut's left hand is raised up, symbolizing his presence on another planet. To make the image more realistic, draw the details of the spacesuit, such as the helmet, gloves and boots.
Pay attention to the position of the astronaut's feet - they should stand firmly, because he is on a hard surface.
- Draw the outline of the planet Earth, which is not illuminated by the Sun. This will add contrast between the dark surface of the Moon and the bright stars in the sky. Lighter shades of blue or green can be used to draw the Earth.
- Paint the sky in the drawing black, leaving white dots - stars. This will give the image a cosmic look and help create the atmosphere of the night sky.
Rocket flies around the moon
The moon in the picture is depicted using a step-by-step master class:
- Make a sketch of the future drawing. You can use simple lines and shapes to outline the main elements of the drawing: the Moon, the rocket, the stars.
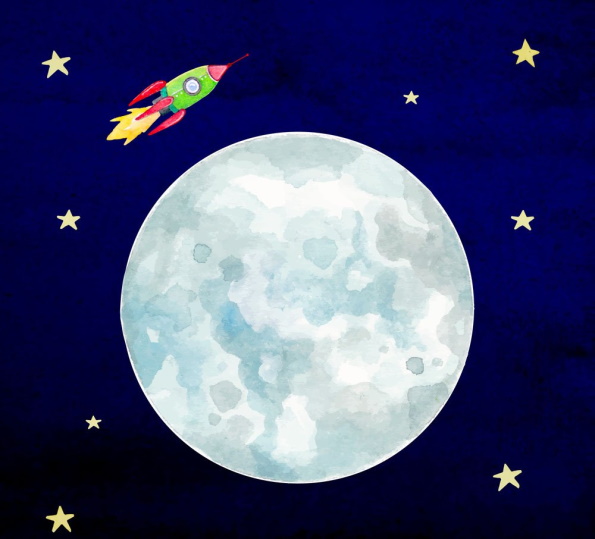
- Draw a large circle in the center of the sheet - this will be the image of the Moon. The circle should be large enough, but not interfere with the rocket and other elements.
- Draw a rocket near the Moon. It can be of any shape. Draw the 3 main elements of the rocket: the body, the engine and the nozzles. These details can be done with thin lines.
- Add stars to the background of the drawing. They can be drawn as small circles of different sizes, located in different parts of the sky.
- The moon is painted blue. It should be light enough so that it does not merge with the background. Use a darker gray color to create shadows and give the moon volume.
- To add color to the rocket, you can use any shades and various techniques: hatching, brush strokes, gradient.
- Paint the stars yellow. The intensity can vary depending on the brightness. To make the stars look three-dimensional, you can add shadows and highlights to them.
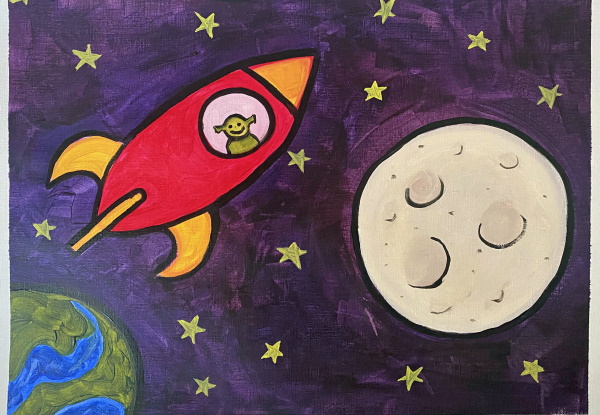
- Give the sky a dark blue color, which will create a contrast with the bright elements of the drawing, such as the moon and stars. You can also add additional shades of blue to create depth.
Tips for Beginners
To obtain the result, it is necessary to consider the main aspects of drawing a celestial body. Thanks to the tips and recommendations presented in this article, novice artists can learn to create its images using available art materials.
| References | It is advisable to use photographs of the moon. It is worth paying attention to lighting, shadows and contrasts. This knowledge will help to create a three-dimensional image and convey the atmosphere of the night sky. It is necessary to pay attention to how the phases affect its shape. |
| Composition | It is necessary to understand the location of the Moon on a sheet of paper. Find the most harmonious location that will help convey the shape and size of the satellite. Draw preliminary lines and contours to determine the basis of the drawing. |
| Sketch | A preliminary sketch needs to be created. Fine lines should be drawn to define the contours of the Moon. To do this, draw a circle or crescent, which will serve as the basis for the drawing. It is important that the shape corresponds to the actual appearance of the Moon during the chosen phase. The shape can be adapted to the drawing style and the details added. |
| Color palette | It is necessary to choose colors that will help convey the mood and atmosphere of your drawing. Cool colors and shades such as gray, blue and silver are typical for the Moon. At this stage, you can also decide whether to use shades of one color or contrasting colors. |
| Details | You should add small details on the moon, such as craters or terrain features. Emphasize texture with shading. You can add shine or reflection from the moon on another surface. |
| Shadows and Light | It is necessary to add shadows and light on the surface of the Moon. Place the darkest areas on the shaded part of the lunar disk, and the lightest ones on the illuminated part. The transitions between shadow and light should be smoothly distributed. After the main shadows are applied, add chiaroscuro to the surface of the Moon. This will help to create volume and the illusion of 3-dimensionality. |
The moon is one of the most poetic subjects in fine art. The article presents general ideas on how to draw it, these recommendations can be modified, elements can be added and creative vision can be realized.
The result should be an original work of art that reflects the understanding of this image.
Video about drawing
Moon - drawing: