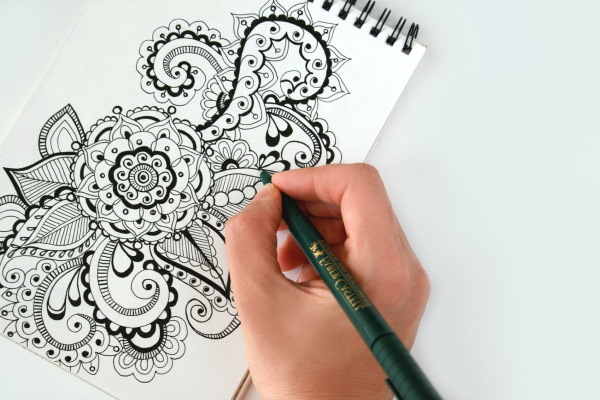
Zentangle was born in 2006 and has conquered the whole world by now. This is the name of an unusual pattern drawing technique. Most of all, it attracts with its simplicity when executed step by step and at the same time a large number of possibilities. Both a beginner artist and a professional can easily cope with this method.
What is Zentangle and why do it, definition of concepts
Zentangle is a new art form that combines several directions. This technique allows you to create, meditate and have fun. As a result, unusual drawings are formed that can be used as an independent work or as decorations.
Zentangle is often compared to the technique of "doodling": these art forms have many similarities. However, zentangle uses repetitive patterns, whereas doodling is an intuitive drawing.
Zentangle combines many different patterns. They are all the same, and simply repeated many times. Each such repeating pattern is a separate component of the entire image and is called a "tangle".
Zentangle (patterns for beginners step by step easy to master) is a simple technique that anyone can master. The only thing you need to know how to do is hold a pencil or pen in your hand. It is recommended to start with Zentangle for those who are just about to begin learning the basics of artistic creativity.
The date of registration of the creation of images in the Zentangle technique is 2006. It was founded by Rick Roberts and Maria Thomas. Rick was a monk in the past, so he knows the practice of meditation well, and Maria is an artist who works with many techniques and does calligraphy.

One day, when Rick was meditating and Maria was drawing, they both found themselves in a special state of meditation. As a result, Rick and Maria came up with a simple system to help people enjoy the creative process. Zentangle was born.
The name of this type of creativity was composed of 2 words:
- "zen" - "path" in Buddhism;
- "tangle" is a confusion that is demonstrated on paper using various curls.
Rick and Maria patented the system they had invented and began to organize seminars, teaching the new technique to anyone who wanted to. Those who completed the practice became certified and had the opportunity to also teach.
With its rapid spread throughout the world, the technique has gained a huge number of followers who use other tools for drawing.
Classical drawing using the "Zentangle" method requires the use of black ink and a canvas, which should be a square sheet of paper. The area of this sheet is also important: it should always be the same, since a canvas with a side of 89 mm is required.
A beginning artist does not necessarily need to use a square sheet of paper, and can use the following writing instruments as writing instruments:
- simple pencil;
- gel pen;
- thin felt-tip pen;
- liner;
- roller.
The main requirement when drawing is that the mark left by the tool must be black.
The peculiarities of the drawing created using the Zentangle method include the lack of orientation of the canvas in space. The sheet can be positioned any way you like. In this drawing, there is no top, no bottom, no right side, no left. As for the drawing itself, created with black ink, it should be abstract. It should not be recognizable as a familiar object.
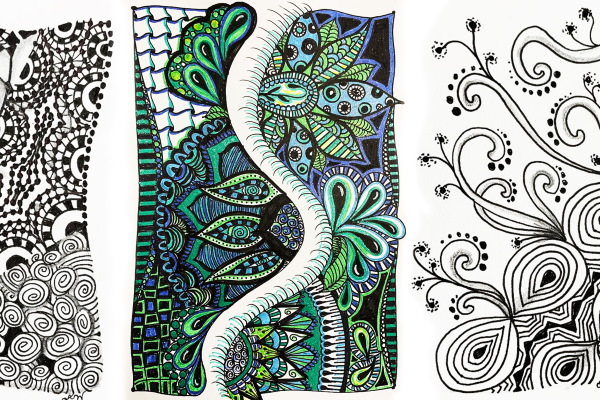
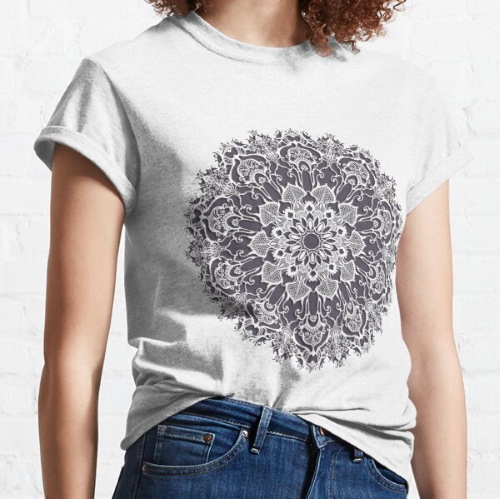
Nowadays, patterns created using the zentangle technique are often:
- decorate clothes and various accessories;
- decorate objects and interior elements;
- used as a basis for embroidery.
There are countless ways to use this technique. However, before you start decorating clothes and other items, you need to practice on a sheet of paper.
Zentangle (patterns for beginners step by step recommended for relaxation) has the following advantages:
- This is a meditative technique, in which the artist completely immerses himself in the creative process, discarding unnecessary thoughts. This allows you to calm down, forget about everyday worries and anxieties, clear your mind. This activity is a meditation, as a result of which a delightful drawing is born.
- Anyone who decides to start drawing using the Zentangle method gradually learns to do it better, and subsequently reaches a level where they can begin to apply the acquired skills in other, more everyday areas. For example, applying unusual makeup.
- To master Zentangle, you don't have to be a gifted person. All you need is desire and some free time that you can spend on meditation.

There may be mistakes at first, but you shouldn't focus on them, it's important to enjoy the process, relax and forget about everyday problems. Mastery will come by itself with constant practice, and mistakes will become fewer.
- When you get good at creating zentangle patterns on paper, you can try transferring your masterpieces to other canvases, such as clothing fabric.
Advice for aspiring artists
Before drawing zentangle patterns, beginning artists should follow these step-by-step recommendations:
- It is necessary to examine as many results of works by other artists as possible. It is important to both admire the masters' magnificent drawings and pay attention to their features: meditativeness, the composition of a complete composition from the same patterns.
- It is better to choose simple patterns rather than entire drawings and try to draw the same ones on a square sheet of paper.
- When after some time you get interesting patterns similar to those created by professionals, you can move on to full drawings consisting of several such tangles.
Zentangle Tools and Materials
Since Zentangle is a common technique, everything you need for work can be found in stores that sell art and craft supplies or ordered through online resources.
Paper
Traditionally, square paper of good density is used for zentangle. The squares themselves should have uneven edges. Professionals call the material designed specifically for zentangle tiles. The size of each tile is 89x89 mm. Its color can be white or black.
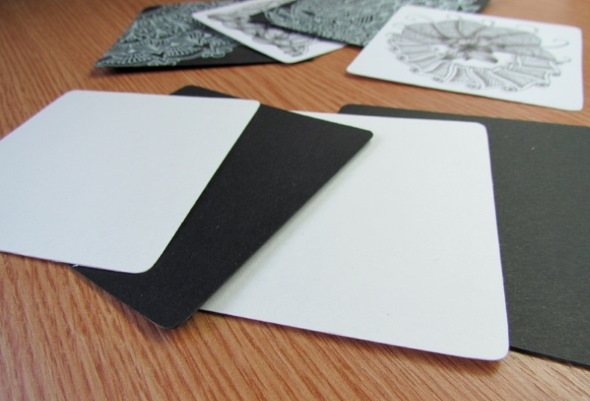
However, since black ink is usually used for drawing, preference is given to a white canvas. If you cannot find the appropriate tiles for Zentangle on sale, and you do not want to wait for the delivery of an order placed in an online store, you can make such tiles at home.
To do this you need:
- Take regular paper intended for working with watercolors or for drawing.
- Cut the sheets into squares of appropriate sizes: the side of each square should be 89 mm.
Sketchbook
A sketchbook is necessary for trying out new patterns and making sketches before creating a full-fledged painting. The main advantage of a sketchbook is that you can take it with you anywhere.

There is an important requirement that should be taken into account when choosing an album: its sheets must be thick. This is necessary so that you can draw with a marker. Everyone has the right to choose any format.
Marker liners
If white paper is used as a canvas for zentangle, then black markers will be required. If the tiles are black, then the writing instruments should leave white marks.
The most suitable for this work are liner markers, which leave a mark up to 0.5 mm wide. With their help, you can draw rich patterns.
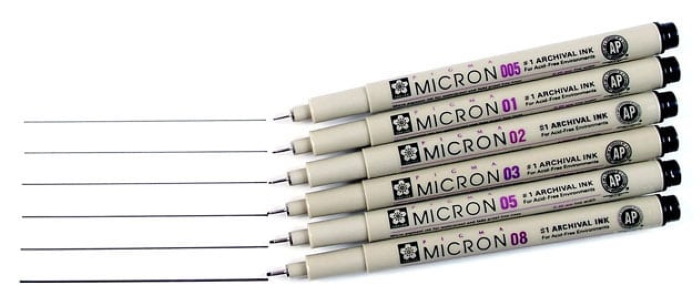
You can buy them individually or in whole sets. If you can't find them on sale, you can use regular gel pens or felt-tip pens.
Simple pencils
Zentangle technique cannot be done without simple pencils. It is best to buy a drawing set, which contains tools of different hardness, and the lines they leave will differ in density and saturation. They will be useful when you need to shade the patterns.
You will need at least 2 pencils. One should be hard, the other soft. When choosing, pay attention to the markings on the pencil itself. It is better to give preference to a hard one marked 2H, a soft one 2B or 4B; you can also use a hard-soft HB.
Since pencils will be used in the work, it is necessary to take care of purchasing a sharpener for them.
Colored markers
Zentangle (patterns for beginners step by step can be done both in the classic version and in the modern one) is usually drawn in black. However, the artist can show imagination and use other colors in the work.
It is recommended to start with traditional black. Once some skills are acquired, you can move on to other shades. Multi-colored markers will help add colors to an initially black and white drawing.
Additionally, you can use:
- colored pencils;
- multi-colored gel pens;
- felt-tip pens.
Ruler and eraser
Many of those who create images in the Zentangle style do not recommend using a ruler and eraser, which are common in other areas of artistic activity.
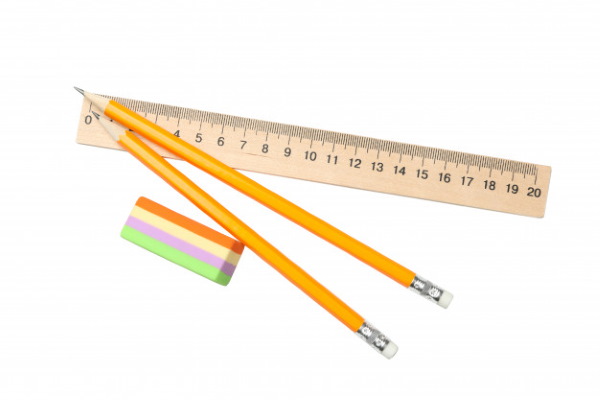
This is due to the fact that this type of creativity itself implies a large number of uneven elements. The main thing here is to relax and enjoy the process. However, there is a category of artists who advise using a ruler and an eraser. These tools will greatly simplify the work when you need to create complex patterns.
How to master zentangle, where to start
Those who have never created drawings using the Zentangle technique in their lives should first pay attention to the finished works made by professionals. They can be seen on various thematic sites.
However, you should not start with drawings that are more complex., even though there is a great temptation to make the most beautiful ones. To begin with, you should choose simple patterns that can be transferred to the prepared paper tile.
The main thing is to be patient, because soon the beginning artist will turn into a professional, who will easily be able to draw even complex tangles. Before you start drawing your first tangle in your life, it is recommended to get comfortable, relax, and breathe normally: slowly inhale and exhale.
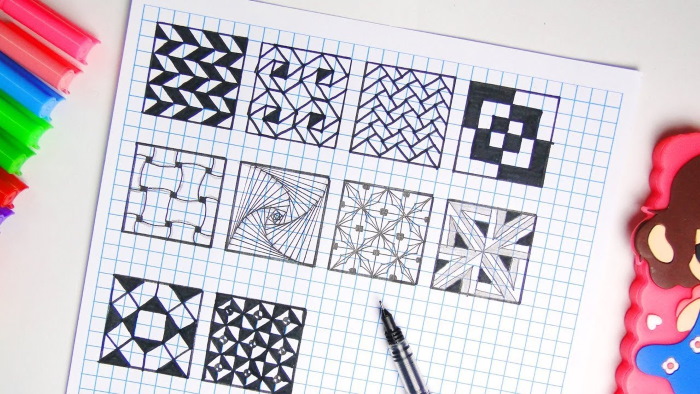
Step by step drawing of tangles for beginners
Zentangle (patterns for beginners step by step are best done first, using examples as a guide) is not just a type of artistic activity, but first of all meditation. The main goal is to relax, forget about problems and enjoy the process.
How to draw the first tangle
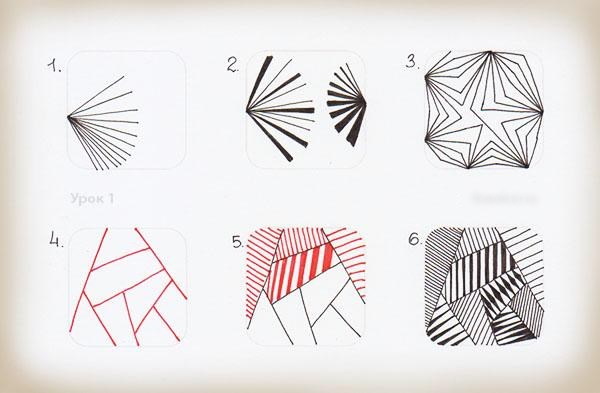
The process of creating the first tangle takes place in the following 6 stages:
| Stage | Description |
| 1 | Divide the sheet into squares. For classic Zentangle, square tiles with sides of 89 mm are required. However, for the initial time, you can use smaller squares, for example, 50 mm. When drawing, you should leave 10 mm gaps between the squares. This is necessary so that the cards do not merge. The same should be repeated on the back of the paper sheet. Anything that is superfluous is removed with an eraser, and to add brightness to the squares, you can outline them with a marker along the perimeter. |
| 2 | Start to design the tangle. Using a simple pencil, without pressing too hard, draw diagonal curved lines. They should be drawn from the upper corners to the lower ones. As a result, a grid is formed, which is recommended to be outlined with a black marker at the end. |
| 3 | Divide each of the resulting rhombuses into 2 equal parts by drawing several vertical curved lines from top to bottom. |
| 4 | At the base of each rhombus, draw a short horizontal straight line. |
| 5 | The base that was drawn in the previous step needs to be completely shaded. As a result, several black triangles are formed. |
| 6 | Draw straight diagonal lines on the right side of each rhombus. |
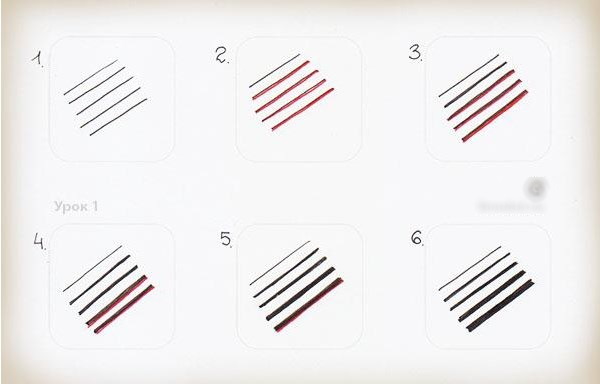
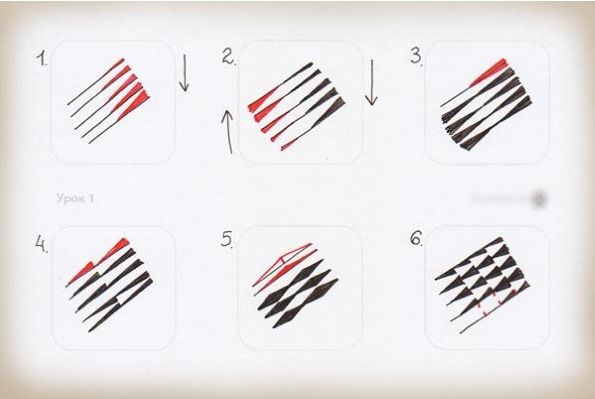
How to draw the second tangle
The second tangle, which will be placed in the next square, is drawn in the following 4 steps:
| Stage | Description |
| 1 | Draw straight diagonal stripes from the upper corners to the lower ones. The lines should not be at the same distance from each other. The gap between the 1st and 2nd should be smaller than between the 2nd and 3rd and so on. |
| 2 | Arm yourself with a marker and start drawing the lines, but not completely: the places where they intersect should be left blank. If everything is done correctly, the result will look as if the stripes are intertwined. Some stripes will be in the foreground, and others - in the background. |
| 3 | Color the back stripes. |
| 4 | Paint over all the white wide lines with long straight strokes. |
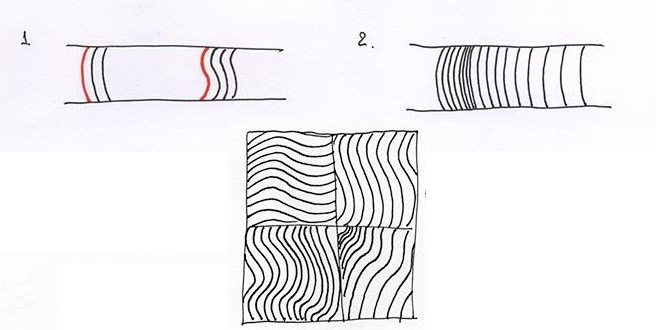
How to draw the third tangle
This tangle will look like some kind of tile laid on the floor.
This work will have the following 2 stages:
| Stage | Description |
| 1 | Draw intersecting lines. They should be slightly rounded. The vertical ones go from the top edge to the bottom, and the horizontal ones go from right to left, respectively. |
| 2 | Draw one small diamond at each intersection, and then color them completely. |
Step by step tutorials on creating patterns for beginners
The technique of drawing zentangle patterns is perfect for artists who are just starting their long and exciting journey in drawing.
Dots and straight lines
Before you start drawing simple line drawings, you need to practice drawing simple lines and dots, and then applying shadows to them using simple and colored pencils.
Exercises for practice can be as follows:
- drawing dotted lines in such a way that the thickness increases with each subsequent one. In this case, it is necessary to give different shadows;
- draw broken lines, trying to make them voluminous, also highlighting them with shadows and strokes;
- try to give the lines thickening in different directions in the form of cones;
- learn to give directions to lines. To do this, they must be drawn from one point to another like a fan.
The essence is as follows: on one sheet of paper a fan is drawn in different directions: first horizontally from right to left, and then vertically from top to bottom; and after that other directions can be applied.
Wavy lines, waves, arcs
To learn how to draw wavy lines, you need to do the following:
- Draw 2 parallel lines, draw lines between them at the same distance from each other. Then this distance needs to be made smaller, and after that - on the contrary, increase it.
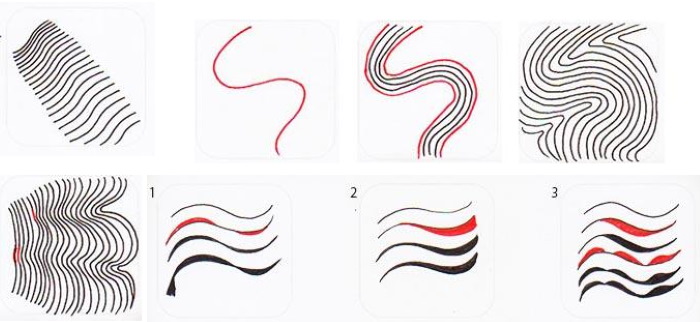
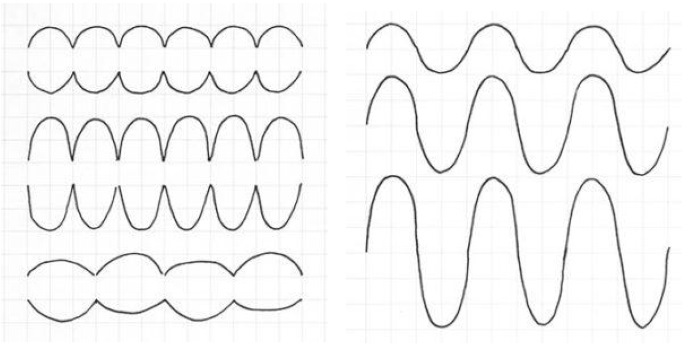

- Draw curved lines that form the letter "S". Similar exercises are performed with such lines.
- Draw several squares, and then divide each of them into equal quarters.
- Draw straight lines in different directions from the central point of the square.
- Draw curved lines, the width of which should also be increased and decreased.
Scales, stones, lanterns, rings, three-dimensional figures
Rings are easy to draw: first, two parallel lines are drawn, and then circles are drawn between them. The ring should be either smaller or larger. The same applies to the distance between them. The thickness of the lines should also be changed.
The scales should become wider and narrower. It is also necessary to shade it using a simple pencil. To make the shadows richer, you need to press harder on the writing instrument. If you need a weaker shadow, then you should not press hard on the pencil.
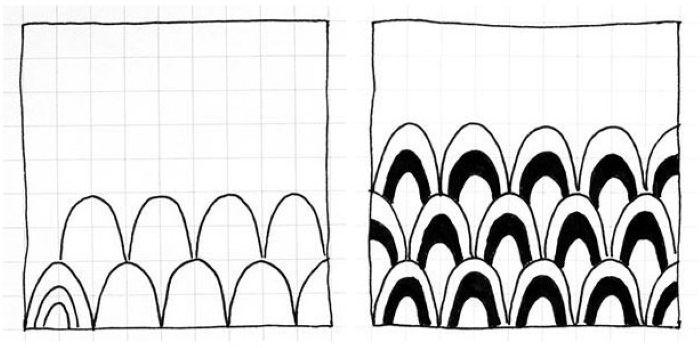

To draw lanterns, use the cells of a regular school notebook. From one edge to the opposite one, arc lines are drawn, which will subsequently be combined, resulting in the formation of a kind of lanterns. The areas that are located inside must be shaded to give the drawing volume.
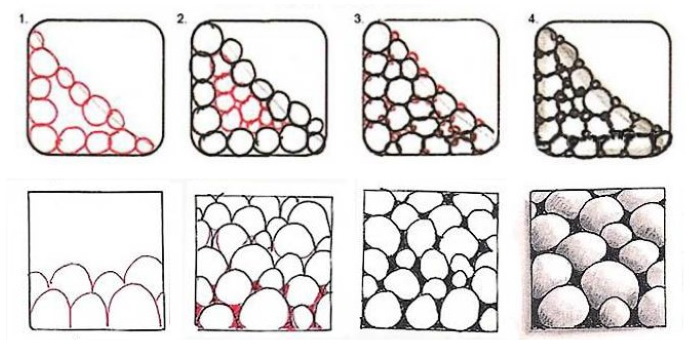
Stones are easy to draw: you just need to create a round, uneven shape. They are superimposed on each other, and it is important not to forget to shade. At the beginning of the exercise, you need to fill the square from the corner, depicting stones with a heap effect. Then you can shade them.
Fish in Zentangle Technique
To draw a fish decorated with unusual patterns, you need to do the following:
- Determine the location of the fish on the paper. Use ovals to mark its body parts – the body, tail and fins.
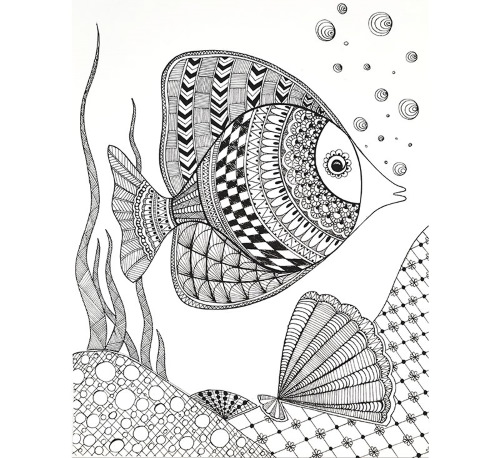
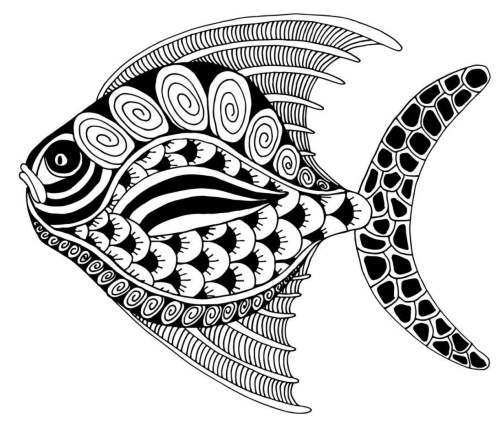
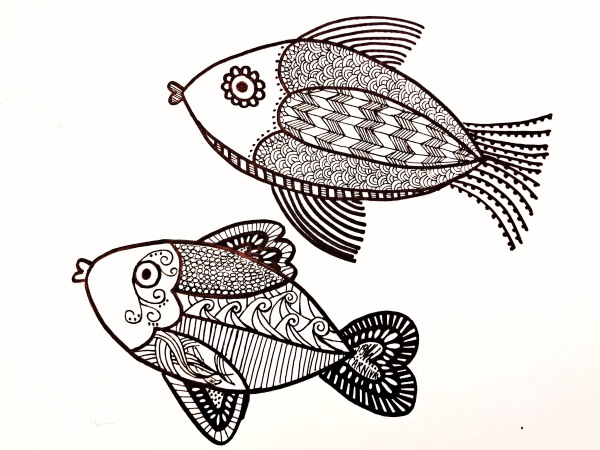
- Refine the outline of the fish's body, draw the eye and mouth.
- Divide the body, tail and fins into stripes using even lines.
- Trace the outline and all lines with a marker or felt-tip pen.
- Go to coloring in the zentangle technique. As ornaments, you can choose different patterns, they can be repeated through a strip or alternate through one.
- Complete the picture with seaweed, stones, sand and water drops.
It is important not to forget to leave space for shadows; if desired, you can add colored elements to the drawing.
To achieve success in zentangle, it is enough to devote at least half an hour a day to step-by-step training. Gradually, beginners' patterns will become more beautiful, and the drawings consisting of them will become clearer.
Video about drawing patterns
Zentangle patterns for beginners: