A wide variety of creative materials provides the opportunity to create original gifts and decorations for any occasion. A pleasant addition to the surprise will be cards made with your own hands from beads, ribbons or paper. Such products are always unique and filled with love and warmth.
DIY Postcard Making Techniques
There are many techniques for making postcards and souvenirs from paper:
- Scrapbooking or decorating photo albums, frames or postcards with paper, beads, buttons and other suitable materials. Scrapbooking is used to create unusual themed souvenirs.
- Method iris folding was invented in the Netherlands and involves folding a picture from strips of colored paper in such a way that the figure takes the form of a spiral. The postcards are colorful and unusual.
- Kanzashi – is a Japanese type of handicraft based on making flowers from ribbons folded in a certain way. The technique requires perseverance and takes quite a lot of time.
- Technique isonit is embroidery on cardboard or thick paper, done using strict geometric lines.
- Quilling – is a simple and accessible method of decorating postcards using strips of paper twisted into a spiral.
- Another type of Japanese art is origami – consists of the ability to fold various figures of animals or plants out of paper.
- Decorating products with decoupage invented in China. Craftsmen used pictures cut out of paper to decorate furniture, and for durability they covered them with varnish. Since then, the technique has not changed at all. Napkins are considered the ideal material for decoupage, due to their thin and delicate texture.
New Year's card with buttons in scrapbooking technique
A handmade postcard made of paper and buttons can be easily made using the scrapbooking technique. Postcards with Christmas trees made of buttons look very original.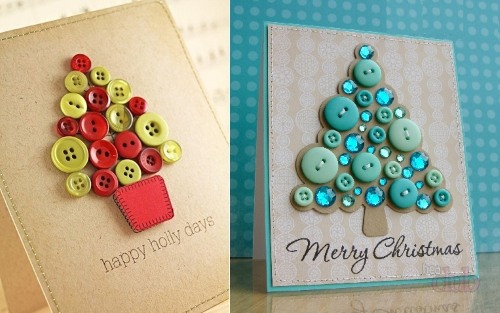
To make such a gift, you will need the following materials:
- thick paper or cardboard for the base of the card;
- decorative paper of several colors;
- buttons of different sizes, flat with two or four holes;
- ready-made stamps for scrapbooking, consisting of ready-made inscriptions or individual letters and numbers;
- double-sided tape or silicone glue gun.
For decoration you will also need decorative scissors, colored threads, markers, rhinestones or ribbons.
First, you need to plan what kind of tree to make, where to place it, and how to decorate the future card.
It's better to sketch out a plan and then get to work:
- Mark the middle of the cardboard sheet for folding and draw along the line with scissors, pressing lightly. Then decorate the cardboard. To do this, sew or glue paper of a suitable color on top of the cardboard or make a frame.
- If you plan to decorate the back of the card, you need to do it in advance.
- The next step is to form a Christmas tree from buttons on the front page of the card. The New Year tree can be traditional green or decorated with multi-colored "balls" made from smaller buttons or rhinestones. Buttons can be easily glued on using double-sided tape, hot glue, or sewn on.
- The following inscriptions from scrapbooking templates are carefully glued to the chosen place: “Happy New Year!”, “Congratulations!”, “Best wishes for the new year!”
- Bows or beads glued near the tree will be an additional decoration for the product.
Christmas Wreath Card in Scrapbooking Technique
A great option for decorating a New Year's card using scrapbooking technique is a beautiful Christmas wreath made of ribbons or paper. To decorate the product, you can use the recommendations for decorating a card with a Christmas tree or use your imagination and decorate the front side with lace or beads along the perimeter or along the edges of two sides that form the corner of the card.
To make a wreath you will need narrow satin ribbons. One ribbon should be green, and the other - light green, red, gold or silver. The edges of the ribbons should be singe to prevent them from fraying and the wreath should be woven in any known way.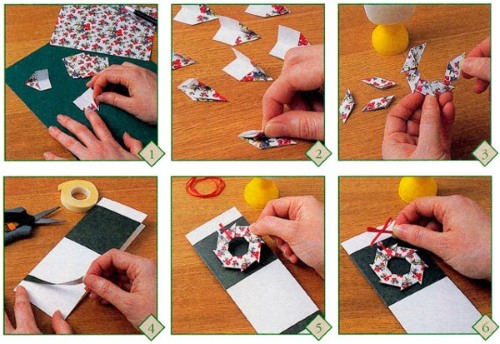
A Christmas decoration can be made from paper ribbons or small snowflakes, collecting them into a fluffy wreath, which is glued to a pre-prepared card base.
Mother's Day Heart Quilling Card
Anyone can make a beautiful card with a heart made of bright paper for Mother's Day with their own hands using the quilling technique.
This requires a little time, patience and some materials and tools:
- thick colored paper in red, pink or cherry colors (it is convenient to purchase a special set of paper for quilling);
- a quilling holder, which is used to twist the paper into a spiral (instead of a holder, you can use a toothpick with an end split in two);
- PVA glue;
- rulers, simple pencil, scissors.
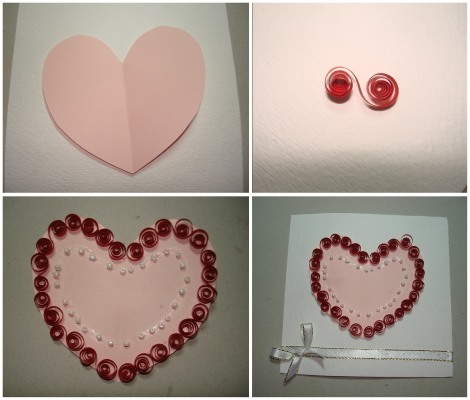
To create an original heart, it is enough to master 3 types of twists:
- A basic tight roll is made with the help of a holder. Having caught the edge of a strip of paper, twist it counterclockwise, holding it with a finger, to make a tight roll. The free end is glued to the roll and then the finished roll is removed from the holder.
- A loose roll is prepared by winding a strip of paper onto a pencil. The roll is removed from the pencil and placed in a template of a suitable size, where it should unravel slightly. Only then is the outer end of the roll fixed with glue. If the end is left loose, a curl will be obtained, which can also be used to decorate the heart.
- A teardrop roll is made from a basic or loose roll by squeezing it after removing it from one side so that the figure takes the shape of a teardrop.
The youngest craftsmen can assemble a heart for mom from pre-prepared rolls. To do this, on the front page of the card, you need to lightly outline the outline of the heart with a simple pencil, and then the child will glue the rolls into this outline.
For older craftsmen, a greeting card with a heart can be made like this:
- From two strips of paper, form the outline of a heart by gluing the strips edgewise to the front side of the card.
- Rolls and curls are placed inside the resulting heart, creating beautiful floral patterns.
- A few beads or rhinestones glued inside the rolls will give the product a finished look.
Christmas angel in isonit technique
Before you start making a card with a Christmas angel using the isonit technique, you must draw a picture on cardboard or use a ready-made template. On the layout, you should immediately mark an even number of dots at the same distance from each other and pierce them with a needle or an awl.
Each element of the angel is embroidered separately and care is taken to ensure that the thread is sufficiently taut, does not sag or bend the cardboard.
To embroider an angel using the isonit technique, you will need floss: pink for the face and nose, white for the dress, yellow for the hair and halo, red for the mouth, and black for the eyes.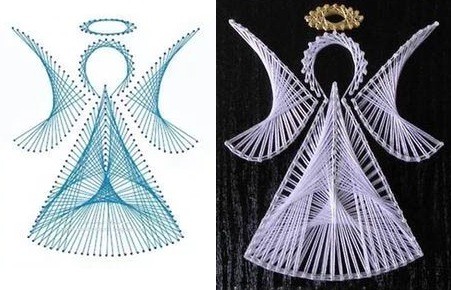
The face, hair and halo are embroidered using the “Circle” technique:
- Each stitch must pass through 8 holes: after passing the thread through the first hole, the stitch must be completed on the 7th hole clockwise.
- On the back side, a new stitch begins in the next hole counterclockwise.
- Hair shaped like circular arcs is easier to embroider by passing the thread through every 7 holes.
The body starts to be made from the very top middle point connecting the body and head, the first stitch ends at the point dividing the bottom of the dress in half. Then do the work as described above. At the end, you need to glue the embroidery to the title page of the postcard. To decorate the craft, the cardboard is processed with curly scissors along the perimeter or a frame is made.
A bouquet of flowers in the iris folding technique for a birthday
To make an original postcard with a bouquet of flowers, you first need to work out the layout. For flowers, a square or pentagonal layout shape is suitable, which is more convenient to do on a sheet of squared paper folded several times. First, draw the outline of the first square, from each of its corners from left to right, mark a 10 mm step on the sides of the square with dots.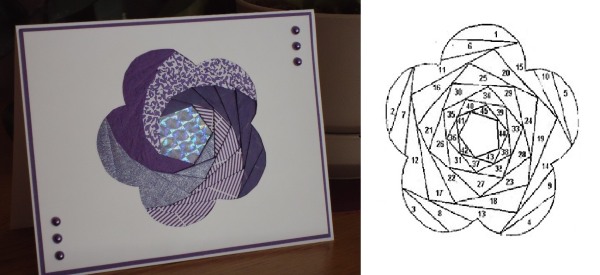
If you connect all the dots, you will again get a smaller square in the first square. Continuing to build new squares in each previous one, you will get a ready iris template. It needs to be pasted over with colored strips of paper, folded in half, following the markings. The strips are glued directly to each other, the excess paper is cut off at the end. The result will be a picture resembling a spiral.
By making several pictures of different flowers, you can create a whole bouquet.
Next, you need to draw and cut out flower templates that will fit into the first square. These templates are placed on the front page of the card, outlined and cut out along the contour. Ready-made pictures from strips of paper are glued to the back under each cut out shape. The stems and leaves of the flowers can be drawn with a marker or cut out of colored paper.
The inscription "Happy Birthday!" is placed under or above the bouquet. The back side of the front page of the card is carefully pasted over with paper, and on the second page, wishes for the birthday boy are written.
Dinosaur in iris folding technique for kids
To create fairy-tale characters, such as a dinosaur using the iris folding technique, you can use ready-made layouts. Each layout detail is numbered with a digit indicating the color.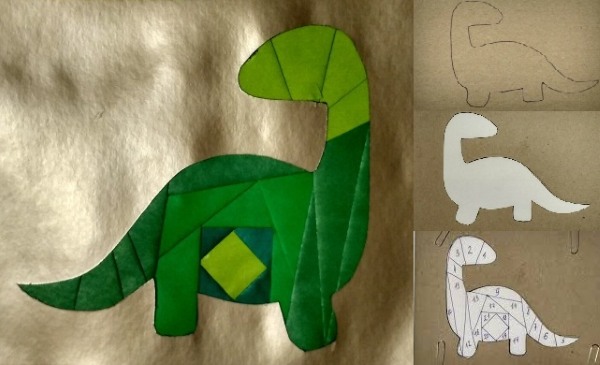
To ensure the work is neat, you need to do the following:
- On a piece of cardboard, draw and cut out a dinosaur that is the same shape as the iris template.
- Connect the model and the cardboard with paper clips so that the outline of the dinosaur on the cardboard matches the outline on the template.
- Cut multi-colored paper into strips measuring 7x10 cm, fold them in half lengthwise. The colors should be chosen in accordance with those suggested on the template.
- Glue the strips onto the cardboard, following the markings of the iris template. The template itself should be removed at the end, and the excess paper ends should be cut off. The edges of the cardboard can be processed with curly scissors for scrapbooking.
- Prepare a new sheet of cardboard of a different color and larger than the first.
- Stick a picture of a ready dinosaur on it. Decorate the background with an applique or an inscription.
Volumetric postcard with a heart in a spiral
A postcard with a heart, made with your own hands using the iris folding technique from colored paper, will be a great gift for any occasion.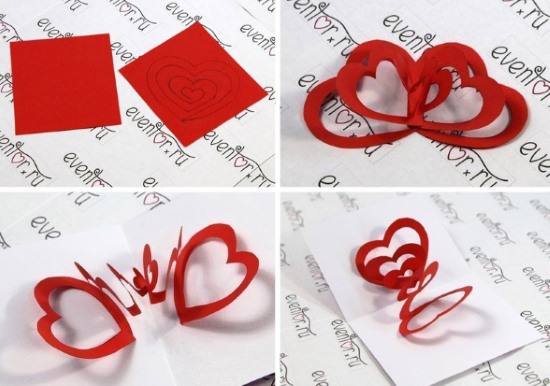
Making a gift consists of the following stages:
- Find, print and cut out the ready-made heart template. The numbers on the template will tell you how to correctly arrange the paper strips of different colors.
- Place a heart model on a piece of cardboard, trace it with a pencil and cut out the shape along the outline. Place the model under the cut out piece of cardboard and tape its corners to the table to secure the future card.
- Prepare strips of paper in 3 different colors, such as pink, burgundy, and purple. Stick the strips onto the cardboard using glue or tape, following the layout markings.
- Cover the center of the heart with cardboard or leave it open. Cover the back side of the work with paper. The front side of the card can be decorated with an inscription or ribbon.
Postcard decorated with a flower using kanzashi technique
To create an original greeting card with a flower using the kanzashi technique, you will need satin ribbons of 2 colors and different widths, tweezers, a thread with a needle, scissors, a lighter, beads or rhinestones to decorate the card, a silicone glue gun, and cardboard for the card.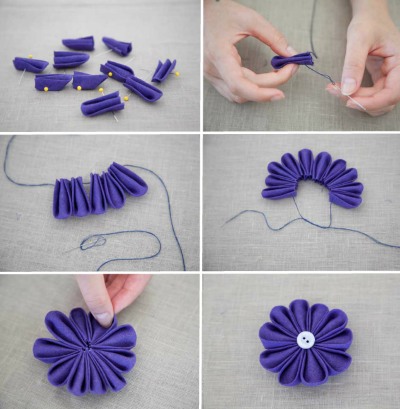
Making petals:
- The ribbons are cut into squares and folded diagonally. The resulting triangle is folded twice in the middle, using tweezers for convenience.
- The ends are sewn together, and the right angle is cut parallel to the fold line of the petal. The edges are singed with a lighter to prevent the ribbon from fraying.
- Make 9 petals from a wide ribbon and 8 from a narrow one.
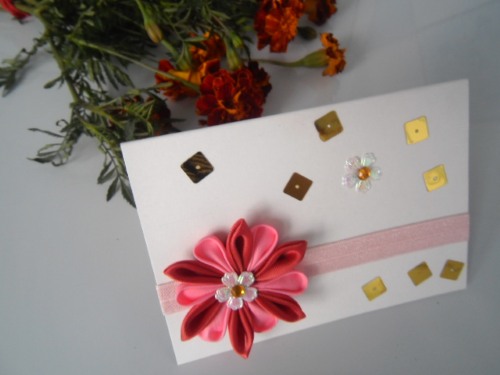
From the prepared petals, 2 flowers of a smaller and larger diameter are collected and sewn together. A bead or rhinestone is glued to the center of the flower. The flower is fixed to the prepared cardboard base of the card in the lower left corner using silicone hot glue, and the remaining space is decorated with rhinestones and ribbons.
Original postcard in decoupage technique
One of the easiest ways to make cards with your own hands is to decorate the product with paper napkins using decoupage technique. To create an original gift, you will need cardboard, a beautiful paper napkin with a thematic pattern, scissors, cling film and an iron.
When everything is ready, you can start working:
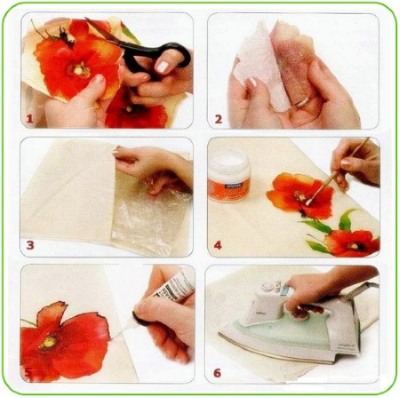
- Remove the thin layer with the image from the multi-layer napkin.
- Select the cardboard of the required size and place it on a flat surface.
- First place the film on the cardboard and smooth it out, then place the removed layer of the napkin with the image on the film.
- Cover the workpiece with a sheet of white paper and iron it with an iron heated to a moderate temperature.
- Cut off all excess along the outline of the cardboard sheet.
The finished card can be decorated with a ribbon, rhinestones or a frame..
Children's New Year's card: Christmas tree made of fingerprints
All you need to create a cute card is cardboard, a ruler, markers and paints.
How to make a Christmas tree from fingerprints:
- The cardstock for the postcard is folded in half.
- On the front page in the middle, using a ruler and markers, draw a model of a Christmas tree: a vertical trunk and 4 perpendicular lines-branches, decreasing upwards. There should be a distance between the branches, which will easily accommodate the fingerprint of the most adult craftsman.
- They choose paints, dip their fingers in them and put fingerprints over the drawn branches, symbolizing toys. At the very top, they always put a fingerprint that will remind them of a star.
- The congratulatory inscription “Happy New Year!” is placed at the top or bottom of the page, and wishes are left inside the card.
Christmas tree made of corrugated paper
Another simple version of a greeting card can be made together with children from corrugated paper:
- On the cardboard base of the postcard, use a pencil to mark out the future tree: double-sided tape is glued to the horizontal lines; the tiers of the New Year tree will be attached here.

- From green corrugated paper, cut out strips 4 cm wide and 6, 8, 10 and 12 cm long.
- The longest strip is gathered along one long side and secured to the bottom strip of tape. This is the bottom tier of the tree. Repeat the action with the remaining strips, attaching them one above the other. The top tier is gathered into a thin top, which is decorated with a star.
- The tiers of the tree can be decorated with beads or rhinestones, and a beautiful inscription can be made at the top or bottom of the title page of the card.
Origami Christmas tree
To make an origami Christmas tree, you will need only 1 sheet of green paper and scissors.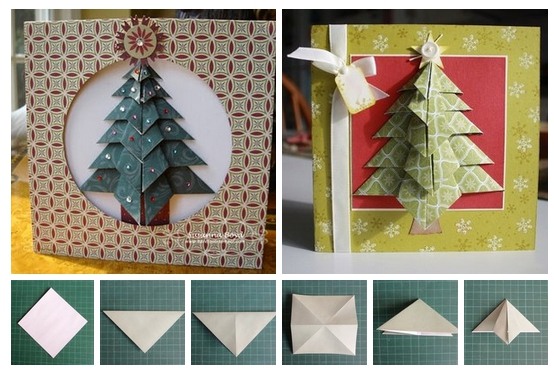
The volumetric craft is made as follows:
- Fold the sheet diagonally and cut off the excess part.
- The resulting square is folded in all directions, obtaining clear fold lines along the diagonals, horizontally and vertically.
- Using the obtained fold lines, fold the square into a triangle, hiding the sides inside (if you look at the figure from above, you will get 4 identical right-angled triangles, touching with vertical legs).
- The resulting triangle is placed with the base down, a middle line is marked, passing from the top to the base, and the right and left sides of the triangle are folded, connecting their corners in the middle.
- Repeat the procedure, turning the figure over to the other side.
- Then carefully unfold the bent parts and bend them again into a shape resembling a diamond.
- This is done on each side of the figure.
- The corners that extend beyond the lower level of the tree are cut off or folded inward.
- You should end up with 8 edges that need to be cut parallel to the base in 3 places.
- The strip of each cut is folded from top to bottom, and at the end the edges are separated to create a fluffy Christmas tree.
Postcard with volumetric snowflakes
Original handmade paper cards can be made three-dimensional. To create a beautiful snowflake that will appear when opening a gift, you will need a stencil that can be drawn and printed from the Internet, colored cardboard and scissors.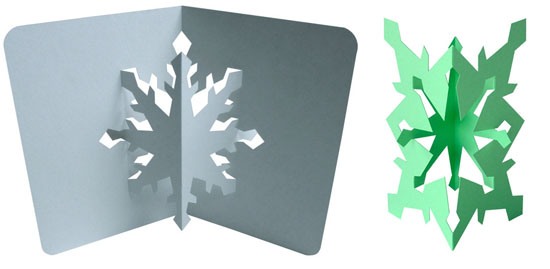
Execution:
- Fold the sheet in half and cut out the snowflake using the stencil, but not completely. If the snowflake is octagonal, its 6 ends should be left attached to the paper, and only the 2 middle ends should be cut out completely.
- Glue the sheet with the cut-out stencil onto the cardboard, leaving the snowflake free.
- Close the card by pressing the snowflake in the direction opposite to the fold line.
- Decorate the title page of the product with ribbons, rhinestones, beads or lace.
Postcard with a voluminous bouquet of paper flowers
A voluminous bouquet for a postcard, made of paper with your own hands, will become an original gift and will bring joy to the recipient. For this you will need colored double-sided paper, flower templates of different sizes, a cardboard base for the postcard, scissors and glue.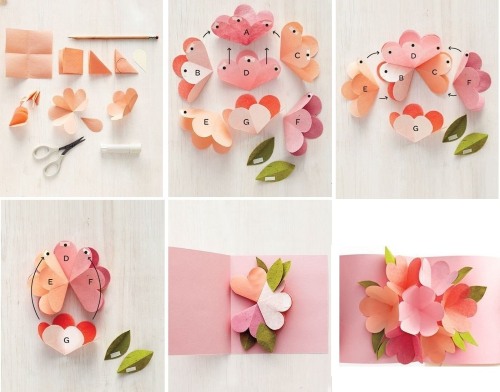
The technique for performing the work is as follows:
- Draw or print flower templates on colored paper, then cut them out.
- Each petal needs to be bent lengthwise in the middle towards the inside of the flower.
- Place flowers of different sizes together, gluing them in the middle so that the largest flower is on the bottom and the smallest on top.
- Decorate the center with a bead, colored paper or ribbon.
The base for the postcard is decorated or colored cardboard is used for the base. Congratulations should be written in advance, because it is inconvenient to do this at the end of the work. Flowers are glued to the finished base, leaves cut out of paper are added.
Kraft card with small decorative buttons
Using kraft paper to decorate postcards is a trendy trend for eco-style lovers. If such products are laconically decorated with buttons, they will become the most unusual gift.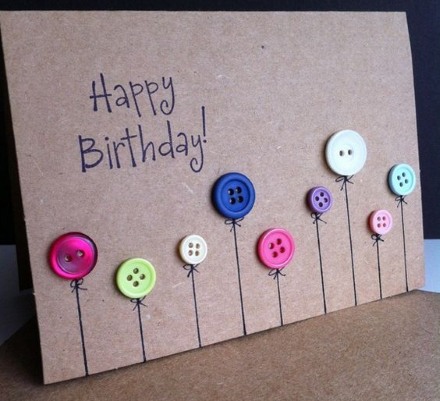
It's very easy to make a surprise:
- Fold the craft cardboard in half.
- Stick buttons on the title page, having previously thought up a plot. For example, the buttons can depict balloons, Christmas tree decorations or flowers.
- Use a gel pen or felt-tip pens to finish drawing the picture. For originality, you can use threads or ribbons.
Heart shaped card with decorative embellishments
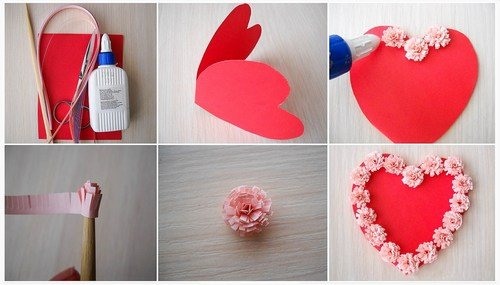
A handmade heart card is an eloquent gift that expresses the warmest feelings for the recipient. A heart is cut out of red, pink or white cardboard, folded in half, so that it connects at the fold. An inscription is made on the inside, and the front side is decorated with suitable decorative details.
Depending on the chosen style, you can use the following types of decorations:
- lace and ribbons;
- rhinestones, beads or beads;
- decorative buttons;
- flowers and butterflies.
The decorations are placed around the perimeter of the card, or they fill the heart.
DIY Beaded Card
A beaded picture for a postcard can be made in two ways: by stringing beads onto threads to form a pattern, or by gluing beads of a suitable color onto a ready-made template.
To make a Christmas tree, you first need to draw a triangular outline on cardboard.
Then secure the thread in the lower right corner of the outline, string the required number of beads of a suitable color onto the thread and secure the thread at the top of the triangle.
Return the thread from the lower left corner and repeat the process, finishing by securing the thread with beads at the top.
Continue filling the triangle with bead threads. At the end of the work, decorate the top of the tree with a star and sign the card.
To make a picture from beads, it is preferable to use a ready-made model. It should be printed in such a scale that each cell of the model corresponds to the size of the beads.
A small section of the model is greased with PVA glue and the beads are carefully glued with a pin with the hole facing up. When the entire model is filled, you can cover it with varnish and treat the edges with a suitable acrylic paint.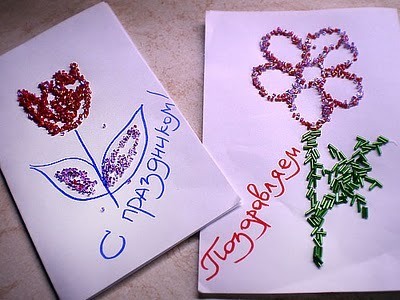
Before gluing the picture to the postcard base, you need to let it dry. Colored cardboard is used as a base. If desired, you can decorate it and then glue the finished beaded picture to it. Hand-made beaded postcards on thick paper or cardboard are quite heavy, so you can make a special stand for them.
Using different techniques for making paper crafts, you can create real creative masterpieces. Unique handmade cards made with love will please your loved ones and will remain in your memory for a long time.
Video on how to make a postcard with your own hands from paper
DIY 3D postcards, watch the video:
The original postcard with a secret, watch the video: