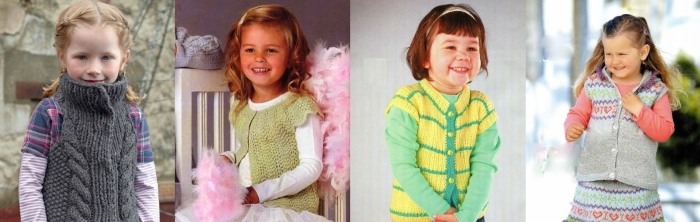
One of the popular hobbies is knitting. You can create unique clothes for children, be it a boy or a girl, using ready-made patterns. Any item, including vests and blouses, can be easily found in the schematic image. If you want to create a unique item for your child, you can decorate it with drawings, patterns or bright accents in the form of ribbons and lacing.
Vest Pattern Options
"Pearl" pattern
Despite the simplicity of execution, this pattern gives the thing an interesting look. The first and second rows are knitted by alternating 2 front and 2 back loops. The next two tracks are knitted similarly, but the arrangement of the broaches must be done in a checkerboard pattern.
Braid pattern
Knitted vests for girls decorated with this pattern are very popular among needlewomen. The "braid" patterns are very diverse, as can be seen from the pictures below. To make the pattern neat, needlework masters advise purchasing a special curved knitting needle for knitting braids. It will also be useful for creating the "harness" pattern.
The appearance of the braid is influenced by the material of the threads.
For a lush pattern, it is recommended to use thick yarn, and for thin braids, cotton threads are more suitable.
Double braid:
- The number of loops collected must be a multiple of 12. In the center of the sequence, 3 folds are counted for the symmetry of the pattern and 2 loops along the edges, the so-called edge yarns. In each line, the final 3 folds are knitted with a purl stitch.
- In the first row, the loops are knitted alternately with the front and back stitch, 3 pieces each.
- The second line is knitted on the wrong side. It is necessary to ensure that the purl and front folds in the upper strips correspond to the location of similar loops in the lower cycles (Fig. 1).
- In the third row, the pattern is interlaced to the left. In this work, you will need a knitting needle for knitting braids. First, the front yarns are pulled through, the back loops, then the bends are thrown onto the curved knitting needle, the next ones are knitted with a purl surface. Each time, 3 loops are taken.
- The seventh cycle is performed symmetrically to the third, with a weave to the right.
- The ninth sequence starts the knitting from the beginning.
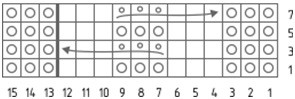
Rice. 1. Scheme of the “braid” pattern
Voluminous braid:
- 15 stitches are cast on with knitting needles, including 4 folds for the edge and symmetry.
- In the first, third, seventh and ninth rows, 2 yarn overs are knitted with purl stitch from the edges and 11 front loops in the middle.
- In odd sequences, knitting is done in reverse. It is important to ensure that the loops in the lower and upper lines correspond to each other.
- The fifth row is a braid weave. It is formed by pulling 2 purl stitches, then 3 loops are transferred to a secondary knitting needle and knitted with purl stitch after 3 front folds, finally 3 front loops are knitted, the remaining 2 are knitted with purl stitch (Fig. 2).
- The eleventh sequence begins with 2 purl and 3 knit yarn overs. The middle 3 folds are placed on an additional knitting needle and knitted in stockinette stitch after 3 purl yarn overs. The remaining 2 stitches are knitted in stockinette stitch.
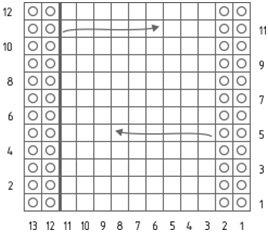
Fig. 2. Diagram of a volumetric braid
Braid "paths":
- An even number of loops is cast on the knitting needle.
- In the middle of the first track, 2 pairs of front loops are knitted. On both sides, the pattern is knitted in mirror image. On the right side, a 2x2 braid is knitted with a slope to the left, on the left side, the slope goes to the right. Symmetrically, 2 front and back loops are knitted for them. The track is closed with front and edge folds.
- The second, fourth and sixth lines are knitted the same way. In the center of the cycle there are 16 loops, knitted with purl stitch. Symmetrically, 2 face loops are knitted to them. At the end of the row, one purl and edge bend are knitted.
- The third and fifth rows are knitted similarly to the first, with the number of folds reduced by 4 pairs.
Pattern "harnesses"
Scheme:
- The number of loops collected must be divisible by 10. To the resulting number, 2 folds are added to form the edge and symmetry.
- At the beginning of the first row, 2 purl, 4 knit folds are pulled through. The next 2 yarn overs are removed back onto a curved knitting needle and, after 2 folds, are knitted with the front surface from the main row. The cycle is completed with 2 purl loops.
- The diagram in Fig. 3 shows the algorithm for knitting even rows.
- In the third sequence, all loops are knitted in pairs. The first and last two pairs must be knitted with a purl stitch, then with a face stitch on the right edge and with a mirror pattern on the left end. The fifth and sixth loops are removed back onto an additional knitting needle. After 2 face stitches, the removed loops are also knitted with a face stitch.
- In the fifth row, the first 4 pairs are knitted in the following algorithm: 2 purl loops, the next 2 loops are removed, 2 front loops, loops from the additional needle are knitted with the front surface. The final 3 pairs of folds are divided into 4 front and 2 purl loops.
- From the seventh cycle the pattern is repeated from the first sequence.
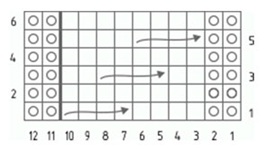
Fig. 3. Scheme of the “harness” pattern
Cell or honeycomb pattern
Scheme:
- An even number of loops, multiple of 4, is cast on with knitting needles. To these are added 2 edge folds and a loop to form the symmetry of the pattern.
- The first row consists of alternating knit and 3 purl stitches. Before the edge fold, there should be 1 loop left, which should be pulled through with the front surface.
- The pattern of the second cycle is a mirror image of the pattern of the first row.
- The third sequence is framed with edge satin stitch at both ends. After the front fold, 3 loops are removed. The entire strip is knitted in this order.
- Fourth strip: edge bend, alternation of 1 purl stitch and 3 front stitches, edge yarn over.
- Knitting of the 3rd and 4th cycles is repeated from rows 5 to 10.
- The eleventh row is knitted as follows: edge bend, 2 purl yarn overs, 4 draw throughs, 1 front loop and 3 purl yarn overs. Alternate to the end of the track and close it with 2 purl loops and 1 edge bend.
- In the twelfth strip, 1 edge drawstring, 2 purl stitches, alternating 1 purl stitch and 3 front yarn overs are knitted.
- In the thirteenth sequence, the edge fold continues by removing 2 yarn overs. The pattern continues by alternating 1 purl stitch, after which 3 stocking stitches are removed.
- In the fourteenth row, the edge draw is followed by a pair of loops knitted in stockinette stitch. After this, the pattern continues with alternating purl loops and 3 front satin stitches. At the end of the track, knit 2 front draws and close the edge fold.
- Cycles 15 through 20 are worked in the same way as rows 13 and 14.
Simple vest
For a girl aged 4-5 years, you will need 350 g of yarn of the chosen colour. For a warm version, it is recommended to take threads containing up to 50% wool. For a light version, cotton yarn is suitable.
The back and the front side up to the neck are knitted identically in two different parts. 90 loops are cast on knitting needles, which are knitted with a 2x2 elastic band. At a height of 5 cm, the cycles are knitted with garter stitch.
To round the neckline from the back, at a height of 55 cm, the middle 27 loops are closed, and the remaining tracks are knitted separately. They are closed as follows: 1 time 3 yarn overs, 2 times 2 folds, 1 time 1 draw through. At a height of 60 cm, all loops are closed. To create a V-shaped neckline at the front, at a height of 48 cm from the bottom edge, the middle fold is closed.
Next, in every second row, 1 yarn over is closed. At a height of 60 cm, the rows are closed completely. The side edges and shoulders are sewn together with a regular seam. If desired, buttons can be placed on the shoulder seam.
Vest with hood
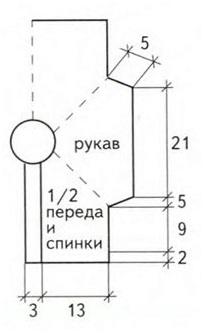
The model is suitable for beginner needlewomen. The vest is made in garter stitch. The edges of the product can be made in a contrasting color. Based on the size of a 2-year-old child, you need to take 150 g of yarn of the main color and 50 g of thread for tying the contours.
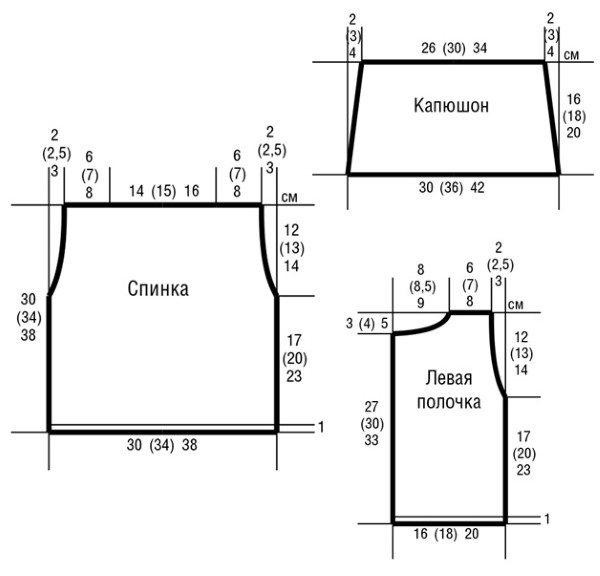
Fig. 4. Pattern of a vest with a hood
Each part of the vest is knitted separately, as shown in Fig. 4. The number of loops is calculated for the average size of a 3-year-old child. To obtain armholes on the back and side zones, 20-22 cm from the first strip on both sides are closed 2 folds and in each 2nd cycle 3 loops are removed. After 32-34 cm all folds are closed.
To make a buttonhole, step back from the side edge of 3 tracks and pull 2 yarn overs together with the front surface. In the back row, the yarn over should be knitted with the front surface. The first armhole should be located at a height of 2-3 cm from the bottom line, the following armholes at a distance of 6 cycles from each other.
To assemble the parts, you need to wet them, stretch them a little and let them dry. For the strips, you should knit a 1 cm wide strip with garter stitch along the edges. The parts are sewn together with a mattress stitch.
Openwork vest with knitting needles
The size of the knitted vest is designed for a girl of 6-7 years. For the back, you need to cast on 95-100 loops and knit them according to the pattern of the selected openwork pattern. At a height of 30-32 cm, you should close the middle 20 loops to form the neck. Then, on every second sequence, you need to close 2-3 loops from the center.
At a height of 35 cm, close the remaining row. The side parts of the jacket are knitted in a similar manner. The neckline level starts at 25 cm and 4 yarn overs are closed in every second strip. To create a conical sleeve, 1 yarn over is added on both sides in every second cycle (Fig. 5).
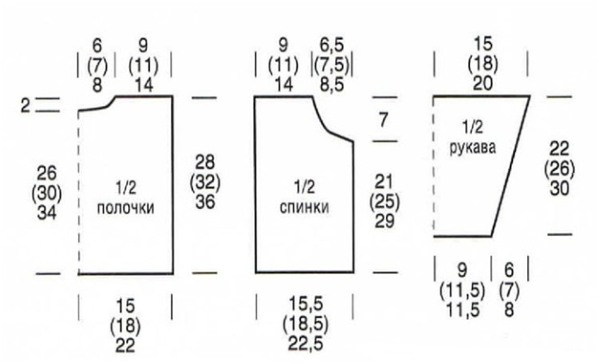
Fig. 5. Vest with sleeves
Pattern variant No. 1.
Description:
- The number of loops must be a multiple of 16.
- The first sequence is knitted as follows: 6 knit stitches, yarn over, 2 knit stitches together, yarn over, continue alternating to the end of the row.
- Even rows should be knitted with purl stitches.
- Odd lines are knitted in the same way as the first cycle, decreasing the number of the first front loops by one unit (Fig. 6).

Fig. 6. Openwork pattern diagram
Pattern variant No. 2.
Description:
- The number of loops is cast on in multiples of 16.
- The first and seventh stripes are knitted by alternating 1 yarn over and 1 draw through. Repeating this 4 times, knit 8 purl stitches.
- The second, sixth and eighth cycles are knitted with 8 front and 8 back yarn overs.
- In the third and fifth rows, knit 4 times yarn over and draw through, then 8 front loops.
- The fourth and twelfth lines are knitted entirely in purl stitch.
- The ninth, eleventh and fifteenth rows begin with 8 purl stitches, then alternate yarn overs and 2 knit stitches on the right.
- The tenth, fourteenth and sixteenth rows consist of alternating knitting of 8 purl and 8 front loops.
- The thirteenth sequence begins with 8 knit stitches, then a yarn over and 2 knit folds are knitted in turn (Fig. 7).
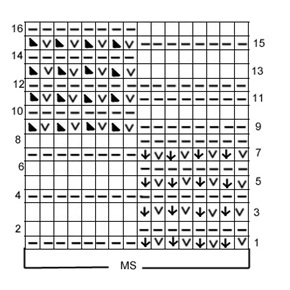
Fig. 7. Openwork pattern diagram
Vest - poncho
The vest is a solid figure with a hole for the neck in the center. It can be knitted in the form of a trapezoid, circle, triangle or rectangle. The advantage of the model is the almost complete absence of seams. The pattern in Fig. 8 is presented in the form of a trapezoid for a teenage girl. It is recommended to use circular knitting needles for work.
Description:
- The first line is made up of 184 loops. In a simple version, the poncho vest is knitted with garter stitch. Experienced craftswomen can decorate the product with patterns. In this case, 2 outer loops are knitted with garter stitch, and the remaining 178 according to the pattern of the selected design.
- Starting from the neck, 44 folds are closed in the middle of the strip. Then each side is knitted separately.
- To round the vest in the shoulder area, in every second cycle the loops are closed according to the pattern 1×3, 1×2, 1×1 (Fig. 8).
- After reaching the desired length, knit the elastic band.
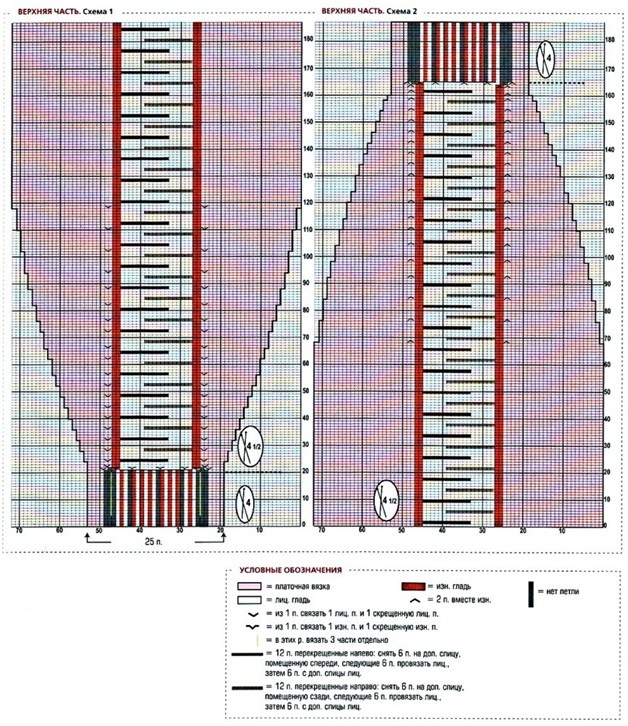
Fig. 8. Poncho vest diagram
Vest with ornament
The vest model can be chosen quite simple: a yoke on thin straps without fasteners. It is recommended to knit the base on circular knitting needles so that the product turns out seamless. For a vest with a diamond-shaped pattern, you will need red, yellow, blue and black yarn. The pattern is knitted with front yarns on the front side, purl folds on the inside according to the pattern in Fig. 9.
The broaches should be crossed from the wrong side.
The straps are knitted separately using garter stitch. If you have the skill, you can attach them to the vest using a crochet hook.
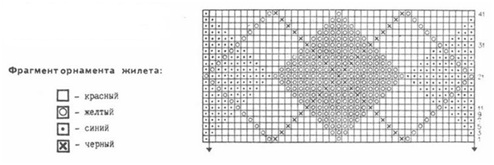
Fig. 9. Scheme of the ornament "diamonds"
Vest with raglan sleeves
This model of the vest is knitted in one piece. The size in the diagram (Fig. 10) is calculated for a girl of 12 years.
Description:
- Cast on 96 stitches on knitting needles.
- From the bottom, 8 rows are knitted in garter stitch.
- In the following cycles, the knitting looks like this: 8 garter stitch loops, 8 knit stitch loops, 2 garter stitch raglans, 16 knit stitch sleeve loops, 2 purl stitch raglans, 24 knit stitches (back), 2 purl stitch raglans, 16 knit stitch loops, 2 raglans, 8 knit stitches and 8 garter stitch loops.
- In each raglan strip, you need to add one yarn over on each side. Having knitted 17 cm of raglan, you need to knit 8 loops for each strip, 74 folds for the back, 62 loops for the sleeves and 33 yarn overs for the fronts.
- After this, the sleeves are placed on additional knitting needles, and the back and side parts are knitted as a single piece: 9 cm of pattern and 2 cm of garter stitch.
- The sleeves are knitted another 4 cm. In the outer row, 4 loops are knitted with the front surface, 2 folds together. This alternation continues to the end of the line. The edges are sewn with a regular seam.
Rice. 10. Vest with raglan sleeves
Bolero
The size of the vest in Fig. 11 is shown for a girl 7-8 years old.
Description:
- The first cycle of the back is made up of 70 loops. The vest is knitted with garter stitch. After 5 cm, according to the pattern, 7 loops are closed on both sides for the armholes. After 15 cm, 18 loops are closed in the middle to form the neck. Then both sides are knitted separately. In every second row, 2 yarn overs are closed once and 1 loop is closed twice. Having knitted 15 cm of the armhole, the stockings should be closed.
- The left and right shelves are knitted symmetrically to each other. 30 loops are cast on. In each 4th row, 1 yarn over is added 2 times. After reaching a height of 6 cm, in each 2nd strip, it is necessary to decrease 1 loop 17 times. At the same time, at a height of 5 cm, 7 loops are closed for the armhole. At 15 cm, the remaining folds are closed.
- For the sleeves, 60 loops are cast on. At a height of 5 cm, to draw the armhole, in every 2 cycles on both sides, 7 loops are removed 1 time and 16 times 1 draw through.
- Before sewing the pattern, the parts must be moistened and stretched a little.
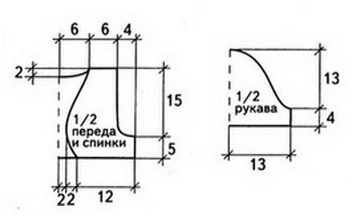
Fig. 11. Pattern of a classic bolero
Batwing Sleeve Vest
The knitted vest model for a girl with a batwing sleeve will not only be a warm item, but also a beautiful addition to a dress, both for a baby and a teenager. The product consists of 2 parts. Fig. 12 shows the pattern of the left half of the vest, identical to the right side.
Description:
- Cast on 190 stitches on circular knitting needles. Knit the stitches in stocking stitch for 6 rows. After that, continue knitting with the chosen pattern.
- To form corners, 1 yarn over is added in every third sequence. Continue this way for 20-24 cycles.
- Having knitted 20 cm, you should decrease the folds. To do this, 3 drawstrings are closed in each 2 strips.
- The neck is formed by closing 1 yarn over in every second row.
- The right part is knitted in a similar way.
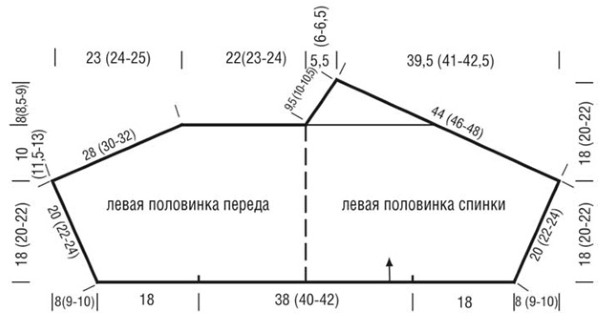
Fig. 12. Pattern of the left part of the batwing vest
In cold weather, a knitted vest for a girl is an irreplaceable thing. Depending on the chosen model, it goes well with trousers, a skirt and even a dress. Today, the choice of patterns and patterns for vests for girls, knitted with knitting needles, is very large. You can knit a simple vest with an ornament for school or an openwork bolero for a holiday. Patterns and drawings will add an unusual look to the product.
Video: Knitted vests for girls. Patterns and description
How to knit a simple vest, watch the video:
Beautiful vest for a girl:
I used to knit a lot. You can't find a better way to knit a vest than a plait (these are the same braids, only crossed with each other). It looks very expressive and even solid, since the pattern is large and, one might say, eye-catching. You don't need to use it for the whole product, since it can turn out too bulky, but the plait is well suited for decorative trim in the center or on the side.