Professional drawing lessons for beginners represent an algorithm of actions, which must be strictly followed to create the desired image. You can learn to draw from scratch at any age. During the first lessons, it is recommended to use a simple pencil. With its help, it is easiest to correct mistakes and draw smooth thin lines.
How to learn to draw
Drawing lessons for beginners from scratch must be organized taking into account the age of the future artist. Children learn information best in a playful way, while adults find it easier to perceive data if it is clearly structured and concise.
For the child
To interest a little person, you should teach him drawing taking into account the recommendations of pediatricians and child psychologists:
- During the first lesson, give the child the opportunity to independently decide what to draw, explaining the task and providing all the necessary tools for creativity (a pencil, an eraser, colored markers and pencils, several blank sheets of paper).

- Do not put the child in a framework, giving him a chance to draw as he sees a specific object, without deviating from the original task. For example, if a child, following a parent's task to draw a lemon, draws a yellow square, do not criticize his work. It will be more useful to show him a lemon in real life and offer to copy it together, guiding the hand of the young artist.
- Do not force the child to draw by artificially switching his attention. A voluntary desire to start the creative process is the key to the little person's long-term concentration on the task set by the adult.
For an adult
When teaching an adult to draw, it is recommended to follow a number of tips that will facilitate the perception of new information by an already formed person:
- Learn geometric shapes. At the first stage, it will be enough to learn how to draw perfectly even geometric figures without using additional templates.
- Practice creating shadows and penumbras. Having mastered this skill, a novice artist will be able to transform flat images into volumetric ones by simply distributing shadows and smooth transitions between them.

- To study the principle of depicting objects located at different distances from the viewer. The basic rule is that the further away an object is, the smaller it should be in the final composition; the closer, the larger it should be.
- Learn to draw complex shapes (for example, an egg or a strawberry).
- It is recommended to draw 2 objects daily to maintain the skill., which your eye will randomly fall on. This could be a food product, a piece of clothing, furniture or a pet.
- Practice drawing living creatures. The most difficult task is to depict people.
- Start using brushes and paints of different compositions in drawing and other creative tools.
Basic rules of drawing with a pencil
The following principles are considered the basic rules of drawing with a pencil:
- Prospects. Correct determination of the scale of objects in a composition, depending on their distance from the viewer.
- Locations. If an object needs to be placed visually closer to the others, it should be drawn at the bottom of the working surface.
- Size. An object that is larger in size than others is perceived as closer than the smaller components of the composition.
- Half-shadow. The part of the object that is located far from the main light source, on the opposite side from it, will be darker.
- Shadows. To make a drawn object three-dimensional, it is recommended to draw a shadow on the side opposite the light source, outside the border of the drawing, which is cast by the object in the drawing.
- Contour. The outline of rounded objects should be clearer. This will give them volume.
- Horizon. This principle allows the beginner to visually place objects at different distances from the viewer's gaze.
- Density. Objects in the composition that are located further away from the rest should be depicted in lighter colors and their details should not be drawn.
Stages and principles of training
Drawing lessons for beginners from scratch should be step-by-step. They imply the need for a person to learn how to create compositions of various types.
Considering that the depiction of human appearance and, for example, winter landscape, have their own specific features, it is important for an artist to have drawing skills in any direction. The number and content of training stages are determined by the direction of the creative process chosen by the beginner.
The only teaching principle common to all drawing education programs is regularity.
To properly organize the learning process, it is necessary:
- make a schedule for the week, in which you will need to devote at least 15-20 minutes a day to drawing on weekdays, and at least 40-60 minutes on weekends;
- for express lessons, it is recommended to select images for copying that are related to the current interests of the beginning artist;
- reward yourself for successfully completing a task (for example, going shopping).
How to learn to draw a person
The algorithm for creating a realistic image of a person implies the need to follow specific steps formulated by professional artists.

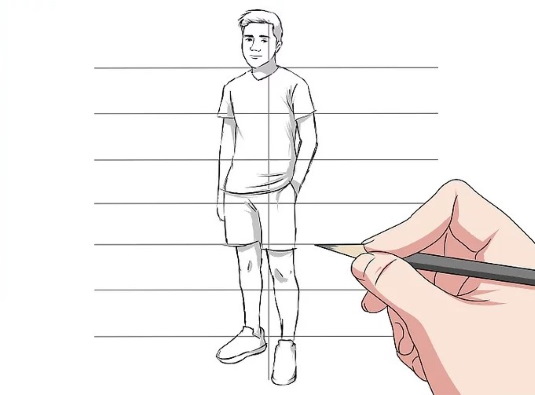
This:
- Carefully examine the original image, paying special attention to details (for example, body curves, wrinkles, eye shape, thickness of limbs, and so on).
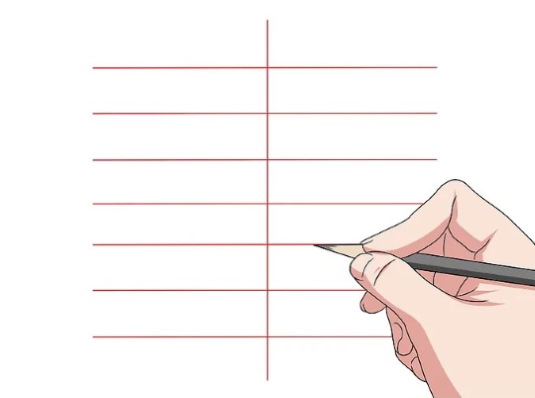
- Draw the head using the previously constructed intersection of the horizontal (eye level) and vertical (middle of the head) lines.
- Find a point located 7 segments equal to the length of the head down.
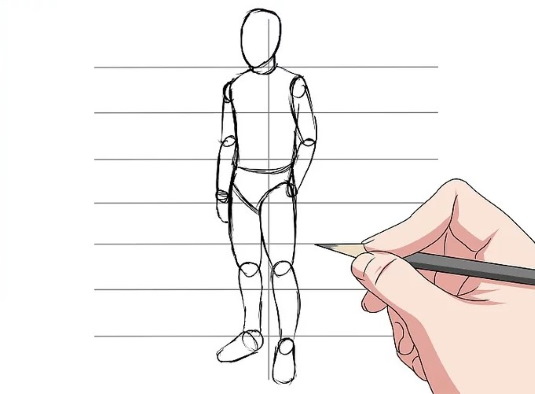
- Draw the shoulders, which in size, for girls, should be equal to 2 head lengths, and for men – three.
- Schematically depict the chest, pelvis, upper and lower limbs. It is recommended to mark the joint area with small ovals.
- Erase minor lines.
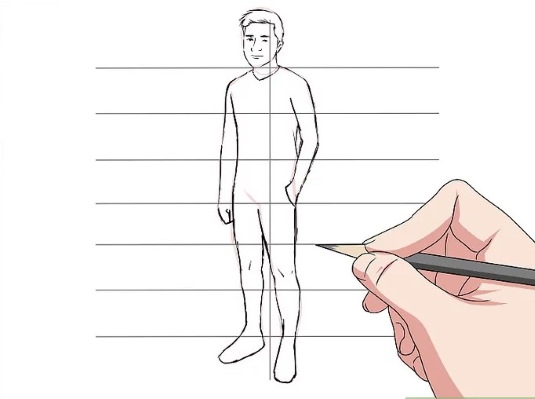
- Connect the previously drawn body parts with lines. For the most accurate depiction of the human body, a novice artist should study the basics of anatomy.
- Erase unnecessary lines.
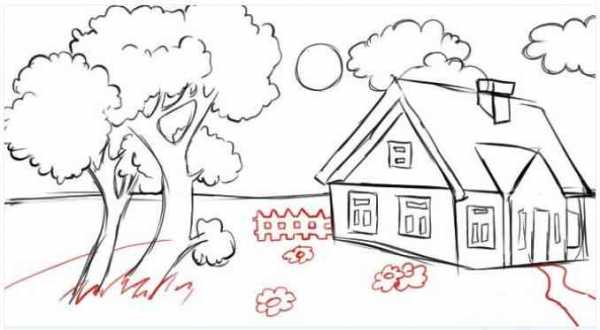
Landscapes
Drawing lessons for beginners from scratch, as a result of which the artist should get a landscape, It is recommended to draw up in accordance with the generally accepted sequence of actions:
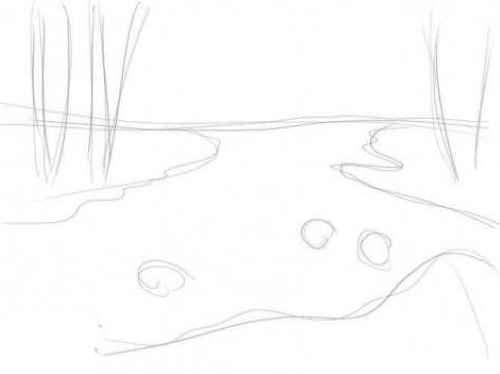
- Draw lines that correspond to the flow of the future river. The width of the part of the reservoir located closer to the viewer should be wider than the area located further away.
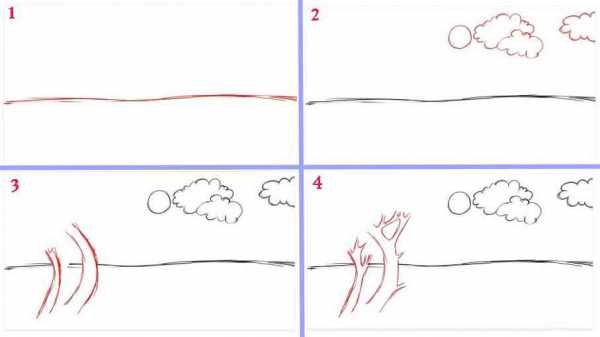
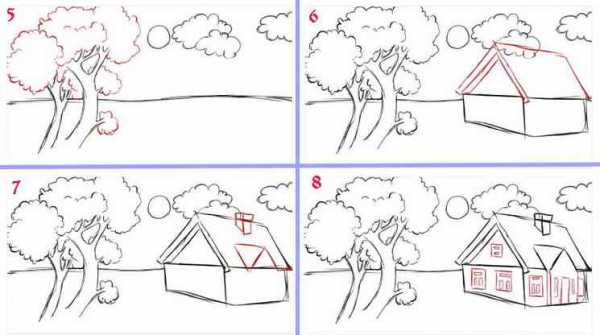

- Detail the river with secondary objects. For example, you can draw waves along the river, add stones, make the banks more expressive.
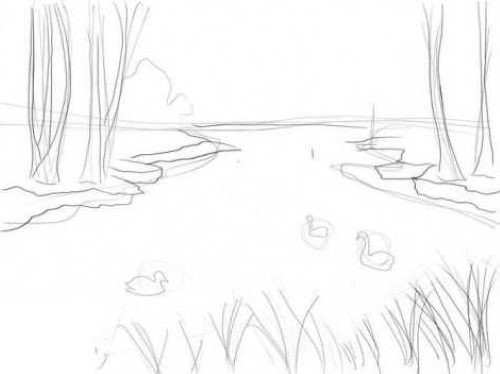
- Depict the bushes and trees located along the river.
- Erase secondary lines. Outline the plants. If necessary, fill in the gaps in the drawing with grass or wild flowers.
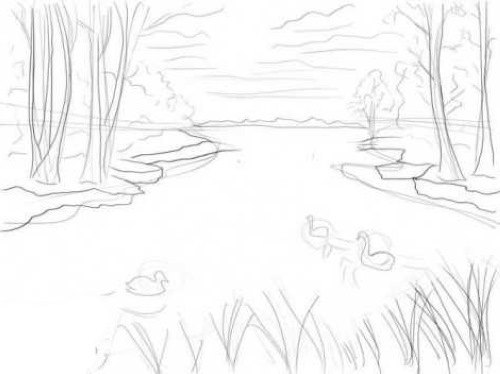
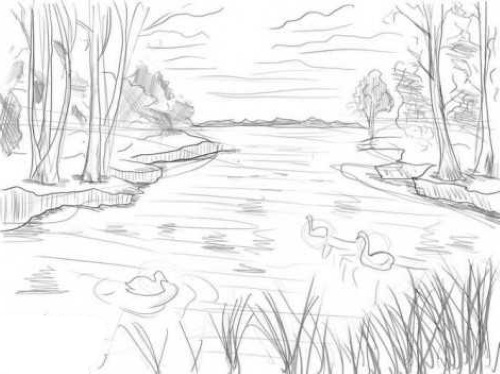
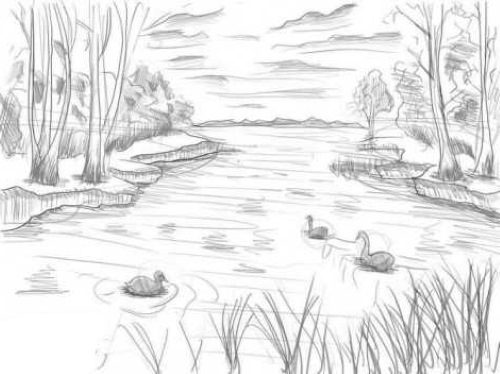
- Detail the resulting picture. To increase the realism of the image's appearance, it is recommended to apply shadows and half-shadows. Color the drawing in colors close to the shades of real objects in the environment.
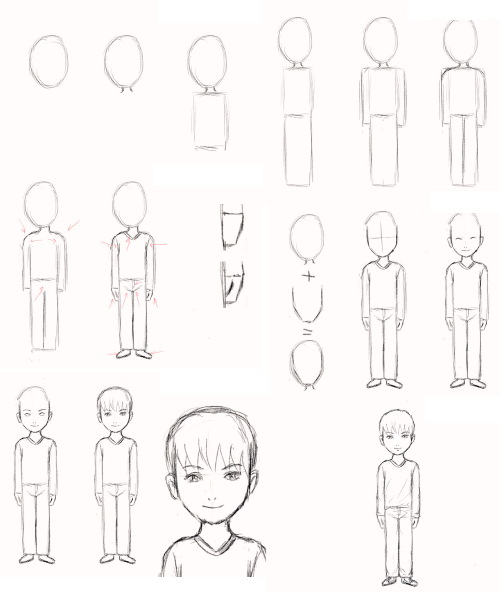
Anime
It is recommended to draw a girl's face in anime style in accordance with the main stages:
- On the working surface, draw the main lines - 3 parallel horizontal and 1 vertical, dividing the parallels in half. These strokes should be thin and almost invisible, so that later they can be easily removed with an eraser.
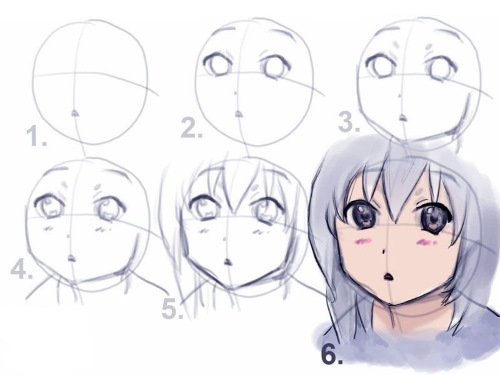
- Draw the head by connecting the end points of the original lines. Change the round shape to an oval, making the appearance of the head as close as possible to the body part of the anime characters.
- Draw the eyes, using the previously drawn sketches as a guide. Draw the mouth and nose, placing them on a vertical line.
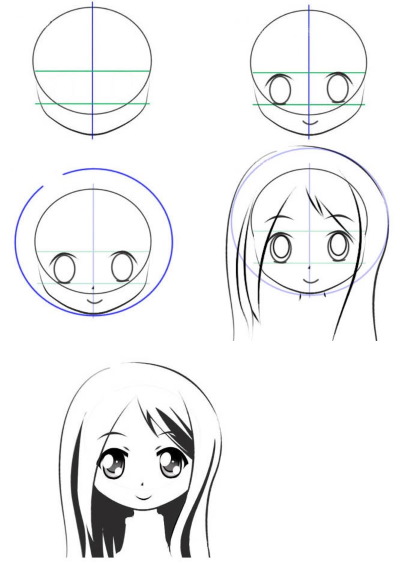
- Shade the inner part of the eyes, following the rules for applying shadows and half-shadows.
- Draw the hair, giving it volume and relief using shading.
- Finish drawing the upper part of the clothes.
- Erase minor lines.
Animals
For beginners, drawing animals can be especially difficult. This is due to the large number of specific features of appearance, varying depending on the breed of the living creature.
A lesson on drawing a fox from scratch might look like this:
- Draw a rectangle with sides equal to 12 and 5 cm. Divide the inner surface of the original geometric figure into 3 equal parts.
- Draw the fox's face in the upper left corner. Regardless of your skills in drawing other styles, these steps should be done with a simple pencil so that if you make a mistake, it can be easily corrected.

- From the side border of the head, draw the outline of the curve of the back and the left front paw.
- Finish drawing the hind limb and a long oval-shaped tail.
- Draw 2 missing limbs.
- Erase minor lines.
- Color the animal in realistic colors.
Basics of Drawing a Portrait with Pencil
When drawing a portrait of a person with a simple pencil, you should adhere to generally accepted principles:
- place the eyes strictly in the middle part of the face;
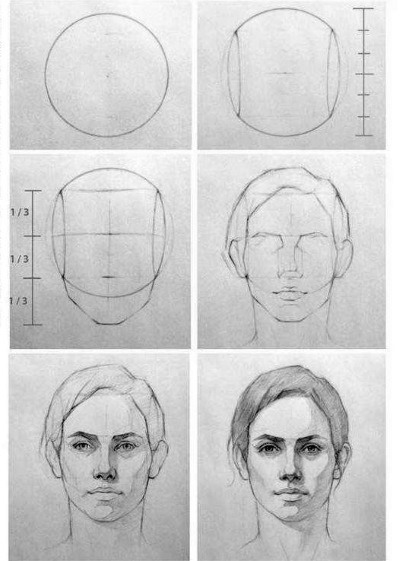
- the end lines of the nose should be at the level of the middle part of the face between the eyebrows and the chin;
- the main border of the nose should run between the tip of the nose and the chin;
- the distance from the growth line to the upper border of the head should be the same as the space between the pupils to the end points of the nose;
- the width of the resulting face should be equal to the width of 5 eyes located horizontally;
- the distance from the edge of the chin to the lower lip should be equal to 1 eye, positioned vertically;
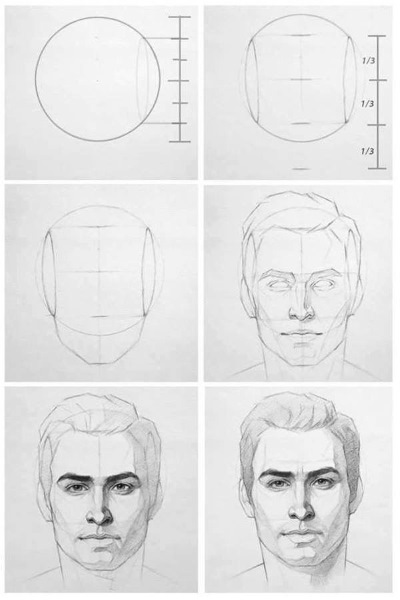
- When drawing ears, it is recommended to focus on the level of the eyes and the tip of the previously drawn nose.
Food
Artists recommend that beginners draw food in accordance with the basic stages.
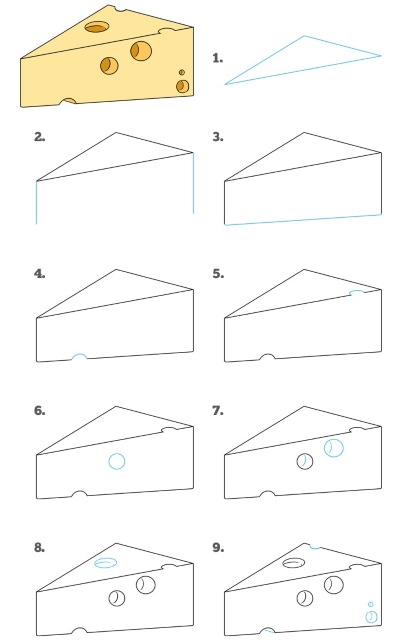
For example, to realistically depict a piece of cheese, you need to:
| Stage | Description |
| Creating the foundation | Draw a parallelogram. Clearly outline the boundaries of the geometric figure, as they will be key in further work. |
| Creating Far Edges | From the top points of the main figure, draw straight lines so that a triangle is formed on top. Outline the contour. |
| Detailing | On the surface of the piece of cheese closest to the viewer, draw circles of different sizes (holes). It is recommended to make some of them double. |
| Adding Realism | Apply shadows and half-shadows to the resulting image. Color the drawing using realistic shades. |
Cloth
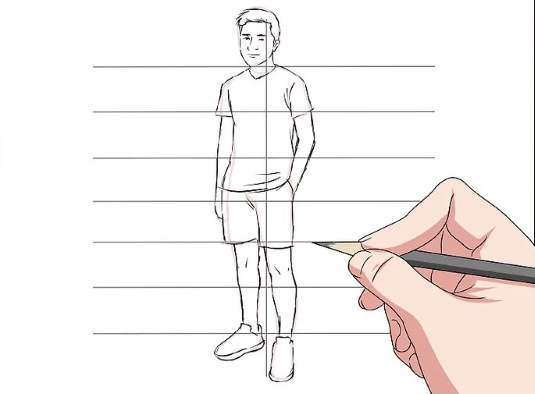
To create a complete image of a drawn person, a novice artist should learn how to draw wardrobe items well.
For example, a shirt is best depicted like this:
- Draw a rectangle, placing it vertically. Leave the upper edge of the geometric figure open.
- Draw straight lines diagonally downwards from the upper corners. After drawing 2 lines on each side, turn the straight lines into identical rectangles (sleeves).
- On the inside of the sleeves, draw a line parallel to the bottom edge.
- Divide the main part of the shirt into 2 equal areas using a vertical line.
- Draw the collar of the item of clothing in question using a loop at the top of the fabric.
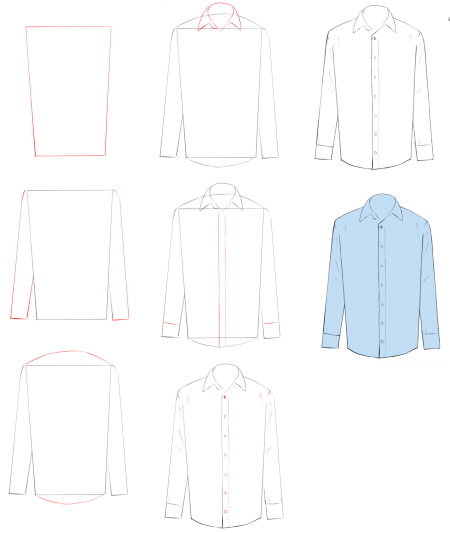
- Detail the image with buttons, pockets, folds, and a manufacturer's label.
- Color the picture.
Flowers
It is recommended to learn how to draw flowers from the simplest types of plants.
For example, you can depict tulips like this:
- On the working surface, draw the outline of the flower using a hard pencil.
- Using shading made with colored pencils, color the stem and bud. To make the flower look more realistic, it is recommended to make the upper area of the bud petals darker in relation to the lower one.
- Using shadows and penumbra, darken the areas of the bud that are farther from the viewer.

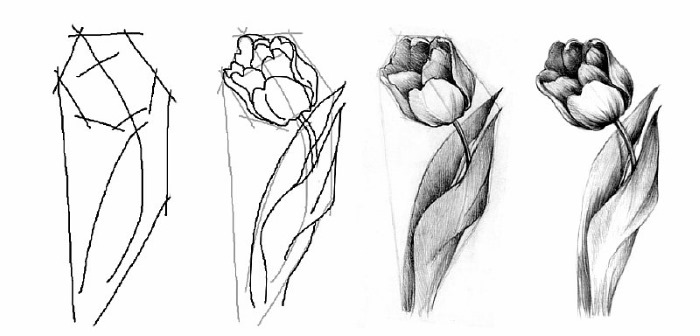
- Using a simple pencil, if necessary, create additional darkness in certain areas of the image, in particular, on the edges of the bud petals.
- Finish drawing the secondary objects – a vase, a table, grass, and so on.
Geometric shapes
It is recommended to start learning to draw geometric figures with a cylinder:
- Draw two parallel vertical lines of equal length.
- Connect the end points of the lines with even ovals.
- In the upper oval, draw 2 perpendiculars, and from the point of their intersection, draw a straight line downwards.
- Repeat step 3, working on the lower oval.
- Outline the main figure.

- Apply shadow to the inside of the cylinder, smoothly moving from a darker shade to a lighter one (from right to left).
- Draw a shadow in front of the geometric figure, judging its size by eye to be approximately 1/3 of the height of the cylinder.
- Shade the shadow.
You can learn to draw from scratch not only in specialized art schools, but also at home. Freely available lessons for beginners should be chosen taking into account the student's age. This approach minimizes the risk of difficulties in the process of perceiving new information.
Video about drawing for beginners
Drawing lessons for beginners from scratch:
Thank you, I really liked the lesson. I'm waiting for the next one.
I want to buy how to learn to draw from scratch with a pencil at home myself