Paper is a universal material for creating cards and crafts. Following the step-by-step descriptions of master classes, even a child will be able to create an unusual flower from paper.
It will take a little skill and patience for the handicraft to become a beautiful decoration. In the future, the flower can be used as a decoration, decoration of holiday packaging, a postcard or a hairstyle, as an unusual independent gift.
Preparing materials for making paper flowers
In order for the craft to be realistic, you should take care to choose the right type of paper. You can use colored paper, thin cardboard, corrugated paper or paper used for gift wrapping, thick napkins of different colors.
For each flower, the material is selected separately. The base for creating a flower can be single-color or with a soft color transition, allowing you to bring the most unusual ideas to life.
Auxiliary tools are needed to create the craft:
| 1 | Thin sharp scissors and small scissors |
| 2 | Marking pencil |
| 3 | Stationery knife |
| 4 | Tape for decorating the stem and base of the flower |
| 5 | PVA glue, dry glue stick, hot glue gun |
| 6 | Threads |
Also, for some types of flowers, paper clips, colored tape, wire and cotton wool may be useful. A long knitting needle or wooden stick can serve as an element for twisting the petals and giving them shape. For additional decoration, you can use rhinestones, beads, and a small scattering of glitter.
Step by step guide to making paper flowers with your own hands
The final result will depend on the correct execution of the technique. Detailed master classes will help to correctly create the shape for the petals, create the overall composition and fasten all the elements together.
Calla
It is advisable to use corrugated paper to make the flower. The structure of the material allows you to create a realistic copy of the calla.
You will need paper in three shades:
- white;
- yellow;
- green.
The easiest way to attach the elements is with hot glue. To form the stem of the flower, you will need wire or a wooden skewer.
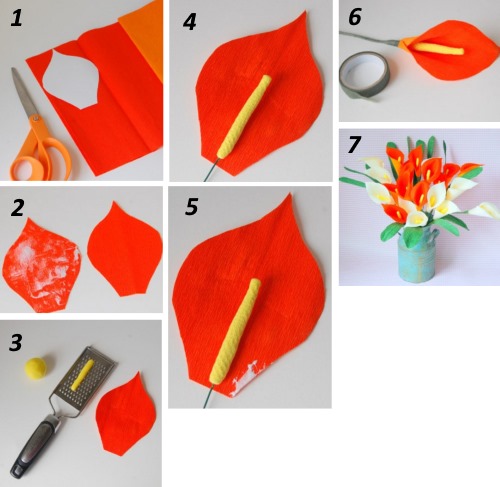
Step by step production:
- First, you need to prepare a cardboard stencil, the shape of which will resemble a dome. The size can be any.
- Next, you should cut the corrugated paper into rectangles, the dimensions of which will be slightly larger than the original stencil.
- The stencil is placed on a paper rectangle and traced. The first piece is cut out according to this shape.
- The paper petal needs to be pulled out slightly to the sides, forming a small depression.
- The outer edges are slightly curled with a knitting needle, stick or pencil.
- The top pointed edge is also curled towards the outside.
- Place 2 thin strips of yellow paper in the center.
- Then the edges of the white paper are joined together, with a slight overlap.
A wire or a prepared skewer should be inserted into the base of the flower. Strips of cut green corrugated paper can be wound onto it beforehand. After that, the flower is fixed with glue. If you use PVA glue, you will have to wait a while for it to dry completely.
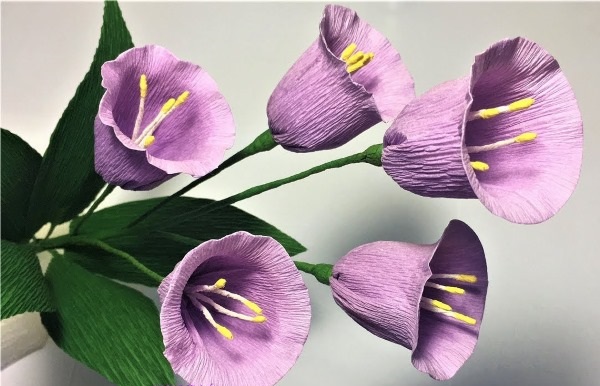
Bell
A do-it-yourself paper flower looks most beautiful if you use blue or light blue corrugated paper to create it.
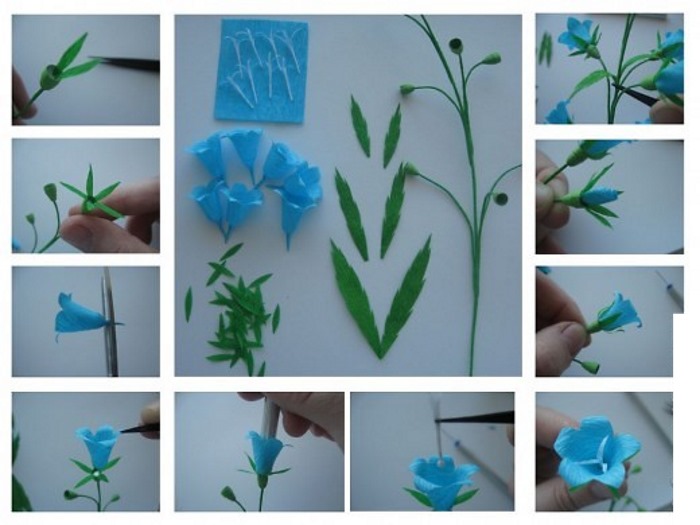
An even better option is paper painted using the ombre technique – with a soft color transition from blue to white:
- First, you should cut out a rectangle and fold it several times like an accordion. The height of the rectangle will determine the size of the finished flower.
- The top of the folded paper needs to be cut into a semicircle shape.
- Next, you can unfold the rectangle and slightly stretch the cut ends outward - this will be the bend of the petals.
- The workpiece must be rolled into a cylinder and secured with hot glue. When using PVA glue, wait until it dries completely.
- A wire or skewer must be inserted into the middle of the workpiece, after which a bundle must be formed.
- The bunch is also attached to the wire with hot glue. The outer cut part is straightened. You can additionally straighten the petals with your fingers, bending them even more if necessary.
- Next, you need to cut green paper into strips and wrap it around the base of the flower, continuing the turns further along the wire. At the end, the paper is also fixed with glue.
Lilies of the valley
You can create such a flower using various techniques. A bouquet in quilling and origami techniques will look original. However, a more realistic lily of the valley will be made from corrugated paper. First, you should cut out several rectangles according to the number of flowers you plan to make. The width of the rectangle is the future height of the bud.
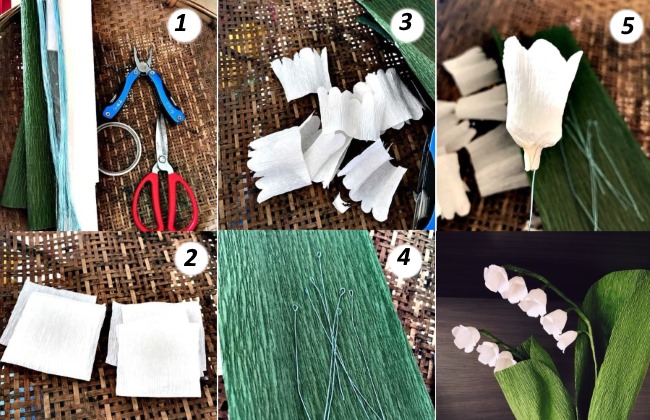
The rectangle should be folded accordion-style 5 times. Next, the outline of the petal is marked with a pencil, slightly pointed. The excess part is cut off along the outline and then the flower can be unfolded. Carefully deforming the paper, it is necessary to bend the ends of the petals to the outer part, and form a small roundness inside the bud.
After rolling the bud, it should be secured with hot glue. Such actions should be done with all the blanks. The base for the stem is formed from green wire, from which small stems should extend on different sides. One flower bud is put on each small stem and also secured with glue at the base.
Poppy
You will need to prepare a stencil from cardboard in the shape of a petal. Using the stencil, you need to cut out petals from colored paper, painted on both sides. For the middle of the flower, cut out a circle from black paper. Along the circle, you need to mark the cut lines leading to the center, which will form the fringe.
You can use a pencil or a wooden stick to curl the fringe. Each petal should be slightly cut in the middle of the base line and the resulting edges should be glued together. This will give them a voluminous shape.
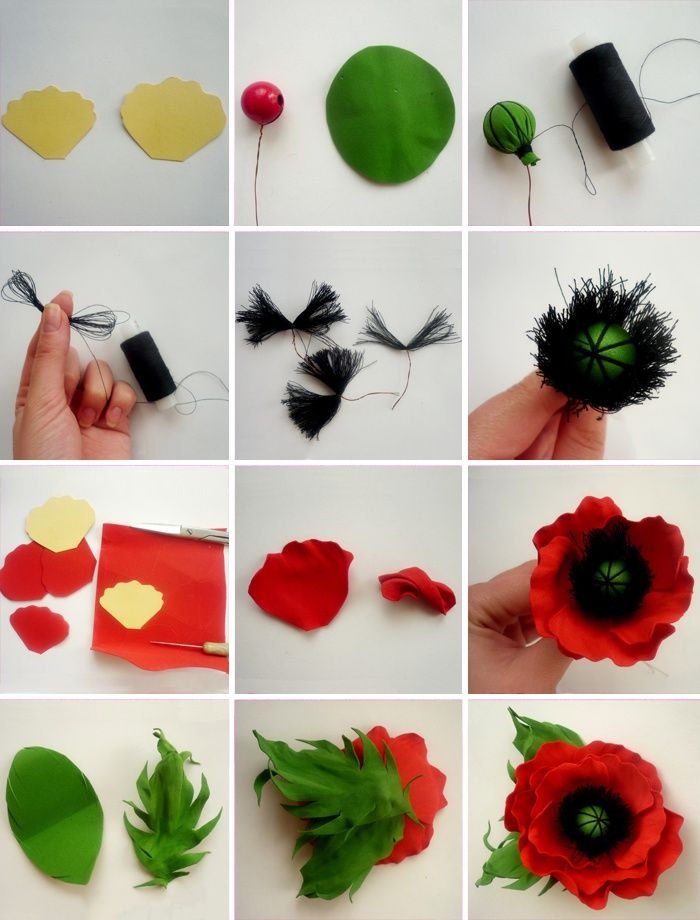
The petals are glued to the core of the flower one by one. A green paper rolled into a tube must be carefully threaded through the center of the poppy core – this will be the stem of the flower.
The flower looks no less impressive if it is made with your own hands from corrugated paper. They are created almost on the same principle, cutting petals with a stencil.
The middle of the flower is not prepared separately, paint will act in its role. For this, black paint is applied to the base of each petal. For realism, it is recommended to use a regular sponge soaked in black paint. The color is applied with soft movements and shading.
After the blanks have dried, the petals need to be straightened out, giving them the shape of a boat. To form a bud, you can use a small ball, on which black threads are wound abundantly. After this, the petals are glued to the bud one by one, overlapping.
Peony
Since the peony is a rather lush flower, you will need a lot of preparations for it.
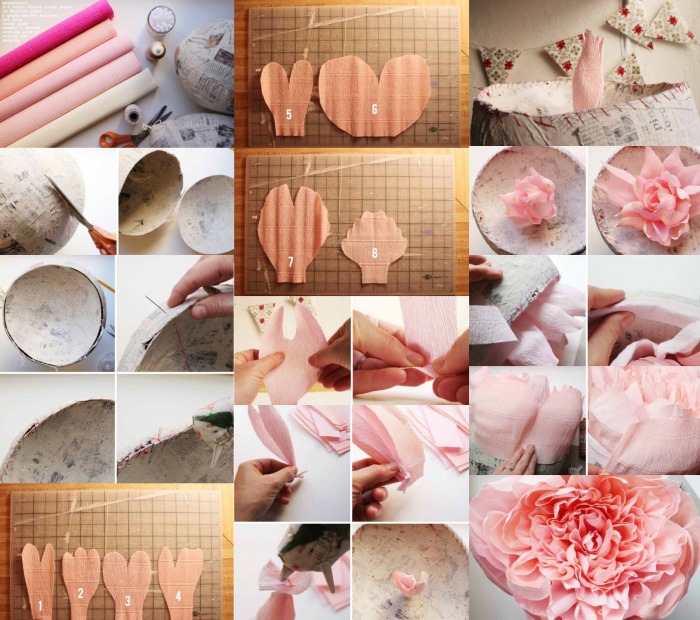
To do this, you need to cut the petals into three sizes:
- 12 large ones to form the outer part of the flower;
- 6 medium;
- 10 small ones for the middle.
The tops of the petals are cut into small strips to form a fringe. Each petal can be shaped into a semicircle by carefully stretching the workpiece. The easiest way to work is with a cardboard base - a pre-cut circle.
Using hot glue, glue 2 rows of large petals onto the base. Each petal must be given a semicircular shape. Then glue a row of medium-sized petals, and then 2 rows of the smallest ones.
For the center of the flower, you need to roll a small ball of paper, napkin or cotton wool. The ball is covered with corrugated paper of the same color as the entire peony. The excess part is tied with a thin thread, and the free edge is cut into a small fringe. The resulting center of the flower must be fluffed up and glued to the center of the peony.
Dandelion
You can make a paper flower with your own hands from colored paper, painted on both sides.

How to do:
- To begin, cut out a long strip 1-2 cm wide.
- The paper tape is cut into small strips along its entire length to form a fringe. The thinner the cuts, the more realistic the dandelion will be. The cut should be made approximately 2/3 of the width of the strip.
- Next, the strip is twisted along its entire length. A knitting needle or a toothpick can be used as a basis for twisting. The end of the strip is glued with glue.
- While the formed bud is drying, it is necessary to cut a small strip of green paper. Along the entire strip, cuts should be made in the shape of the leaves. After this, the strip is fixed to the bud with glue on one side. Then the bud is wrapped, and the second end is fixed in the same way with glue.
- After complete drying, it remains to give the dandelion a shape. First, bend the green leaves, and then straighten the yellow fringe to the outer edges.
Carnation
Before forming the flower, it is necessary to make blanks. For this, you can use double-sided colored paper of red color.
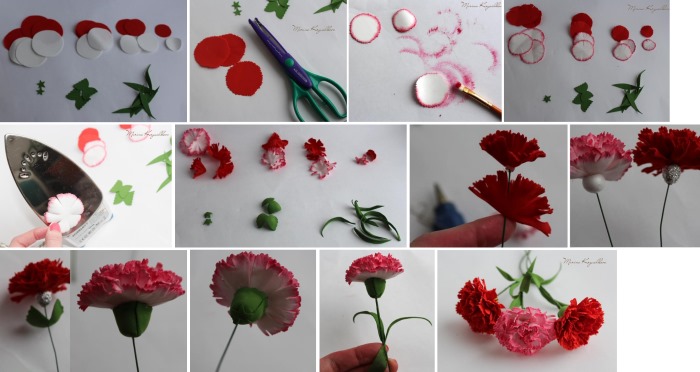
Manufacturing:
- From red paper you need to cut out 8 circles with a diameter of approximately 6-8 cm.
- Next, the circles are placed one on top of the other and secured with a clip or paper clip.
- Along the outline of the circle, carefully cut the petals in the form of small teeth.
- Next, each circle is folded in half, and the resulting half is folded in half again.
- As a result, the circle is divided by fold lines into 4 equal parts. It is necessary to make cuts along the formed lines, leaving the center of the workpiece intact.
- Three more incisions are made inside each segment.
A DIY paper flower will look spectacular if each petal is given a realistic shape. To do this, bend the cut edges to the middle using a stick or pencil. For the base, you can use green wire, at the end of which a loop is formed.
The blanks are strung one by one. The first one is carefully compressed and fixed with glue, the second one should be compressed less, and so on. The last blank is straightened, and if necessary, the petals can be adjusted and made more curved.
Aster
To create a flower, you will need colored paper, the shade of which can be chosen at will. The sheet of paper is folded in 4 times. Then, along the fold line, the sheet is cut into identical strips. The resulting strips are stacked on top of each other and folded in half. Next, the outline of the future petals is applied with a pencil.
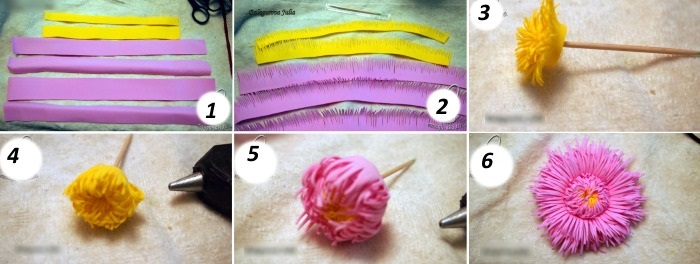
Use scissors to cut out the petals along the outlined contour, rounding each petal. Next, prepare the stamens of the flower. To do this, you will need a strip of yellow paper. Fold the strip several times and make frequent cuts with scissors. You can use green wire as a stem.
The finished flower center must be wound onto one end of the wire and secured with glue. Then each strip of petals is alternately wound around the center of the future aster, while the petals should be shaped by bending them inward. The strips are also secured with glue.
The bottom part of the bud is formed last. For this, you will need a strip of green paper, which is wrapped around the place where the bud is attached to the stem.
Chamomile
A flower made from corrugated paper looks especially original:
- First, you need to cut out a rectangle measuring 15 by 4 cm and fold it in half.
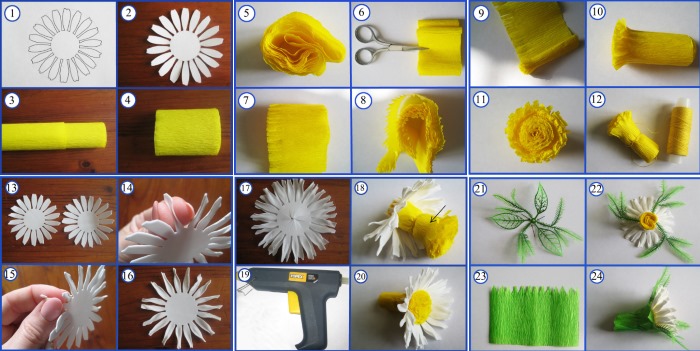
- Along the entire length of the rectangle, cuts are made with scissors every centimeter, 3.5 cm long. This will be the blank for the chamomile petals.
- The free cut edges are given a rounded shape in turn in the form of a real petal. The structure of the material allows you to stretch the workpiece a little so that the flower turns out more voluminous.
- Next, you need to put a yellow center on one end of the wire. To get the center, you can use a small cotton ball wrapped in yellow paper.
- Having fixed the middle on the wire with glue, you should wrap a blank of white paper around it.
- The end of the workpiece is also secured.
The resulting flower can be further shaped by bending each petal away from the center.
Rose with twisted edge
Original roses are made from corrugated paper, which has the property of holding the shape given to it perfectly. To create such an unusual flower, you will need a strip about 5 cm wide. The long strip is folded in half lengthwise. To twist, you will need a toothpick or a knitting needle.
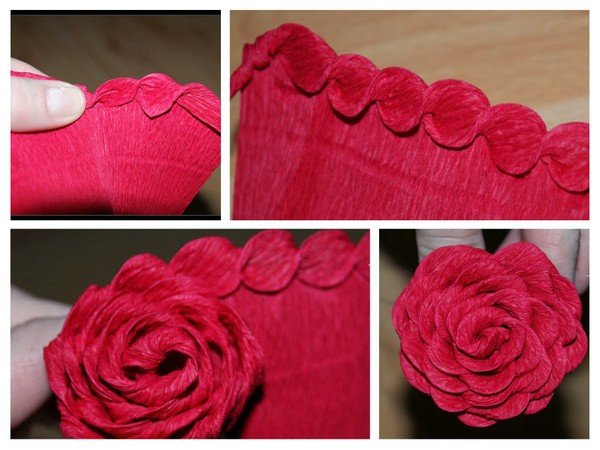
The strip is wrapped around the spoke with a regular roll, and then the wrapping continues with the tape twisting around itself. Having wound the entire tape in this way, the edge is firmly fixed with glue. To implement this method, a little attention and skill are required.
Simple rose
First, you need to prepare a stencil from cardboard, cutting out a small heart-shaped blank for future petals. The size can be selected as desired. After cutting out about 10 rectangles from corrugated paper, you should stack them on top of each other. Put the finished template on top and cut off the excess edges of the paper according to it.
Next, each heart is given the shape of a boat, carefully stretching the petals to the sides. When the petals are ready, you can start on the stem of the rose. To do this, a strip of green corrugated paper is wound onto the wire, the ends are secured with glue.
One of the petals should be wrapped around the stem and secured. The remaining petals are fixed with glue one by one. Once the petals are glued, it remains to give them shape. To do this, you can use a thin knitting needle or a toothpick, with which you need to round each half of the petal one by one.
The sepal can be made from a strip of green paper, carefully making cuts in the shape of the leaves. The strip must be attached to the base of the bud.
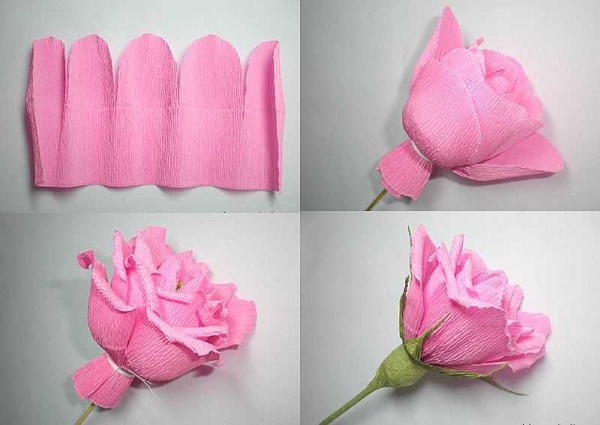
Big rose
A DIY paper flower will look especially delicate if you use corrugated paper to create it. You can choose absolutely any color, based on your wishes. First, you need to prepare petals of different sizes, cutting out 5 small teardrop-shaped petals and 15 larger heart-shaped petals.
Each petal must be carefully stretched to the sides, giving them a realistic volumetric shape. The teardrop-shaped petals are alternately twisted onto a pencil or a wooden stick, thereby giving them a curve. The edges of the other petals are also twisted upward.
To prepare the stems, you will need wire and colored material to wrap it with: tape or strips of green corrugated paper.
To the end of the stem, you need to attach the petals in the shape of a drop one by one - this will be the inner part of the rose. It is most convenient to use hot glue for fixing. Then attach the large petals in the shape of a heart and carefully straighten them out.
After fixing all the petals, the base of the bud is wrapped with a strip of green paper. To create the sepal, green paper is also used, the strip of which should be cut into an accordion. After the bud is formed, it is necessary to glue the finished strip to the place where the bud is attached to the stem.
Twisted paper rose
The twisting method is one of the fastest and easiest ways to create a rose. For this, you can use regular colored paper, colored on both sides. On a sheet of paper, you need to draw a spiral outline. The paper is cut along the outline of the spiral. To twist the workpiece, you will need a pencil.
A flower must be carefully wound onto its end from the outer edge of the spiral. A little glue is added to the center of the flower, after which the bud is fixed. This version of the rose looks great on handmade cards or gift wrapping. If desired, you can form a stem from wire and a sepal from green paper.
Clover
To create a clover, you will need colored paper of medium density. The paper is cut into squares according to the size of the future petals. A heart-shaped template is prepared from cardboard. Small cuts are made between the two halves of the heart. Along the cut line, the edges should be slightly folded inward and secured with glue. This will make the petals voluminous.
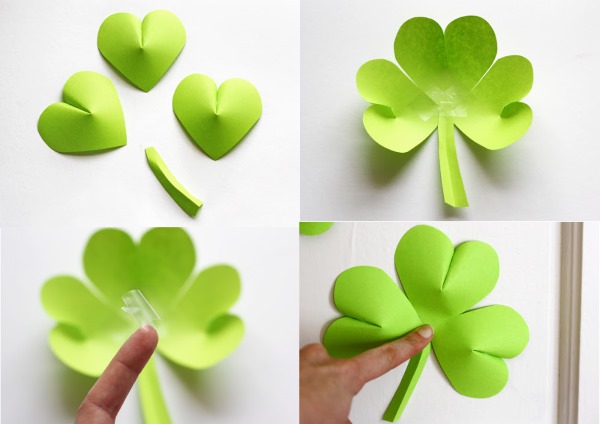
When all the petals are ready, they are folded into a semicircle, with the sharp end of the petal towards the center. You can glue them together using PVA glue, hot glue or tape. Cut a narrow strip out of green paper and fold it in half lengthwise. After straightening the resulting stem a little, attach it to the base of the petals.
Following simple patterns, you can create an original decoration with your own hands, which can be used for a variety of purposes. Making a paper flower will require a little patience and attention.
Article formatting:Natalie Podolskaya
Video about making paper flowers
Paper flower - how to make, the following video will tell: