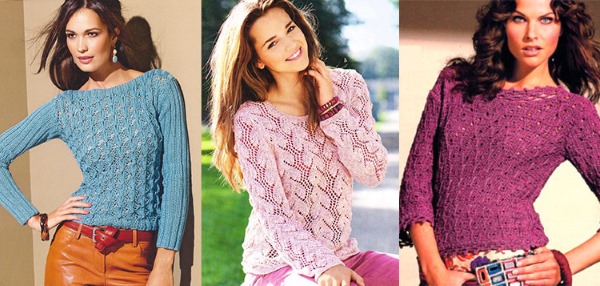
A sweater is one of the main things in a modern woman's wardrobe. A girl with a passion for needlework will have no trouble knitting a women's sweater with her own hands from thick wool yarn or airy synthetics. There are many interesting sweater models, with options for sleeves, necklines and patterns. For beginners, it will be easier to knit according to patterns with descriptions.
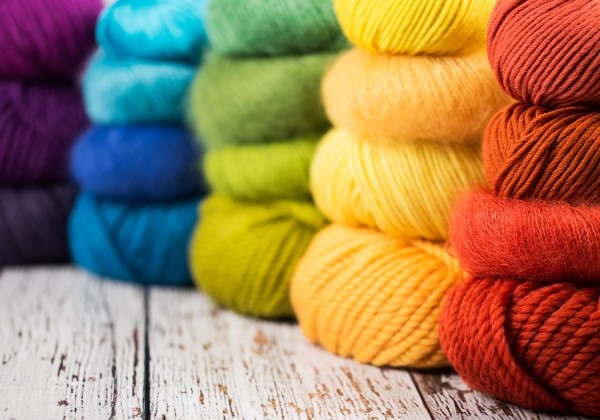
Choosing yarn for a women's sweater
To figure out how many skeins of yarn you will need for a specific item, you need to pay attention to the total length and weight of the skein. At the beginning of each pattern there is the name and weight of the threads that will be needed to create a specific product.
To obtain the most accurate calculations, you should knit a 15x15 cm sample using the pattern you are going to knit the product with. After that, you need to multiply the volume of yarn used by the total area of the sweater. To do this, you will need to measure a ready-made sweater of the appropriate size (this can even be done in a clothing store or at the market).
After this, you need to move on to choosing the composition of the thread.
There are many types of yarn and each one is different from the other:
- Wool yarn. There are several types: alpaca, lamb, mohair (depending on the animal from which the natural wool was taken). Among the advantages, it can be noted that clothes made from such yarn are always warm. Among the disadvantages: it pricks and quickly becomes unusable (after 2-3 months, pellets appear).
- Acrylic yarn made of synthetic fiber. Products made from it are soft and elastic. Acrylic is considered a hypoallergenic material, but it is better not to use it to create children's things. It is almost air-tight and does not absorb moisture well.
- Cotton yarn. Natural yarn, most often used for knitting summer items. It allows air to pass through well and absorbs moisture.
- Cashmere. Made from the down of a mountain goat that lives in Tibet. The yarn produces warm, soft and light items. This thread is used to knit basic items that will be used on a daily basis.
Please note: natural wool has an unpleasant smell and can prick the skin, so the yarn must contain acrylic. This will guarantee elasticity and softness of the product.
During the knitting process, you need to save the thread label so that you can purchase an additional skein if necessary.
Knitting pattern for a pullover for beginners
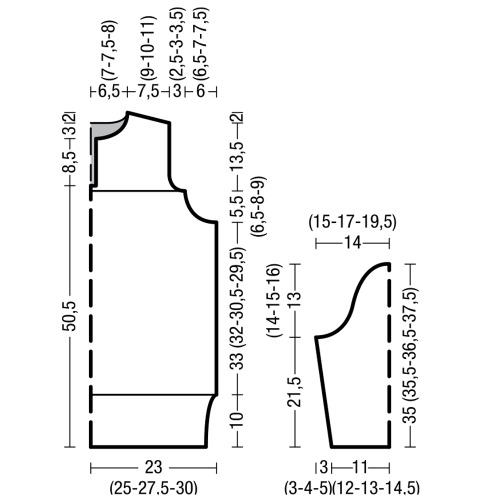
To knit a pullover you will need 10 balls of Puna thread weighing 50 g each, as well as No. 4 knitting needles. Composition: 100% alpaca. Product size: 44-46. Hip circumference: 96 cm.
Making a sample
First, you need to make a sample. You should cast on 30 stitches on the working needles and knit 10 rows with the required pattern. After that, you need to measure the sample (for example, let's take 12 cm).
The product will be sewn, so 96 cm must be divided by 2 (you get 48 cm). This means 48 loops must be divided by 12 cm, you get 4. You will need to knit 4 times 25 loops, that is, initially cast on 100 loops + 1 for pattern symmetry.

Women's sweater (knitting pattern):
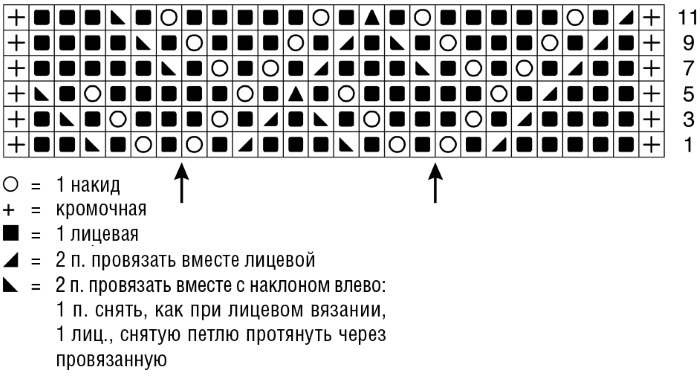
- The first stitch should not be knitted, then knit with the front surface, 1 slip without knitting (yarn behind the knitting), 1 front "granny" stitch, 1 slip, 1 front "granny" stitch, 1 slip and so on to the end of the row. The last stitch should always be knitted with the back surface.
- The inner rows need to be changed slightly: 1 granny stitch slipped as an edge stitch, 1 knit stitch, 1 slip (yarn in front of the fabric), 1 knit granny stitch, 1 slip, 1 knit granny stitch, 1 slip, 1 knit granny stitch, 1 slip, 1 knit granny stitch, 1 slip and so on to the end of the row.
- The first loop must always be removed as an edge loop, then all the “granny” loops are knitted as front loops, and the last one is knitted as a purl loop.
- In this row, knit all the loops with purl stitch.
The pattern will be light and airy, so the pullover is suitable for summer or warm autumn. If desired, you can choose a denser pattern.
Front of the pullover
Cast on 101 stitches on knitting needles #4. After that, knit the pattern described earlier. The workpiece should be 45 cm high. At this stage, you can move on to the most difficult part - knitting the armholes.
To create a smooth transition of the armhole, it is necessary to perform decreases. First, you need to decrease 5 "granny" loops from the outside, and then the same number of loops from the inside. Now, from the front side, you should decrease 3 "granny" loops, then repeat the same from the back side.
In the next two rows, you need to remove 2 loops on each side, and then 1 "granny" loop. In total, you should get 4 decreases.
Decreasing stitches in detail:
- The first loop should be slipped, the next one knitted and passed through the slipped loop. This will result in a decrease of 1 loop. In this way, 5 "granny" loops should be decreased.
- You need to knit according to the pattern until the end of the row.
- The inner (purl) row begins the same way as the front row - with decreases. You need to remove 1 loop, then knit the next purl and pass it through the removed loop.
- Then continue using the same technology. After the decreases, the fabric should be knitted according to the pattern, the last loop will need to be removed (thread in front of the fabric).
- In this row, you need to make 3 decreases. You need to throw 2 loops onto the second knitting needle without knitting, then pass the second loop through the first.
- The resulting loop needs to be thrown back onto the knitting needle, then removed 2 and decreased again. Thus, 3 "granny" loops are decreased. Then you should knit according to the pattern.
- The last loop must be removed as an edge loop (thread before knitting).
- In the inner row, you need to decrease 3 loops again, knitting them with a purl stitch. You need to knit with a purl stitch until the end of the row, the last loop is removed (yarn in front of the fabric).
- In the next outer (front) row, you need to decrease 2 loops using the previously described technology, then knit according to the pattern.
- The inner row is done in the same way as the previous one, but with purl stitches.
- In the final rows, decrease 1 stitch. The last stitch should be knitted with a purl stitch.
You will get smooth cutouts for the sleeves. Then you should knit 4 more rows without changes according to the pattern.
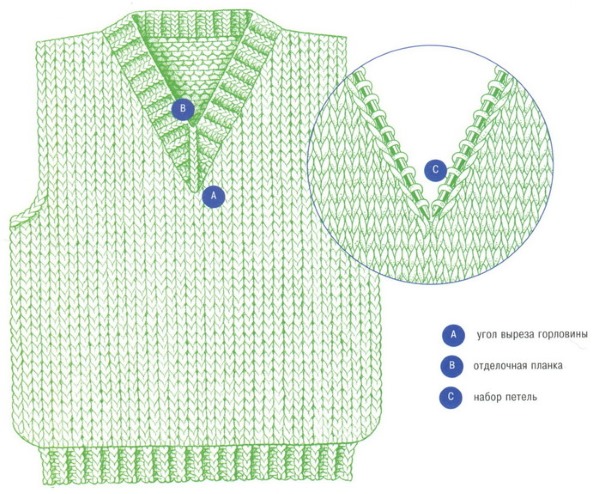
Knitting the neck
You will need to divide all the existing loops into two parts and place a marker in the middle. The stitches will need to be decreased from the middle to create a "V" shaped neckline.
Knitting the neck:
- It is necessary to knit according to the pattern to the middle.
- After this, 2 loops will need to be knitted with a leftward tilt. Then you need to knit according to the pattern to the end of the row.
- In the inner row, knit the fabric according to the pattern to the middle. One loop must be removed (thread before weaving).
- The work needs to be turned over to the front side. Then you need to make decreases again: 2 loops should be removed without knitting and a left-tilt drawthrough should be made. Then you need to knit according to the pattern.
The back row should be knitted with back loops to the middle, but the last loop should be removed without being knitted (thread in front of the product). Then you will need to turn the weaving over to the front side again and perform a decrease using the previously described technology.
In the back row, you need to knit the penultimate loop with the front surface, remove the last loop (yarn in front of the product). In the front row, you need to decrease by 1 loop again. Then decreases are performed until there are 25 loops on the needle.
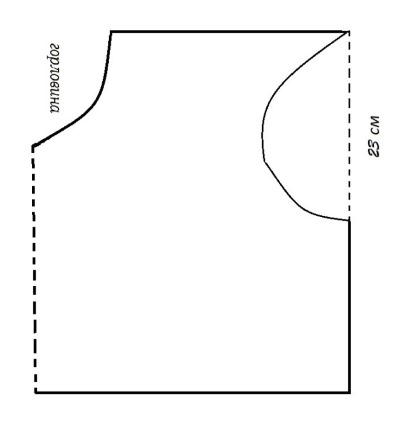
After this, you need to knit straight until the moment when from the beginning of the armhole to the end of knitting there are 23 cm. At this stage, you need to close the shoulder loops. You can move on to knitting the second neckline.
Knitting the back
You will need to cast on 101 stitches and knit 45 cm in an even pattern. Next, you need to make a cutout for the sleeves using the previously described technology. From the beginning of the armhole to the last row there should be 23 cm.
Now you can start knitting the neck from the back. If you wish, you can skip this step, leaving the back as a flat piece of fabric. Count 25 stitches on both sides and put a marker.
All loops that remain in the middle must be closed. This is done in the following sequence: 2 should be knitted externally, then a draw through with a leftward tilt. After that, you need to knit 1 front and draw through again.
The left 25 loops must be knitted according to the pattern of 4 rows. After that, you can close the loops in any convenient way. The second part must be knitted in the same way. At this stage, you can sew two parts of the sweater in any convenient way.
Knitting sleeves
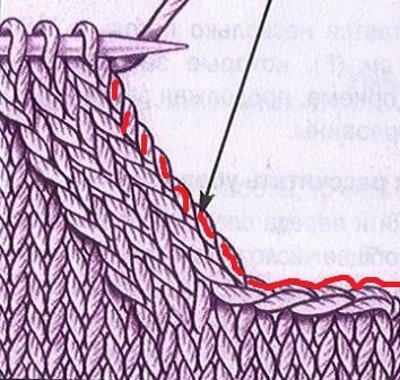
After sewing the product, there will be a circular opening from which you need to pick up loops on a 3-3.5 mm knitting needle. You need to look closely at the bevel of the sleeves and find a braid of loops. You should pick up one part of the braid on the knitting needle, which is closer to the edge. It is most convenient to work with circular knitting needles.
Knitting the sleeve:
- You should knit the stitches as if they were knitted, leaving 8-10 “granny” stitches before the stitching point.
- On an additional knitting needle, cast on 17 stitches (a braid of stitches) and knit them according to the pattern. On this knitting needle, you need to knit the sleeve cap.
- The thread should be left in front of the fabric, remove 1 loop from the knitting needle on the left. After this, the thread should be returned to the work.
- The fabric should be turned over to the wrong side. Using another additional knitting needle, remove 1 loop without knitting, then knit according to the pattern. At the end, remove 1 loop from the main knitting needle (thread behind the work).
- The fabric should be turned over to the front side. One loop should be removed, and then continue knitting according to the pattern. As soon as the last loop is knitted, you will need to send the thread before knitting and throw one unknitted "granny" loop from the knitting needle on the left.
- Knitting must be turned to the wrong side. One loop must be transferred to the second knitting needle without knitting, then knit a row according to the pattern.
In this way, you need to knit until there are 10 loops left on both sides before the sewing point (that is, 20 loops). After this, all loops should be returned to circular knitting needles (but you can also use stocking needles).
Next, you need to knit the sleeve in a circle, adapting the pattern to knitting only with front loops:
- The first row should be knitted according to the pattern.
- In the second row, you need to remove 1 loop, knit 1 with a purl stitch, remove 1, 1 purl “granny” loop, remove 1, 1 purl and so on until the end of the row.
- In the third row, all loops must be knitted with front “granny” loops.
- In this row, all loops must be knitted with front “granny” loops.
In this way, you should knit a sleeve of the desired length. In this case, the sleeve length is 41 cm. After that, you can knit a 1x1 or 2x2 elastic band.
To smooth out the edge of the neck, you need to crochet it with 2.5 mm single crochet stitches or half-double crochet stitches. After that, you can cast on the stitches with circular knitting needles and knit several rows with a 1x1 elastic band. This will give you a neat neck.
To narrow the sleeve, you can decrease 3-4 loops at the end of the last rows. You can make the knitting more elastic with a thin elastic band, which must be woven in as you knit.
Openwork sweater with knitting needles
To knit an openwork sweater, you need to choose the appropriate pattern, and then repeat the knitting using the previously described technology.
To accurately calculate the number of threads, you need to knit a 15x15 cm sample. For example, if knitting is done with braids, the product will require one and a half times more thread.
Knitting with knitting needles raglan from the top
A women's sweater (knitting pattern) can be knitted with a raglan, which will reduce the number of sewn parts.The fabric should be knitted on circular needles from the top or bottom. Typically, the method is used to create children's items, but it can be adapted to make sweaters of any size.
First you need to calculate the loops:
- You should measure the circumference of the neck and add 8-15 cm (it all depends on the result).
- From the total volume of loops, you need to subtract the loops of the raglan line. In this case, 4 lines (2 on each side). With standard weaving, you should take 1-2 loops for each raglan line, but everything depends on the idea.
- The remaining loops should be divided into 3 - loops for the back, front and sleeves.
For example: there are 90 loops, from which you should subtract the raglan loops: 88 - 4 = 84 loops. The result should be divided into 3 parts, you will get 28 loops. This means that 28 loops are allocated for the front and back. For 2 sleeves - 28 loops, which means 14 for each side.
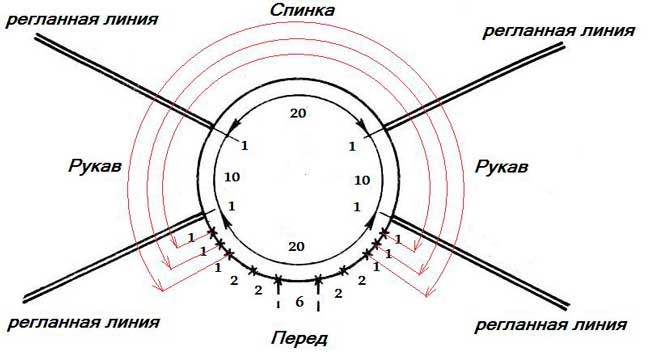
It is best to start knitting from the back. In the example given above, the raglan is knitted as follows: 3 back loops, 1 raglan loop, 14 sleeve loops, 1 raglan loop, 28 front loops, 25 back loops. Then knit with circular needles. The raglan can be decorated with the front surface or you can come up with your own pattern.
Knitting with knitting needles raglan from the bottom
Creating a raglan from top to bottom is done in two ways:
- The women's sweater (knitting pattern) should be knitted separately. The last loops should not be closed. As a result, all parts are cast on circular knitting needles in the following order: front, sleeve, back, sleeve. The parts will need to be knitted all together.
- In the second variant, you can knit the body to the armhole. After that, you should knit the sleeves to the armhole and attach them to the body. The product must be knitted on circular knitting needles. The connection should be made by knitting one row according to the pattern.
When knitting children's clothes, it is better to knit with a raglan from the top, so that over time you can increase the size of the product.
How to Knit a Sweater with Pockets
The women's sweater (knitting pattern) will need to be knitted and assembled using the previously described method. After that, you should determine where exactly the pockets will be located.
After calculating the location of the pockets, you should knit them in the form of a square, rectangle, triangle or any other geometric figure. It is necessary to knit two identical pieces and sew them to the product with an invisible seam.
It is not recommended to use a sewing machine to sew the pieces together. It will overstretch the fabric, causing it to deform after the first wash. You should take a piece of knitting thread and use a wide-eyed needle to sew the product, going into each loop.
How many balls of thread are needed for a women's sweater
| Size | Amount of yarn |
| 40-44 | 350-500 g |
| 46-48 | 450-600 g |
| 50-54 | 500-700 g |
| 56-58 | 650-850 g |
A smaller weight is needed for light openwork items made from thin threads. The second designation is suitable for knitting thick winter sweaters. However, in this case, it is necessary to take into account the type of pattern, the number of knitting needles and the knitting density.
To determine exactly how much thread is needed to make a particular item, you should knit a small sample. desired pattern. Measure the sample and calculate the approximate amount of thread that will be used to make the product.
Women's sweater - tips on knitting and assembly, according to the diagram:
- To avoid skipping stitches and knitting the fabric evenly, you need to give your eyes and body a rest from time to time.
- To check the quality of the thread, you will need to wash a sample in warm water and dry it between two white napkins. If they change color, it means that the sweater will also stain the skin of its owner. In this case, it is better to give preference to yarn from another manufacturer.
- To protect yourself, you need to buy yarn with a reserve. An extra 50-100 g of thread will help you feel more confident.
- It is better to write down the order of the pattern on a piece of paper to make it easier to remember.
- To determine the knitting density and see how the pattern will behave with a particular yarn, it is always necessary to knit a 15x15 cm sample.
- To make the stitching area less noticeable, do not tighten the thread too much.
- When weaving a strip or a neckline, you can add elastic to the yarn. This will help to always maintain the perfect appearance and elasticity of the product.
- The elastic band must be knitted with knitting needles of a smaller diameter so that it fits tightly to the wrist.
- To avoid having to recount rows, mark every 2-3 rows with a marker or contrasting thread.
Each master knits a women's sweater (knitting pattern provided) in their own way. Therefore, before starting work, it is necessary to practice, and also make several samples to understand how much yarn is needed for this or that product. With experience, this can be determined by eye.
Article formatting:Natalie Podolskaya
Video about knitting women's sweater
Video on how to knit a women's sweater with knitting needles:
https://www.youtube.com/watch?v=d0zHanj_jDY