With the onset of cold weather, it is worth taking care of warm clothes. Headwear knitted with knitting needles takes an important place in the wardrobe. Among them, increasingly popular are snood-hood. The description and patterns for this type of clothing are quite simple. The models are very diverse.
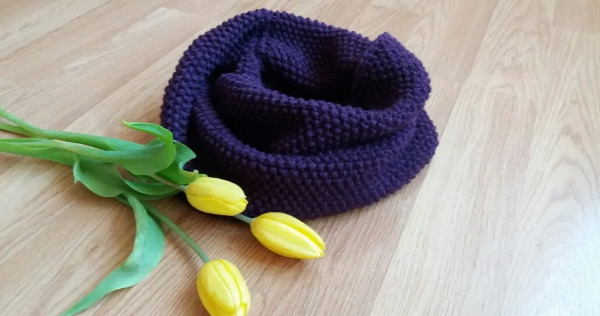
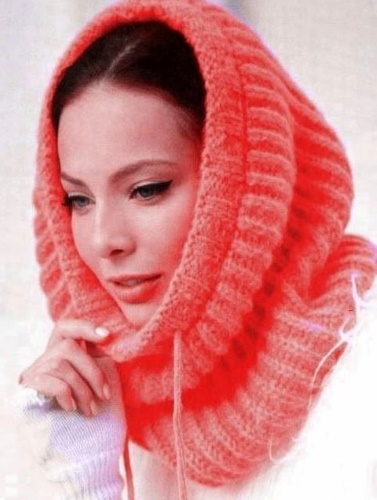
Snood hood, knitted with pearl stitch
Pearl knitting is a simple pattern that is knitted by alternating front and back loops. Despite its simplicity, the product looks very impressive and beautiful.
To knit a snood you will need:
- measuring tape;
- circular knitting needles of a diameter corresponding to the knitting density;
- markers;
- scissors;
- hook;
- needle.
To calculate the number of stitches needed to start the process, first determine the knitting density and take measurements from the person for whom the product is intended. To determine the density, you will need to knit a sample measuring approximately 15 cm by 15 cm. The knitted sample should be washed in warm water and allowed to dry.
Only after this, using a ruler or a measuring tape, the number of loops in 10 cm horizontally is calculated, then the result is divided by 10, resulting in the knitting density horizontally. The same is done vertically.
Example:
- The number of resulting loops in 10 cm horizontally is 18. You need to divide 18 by 10.
- 1.8 - horizontal knitting density.
- The number of resulting loops in 10 cm vertically is 20. You need to divide 20 by 10.
- The resulting vertical density was 2.
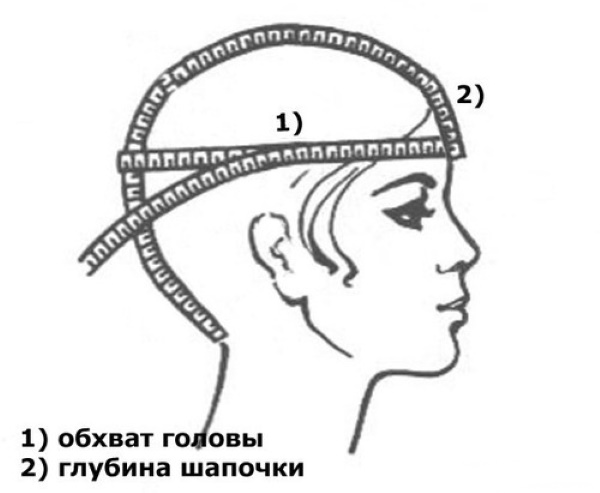
Having decided on the knitting density, you need to move on to taking the necessary measurements for the snood:
- Head circumference. To get the correct measurement, place the measuring tape along the widest part of the head. That is, along the frontal part just above the eyebrows and along the most protruding part of the back of the head.
- Head height. The measurement is taken in a straight line from the back, from the middle point of the back neck to the top point of the head.
- Neck circumference. Measured at the base of the neck. The tape will lie above the process of the seventh cervical vertebra, and in front it will close under the jugular notch.
A snood-hood with knitting needles (diagrams and descriptions for it can be easily made taking into account the selected model) must be knitted, making the necessary additions to the basic measurements, depending on how spacious it will be according to the model.
Below is a specific example:
- neck circumference - 31 cm;
- head circumference - 52 cm;
- head height - 30 cm.
Knitting of the snood-hood starts from the bottom up:
- To calculate the number of stitches needed for casting on, the neck circumference measurement is used.
- An allowance is made for ease of fit, here it is necessary to take into account the individual preferences of the person for whom the product is intended, on average the allowance is approximately 2 times more than the neck circumference measurement, in this case it is 62 cm.
- To obtain the required number of loops, the required number is multiplied by the resulting density when knitting a test sample, horizontally. 62*1.8=111.6
- The resulting number is rounded to the nearest whole number so that it is divisible by 2, since the pattern repeat assumes an even number of loops, it turns out 112 loops for casting on.
- Loops are cast on using circular knitting needles in the way you like best.
Methods of casting on stitches:
- Classical or, as it is also called, traditional.

- Italian. With this set, the edge looks like that of items knitted on a knitting machine.
- With i-code cordIn this case, the typesetting edge is obtained in the form of a hollow cord.
- Using a hook. The set of loops is carried out with a hook. In this case, the thread is wrapped around the knitting needle and the loop is picked up with a hook. The finished loop is put on the knitting needle from the hook and the process continues again. The advantages of such a set are that the thread comes from the ball, and at the base of the edge lies an even, beautiful braid.
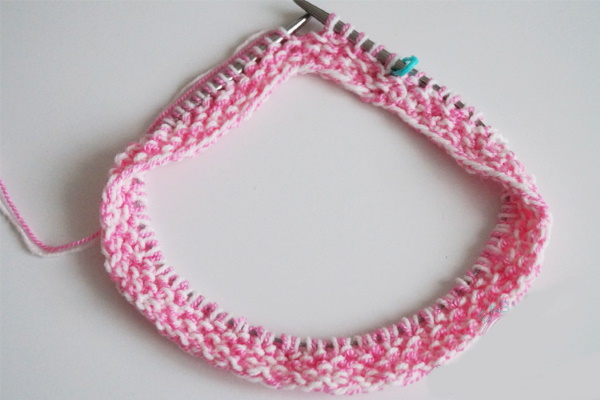
6. Next, the collected loops are closed into a circle.
7. Hang a marker and knit a piece of fabric, approximately 20 cm long, using the pearl knitting pattern.
Pattern Description:
| Row No. | Description |
| 1 row | 1 knit, 1 purl. Then alternate until the end of the row. |
| 2nd row | 1 purl, 1 knit. Then alternate until the end of the row. |
Then, rows 1 and 2 alternate. This pattern is knitted in a circle. When knitting in a turn, the alternation of loops is changed accordingly: the front loops are knitted over the back loops, and, accordingly, the back loops are knitted over the front loops.
8. Then knitting begins in turning rows, following the pattern diagram.
9. The length of the hood is calculated using the formula: head height + allowance for ease of fit. It turns out to be approximately 30+10=40 cm.
10. When the desired length of the product is knitted, you need to close the loops in the usual, classic way.
11. Then fold the pieces in half and join them with a knitted seam, or join the pieces along the open loops with a loop-to-loop seam, while maintaining the pattern.
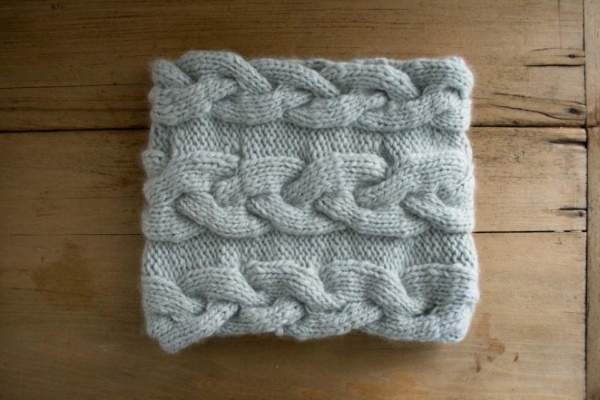
Snood with braids
Knitted items with braids have become very fashionable. A snood-hood with knitting needles (patterns and descriptions of this item with various types of braids and cords can be modeled and knitted in different ways) can be knitted across, and then raised upward from one of its sides.
Description:
- The required number of loops is cast on another thread, which is then removed from the knitting, resulting in open loops. Their number is calculated as follows: 20 cm is the height of the snood, multiplied by the knitting density vertically, resulting in 20 * 2 = 40 loops.
- Next, knitting is done in turning rows, following the pattern diagram. Description of the pattern:
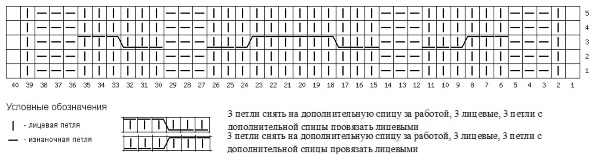
Snood hood knitting. Knitting pattern with braids. - The pattern rapport consists of 40 loops. First, 6 rows of the pattern are knitted, and then knitting is repeated from the third row. The initial loop and the last one act as the edge of the snood. The lower edge loops of the snood-hood can be knitted with a thickened side edge.
- The length of the fabric is calculated as follows: neck circumference multiplied by 2. This is approximately 62 cm.
- Then the finished fabric is connected along the open loops with a “loop in loop” stitch; it is important to follow the pattern when connecting the beginning of the knitting so that the product has an aesthetic appearance.
- Next, loops are collected along the edge of the resulting snood to knit the hood. And knitting of the hood begins upwards in turning rows with the front surface, approximately 40 cm high. This value is calculated using the formula: head height + allowance for ease of fit. There are no clear boundaries for this allowance; the knitter's wishes are taken into account here.
- Then the resulting fabric is folded and the side parts of the hood are connected with a loop-to-loop seam.
Seamless snood
The snood hood can be knitted seamlessly. The hood will follow the shape of the head, making it comfortable to wear in windy weather. The edge of the hood can be decorated with a hollow elastic band for a drawstring.
This model can be knitted with any pattern you like. The most optimal is garter stitch, because its fabric is soft, easily draped, and the thickness is greater than when knitting with a garter stitch, which is important in cold weather.
Description:
- Cast on 112 stitches on circular knitting needles using any convenient method, close the stitches in a circle, and knit approximately 20 cm.
- Then knitting begins in turning rows, the height of the hood is approximately 40 cm.
- Next, the knitting is divided into 3 parts. The first and third parts are the sides of the hood, and the second part is its middle. Therefore, less loops are allocated to the middle part than to the others.
The width of the entire canvas is approximately 62 cm, of which approximately 12 cm is allocated for the middle part. This number is calculated as follows: the width of the canvas is divided by 4 and 2 or 3 cm are subtracted, depending on the model.
Thus, the following calculations were obtained:
On the side parts 25 cm, on the middle part - 12 cm. The resulting numbers are multiplied by the knitting density, it turns out 25 * 1.8 = 45 loops. 12 * 1.8 = 21.6
The following check is being made:
- 45 + 45 = 90.
- 112-90=22 loops.
Next:
- The next step is knitting the top of the hood. First the first part is knitted, then the second, the last loop of the second part of the hood is knitted together with the loop from the third part, the knitting is turned, the first loop is removed, the middle part is knitted, the last loop of the middle part is knitted together with the loop of the first part of the knitting, the fabric is turned again. In this way, knitting continues until all the loops of the side sides are finished.
- When only the loops of the middle part remain on the knitting needles, a hollow elastic band is knitted. To do this, loops are collected on the knitting needles along the sides, and a hollow elastic band is knitted. If you plan to insert a lace inside, then you need to make holes for it in the lower part. The distance between the holes is approximately 5-7 cm. A hollow elastic band can be knitted using various methods. One option is to knit a double-width strip, and then connect along the open loops with a knitted seam with the beginning of knitting the strip.
Snood-hood, knitted with patent elastic
A snood-hood with knitting needles (patterns and description of the product, knitted with a patent elastic band or, as it is also called, English, have the same principle) can be started from the bottom up or across.
Pattern Description:
| Description of the series | |
| 1 row | 1 edge, *1 front, 1 back*, 1 edge. |
| 2nd row | 1 edge, *1 knit, yarn over, slip 1 stitch*, 1 edge. |
| 3rd row | 1 edge stitch, *yarn over, slip 1 stitch, knit yarn over and stitch together*, 1 edge stitch. |
| Then the 2nd and 3rd rows alternate. | |
When knitting a snood across, the technique is very simple:
- You need to knit the fabric with a patent elastic pattern in turning rows. The dimensions of the fabric are determined as follows. The height of the head plus the desired width of the snood. It turns out to be approximately 20 + 40 = 60 cm. This number is multiplied by the knitting density vertically. 60 * 2 = 120 loops.
- When the desired length of the fabric is obtained, the loops are closed.
- The product is joined with a 20 cm knitted seam (the width of the snood).
- Then the sides of the hood are connected, a seam is obtained in the center of the product. The snood-hood with English elastic is ready.
The second way to knit a snood with English elastic is from the bottom up:
- Cast on 112 stitches for knitting on knitting needles, the calculation formula was given earlier.
- Knitting is closed in a circle and is knitted with an English rib about 20 cm. When knitting in a circle, the "English rib" pattern is knitted a little differently. The number of loops cast on must be even.
Pattern Description:
| Description of the series. | |
| 1 row | *1 knit slip with yarn over, 1 purl*. |
| 2nd row | *Knit 1 together with yarn over, slip 1 purl with yarn over*. |
| 3rd row | *1 knit slip with yarn over, 1 purl knit together with yarn over*. |
| Then the 2nd and 3rd rows alternate. | |
3. Having obtained the required width, you need to move on to the process of knitting the hood.
4. From the marker that marked the beginning of the row, the transition to turning knitting is made.
5. The edge of the hood is knitted thicker for a more aesthetic look.
6. Having knitted the height of the hood to 60 cm, close the loops.
7. Then the side parts of the hood need to be connected with a needle using a knitted seam.
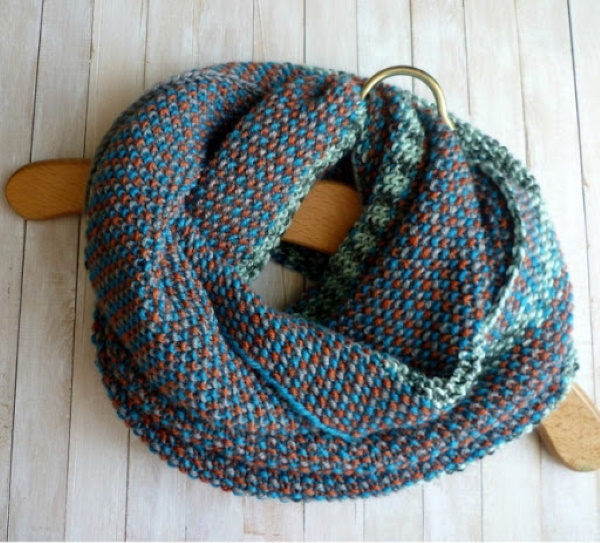
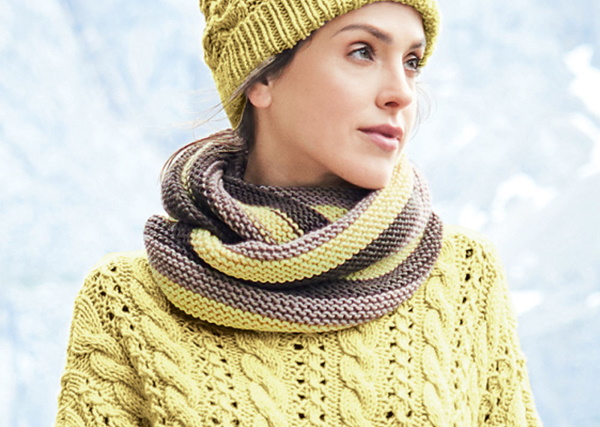
Three-color snood
More and more often, products made with color transitions are becoming fashionable.
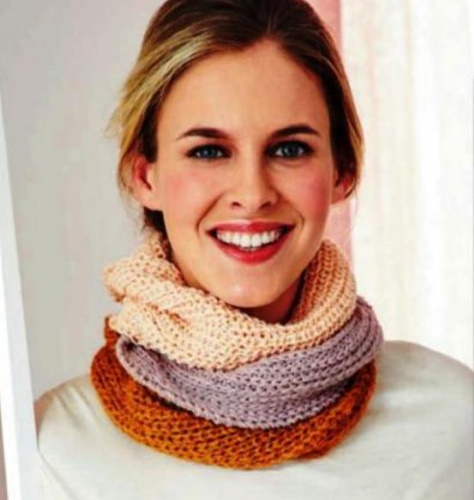
Thus, the knitted products are three-colored:
- To make such a product you will need 2 primary colors.
- The product is knitted in two or three threads, depending on the desired thickness of the product.
- The entire height of the snood is divided into three, approximately equal, parts.
- The first and third parts will be knitted from the main colors, and the middle part will be knitted from the threads of the first and second main colors.
The snood-hood can be knitted with knitting needles of any model, considered earlier, following this technique with a description. There is no limitation in the patterns used.
Striped snood
A striped snood can be knitted in different ways, it all depends on the knitter's imagination. It is best to knit it with a garter stitch pattern. The stripes themselves should not be made too wide. It is important to choose the right colors that match each other.
An interesting option would be to knit stripes in the following way:
- Knit 3 or 4 rows in a circle with one color using the front surface.
- When changing to another color - the same number of rows, knit with purl stitch. In this case, the snood will be soft, will spring easily, and the color transition will give exclusivity and originality.
- To make the transition to another color invisible when knitting in the round, you need to knit the last loop by inserting the knitting needle into the loop of the bottom row and, picking up the yarn over that holds the top loop, knit the last loop. This way, the top loop will lie on the bottom loop, and the color transition will be invisible. When knitting in a turn, everything is much simpler. The color change will not be noticeable.
- All tails that remain from the cut threads when changing colors, after finishing knitting the product are carefully hidden, using a hook, between the broaches. In case of turning knitting - in the edge row of the product.
Snood clamp 2 turns
Description:
- The process of creating this product begins with calculating the number of loops needed for casting on. The calculations are based on the following formula: the height of the head must be multiplied by 4 and an increase depending on the model, approximately 10 cm. For example: Head height - 30 cm. 30 * 4 + 10 = 130 cm. 130 * 1.8 = 234 loops. (This result was obtained as a result of multiplying by the density obtained when knitting a test sample).
- Loops are cast on using circular knitting needles in any convenient way.
- Knitting is closed in a circle and the fabric is knitted with the most liked pattern. The choice of pattern is determined by the model of the product.
- The height of the product is determined as follows: the head height measurement is multiplied by 2, the desired width of the lower part of the snood is added, approximately 25 cm. It turns out: 30 * 2 + 25 = 85 cm.
- When the desired height of the product is knitted, the loops are closed in any convenient way.
The snood-yoke, which functions as a hood, is ready.
Openwork scarf-collar with knitting needles
The same snood can be knitted with an openwork pattern. They look very stylish and beautiful. Having knitted such a scarf, it can be used in demi-season weather, sheltering from a light wind. In this version, it is better to use cotton or semi-cotton yarn.
There are a lot of openwork patterns. Any pattern with repeating rapports will suit such a scarf. For example.
Pattern diagram 1:
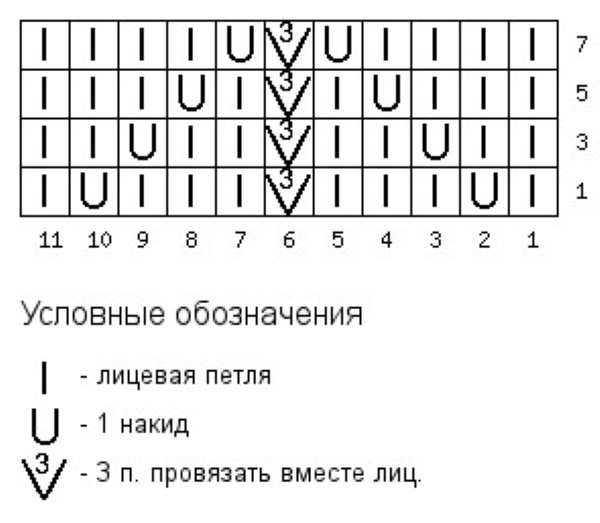
Pattern diagram 2:
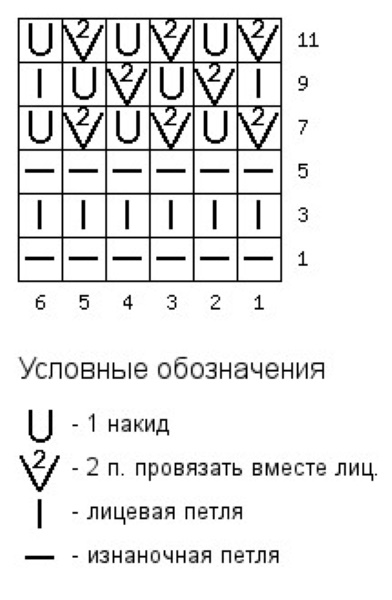
The rapport of this pattern is 3rd and 4th loops. Even rows, in this case, are knitted according to the pattern. The edging of such a snood can be done in different ways.
Methods of edging the product:
- Hollow elastic band.
- i-code cord
- Classic or traditional.
Stylish models
A snood-hood knitted with knitting needles (diagrams and descriptions of different models are given above) goes well with both a coat and a jacket. For beginner needlewomen, the yoke model is an excellent option to try your hand at knitting. There are no restrictions on the use of patterns for this product. Braids, openwork, various types of elastic bands, dense patterns - any option will do.
For lovers of seamless knitting, the snood can be made on circular knitting needles. If you do not have the skills for this type of knitting, then you can easily create a product with turning rows on straight knitting needles. With a little effort and your imagination, you can get a chic look.

Recently, another new technique has entered knitting, called enterlak. The fabric knitted in this way looks like a braid, the stripes of which are intertwined diagonally. This method can be used to knit various products, including a snood-hood. For this technique, you can use one or several colors. Such a snood made of sectional yarn will also look interesting.
Thanks to this method, the product looks voluminous. When knitting with a thread of one color, knitting occurs without tearing.
A knitted snood or hood will replace a hat and scarf, protect from the wind and keep you warm when it's cold. It can be either an addition to a jumper or sweater or a separate piece of clothing. It's fashionable, comfortable and functional. For items intended for the winter season, it's better to use a pattern and description of dense patterns. Even if they require more yarn, the cold and strong wind will not be a problem.
Video about making a snood hood with knitting needles
Snood hood, DIY: