Drawing people is one of the most difficult tasks for young artists. The easiest way for children is step by step drawing of a person, which will help to understand the basic principles and rules. Together with parents, the child will learn to improve their skills and abilities, revealing new potential in the fine arts.
Drawing tools
Each style and type of drawing corresponds to a certain set of artistic tools. To choose it correctly, you need to decide on the final goal of the drawing and the technique of execution.
| Tool | What you need to know when choosing | When is it best to use |
| Graphite pencils | They have different levels of softness, which are indicated by letters: B – soft. The lines are rich, dark, dense; H – hard. Makes thin, dull strokes; HB – intermediate type of hardness. | This is the most convenient and easy-to-use tool for beginner artists, as well as in cases where:
· it is necessary to convey maximum verisimilitude (drawing of a person, animal, inanimate objects); · it is necessary to convey volume and perspective; · draw architectural structures and equipment. |
| Paper | Each type of paper is focused on 1-2 drawing methods and has different qualities:
· format; · density; · color; · texture. | · office paper is the easiest option for beginning artists, but it is not resistant to paints;
· Watercolor – suitable for both pencil and watercolor drawings; · Whatman paper – best used for drawing with pencils and gouache; · textured – for paints, pastels. |
| Paints | differ in composition, consistency and color saturation. Some require the addition of water, others do not need it at all. | · with the help of watercolors you can easily mix colors to the desired shade. It is easy to apply. It is most often used to depict landscapes, still lifes;
· gouache – a thick, rich paint that is most often used for painting posters; · acrylic – suitable for experienced artists. |
Master classes
Drawing a person step by step is the best way for children to learn the science of art. It will help them get acquainted with the basic patterns in the structure and proportions of the body, and will also serve as a visual aid for young artists.
Drawing a person with children 3-4 years old
Fine art classes with preschool children are good for developing attention and visual memory. Before starting training, it is important to introduce the child to the general principles of human structure using dolls as an example: the presence of such important components as the head, neck, torso, arms and legs.

Invite the child to take the doll in his hands to independently assess the length and thickness of the body parts, their proportional relationship, and position relative to each other.
Before you start drawing, you can prepare a template of a person. It can be done as a schematic image or as an applique. The latter option will be easier to understand, since at a young preschool age, a child perceives the image as a whole, without detailing it.
To do this, you need to cut out simple geometric shapes from colored paper:
- circle – head;
- a wide rectangle – the body (or a triangle – as an option for depicting a girl in a dress);
- oblong rectangular stripes – arms and legs.
First, you should ask the child to independently fold a person from ready-made figures. As soon as the principle of construction becomes clear, you can start drawing. The main thing is to awaken the child's interest in a new activity without resorting to direct coercion.
A person is drawn in several stages:
- start from the head - a circle;
- below is a rectangle or triangle - the body, which is connected to the circle by a short straight line - the neck;
- from the upper corners of the rectangle, or slightly below the upper vertex of the triangle, two straight lines extend – the arms;
- At the bottom of the body, draw two more lines – legs.
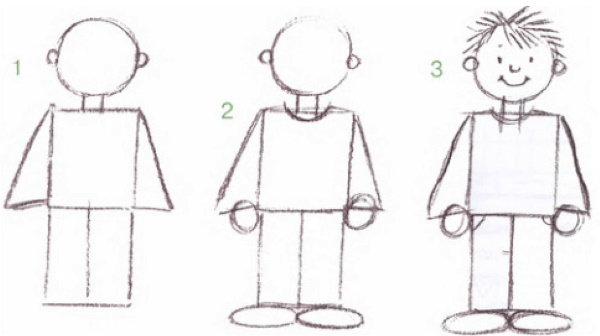
We draw a person step by step for children, and then, when the child has mastered the technique of an elementary schematic depiction of a person, it is complicated by adding smoothness to the lines and volume to the arms and legs.
To arouse interest in the baby, you should offer him various drawing techniques - from pencils to paints. This can be an unusual way - with fingers, foam rubber, or cotton swabs. The main thing is to give him freedom of choice, even if it goes against the task.
Drawing a person with children of school and senior preschool age
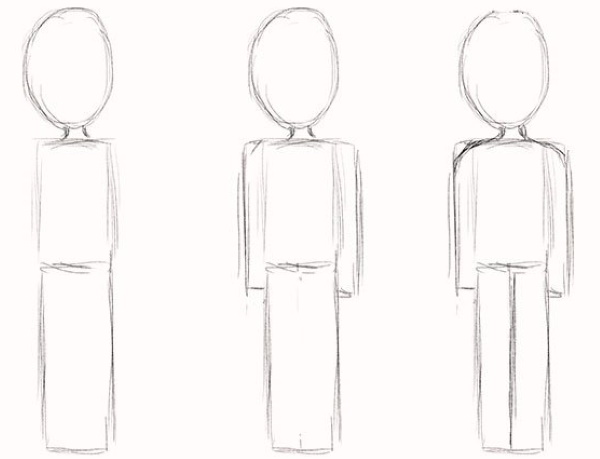
After the child has understood the general principle of human structure, further lessons are devoted to studying the proportions of the body. For this, in addition to a pencil and paper, you will need an eraser and a ruler. It is believed that the ratio of head length to height for an adult is on average 1:7, or 1:8. If you take this rule as a basis, you can achieve the most natural proportions of the body.
To do this, it is necessary to strictly follow the basic principles:
- determine the height of the head. For example, if it is equal to 2 cm, then the body length will be 16 cm + 2 cm for the head. Closer to the edge of the sheet, measure the given length with a ruler and divide it into 9 equal segments. From them, perpendicular to the vertical line, draw lines dividing the plane into 8 equal cells. For convenience, they are numbered;
- in the topmost cell, draw an oval - this is the head. Under the head, slightly below the second line and parallel to it, draw a segment equal in length to twice the size of the head. In this case - 4 cm. These are the future shoulders;
- from each shoulder down draw the arms, and between them outline the torso. The elbows are located at the same level as the waist;
- the hips widen at the junction of the fourth and fifth cells, and then smoothly narrow towards the knees - they are located at the level of the seventh line. It should be taken into account that the arms end at the level of the middle of the thigh. From the knees to the middle of the seventh cell, the legs widen to the calf area, then narrow;
- The feet are drawn in a blade-like shape, and then the toes and heels are drawn.
We draw step by step so that children can understand the principle of human structure.
Drawing a portrait
At first, young artists rarely manage to correctly place the eyes, nose and lips on a portrait. To simplify the task, it is necessary to use the rule of symmetry: divide the given plane into equal parts. Auxiliary lines will help determine the location of all parts of the face and harmoniously depict them relative to each other.
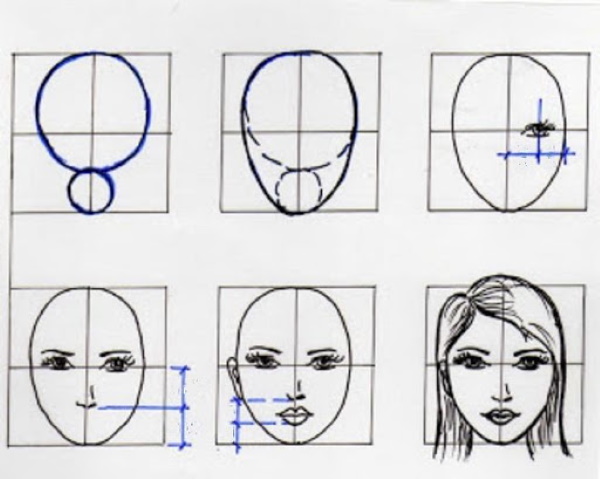
The portrait is created in stages:
- They draw the outline of the face. It can be in the form of a simple oval, or adapted according to gender: for women - oval, or, more often, obovate, tapering downwards; for men - almost square with a rounded upper edge and almost straight lower edge with a slightly protruding chin.
- Lines of symmetry are drawn. One is the vertical axis, it runs through the entire length of the face and divides it into left and right halves, the second is horizontal, it also runs through the center and divides the face into upper and lower parts.
- The eyes are drawn at the level of the horizontal line, which divides each of them into two equal halves. They are located at a small distance from the vertical axis, the same on both sides. The eyes are depicted as two low arcs, meeting at the level of the horizontal line and forming an oval pointed on both sides.
- In order to determine the location of the future mouth and nose, the lower half of the face is divided into three equal parts by additional horizontal lines. At the level of the upper one, the lower edge of the nose is drawn, and at the lower one, the mouth.
- The nose is drawn as two vertical lines starting at eye level on either side of the main axis. Above the upper additional line, they end with semicircular extensions on the sides – the nostrils, and a slightly convex lower edge – the tip of the nose. It is important to remember that a wide nose is typical for a male portrait, and a narrow nose for a female portrait.
- Lips - upper and lower, are drawn respectively on both sides of the lower additional line. The upper one is in the form of a wave-like arc with a small notch in the middle. The lower one is a smooth convex arc, slightly fuller than the upper one. Women are characterized by a wide, expressive mouth, men - a narrower one.
- Women's eyebrows are arched, while men's eyebrows are straighter.
- The ears are positioned at eye level in the form of small arches.
- To draw the hair, the upper half of the head is divided into two parts by a horizontal line. It will determine the edge of the hair. Then, with neat strokes, the hairstyle or haircut is formed.
We draw a person step by step for children, so that it is easier for them to remember the sequence. You can complete the image by drawing a mustache or beard for a man, or earrings or beads for a woman.
Drawing a face in profile
When depicting a head in profile, not only the front part is visible, but also the back part - the brain part of the skull. The main task is to find the optimal ratio between these two zones. Otherwise, the same principle of symmetry will help as when depicting a face in full face.
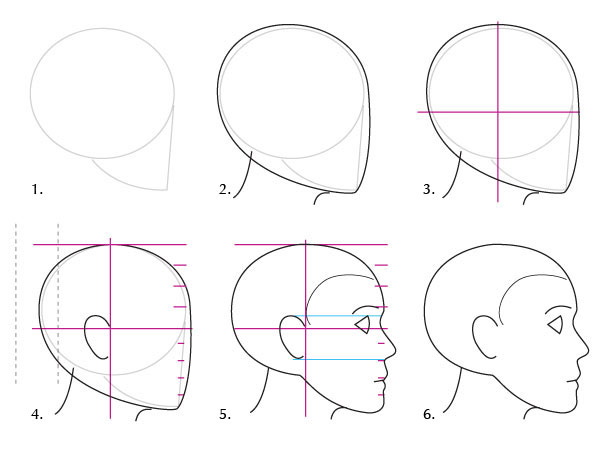
The diagram for constructing the drawing is as follows:
- Draw a basic sketch. Take a circle as a basis - you can draw it by hand, or use a stencil or compass. Using the horizontal and vertical axes, divide it into four parts, and then draw a diagonal through the upper left segment and the lower right. It will be needed to determine the lower border of the chin. Next, transform the circle into an egg shape, the top of which is directed to the lower left side. To do this, draw lines from the left and lower sides of the circle so that they intersect along the diagonal line.
- Next, you need to find the center of the resulting sketch, taking into account the new lines, and draw the main vertical and horizontal axes again. Then the lower half is divided into two, and the upper half into three parts using additional horizontal lines.
- We make the right upper segment more convex so that it looks like a forehead.
- The nose begins immediately below, smoothly expanding from the main horizontal axis to the lower additional one. At first it is depicted as a triangle, then its protruding top is made more rounded.
- To draw the mouth, just below the nose, draw a short line from which arched lines go up and down, resembling a heart. These are the lips. They can be wide and narrow, short and long.
- At the level of the horizontal axis, slightly retreating from the edge of the face, draw the eye. It is depicted in the form of a triangle, or an arrowhead, the top of which is directed to the left, and the base to the right. Immediately above it, draw a parallel line - the eyelid. Above it, at the level of the auxiliary line - the eyebrow.
- The ear is located just behind the vertical axis. Its top is level with the line of the eyes, and its bottom edge is level with the tip of the nose.
- The upper additional line defines the edge of the hair, which descends smoothly from the forehead to the upper edge of the ear. By changing the direction and size of the strokes, you can draw any hairstyle or haircut.
Drawing a face in profile, as well as in full face, is not so difficult, since it implies a view in a two-dimensional plane. In the future, you can complicate the task by depicting a face in three-dimensional space.
Drawing of a man in motion
When a child first tries to draw a person in motion, he does not know where to start. After all, when taking any pose other than strictly vertical, the position and angle of several parts of the body changes at once. And without some experience, it is difficult to grasp this right away and correctly convey the position of the body.
To make the task easier for the child, you will need to prepare visual material that he will work with in the future:
- wire frame. A person is twisted from wire and then given various poses. The child will be able not only to understand the elementary principles, but also to sketch them “from life”;
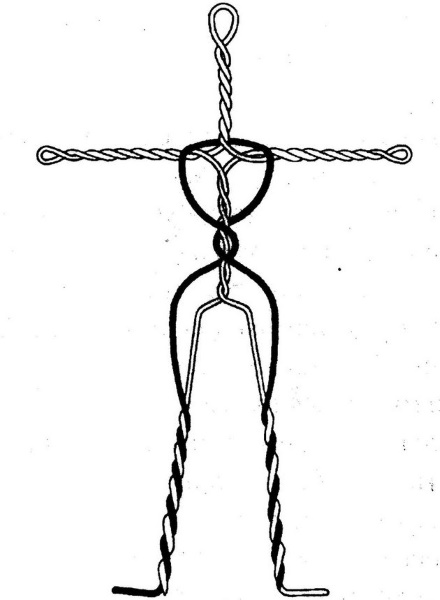
- cardboard model with moving parts. Cut out a silhouette of a person from cardboard, and at the folds, connect the individual parts of the body with threads or laces so that they can be moved;
- plasticine modeling. Will help the child to quickly get acquainted with the proportions of the body and learn to observe them. Most often, it is such activities that contribute to the development of spatial thinking, which will speed up knowledge in the fine arts.
Don't start with complicated movements right away. It's better to start with a change in the position of one part of the body, for example, draw a person standing upright with his hand raised up, or his leg extended.
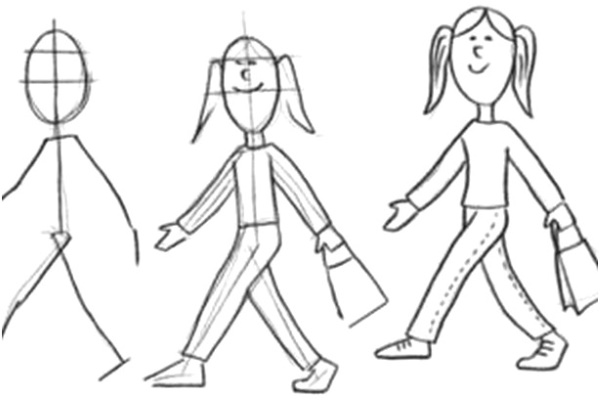
Then you can try to display movements while walking:
- First, you need to draw a "skeleton". From the head, a segment extends vertically downwards - the torso, at the end of which a short line is drawn perpendicular to it - the hips. Legs extend from the hips - the right one is tilted to the left (back), and the left one - to the right (forward). At the top, under the line of the hips, they intersect. The arms are spread out;
- give the "skeleton" shape. Draw additional lines around the main ones, increasing the width of the body, arms and legs;
- The axes of the “skeleton” are erased, and the feet and legs located in the direction of movement are drawn.
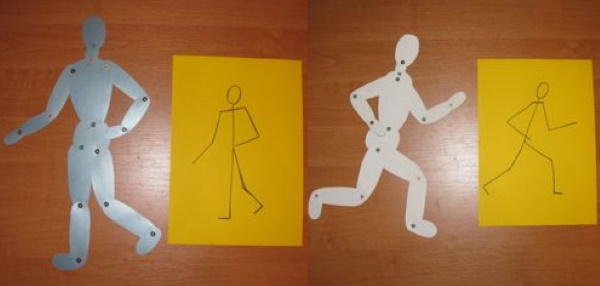
Based on this diagram, it is not difficult to draw a running person. To do this, it is enough to draw the axis of the body at a slight angle, bend both arms at the elbows, and move the legs at a large angle to each other.
Drawing people from different angles has a lot of nuances and requires maximum visual attention. When we draw a person step by step, this technique is easier for children to perceive. They remember the sequence faster and are able to reproduce it independently in the future.
Video about drawing a person for kids
How to teach a child to draw a person: