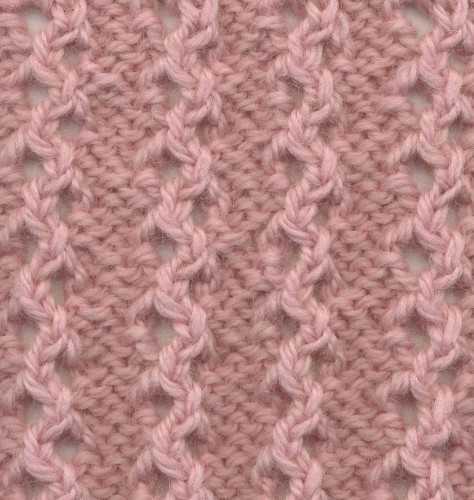
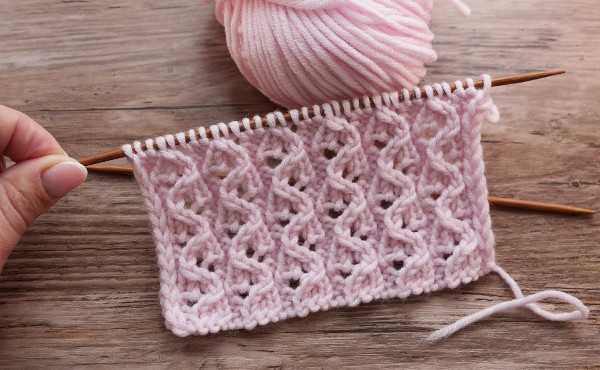
The Snake pattern is also called a zigzag, which is included in the category openwork patterns of one-sided type. However, this ornament is included in relief knitting patterns. The pattern is often used when decorating a jumper, jacket or scarf.
Necessary tools and materials
The "Snake" pattern with knitting needles (the relief pattern is simple and clear, so it is suitable for beginners) can be knitted from any type of yarn.
The composition of the material will depend on the required texture of the product and the season. You also need to pay attention to the softness of the threads so that the finished item is pleasant to the body.
Avoid choosing prickly and hard yarns because they are not suitable for the skin. When choosing a material, it is recommended to run the yarn over your cheek to properly assess the comfort of the future product.
For knitting, the thread material can have synthetic, artificial and natural fibers. In the first case, polymers in the form of polyester, nylon, acrylic are used for production.
Using natural industrial methods, artificial fibers are created in the form of bamboo and viscose. Natural threads are represented by animal (for example, silk with cashmere, alpaca, angora and merino) and plant (for example, hemp with cotton and flax) fibers.
The material may contain monofilament or a mixture of several components. To make the natural threads stronger, not deform after washing and highly resistant to abrasion, this material is supplemented with a minimum percentage of synthetics.
Selection of material by season:
| Cloth | What will do? |
| Winter | You can use wool or a mixed set that includes wool. If the skin is sensitive or there is a predisposition to allergic reactions, merino wool will do, due to the fact that it is hypoallergenic and intended for children's things. Instead of woolen material, it is permissible to use acrylic. However, these threads are less heat-insulating and hygroscopic. |
| Summer | In this case, linen and cotton threads are suitable. For knitting demi-season comfortable sweaters, a mixed composition is suitable, for example, wool with cotton or acrylic with cotton. |
To obtain a high-quality product, it is best to choose blended yarn. However, synthetic fibers should not exceed 20%.
To knit the pattern, you may need regular and circular knitting needles. The tool number is always indicated on the yarn label, so you can’t make a mistake with the choice. The needles can be bone, plastic, wooden or metal.
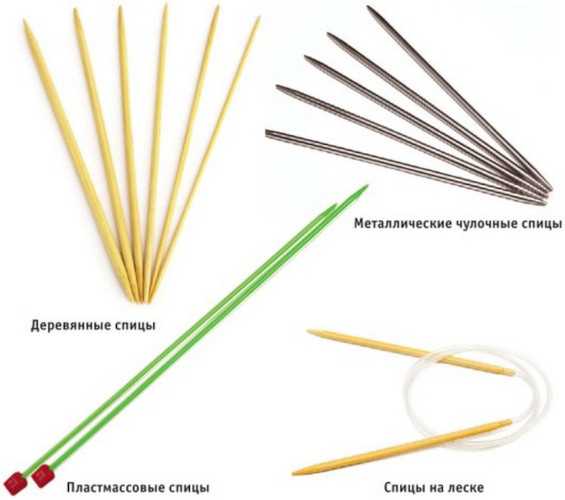
The choice will depend on your own preferences and several factors:
- plastic and wood tools are more comfortable and lighter, but can bend and break, and can also catch on very fluffy yarn;
- Aluminum knitting needles are stronger, but can stain light-colored yarn, giving it a gray tint;
- The steel tool does not leave marks on the blade and is not subject to breakage, but it weighs a lot.
Schemes with description of works for beginners
The snake-shaped pattern is presented in several schemes. For example, the ornament can be knitted in a circle, made openwork or as a double-sided relief. In any form, the pattern turns out clear and neat.
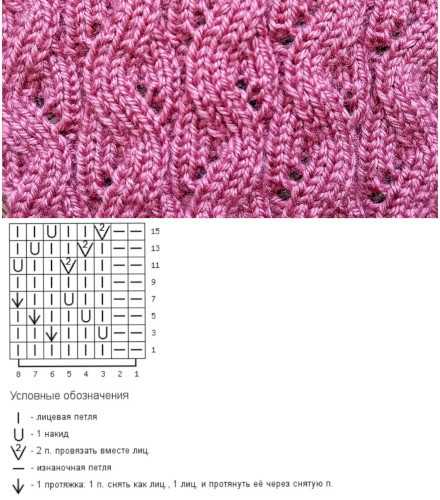
Openwork
The "Snake" pattern with knitting needles (the diagram suggests creating an openwork pattern) is suitable for creating light openwork items in the form of a jumper, tunic, dress and jacket. Knitting will be one-sided, therefore this option is not suitable for decorating clothes that require a presentable appearance on each side.
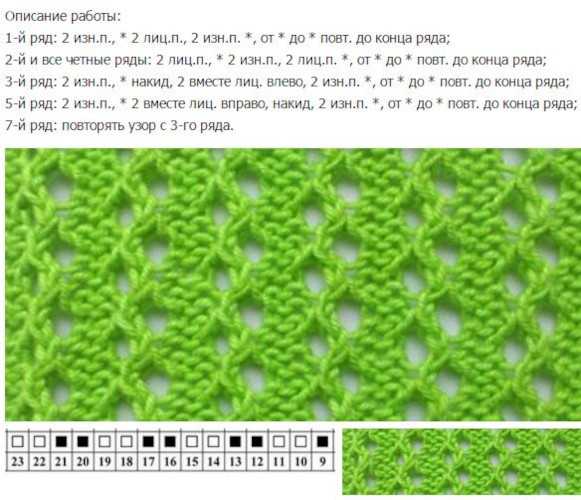
Step by step process:
- Initially, make several stitches, the number of which can be divided by 4. Additionally, make 2 elements for symmetry and a similar number of edge stitches.
- In row 1, first make an edge stitch and 2 purl stitches. Then, to the end of the row, knit 2 front and purl stitches in turn. At the end of the row, make 2 purl stitches and 1 edge stitch again.
- In the 2nd and other even rows, knit the stitches according to the pattern, and make the throws in the form of purl elements.
- The beginning of the 3rd row coincides with the 1st row. Then perform a throw and knit 2 elements together behind the back walls (perform these manipulations with alternation and until the end of the row). At the end, make 2 purl and edge loops.
- The edges on each side of row 5 are identical to row 3. In the center, make 2 stitches together in turn for the front walls and a throw.
- Then, to continue decorating the ornament, alternate 3-5 lines.
Raised
The zigzag pattern can be given relief to make it look more voluminous. At the same time, this pattern does not require the design of a large rapport, and the knitting process will not take much time and effort.
You can use either thick or thin thread material for the work. In any case, the ornament will have volume. This pattern is suitable for any knitted item. At the same time, the back side of the fabric will also have a neat appearance.
The pattern repeat is 8 lines high and 12 stitches long. At the beginning of each line, it is necessary to knit 1 edge piece. If the description says "*…*", this stage should be repeated until the end of the line with alternation.
Step by step description of the process:
- Knit a certain number of stitches, the number of which can be divided by 12. Also design 2 auxiliary edge elements.
- 1 row includes *2 purl, 3 together knit elements, and also 3 knit loops, between which perform 1 yarn over. Then knit 3 stitches together knitwise and 1 purl loop*.
- 2 and other clear lines knit according to the pattern.
- In the 3rd row, make *2 purl, 9 knit and purl stitches*.
- In the 5th row, make *2 knit stitches, between which make 1 yarn over. Then, repeat 3 elements together with knit stitches 2 times, making 3 purl stitches between them. Then make 2 yarn overs, and between them 1 knit stitch*.
- In the 7th row, do *5 front loops with 3 back loops and 4 front loops*.
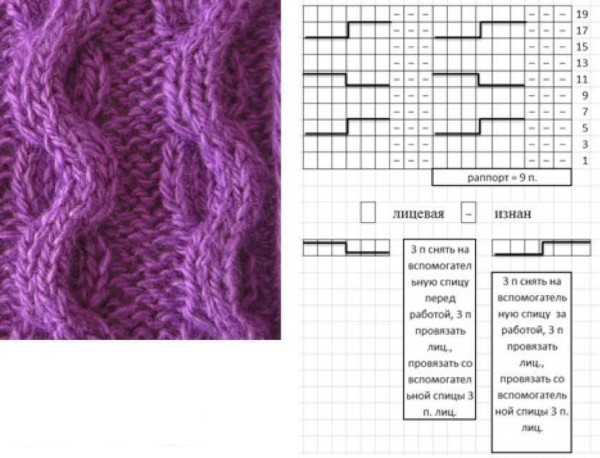
Double-sided relief
The snake can be presented as a two-sided relief. In this case, the ornament will have the same appearance both on the front and back sides.
According to this scheme, the pattern repeat in height is 8 rows and is performed horizontally. In this regard, it is necessary to cast on several stitches, the number of which should be divided by 8. In addition, it is necessary to knit 2 edge parts. At the beginning of each row, 1 edge face loop should be knitted.
The description contains the abbreviation "*…*". In this situation, it means that such a scheme must be implemented with alternation until the end of the line.
Step-by-step knitting instructions:
- In the 1st row, knit *4 purl elements. Then cross the next 4 loops. To do this, remove 2 elements to an additional tool and put them behind the fabric. Knit the other 2 loops on the left knitting needle as front loops. Then transfer 2 elements on the additional tool to the left knitting needle and make them front loops*.
- In the 2nd and other even rows, knit according to the pattern, as the loops look. In this case, knit 4 purl and 4 face stitches in turn.
- In the 3rd row, *cross the first 4 elements. For this purpose, transfer 2 loops to an auxiliary tool and place in front of the product. Make 2 elements on the left knitting needle purl. Then return the removed stitches to the left tool and knit purl. Then make 4 front elements*.
- In the 5th row, do *4 purl elements. Transfer the next 2 loops to an additional knitting tool and place them in front of the fabric. Make the other 2 elements on the left knitting needle as front ones. Then return the transferred stitches to the left knitting needle and knit as front ones*.
- In the 7th row *throw the first 2 elements onto an auxiliary tool and place them behind the fabric. Make the next 2 loops on the working knitting needle purl. Return the thrown elements to the left knitting needle and knit purl. Then make 4 front loops*.
- Moving on to row 9, repeat the pattern starting from row 1.
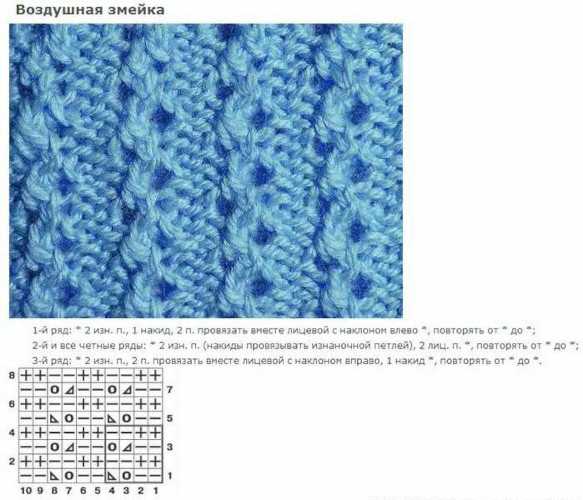
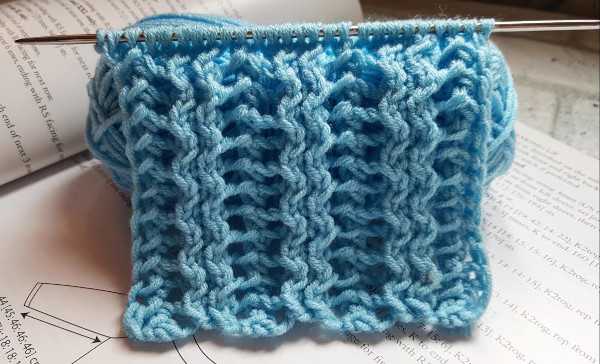
In a circle
The "Snake" pattern with knitting needles (the pattern can be done in a circle) is suitable for decorating warm knitted items such as scarves and socks. Due to knitting in a circle, the fabric is characterized by a neat back side, so your fingers will not catch on the thread material.
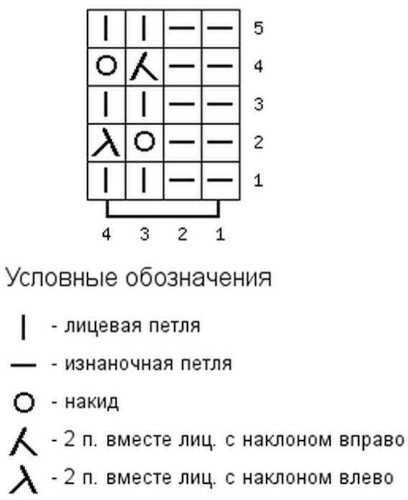
The pattern rapport consists of 4 rows. Initially, it is necessary to knit a certain number of stitches, which can be divided by 4. Additionally, it is necessary to make a 1x1 elastic band to the required height.
Technique for knitting in a circle:
- 1 row consists of only knit stitches.
- In the 2nd row, first make a yarn over, and then knit 4 front loops. Repeat this step until the end of the row in turn.
- In the 3rd row, make a yarn over initially. Remove the previous yarn over without knitting. Then remove the next element without knitting, and hold the material behind the canvas. Then make 3 front loops. The element that was removed without knitting, throw over the last 3 elements. Repeat these steps from the beginning to the end of the row.
- In the 4th row, make all elements front.
- To continue designing the pattern, repeat steps 1 through 4 of the row.
Secrets for Beginners
Useful tips and recommendations:
- The knitting tool must be smooth and straight. Thanks to this, the yarn will slide easily along the surface of the needles, which makes the knitting process easier. At the same time, the edges of the tool should not be too blunt or sharp. In the latter case, you can accidentally leave scratches or pricks on the skin of your hands, as well as provoke the splitting of the yarn, which can spoil the texture of the product. If the needles have blunt edges, knitting will be problematic because you will have to apply a lot of effort. At the same time, the created loops may have a stretched appearance. For this reason, the appearance of the fabric will be spoiled.
- For knitting in a circle, it is best to use circular tools connected to each other with a nylon rope or fishing line. When choosing these knitting needles, you need to look at the joint between the tool and the rope. It should be tight, and there should be no sharp edges or cracks. Otherwise, the thread material will constantly cling, which will damage the quality of the yarn. When working with a thick tool, the size of which is not less than 4.5 mm, the transition from the rope to the thickness of the knitting needles should be smooth. In other cases, transferring loops from the rope to the tool will be problematic.
- When closing the working fabric into a ring, the outermost knitted element of the 1st row will always be the 1st loop of the new row. It is in this area that it is recommended to hook a plastic marker or tie a contrasting shade of yarn. Thanks to this, you can accurately determine where the end of the first and the beginning of the second row are. In this case, you need to pay attention to the fact that the line is not twisted, and each loop is facing up.
- It is advisable to pull the thread material tightly so that steps do not form in the area where the fabric closes into a circle.
- When following the template, it is recommended to make a preliminary sample so that you can understand how the product will look like and what size it will be. This is considered the only way to know exactly how small or large the canvas will be.
- Knitting should not be too tight. When the loops are loose, they can be knitted quickly and easily, unlike dense ones. If you need to make a dense product, it is recommended to use a thin knitting tool.
- If a factory skein of yarn was used for work, you need to take the inner edge of the thread. This end of the yarn can be easily pulled out of the general skein. In this case, the material will be located in one place, without turning over.
- If there are uneven stitches through the line, the fabric will have an uneven appearance. This happens when some stitches are larger than others. To obtain a smooth and beautiful product, it is recommended to hold the thread material in your hands with the same tension during the process of shaping each stitch. For this purpose, the thread must be pulled and loosened between the fingers as needed.
- During the knitting process, the working thread material should be placed near the thickest part of the tool, but not near the narrow edge. At the same time, do not constantly pull the yarn to tighten the formed stitch. Each stitch should be characterized by a tight fit to the knitting needle, and should also slide freely along the surface of the tool.
- During work, it is necessary to regularly check the fabric for errors. These actions help to detect and correct defects in a timely manner. If you do not check the work systematically, if a large number of errors are made, you will have to unravel most of the product and start knitting again.
The snake is considered a universal pattern because it goes perfectly with almost any clothing. For example, this pattern can be knitted on an autumn pullover, a summer top, a skirt or a dress. Thanks to a large number of simple and accessible patterns with detailed descriptions, not only experienced but also novice knitters can create the product.
Video about the Snake knitting pattern
Knitting the pattern "Openwork snake" with knitting needles: