The Rhombuses pattern (schemes for simple patterns are presented below) can be used in creativity when knitting scarves, hats, sweaters, capes and more.
Relief patterns with knitting needles imply alternating front and back loops, which allows achieving a three-dimensional image. The pattern can be dense and loose, and patterns with large rapports look especially expressive.
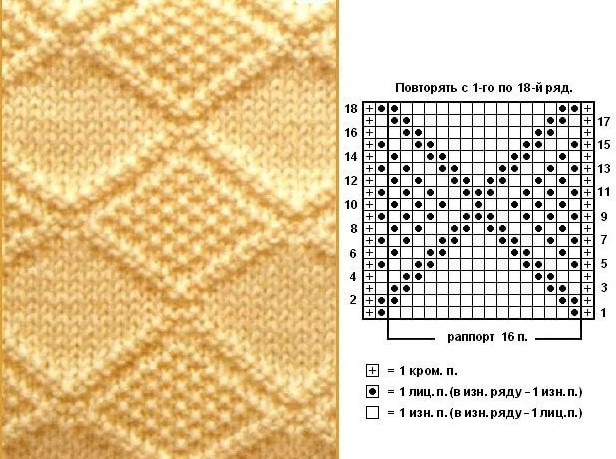
Simple Pattern Diamonds
Simple patterns are present in all knitted items. This means that with the help of purl and face rows, you can achieve interesting combinations of color and shape. The most suitable yarn for work is one that contains cotton, viscose, mixed linen, silk.
Thick threads in the composition allow you to see the pattern in more detail. Thin yarns make the pattern less voluminous, but no less attractive and elegant.
Simple patterns are convenient:
- they can be combined with openwork patterns;
- they are easy to steam;
- the pattern does not deform when washed;
- You can choose non-wool yarn to minimize shrinkage of the product;
- can be ironed and pressed;
- easy to dry;
- The patterns look elegant.
Diamonds are suitable for knitting office clothes, because these are the patterns that are associated with a strict elegant style. Due to the simplicity of the combinations, only a few symbols can be seen in the working scheme (the designation pattern may differ in different publishing houses):
| p. | loop |
| purl p. | purl |
| persons. p. | facial |
| chrome. | edge loop |
| crossbreed | crossed loop |
The pattern Rhombuses with knitting needles (simple rapport patterns can have up to 200 varieties and knitting methods) can be knitted using the methods of different styles. There are excellent names for the direction of simple rhombuses, where the front loops are presented as purl, and vice versa, and where there are different types of yarns. All this unites the patterns of simple and easy patterns.
“Pomegranate” rapport 6*6 loops
In this pattern, all the purl stitches will be knitted in the purl rows. This means that the pattern is marked as knit.
If you need to knit a purl stitch, you need to knit the front stitch in the purl row.
- In the first row from right to left you need to knit 1 edge st, 2 front sts (purl st in purl row), 1 purl st (front st in purl row), again 1 front st and purl, then close the row of front sts. The rapport continues to the end of the row - add 2 front sts, 1 purl st and 1 edge st.
- The second row also begins with 1 edge st. Then you need to knit 1 front st, purl st, 1 front st and 3 purl sts. Then continue 1 front st, purl st, front st and edge st.
- Start the third row with an edge st and 1 purl st. Then knit 3 knit sts, 1 purl st, 1 knit st. Add 1 purl st, 2 knit sts and an edge st.
- In the 4th row you need to knit 1 edge, 1 front, 1 purl, 1 front, 1 purl and 3 front sts and 1 purl, 1 front st and edge.
- In the 5th row you need to knit 1 edge, 3 purl sts, 1 front, 1 purl, 1 front, 3 purl sts, 1 edge.
- The sixth row should be started with an edge st, 1 knit st, 1 purl st, 3 knit sts, 1 purl st, 1 knit st, 1 purl st and knit st, edge st.
A simple pattern is made using a rapport, which can be duplicated to achieve a grid of 20*20 or more. Each row must be closed with an edge loop.
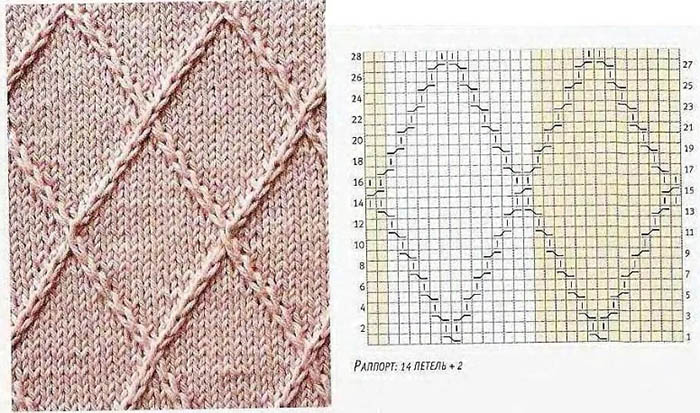
Pattern "simple relief"
The pattern rapport according to the scheme is 14 loops for 12 rows. The pattern is considered uneven due to the arrangement of the diamonds. So, unlike the standard sizes of 10*10 cm, this model is suitable for knitting items where the width is greater than the height.
Just like in the previous pattern, you need to start and close each row with edge loops.
- In the first row you need to cast on 4 knit stitches (1 knit stitch in the purl row), 6 knit stitches (knit stitch in the purl row), 4 knit stitches.
- The second row is knitted from 14 front sts.
- In the 3rd row you need to knit the same way as in the 1st.
- In the 4th row, cast on 3 knit stitches, 1 purl stitch, 6 knit stitches, 1 purl stitch, 3 knit stitches.
- Start the fifth row with 2 knit stitches, 1 purl stitch, 8 knit stitches, and in the opposite direction, 1 purl stitch and 2 knit stitches.
- In the 6th row you need to cast on 1 knit stitch, 1 purl stitch, 10 knit stitches, 1 purl stitch and 1 knit stitch.
- Here you need to knit 1 purl st, 12 knit sts, 1 purl st at once.
- The eighth row should be knitted like the sixth.
- In the 9th row, repeat the rapport of the 5th row.
- In the 10th row, do the same as in the 4th row.
- In the 11th row, knit everything as in the 3rd row.
- In the last row you need to knit only knit stitches.
The rapport on the left and right will be mirrored, and the part that is between the patterns will also form a diamond pattern without solid lines of face loops.
“Coffee beans” pattern repeat for 18 loops in 36 rows
This pattern is considered large, as its rapport is 28 rows in the pattern, as well as side transition loops, edge border to create a complete pattern in the case of knitting a single pattern without transitions.
- Each row must begin and end with an edge loop.
- In the 1st row, you need to cast on 7 front sts, then 8 purl sts, alternating them with front sts every other one so as to stop at a purl st, then cast on 7 front sts again, taking into account the exit from the rapport to the adjacent area for knitting the edge loop.
- Start the second row with 6 knit stitches, cast on 3 more purl stitches, knit 5 purl stitches in the same way, one after the other, from the knit stitch, coming out on the last knit stitch. Then knit 3 purl stitches and 6 knit stitches.
- In the next row 5 knit stitches, 5 purl stitches, 5 knit stitches with alternating purl stitches, again 5 knit stitches and 5 purl stitches.
- In the 4th row, knit 4 knit stitches, 3 purl stitches, 1 knit stitch and 3 purl stitches, alternate 3 purl stitches and 4 knit stitches, 3 purl stitches, 1 knit stitch and 3 purl stitches. Close the row with 4 knit stitches.
- The next row should again be knitted with 3 front sts, then 3 times with 3 purl sts alternating 1 front st between them. Then continue by knitting 3 front sts alternating 2 purl sts and 3 purl sts, 1 front st, 5 purl sts and 3 front sts.
- In the 6th row you need to knit 2 knits, 3 purl, 1 knit, 3 purl. Again 1 knit, 3 purl and 2 knits with 1 purl between them. Continue the row with 3 purl and 1 knit, then again 2 times 3 purl with 1 knit between them, closing the row with 2 knit.
- In the 7th row, knit 1, 3 purl sts twice with 1 knit st between them, then 5 purl sts, 1 knit st, and 3 purl sts with 1 knit st between them twice, closing the row with 5 purl sts and 1 knit st.
- The entire 8th row begins and ends with a purl st. You need to knit 3 purl sts 3 times and 1 knit st between them, then 5 purl sts 1 knit st. Then you should knit 3 more times 3 purl sts with 1 knit st between them.
- Next, starting from rows 9 to 15, you need to knit in the opposite direction, as from rows 8 to 1. In this case, you need to add alternation of purl sts where there are only knit sts, changing the alternation of knits with purl sts to the side parts instead of the central pattern.
The pattern Rhombuses knitting needles (pattern rapport patterns are given for a one and a half pattern) in the 15th row in the center will have 13 front loops. This is the middle of the pattern rapport. Having reached the 28th row, the pattern pattern must be repeated from the 1st row.
The important thing here is to move the knit and purl stitch combinations from the side edge stitches to the middle of the pattern to mark the top of the knitting chart.
With front and back loops
The most beautiful patterns are those that consist of facial and purl loops. Their combination allows you to create unusual relief patterns along with the simplicity of knitting techniques. To knit varieties of such patterns according to the scheme, you need to alternate facial loops with purl ones so that the result is a pattern.
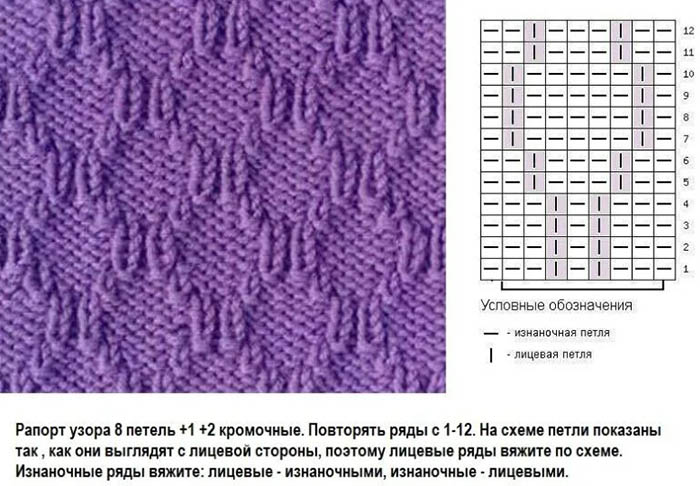
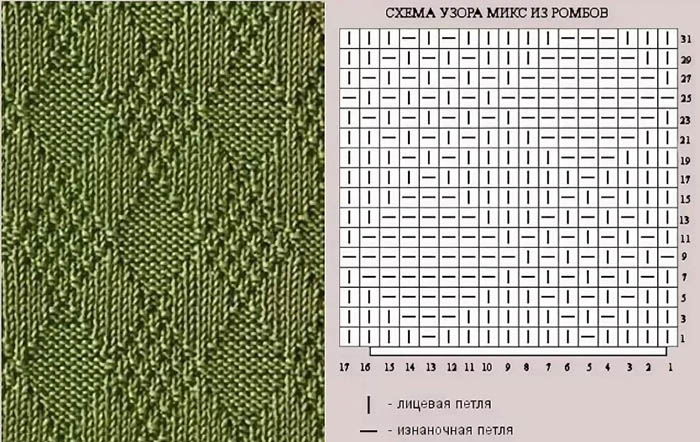
Diamond cells in a rapport of 6 loops per 16 rows
Almost everywhere you can find patterns consisting of only two types of loops - purl and face. In addition, to place the pattern in the center or on circular knitting, additional types of loops appear that help to fasten the rapport along the entire section.
| “+” | edge loop |
| "square" | knit stitch (purl stitch in a purl row) |
| "black circle" | purl stitch (purl in front row) |
| “\” | remove 1 stitch, leave the thread behind the work in the front row, in front of the work in the back row. |
Next, you need to cast on 6 loops for the pattern and knit 16 rows, starting and closing each of them with an edge loop:
- In the first and second rows you need to knit 11 purl sts.
- In the 3rd row, you need to cast on 3 front sts, remove 2 sts, leaving the thread behind the work, knit another 4 front sts and remove 2, as in the front row.
- In the 4th row, you need to remove 2 sts and leave them in front of the work, knit 4 more front sts, remove 2 sts again, leaving the thread as for the purl row, and knit 3 front sts.
- In the 5th and 7th rows, repeat the steps for the 3rd row.
- In the 6th and 8th rows, repeat the steps for the 4th row.
- In the 9th and 10th rows, repeat knitting as for the 1st and 2nd rows.
- In the 11th row, you need to remove 2 sts, and leave the thread as for the front row, knit another 4 front sts, again remove 2 sts for the front row, and knit 3 front sts.
- In the 12th row, knit 3 sts in the opposite direction, remove 2 sts for the purl row, knit 4 more sts, and also remove 2 sts as for the purl row.
- In the 13th and 15th rows, repeat everything as in the 11th row.
- In the 14th and 16th rows, repeat the steps as in the 12th row.
The rapport for 6 loops is repeated up to the 11th loop, so that the pattern is clear. The pattern can be stretched with a transition to the left and right parts.
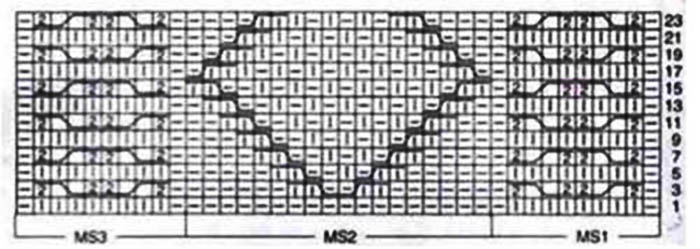
Patterns for MS1-MS2-MS3
Multi-layered patterns look beautiful on large areas, so diamonds in this technique should be knitted for scarves or hats.
The diagram is presented in pictures:
- In the purl rows, all loops must be knitted strictly according to the pattern.
- All the loops shown in width must be knitted once. In height, the number of rows and loops according to the rapport must be observed.
- If necessary, the rapports of patterns MS1 and MS3 should be repeated from the 1st to the 8th rows to obtain a clear pattern.
- MS2 pattern taking into account the scale of the side parts should be repeated from the 1st to the 24th rows. It is important to observe the sequence. If there is a lack of height, the height rapport should be repeated from the 3rd to the 24th rows once.
A similar diagram is shown below:
- In the rapport, all purl loops must be knitted strictly according to the pattern, without deviating from the diagram.
- To gain height you need to collect 32 rows.
- The rapport of 32 rows can be repeated if you need to dial more loops in height. To do this, you need to start repeating the knitting from the 5th row to the end of the pattern.
- It is not possible to increase the width of the pattern by adding additional loops.
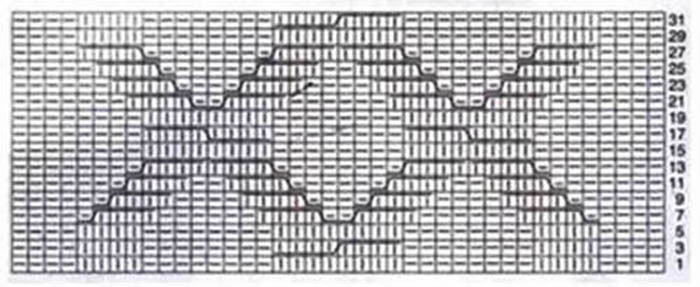
The pattern Rhombuses with knitting needles (patterns for several patterns are presented above) can be knitted not only according to the pattern, but also supplemented individually. For example, to make the rhombus wider, you can initially change the rapport by adding several loops to the middle of the pattern. It is important to knit a sample to see what happens when modifying the pattern.
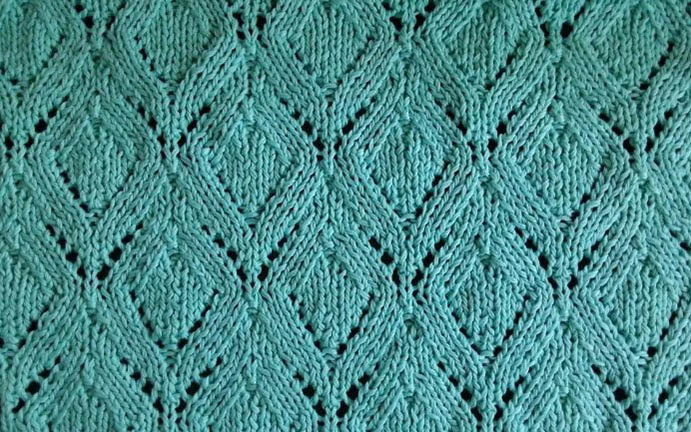
Openwork
This pattern is present in the knitting of light sweaters, where the distinctive feature is the presence of holes between the diamonds.
There are several variations:
- summer openwork;
- combined openwork;
- openwork on the front surface;
- fine lace with cones;
- Japanese openwork with double-sided pattern.
If openwork diamonds are present in the patterns, it means that there are a dozen more variations where it can be changed in the number of loops, width and height.
At the same time, there are also standard patterns for sweaters, autumn scarves, etc.
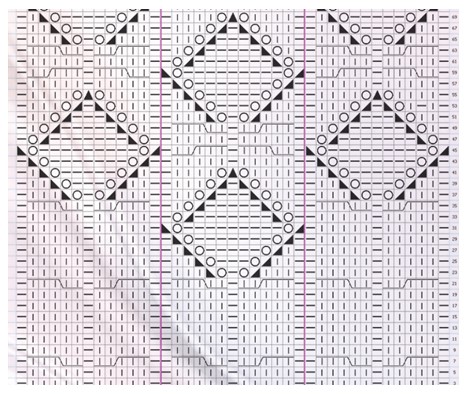
- According to the rapport, the diagram is presented for 8 loops in 31 rows.
- First, you need to combine the arrangement of the rapport so that it is placed in the center, and on the right and left there are parts of the rapport of the corresponding sides.
- In this case, the number of loops is a multiple of 8, as in the pattern. But you need to add edge loops on the sides and 1 additional loop before the beginning of the pattern, so that the wide area of the rapport rests against the edge.
- The diagram shows only the front rows, so you need to knit according to the diagram, without changing the direction of the thread and the method of knitting the front rows.
- In the purl rows, only purl stitches remain, as do the yarn overs.
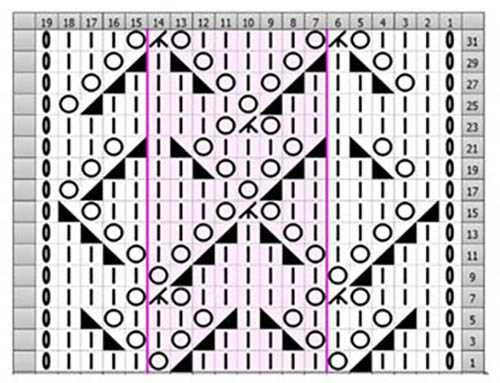
The openwork pattern should be started according to the diagram:
- Cast on 19 sts, of which 5 sts before the rapport are always repeated, another 8 knit sts for the pattern, 4 sts after the rapport and finish the row with an edge stitch, knitting 2 sts for the transition.
- In the first main row, you need to knit the edge, then 3 persons. and 2 persons. together, make a yarn. Then knit another 6 persons. and 2 together with a yarn in the purl row. persons. satin stitch. Repeat the pattern the required number of times and knit 5 main loops at the end, 4 persons. p. and close the row with an edge.
- In the 3rd row after the edge stitch, knit 2 knits, then 2 sts together and a yarn over. Then you need to add 1 knit st with a yarn over, knit 2 sts together and make a draw through. It is done as follows - remove the first loop as if it were a front loop, knit 1 st with the front surface and pull it through the removed first loop. Then continue the row, dial 3 knits and 2 together with a yarn over with the front stitch, 1 knit st. Repeat this step until the end of the pattern, finishing with 5 knit sts. Then knit a yarn over, 2 sts together again with a draw through, close 2 knit sts and knit the edge stitch.
- In the 5th row, you also need to knit an edge loop and immediately 1 front, 2 together with a yarn over. Then knit 2 front sts, repeat the pattern and continue 1 front st, yarn over and 2 together through the yarn over. Then again 1 front st and 1 together, yarn over and again 2 front sts in stocking stitch. The additional pattern should be repeated in width the required number of times, and then close the row to the last 5 front sts with 2 front sts together through the yarn over. At the end, knit 1 front st and an edge st.
- The seventh row is knitted through the edge st, then cast on 3 knit sts, a yarn over and 3 knit sts together, then repeat the pattern until the yarn over, 5 knit sts and a yarn over. Then knit 3 loops together through the purl st and draw the rapport to the end of the row. Close the row through 4 knit sts and a yarn over, then knit 3 knit sts and the edge.
- In the 9th row, do the same as in the previous row until the yarn over, then knit 3 knit stitches and 2 together with a yarn over. Then make 6 knit stitches and 2 together without a yarn over, add a yarn over separately and knit the rapport, finishing the row with 5 knit stitches and 4 front stitches with an edge.
- In the 11th row, knit the edge with 2 knit stitches, then 2 more together and a yarn over. Knit 1 knit stitch, a yarn over, 2 together with a yarn over and 3 knit stitches. Finish the pattern up to 2 knit stitches and a yarn over, add 1 knit stitch and repeat the rapport up to the last 5 knit stitches in stocking stitch. Then knit a yarn over and 2 knit stitches together through a yarn over, then close the row with 2 knit stitches and an edge.
- In the 13th row, repeat everything as in the 5th row.
- In the 15th row, make an edge st, add 2 sts and knit them together, make a yarn over and cast on 3 knit sts. Then knit a rapport of 2 knit sts using stocking stitch and make a yarn over for 3 knit sts together. Again, knit a yarn over, 3 knit sts using stocking stitch and repeat the rapport to the last 5 knit sts, finishing after 2 knit sts with a yarn over. Finish knitting 2 sts at once and draw through to the edge st.
- In the 17th row, the actions are identical to the 25th row: cast on edge sts, then the main 5 l. p., continue the pattern to 2 sts together and make a yarn over. Then cast on 4 l. p., repeat the rapport to 5 l. p. Then you need to knit 2 l. in stocking stitch, then 2 together again with a yarn over and close with an edge.
- In the 19th row, repeat the steps for the 27th row: make an edge, knit 1 knit stitch and a yarn over, come out to 2 sts together through the yarn over, knit 2 knit stitches again. Repeat the rapport up to 1 knit stitch, then knit 2 together in stockinette stitch and make a yarn over, close the row through 1 knit stitch and a yarn over. Repeat the pattern up to 2 sts together and 5 knit stitches with a yarn over. Then additionally knit 1 knit stitch and an edge.
- In the 21st row, repeat the steps for the 29th row: edge with 2 knit stitches, yarn over and 2 knit stitches together until you draw through into 1 knit stitch. Repeat the pattern until you draw through into 2 knit stitches together and make a yarn over. Come out to 3 knit stitches with a yarn over and knit 2 stitches together again. Then knit the draw through into 1 knit stitch, repeating the pattern until you draw through into 5 knit stitches and 2 stitches together. Make a yarn over and knit 2 more stitches in stockinette stitch with an edge.
- In the 23rd row make an edge loop, then knit 5 sts and repeat up to 2 sts with a yarn over. Then knit 3 sts together and make a yarn over with 3 sts. Repeat the pattern up to 5 sts. Then knit 4 sts and an edge again with the front surface.
- In the 31st row, the pattern is the same as in the 23rd, but it differs in the presence of two patterns: first, you need to knit the edge st, then 3 front sts with a yarn over and knit 3 front sts together. Repeat the pattern until the yarn over and 5 front sts. Then pick up a yarn over again and knit 3 front sts together. Repeat the rapport until the last 4 front sts and a yarn over. Close the row with 3 front sts and the edge.
This pattern can be increased in height by repeating rows from 1 to the last.
With braids
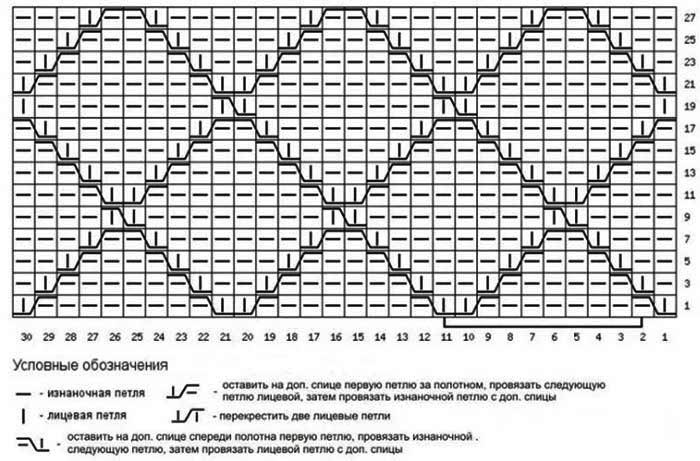
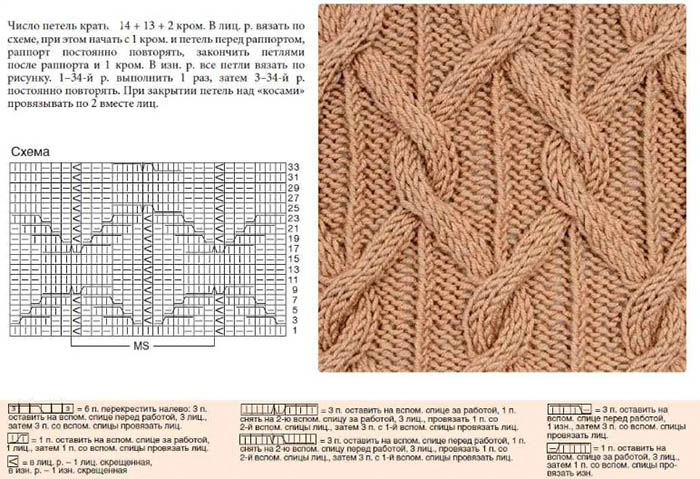
The pattern Rhombuses with braids knitting needles is typical for complex rapports, where the pattern is repeated several times at different heights. To make a diagram, you need to determine how many rows up the pattern will be knitted. To do this, you need to knit a sample and follow the schematic hints for the standard rapport MS=13.
The rapport diagram shows the symbols according to which the pattern should be knitted:
| “-” | purl loop in purl row |
| "triangle on the left" | 2 sts knit together through the drawstring: you need to remove 1 loop and draw it through the other adjacent loops |
| "triangle on the right" | 2 loops need to be knitted together without a yarn over or a drawstring |
| "circle" | yarn over |
| “|” | face loops |
| "isosceles triangle" | knit 3 stitches together without drawing through |
| "TTT\||" | Leave 3 loops on an additional needle before work in the front row or behind work in the back row, then knit 2 front sts in stocking stitch and knit them with a loop from the additional needle |
| “||/TTT” | Leave 2 loops on an additional needle before work in the front row or behind work in the back row, 3 front loops in stocking stitch and knit them with a loop from the additional needle |
The process of knitting all patterns several times:
- First, cast on 40 stitches and 2 stitches to create the edge.
- All loops should be knitted with the front surface to the end of the row. Purl loops should be made in the purl rows. Also, yarn overs in the purl row should be knitted for the purl thread of the corresponding row.
- After reaching the desired width, you should start the pattern with the edge and preparatory loops according to the pattern.
- Next, you should knit the full rapport and add 1 kr. p.
- The height should be up to 74 rows. If the pattern needs to be repeated, the pattern should be started from the 1st to the 72nd rows the first time, and from the 45th row to the end with subsequent rows.
- Braids should be done from the 1st to the 8th rows with a single repetition, or from the 9th to the 23rd row with multiple repetitions of the rapport in height.
- You can cast on any number of stitches for the desired height, but it is advisable to do the repetitions for the braids at the level of the 9th row with diamonds.
- Next, in the 14th rows, you need to make a gap to repeat the braids and diamonds.
- The middle diamond should be started completely on the 9th row and repeated every 16 rows.
The pattern can be changed in width and height.
Raised
The voluminous relief pattern of diamonds can be knitted using circular and single needles. It is best to use thick wool yarn.
This design will look beautiful on large area items.
- The number of loops must be a multiple of 8. Additionally, for each row, you need to cast on 2 edge sts on each side at the beginning and end of the row.
- In the preparatory row, you need to cast on 12 loops, taking into account the edge loops. You need to knit according to the pattern for the front and back rows.
- The rapport will have 8 loops in width. They can be increased for 2 patterns by adding 2+2 loops in addition to the edge loops.
- Next, you need to knit a purl row of 1 knit stitch, pattern *3 knit stitches, 2 purl stitches and 3 knit stitches* and 1 knit stitch. The pattern, in addition to the main stitches, needs to be repeated as many times as there are 8 stitches in the width of the garment.
- Next, in the 1st and 3rd rows, cast on a pattern of 1 purl st, pattern *3 purl sts, 2 knit sts, 3 purl sts* and 1 purl st in the front row.
- The second row and all subsequent ones will be considered even. This means that the front loops should be knitted as purl, removed as purl and leave the thread in front of the work.
- In the 5th row, you need to cast on 1 purl st, pattern rapport *2 purl sts, 2 loops crossed to the right (to do this, you need to remove one loop onto an additional knitting needle, leave it behind the work, then knit 1 purl st, and remove the loops from the additional knitting needle for knitting purl sts), 2 purl sts* and finish the row with 1 purl st.
- In the 7th row make 1 purl st, knit the rapport *1 purl st, 2 loops crossed to the right, immediately finish knitting 2 purl sts and 2 crossed loops to the left, close the pattern with 1 purl st*, and finish the row with 1 purl st.
- In the 9th row, you need to knit 1 purl st before the rapport, then the pattern itself *2 loops crossed to the right, 4 purl sts, 2 loops crossed to the left* and 1 purl st.
- In the 11th and 13th rows the pattern is the same and consists of 1 l p, *6 purl p, again 1 l p* and a pattern*, which must be repeated to the end of the row, and then closed with 1 purl p.
- In the 15th row you need to knit 1 l st, 1 purl st, *2 crossed sts to the left, 4 purl sts, 2 crossed sts to the right*, 1 purl st.
- In the 17th row you need to start with 1 purl st, then the rapport is *1 knit st, 1 purl st, 2 crossed sts to the left, 2 purl sts, 2 crossed sts to the right, 1 purl st, 1 knit st*, 1 purl st.
- Row 19 should be started with 1 purl st and immediately go to the rapport *2 purl and crossed sts to the left and right, 2 purl sts at the end*. The row should be finished with 1 purl st.
The knitting pattern Rhombuses (patterns for rapports can be found above) should have a height of at least 18 rows. If the pattern is made for large areas, the height should be two dozen rows, or with repetitions of rows for rapport from the 1st to the 18th rows.
Relief patterns will require more yarn and time, so for some items you will need 4-5 skeins of wool or cotton with viscose.
Two-tone
Multicolored patterns can be flat and embossed, openwork and with various ornaments. They can be modeled and also changed according to the rapport scheme depending on the desired result.
| Rows | Color 1 | Color 2 |
| 1 | The row consists of face loops | |
| 2 | The row contains only purl stitches | |
| 3 | You need to start with 1 lp and knit the rapport *1 lp, remove 1 st, leave the thread behind the work without knitting the removed loop, 3 lp, remove 1 lp without knitting, 2 lp*, close the row with 1 lp. | |
| 4 | You need to start with 1 purl st and knit the pattern *2 purl sts, slip 1 st, leave the thread in front of the work without knitting the slipped stitch, 3 purl sts, slip 1 knit st without knitting, but leave the thread in front of the work as for knit sts, 1 purl st*, close the row with 1 purl st. | |
| 5 | You need to start with 1 lp and knit the pattern *1 lp, slip 1 st, leave the thread behind the work without knitting the slipped stitch, 3 lp, slip 1 lp without knitting, 1 lp*, slip 1 st, leaving the thread behind the work. | |
| 6 | First, remove the thread from 1 knit stitch, leave the thread in front of the work without knitting the removed loop, knit the rapport *1 knit stitch, remove 1 st, leave the thread in front of the work without knitting the removed loop, 2 purl stitches, remove 1 st without knitting, 1 purl stitch*, remove 1 st, leaving the thread in front of the work. | |
| 7 | First, remove the thread from 1 st, leave the thread behind the work without knitting the removed loop, knit the rapport *2 l.p., remove 1 st, leave the thread behind the work without knitting the removed loop, 1 l.p., remove 1 st without knitting, 1 purl.p.*, remove 1 st, leaving the thread behind the work, another 2 l.p., remove 1 st without knitting (leave the thread behind the work). Close the row by knitting 1 l.p. | |
| 8 | You need to start with 1 purl st and knit the pattern *slip 1 st, leave the thread in front of the work without knitting the slipped stitch, 2 purl sts, slip 1 kn st without knitting, but leave the thread in front of the work as for knit sts, 2 purl sts*, close the row by slipping 1 kn st without knitting. |
Next, you need to knit a rapport in height, repeating the previous patterns in some rows:
- The 9th, 15th, 19th, 21st and 23rd rows should be knitted as the 3rd with color 1;
- The 10th, 16th, 20th and 32nd rows should be knitted as the 4th with color 2, and the 26th with color 1;
- Knit the 11th and 23rd rows as the 5th with color 2, and the 17th and 23rd with color 2;
- The 12th and 24th rows should be knitted like the 6th with color 2, and the 18th and 30th with color 1;
- Knit the 13th, 21st and 33rd rows with color 1, and the 27th row with color 2 as the 7th row;
- Rows 14, 22 and 34 should be knitted with color 1, and row 28 with color 2 as row 8.
The pattern must be repeated according to the rapport, starting from the 3rd row.
With a tourniquet
The Aran knitting style, supplemented with diamonds, gives things a bright effect. The cables can be located both inside and along the contour of the geometric figure. In the process of knitting the pattern, the main specificity is the movement of loops. One part must be transferred to an additional knitting needle, which is then knitted.
The rapport is presented in 14 loops excluding edge loops (they are sometimes not indicated in the diagrams). All rows with faces will be considered purl due to the lack of pattern manifestation. Purl rows are knitted according to the pattern, and yarn overs remain purl.
The height according to the pattern is 22 rows.
- First you need to cast on 14 front loops + 2 edge loops.
- In the next row you need to knit 3 l.p., 1 draw through, 2 l.p., yarn over and everything in the opposite direction.
- In the 3rd row, you need to knit 2 knit stitches, 1 yarn over, 2 knit stitches, a yarn over and 4 knit stitches. Repeat the pattern in the opposite direction.
- In the 4th row, you need to knit 1 l. p., draw through, 2 l. p., yarn over, 4 l. p. Then you need to do the same thing and vice versa.
- In the 5th row, immediately knit a drawstring, then cast on 2 knit stitches and a yarn over, and knit 6 more loops. Then you need to knit starting with a yarn over.
- In the 6th row you need to knit only the front loops.
- In the 7th row, you should make a yarn over, 2 knit stitches, then knit 2 stitches together and 6 more knit stitches. Repeat all the steps in reverse until the end of the row.
- In the 8th, 9th and 10th rows, you need to repeat the actions from the 1st row, replacing the yarn over with a yarn over, and the yarn over with knitting two loops together.
The knitting pattern Rhombuses (patterns for creating a frame are already shown in the variations above) can be combined with each other. It is acceptable to combine knitting techniques of rhombuses with braids, openwork ornaments and cords inside or along the contour of the figures. Such dense relief knitting will look beautiful on loose-fitting sweaters, scarves, capes and more.
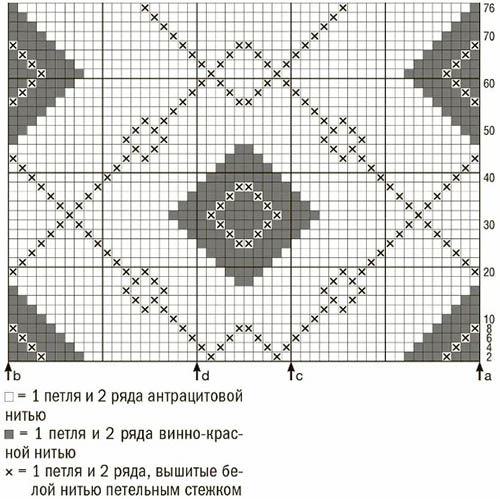
Patterns of various shapes give things a sophisticated and complete look. Knitting diamonds can also be voluminous, two-color and simple with openwork inserts. A figure of this shape elegantly complements the image, and thanks to various patterns, you can knit combined patterns, combining the pattern and color of the yarn.
Video about knitting
Master class: relief mini-diamonds with knitting needles: