The purl is the second loop in knitting. The first is the front loop. If you know how to make front loops with back loops, you can create a large number of ornaments and products that use only this combination of loops. The back type of loops can be made using the granny and classic methods.
Structure of the loop
The structure of the purl loop is as follows:
- draw through – between loops;
- arc – the upper end of the loop on the instrument;
- the front wall is located closer to the knitter;
- The back wall is located behind the instrument.
There is no significant difference between the classic and grandma's method of creating loops. However, some patterns or knitting with continuous alternation of purl and face loops will look different if you knit them in two versions for comparison.
For example, pearl knitting with a 2x2 rib, knitted using the granny method in the lower area, will have a slightly rough texture, unlike the upper one, made using the classic method.
The difference between the two methods of knitting purl stitches will be clearly visible in the "Confusion" pattern. Classic purl stitches with face holes in the upper area will be very easy to knit behind the front walls.
It is advisable to create openwork ornaments using the classic method, since the grandmother's method will not allow you to form 2 and 3 loops together. However, the latter knitting option is faster than the first, since it is characterized by simple fixation of the working thread during the creation of purl loops.
Classic way of knitting purl stitches
Purl loops on knitting needles can be knitted in the classic way. However, beginner knitters may encounter some difficulties that affect the speed of work. This type of loops will ultimately be more relief and loose, unlike knitting face loops in the classic way.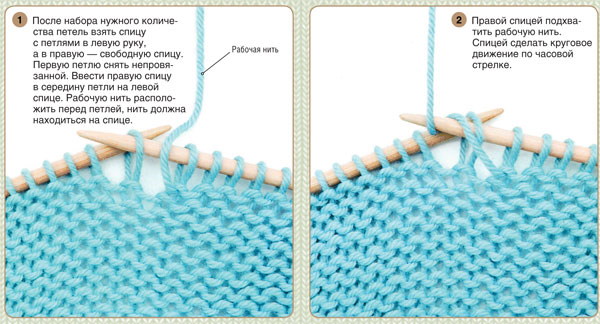
To obtain a loop, the working yarn must be grasped with a knitting needle from the bottom up. In this case, the shortened end should be placed on the left side, the thread from the ball - on the right side. The yarn should be thrown over the left index finger.
When creating classic purl stitches, the ball of yarn should always be placed in front of all needles and stitches.
Knitting purl stitches is the same as the process of creating knit stitches using the classic method:
- Using any option, cast on the loops of the initial row onto the tool. In the initial position, take the left knitting needle with the cast-on loops in your left hand, and hold an empty tool in your right hand, which will be the working knitting needle.
- Place the thread coming from the ball on your left index finger, pinching it between your middle and index fingers. It should pass between your little finger and ring finger.
- Before knitting the first loop, remove the edge loop without knitting. To do this, insert the working needle from right to left into the edge loop, transferring the loop to it. The thread should remain on the left index finger. If there are no instructions, the edge loop should be removed without knitting.
- From right to left, insert the working tool into the next loop, leaving the working thread in front of the knitting needle. Counterclockwise, grab the working thread, wrapping it around the right knitting needle.
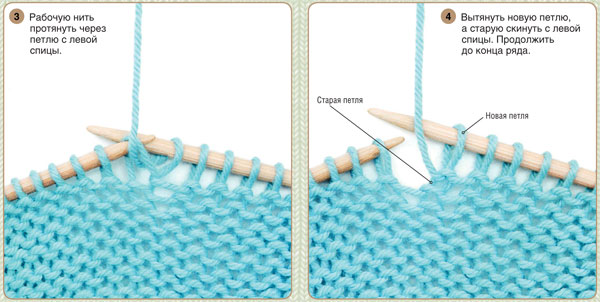
- Pull the loop that formed on the tool into the loop. When creating a new loop, place it near the edge loop on the right knitting needle.
- Remove the loop on the left tool through which the thread was pulled from the knitting needle. Perform similar manipulations with the remaining loops of the initial row. As a result, you should get the first row. This should free the left knitting needle, which will subsequently act as the right working tool.
- Knit the 2nd row. Take the working tool in your right hand, hold the knitting needle with the work in your left hand, turning it towards you with the opposite side.
- If you complete all of the above steps, you will get a fabric knitted from purl stitches.
This knitting pattern is called garter stitch from purl stitches that were made using the classic method.
Grandma's way of knitting purl stitches
Purl stitches on knitting needles are best knitted using the grandma's method, since it is much easier and simpler than the classic version. The working tool will be inserted into the hole from right to left, and the thread will always be located on top of the second knitting needle, with which the loops are formed. The thread should be placed between the outer and next loops, and it is allowed to be thrown over at the knitting stage.
After completing the row and turning the needles, the front loops will be with the back walls. This method of creating back loops is often used when obtaining the front surface with turning rows, since it is quite quicker than the classic version.
However, if knitting involves any pattern, the purl loops in the granny way will be placed with the back walls, so they need to be knitted through the back walls.
Although grandma's method of knitting purl stitches is very fast, it has several disadvantages:
- the loops in the elastic band begin to twist;
- on the front side, the purl and front rows will be visible, which will create the effect of crooked loops;
- the hinges may be uneven;
- loose, stretched fabric.
Basically, this knitting method is suitable for creating scarves, hats, socks and warm sweaters. However, the use of this method of creating loops should always be specified in the knitting instructions. If there are no instructions, you must use the classic version.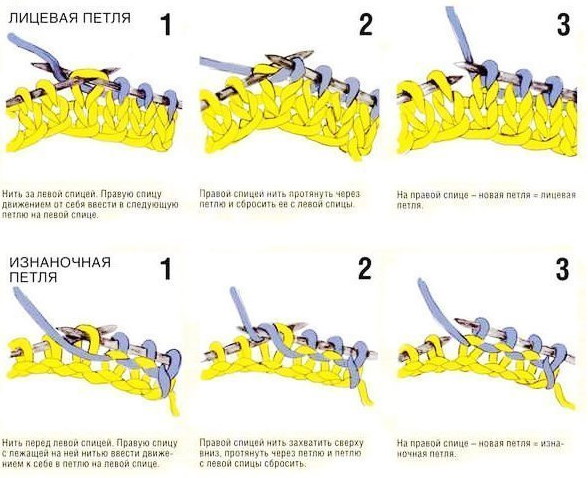
Step by step instructions:
- Cast on the stitches of the initial row using any convenient method.
- Take the tool with the loops in your left hand, and hold the empty knitting needle in your right hand, which will be the working needle.
- Place the thread coming from the ball on the left index finger, fixing it between the middle and index fingers. It should also pass between the ring finger and the little finger.
- Before knitting the first loop, remove the edge loop without knitting, inserting the working tool into the outer loop from right to left and transferring the loop to it. The thread should remain on the left index finger.
- Insert the right tool from right to left into the new loop so that the working thread remains in front of it. Bring the working yarn under the edge of the right tool and pull it into the hole.
- Place the new loop on the right tool near the edge. Remove the loop on the left knitting needle, used to pull the thread through, from the tool. The result should be a purl loop using the granny option, which coincides with the knitting of the front loops using the corresponding method. Perform similar manipulations with the remaining loops of the initial row.
- After the first row, the left knitting needle should be freed and will continue to act as a working tool.
- To create the second row, take the working tool in your right hand, and the knitting needles with loops should be in your left hand, facing away from you.
When all the steps are completed, you will get a knitted product made from purl granny loops, called garter stitch from similar loops.
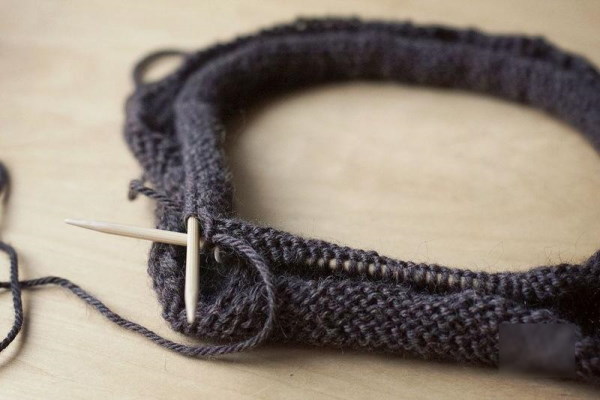
How to knit with circular needles
Knitting with circular needles has a number of advantages:
- Most of the patterns in the diagram are arranged in the same way as the front part of the product looks, so when knitting in the round, such diagrams are convenient to use, since there is no need to additionally work out rows with purl loops;
- the absence of seams makes the knitting process easier for those who do not know how to sew parts neatly and beautifully;
- allows you to create clothing without seams, which is relevant for children's products;
- with this method of binding there are no symmetrical and edge loops, the number of loops collected will be a multiple of the rapport;
- This tool is very compact, so it is convenient to take it outdoors or on the road, since it does not take up much space.
Knitting with circular needles is characterized by the following features:
- In the initial rows, it is necessary to ensure that the line does not turn over.
- In the patterns where there are odd and even rows, you should not get confused. For even rows, knitting according to a visible pattern is often provided. In this case, when knitting in the round, even rows should repeat odd ones.
- There are ornaments that can only be done with reverse and straight rows. Such techniques are not suitable for knitting with circular needles.
Casting on stitches in the round:
- Using a simple straight tool, cast on a certain number of loops.
- Remove one spoke as it is no longer needed.
- Take the tool on the fishing line and knit the first row according to the chosen pattern.
- Be careful not to twist the line, otherwise the edge of the canvas will be crooked.
To get a beautiful joint, when closing the first row, it is permissible to cast on 1 more loop. Then, when closing the row into a ring, it should be transferred to the first tool, knitting immediately with the first loop. It is also permissible to knit the initial loops of the row with two threads - the free end and the working one. However, this place will be denser than the rest of the edge of the fabric.
Knitting purl stitches using circular needles can be done in the following way:
- In the row with purl loops, remove the last one to the right working tool.
- Pull the yarn over onto the left knitting needle, returning the removed loop back.
- At the end, knit together purlwise. As a result, the seam will not be too visible.
Crossed Purl Stitch
Knitting of the main loops always begins with inserting the working tool into the hole with a slight pull of the wall on the right. To obtain a crossed purl or front loop, the walls of which will be located crosswise, the tool must be inserted into the hole from a different place, knitting behind the wall on the left.
The entire fabric should not be created with crossed loops, as the resulting product may be rough and skewed. Such loops are often used to create various ornaments as thin vertical tracks and in knitting various elastic bands in a circle. To form a certain pattern or to expand the fabric, crossed loops can be knitted from yarn overs.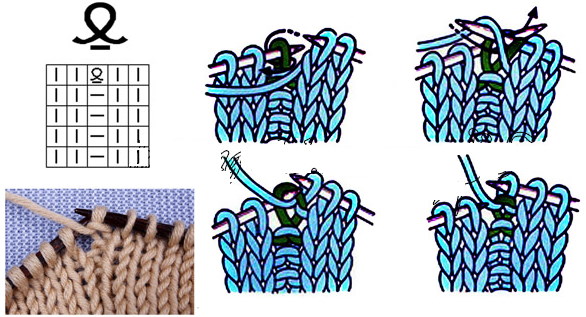
The difference between crossed purl and knit stitches in the classic method:
| Option | Peculiarities |
| Crossed face | To obtain it, you need to knit the open hole behind the back wall on the left. The right tool needs to be inserted into the hole from right to left. As a result, the knitted element should turn clockwise by 180°, creating a cross of walls with a tilt to the left. |
| Crossed Purl | To obtain an element with a left slope, the working tool must be positioned behind the product, inserted into the hole from left to right. It is also necessary to move the back wall from the left side. |
The difference between crossed purl and knit stitches in Granny's method:
| Loop type | Peculiarities |
| Crossed face | The loops must be knitted behind the desired wall from the left side, inserting the working tool from the front from left to right into the open hole. As a result, the completed element should turn 180° counterclockwise, creating a cross with a right slope from the left and right walls. |
| Crossed Purl | The initially open loop needs to be turned counterclockwise on the left tool. Then it can be created as a simple back hole, inserted behind the front wall on the left. |
You can knit purl stitches crosswise on knitting needles in the following way:
- Pick up the back wall of the purl loop with the right working tool from right to left.
- Remove the loop from the left needle, turn it and return it to the left tool. The loop should end up crossed.
- Form a purl stitch as a simple stitch.
The crossed purl stitches must always be turned clockwise, regardless of the knitting option, since the chosen method will affect the process of creating the front stitches in the next row.
Two loops together purl
Purl stitches on knitting needles allow you to knit various openwork patterns, and also make it possible to narrow the fabric. Sometimes the technique of "two stitches together purl" is used.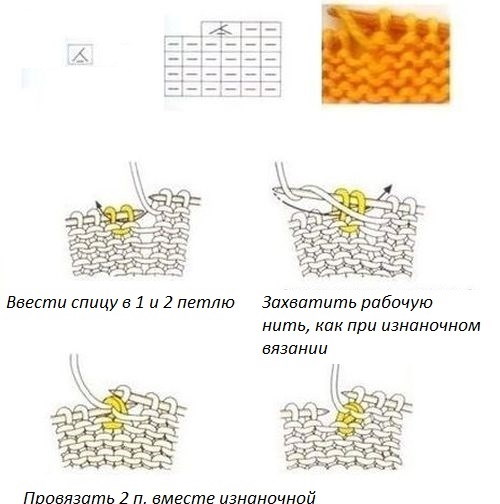
Step-by-step instructions for knitting with a right bias:
- Using the tool, cast on two loops at the same time, as when forming one wrong side hole.
- Grab the thread using any method of creating purl loops and make 1 purl loop.
- Drop the loops from the left tool. On the right needle you should have one purl loop out of two, and the slope of the loops on the purl surface will be almost invisible. It will be visible if you turn the product over to the other side.
- The two holes that were knitted together purlwise should look like two loops together knitwise on the other side with a right bias.
- To get two loops together purlwise with a left tilt, first turn 2 holes one by one so that they are placed on the tool with the back walls forward.
- Place the right tool to the lower lobe of the second hole from the end, grab 2 loops from this place and knit them together purlwise using any convenient method.
If you turn the fabric over to the other side, the two loops created together with the back side will resemble two holes connected together with the front side with a left bias.
Pulled out (removed) purl stitches
To create an elongated purl loop, you will need to remove the element from the left tool to the right without knitting. It is permissible to pull it out by 2 or 3 rows. As a result, you get a double or triple elongated loop. Regarding the scheme of the selected pattern, when removing the loop from the left tool to the right, the working thread can be placed in front or behind the fabric. It is also permissible to make a loop with a yarn over on the working knitting needle.
Step-by-step instructions for knitting elongated purl stitches:
- Cast on stitches with the tool, placing the yarn behind or in front of the slipped stitch, according to the instructions included with the pattern.
- When creating a pattern with threads of different colors, where there are elongated loops, it is possible to achieve a jacquard effect.
- When removing loops for several rows, wrap the right working tool with working thread 2 or 3 times during gripping to lengthen the loop and not compress the product.
- In the next row, drop all the threads except the first one so that the elongated loops become longer. To create a long edge loop, knit a chain.
 Double or triple grip of the working needle when removing loops allows you to achieve loops of different heights. Thanks to this type of loop removal, it is possible to create patterns that will be openwork. However, in the following rows, you must immediately knit these loops, without creating broaches behind or in front of them.
Knitting a purl loop using the granny method is simpler than the classic version. At the same time, to master this type of loops with knitting needles, you will need to spend much more patience and strength than when mastering facial loops. However, if you have a great desire, it is permissible to achieve the desired effect.
Video about purl stitches
How to knit purl stitches: