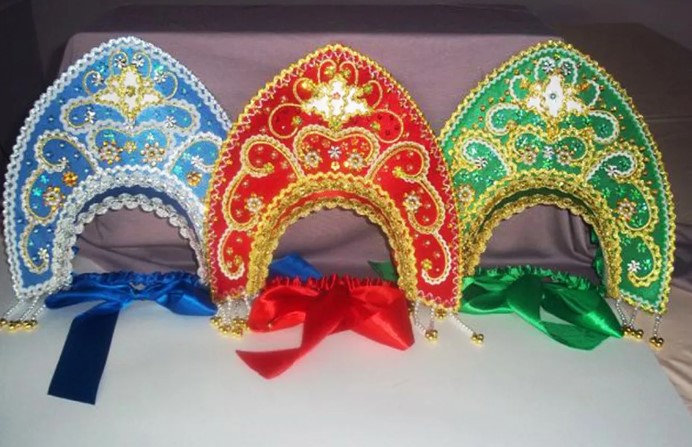
Since ancient times, the kokoshnik has been a festive headdress, decorated with beads with embroidery and pearls. This allowed to draw attention to the female face, while the product did not hide, but gave the appearance a noble look.
When making a headdress with your own hands It is acceptable to give it a round, cylindrical shape, or in the form of a crown or crescent.
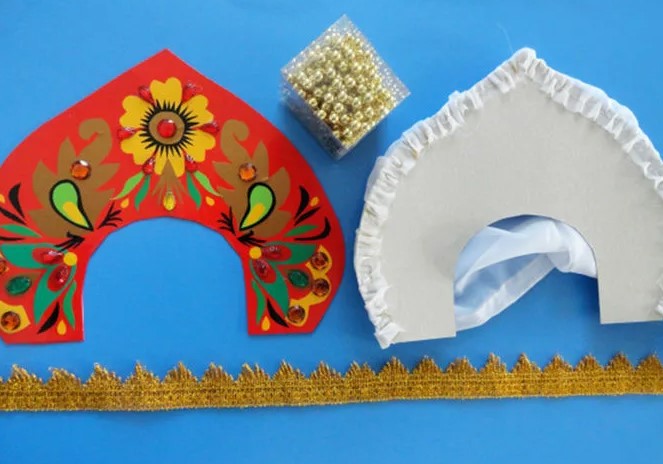
What does a kokoshnik consist of?
The kokoshnik consists of 3 parts in the form of a comb, a strong headband and decor. The first part is often presented in the form of a crescent. However, it is acceptable to make a comb in the form of a cylinder, a round shield or a crown. This part must be fixed to a strong headband so that the product is firmly held on the head.
A mesh with a scattering of beads and beads is suitable as decoration to cover the frontal area and give the kokoshnik a finished look.
You can make a kokoshnik with your own hands from almost any base, which can be:
| Material | Features of application |
| Cardboard sheet | It is possible to find it in any office supply store. At the same time, the material is simple and easy to work with. However, it is only suitable for one-time use. |
| Plastic | The headdress will not wrinkle and will serve for a long period of time. In this case, you need to prepare a quality tool for cutting the material, as well as hot glue. |
| Thick paper sheet | For these purposes, it is acceptable to use Whatman paper or old wallpaper. The main thing is that the material is dense. |
| Wire | Suitable for making a frame of various shapes. Afterwards, the structure needs to be covered with fabric. However, to work with wire, you need to be able to work with round-nose pliers and flat-nose pliers. |
Kokoshnik is a smart, festive headdress that requires high-quality and beautiful fabrics.
For example, it is acceptable to use:
- atlas;
- velvet;
- organza;
- brocade;
- taffeta.
You can use batiste or crepe if you want to decorate the accessory beautifully. However, it is recommended to give preference to fabrics with a jacquard pattern or a single-color material.
How to sew with your own hands using a pattern
The kokoshnik is a mandatory element of the national costume, which is suitable for both adults and children. In this case, it is necessary to take the correct measurements so that the headdress is comfortably and firmly held, without falling over the eyes.
Materials required:
- thick cardboard sheet;
- various decor;
- rubber bands for fixing the accessory;
- fabric material that will match the overall style of the image;
- sample.
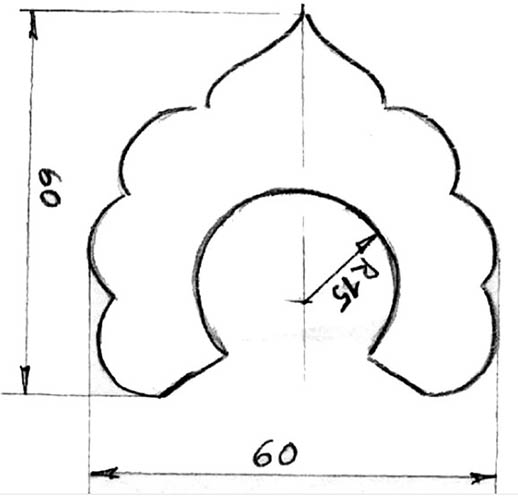
The cutting template can be printed out in a ready-made form, or you can make a sketch yourself, taking into account individual dimensions.
Step-by-step process of sewing a kokoshnik using a pattern:
- Cut a stencil from a sheet of paper to transfer the design onto thick cardboard.
- Using a cardboard template, cut out 2 pieces from fabric. At this stage, be sure to take into account seam allowances.
- Connect 2 pieces together with threads and turn them inside out.
- Place a sheet of cardboard inside the product and sew it with a hidden seam so that the cardboard does not fall out.
- To secure the accessory to your head, cut a strip out of a thick cardboard sheet to serve as a headband.
- Cover the headband with fabric and secure it to the comb with thread material. There should be a right angle between the pieces.
- Additionally, baste elastic bands or ribbon ties so that the kokoshnik sits securely on the head.
- To decorate the comb with a headband, use a braid or any other decoration that matches the style.
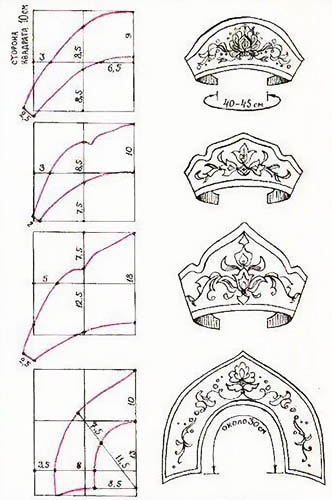
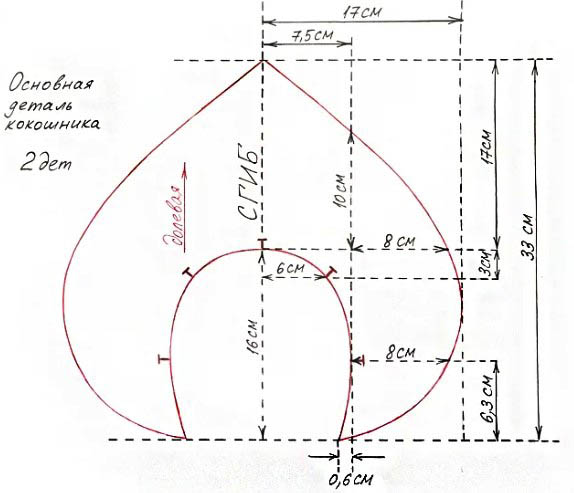
To make a traditional headdress, you need to take measurements correctly. In this case, you need to measure the circumference of your head.
The pattern should consist of 2 parts in the form of:
- the upper part in the form of a comb or crescent (considered the main detail, so it will not depend on personal measurements);
- lower semi-oval (acts as the forehead element of the headdress with a standard size of 14-15.6 cm, but these measurements can be changed to the actual size).
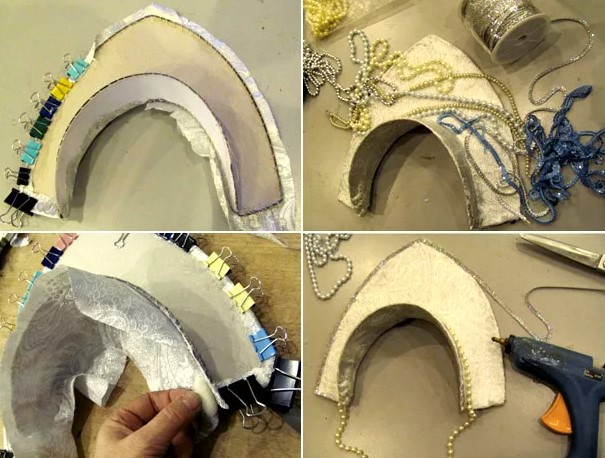
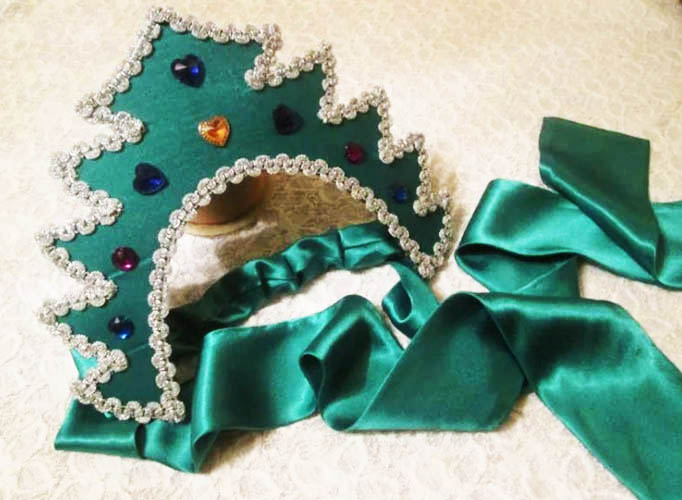
For the Snow Maiden costume
A kokoshnik is a must when making a New Year's costume of the Snow Maiden. At the same time, such a headdress is suitable for creating the image of a snowflake, a fairy and other characters associated with the winter season.
Beginner craftsmen are advised to print out a ready-made sketch of an accessory on a sheet of paper or create a new template with their own hands.
The product will decorate any festive costume, and you need to spend a minimum of time to create the craft.
List of materials and tools:
- crepe-satin, intended for finishing;
- lace with silver braid and other decorative elements;
- scissors with glue and a hot glue gun;
- rubber;
- foil insulation as a base and a cardboard sheet.
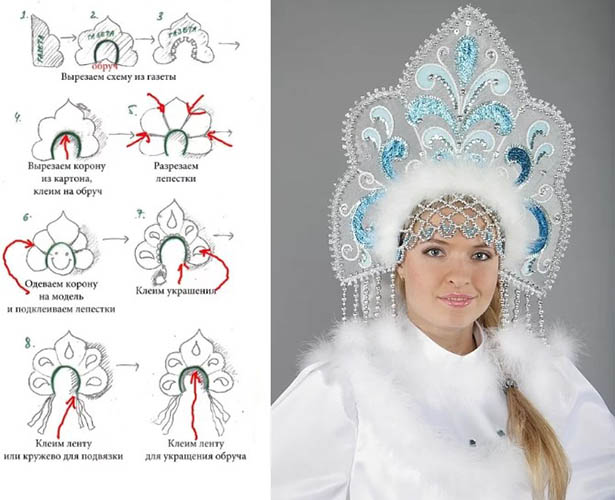
Step-by-step description of the work:
- Using a template, cut out 2 accessory parts from foil and cardboard. Glue the blanks together.
- Transfer the round stencil onto the fabric and cut it out. Burn the edges of the workpiece so that the threads do not fall apart.
- Apply glue to the foil layer and cover it with fabric so that the front side is on the outside.
- Iron the workpiece to prevent creases and folds from forming.
- Turn the part over to the other side for tracing with a pencil. Be sure to make allowances, then cut out the workpiece.
- Trim the protruding edges a little to make it easier to tuck and secure to the product.
- Apply glue to the base of the kokoshnik and attach the fabric piece so that the front side is on the outside.
- Between the base and the fabric material, place an elastic band along the edges for ease of wearing the headdress.
- To fix the ribbon, apply hot glue to the edges of the accessory. Cut out various ornaments from the lace.
- Fix the decorations on the front part of the kokoshnik. Additionally decorate the product with rhinestones, stones and beads.
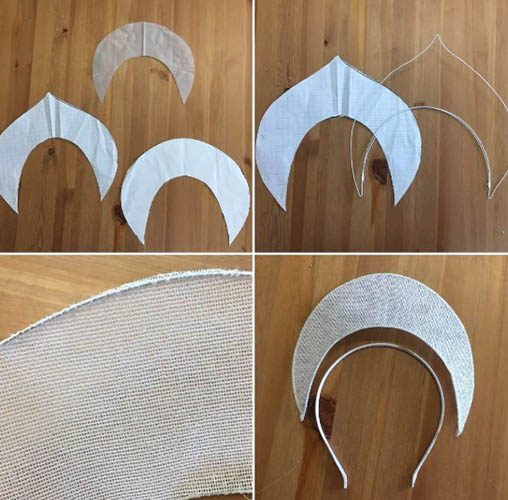
Kokoshnik-headband made of paper
You can make a kokoshnik with your own hands with a headband so that the product stays firmly on your head. The material can be cardboard with paper. The headband can be placed at the back, front or in the middle of the comb. However, initially you need to choose a template that matches the natural size.
Additionally, you should prepare:
- white, silver and blue satin ribbons, 5 cm wide each;
- white satin;
- cardboard sheet;
- glue gun with sewing machine;
- rim;
- decorations.
Step by step creation process:
- Wrap the headband with a white satin ribbon using a glue gun.
- Fold the paper sheet in half, draw a sketch and cut it out. Determine the opening for the head by the stretched rim. Transfer the template to a cardboard sheet and cut it out.
- Fold the fabric in half so that the front side is inside. Fix the workpiece with needles to transfer the stencil to the material. Be sure to take into account seam allowances.
- Carefully stitch the piece along the marking strip. Then turn the piece right side out and iron the seams.
- Place a cardboard base inside and stitch the blank with a blind stitch.
- Sew the headband to the product yourself. Make the stitching from the inside.
- To create the decor, cut the satin ribbons into identical squares with a side of 5 cm. For 1 piece, 3 shades are required.
- Fold the square diagonally in half so that the front side is on the outside. Then fold it again so that the bend is on the opposite side. Do the same with the remaining squares.
- Fold 3 elements together in half. Cut off the corner and process the edges with matches for gluing. Then align the second side and process the edges with fire again. Do the same with the rest of the parts.
- From the braid create small blanks consisting of 2 squares. Then decorate the kokoshnik. Additionally, you can use beads with rhinestones and sequins.
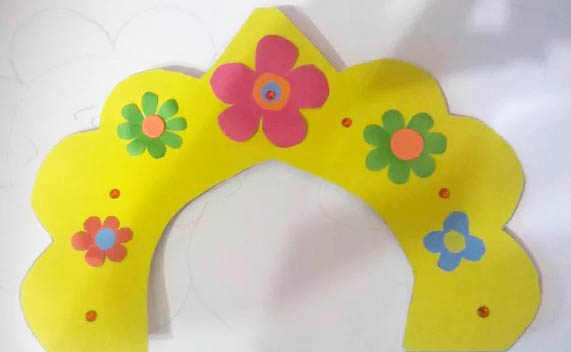
A quick option for kindergarten
If you need to make a kokoshnik in 30 minutes for a kindergarten, it is recommended to use a sheet of cardboard as a base, which should be covered with self-adhesive paper.
Additionally, you should prepare:
- paper or a narrow satin ribbon;
- scotch;
- wide elastic band.
Step-by-step description of the work:
- Draw or print a ready-made stencil, according to which you will cut out the headdress detail. To do this, use a colored cardboard sheet.
- Cut out drops, circles, flowers, petals and other elements that resemble folk motifs from self-adhesive paper.
- Fix the cut out fragments onto a cardboard base.
- Cover the entire workpiece with tape as lamination.
- Attach the elastic band with threads or double-sided tape.
- Decorate the sides of the headdress with paper strips or satin ribbons.
From simple materials
It is permissible to make a kokoshnik with your own hands from simple materials at hand, for example, from old wallpaper that remained after repairs. The main thing is that the material has a suitable pattern.
Monograms with curls, flowers and plant patterns are perfect for headwear. In this case, it is permissible to cut out a large number of fragments from the material if you prepare a cardboard stencil in advance.
List of materials and tools:
- whatman;
- thread material with a needle;
- wallpaper with a beautiful pattern;
- wide elastic band;
- Scotch tape with glue and scissors;
- silver-colored braid;
- wide white ribbon.
Step by step process of creating a headdress:
- First, create a stencil using the pattern. Using Whatman paper, cut out the headdress blank.
- Cut out the desired fragments of the pattern from the wallpaper, and additionally use rhinestones to design the complete composition on the kokoshnik. Fix the decorative details in certain places with glue.
- To prevent rhinestones from falling off and the headdress from being crushed, cover the product on each side with tape.
- Sew tape around the perimeter.
- After finishing the work, fix the elastic band of the required size along the edges of the product. Additionally, sew on ribbons for tying a bow at the back of the head.
The difficulty of this work is that it is problematic to cut out identical fragments with a pattern from the wallpaper.
If desired, it is permissible to make a headband from the remains of the wallpaper material, which must be attached to the headdress. As a decoration, you can use not only ribbons, but also sequins with glitter. The kokoshnik can also be trimmed with New Year's tinsel.
Decoration methods
You can decorate your kokoshnik with your own hands not only with pearls, but also with beads, flowers, ribbons, and seed beads. If desired, you can use gems with sequins and rhinestones. The choice of decorations depends on personal preferences, and you do not need to spend a lot of time decorating the headdress.
Beads are in great demand as decoration for kokoshniks. To stitch the product, you need to prepare a beading needle with monofilament and a glue gun. It is acceptable to use a beaded ribbon to decorate the edges of the accessory.
To create a ribbon, you need to make several rows of beads. When the decoration is ready, the ribbon needs to be carefully fixed with glue to the contour of the kokoshnik. Additionally, you can attach several beads to make the headdress look elegant.
The headdress area can be decorated with a floral pattern. Flowers should be fixed to the product using hot glue. If the kokoshnik is needed to create a New Year's look, the pattern can be made in the form of snowflakes. If desired, the lower part of the headdress can be decorated with a small bead mesh, which will be located on the forehead area.
Rhinestones and sequins can be used as decoration. However, this type of work will be more complex and labor-intensive, because you will have to fix each element of the decoration separately using threads or glue.
Materials required:
- pencil with glue gun;
- thread material in tone;
- sequins with rhinestones (if desired, you can add pearls with decorative stones);
- thin needle.
Decorating features:
- Rhinestones need to be carefully glued to the rim of the product, and for sequins, you need to mark them with a pencil. The line should be drawn from the upper corner in a slightly rounded form to create petals.
- Sequins should be gradually sewn onto the marked strip, creating flower petals. The thread material should match the decor in shade so that the threads are invisible.
- The headband and the upper area of the headdress should not be decorated with sequins, because rhinestones are located here.
- In the center of each petal, you need to create a small flower from 4 multi-colored stones and 1 large rhinestone. To do this, use a pencil to mark the line of the bud location, sewing a rhinestone in the middle. The petals will consist of stones.
You can decorate the kokoshnik with ribbons and flowers made of this material so that the headdress is beautiful and bright. Ribbons are needed for fixation, so the long material must be evenly placed at the back of the accessory so that the ends have the same length.
The tape needs to be fixed with glue. An elastic band that stretches can be used as a fastener. In this case, the elastic band needs to be wrapped with a satin ribbon, carefully hemming the edges.
On the front part of the kokoshnik, you can decorate the headband with a ribbon, and place ribbon flowers along the perimeter. In this case, sequins can act as petals, with flowers in the middle. The buds should be small, and there should be 1 rhinestone in the center. The petals located in the center of the product can be supplemented with larger flowers.
Tips and recommendations for applying decor:
- To tie a kokoshnik, you can use an elastic band to which you can attach a bow made of satin material.
- To fix some decorative fragments, it is better to use adhesive tape or an iron.
- It is advisable to fix rhinestones with a braid on the headdress with a glue gun. A braid of a gold shade of different shapes will look impressive. The outline of the product can be pasted with a braid on which small round coins hang. The semicircle on the forehead can be decorated with a braid on which tassels are located, hanging down to the forehead area. In this case, you can do without a bead mesh.
When making a festive headdress with your own hands, it is permissible to use not only beautiful fabric, but also simple materials such as cardboard, wallpaper, paper. To make the kokoshnik look beautiful, it is recommended to additionally decorate the product with beads, flowers, ribbons, and also embroider with beads.
Video about making a kokoshnik
How to make a kokoshnik: